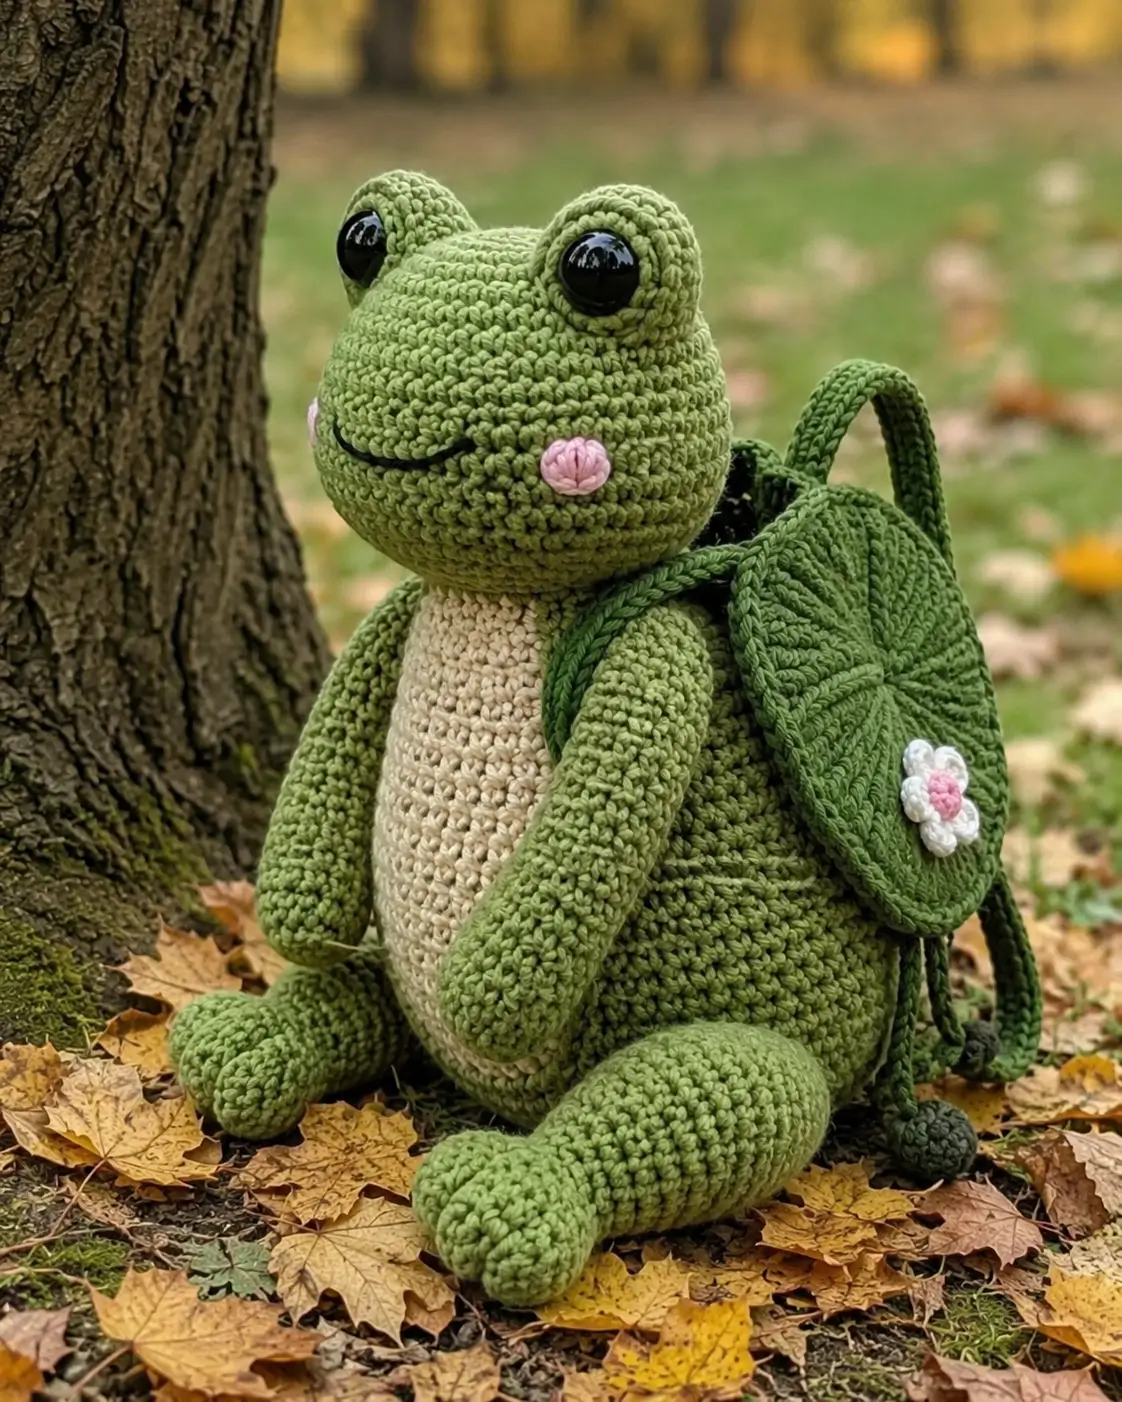
Frog eyes sit on top of the skull, so this frog amigurumi crochet pattern starts by making the head wide enough to carry raised eye pads. The project uses super bulky chenille, a 3.5 mm hook, and 10–12 mm safety eyes for a 27 cm seated frog with a beginner-plus skill level. Make it as a shelf toy with a removable leaf-style backpack. Source: Ravelry.
The Design: What Makes This Frog Different
The head is wider than a plain ball because frog eyes read from silhouette first. You place the eye pads high and slightly outboard, then the face can stay low with only a stitched smile and two pink cheek disks. The body needs a flatter front for the cream belly panel; a round torso would push the patch into a circle and hide the frog shape. Back legs sit forward, not under the body, so the toy rests in a tripod with the backpack touching the rear. Many makers center the eyes on the face like a bear. That mistake removes the amphibian profile. The maker should build the top-line first, then pin the crochet frog amigurumi limbs around that line. This also leaves room for the frog plush crochet pattern backpack straps.
Project Info at a Glance
| Skill Level | Time | Finished Size | Hook | Best For |
|---|---|---|---|---|
| Beginner-plus / low-sew | 5–6 hours | 27 cm | 3.5 mm | Display toy, nature-themed gift, backpack detail practice |
Size, hook, yarn, and eye data match comparable chenille frog pattern listings. Source: Ravelry.
Materials and Tools
Yarn
- Olive green — super bulky chenille — 120 g total — Himalaya Dolphin Baby, Premier Parfait Chunky, or similar. Base frog reference: 90 g green. Source: Ravelry.
- Cream / ivory — super bulky chenille — 20 g — for belly and small accents. Base frog reference: 10 g white. Source: Ravelry.
- Dark green — super bulky chenille or velvet — 30 g — for backpack pouch, straps, cords, and leaf flap.
- Pink — super bulky chenille or worsted scrap — 5 g — for cheek patches and flower center. Source: Jess Huff.
- White — worsted or chenille scrap — 3 g — for flower petals.
- Black embroidery yarn — small amount — for mouth line.
Tools
- Hook 3.5 mm
- Safety eyes 10–12 mm, 1 pair
- Polyfill stuffing
- Yarn needle
- Locking stitch markers
- Straight pins
- Scissors
Abbreviations
MR = magic ring; sc = single crochet; inc = 2 sc in one stitch; dec = single crochet decrease; sl st = slip stitch; ch = chain; BLO = back loop only; st = stitch; R = round or row. This pattern is worked in continuous spiral rounds unless a section says rows. Invisible decrease means working through the front loops of the next two stitches before completing one sc; it prevents a visible notch on chenille decrease rounds.
Pattern — Step by Step
Continuous spiral unless noted. Use the 42-stitch plateau for the head and body because this is a large seated frog.
Head Make 1
Yarn: olive green — Source: standard amigurumi math; scale checked against 27 cm chenille frog data.
R1: 6 sc in MR (6)
R2: inc ×6 (12)
R3: [sc, inc] ×6 (18)
R4: [2 sc, inc] ×6 (24)
R5: [3 sc, inc] ×6 (30)
R6: [4 sc, inc] ×6 (36)
R7: [5 sc, inc] ×6 (42)
R8–14: sc around (42)
Mark the front center after R10. Do not place the safety eyes directly into the head; they go into the raised eye pads.
R15: [5 sc, dec] ×6 (36)
R16: [4 sc, dec] ×6 (30)
R17: [3 sc, dec] ×6 (24)
Stuff firmly. Shape the top wide and slightly flat for the eye pads.
R18: [2 sc, dec] ×6 (18)
R19: [sc, dec] ×6 (12)
R20: dec ×6 (6)
Fasten off. Leave 40 cm tail.
Body Make 1
Yarn: olive green — Source: standard amigurumi math; comparable frog body shaping starts from MR 6 and closes after decrease rounds.
R1: 6 sc in MR (6)
R2: inc ×6 (12)
R3: [sc, inc] ×6 (18)
R4: [2 sc, inc] ×6 (24)
R5: [3 sc, inc] ×6 (30)
R6: [4 sc, inc] ×6 (36)
R7: [5 sc, inc] ×6 (42)
R8–16: sc around (42)
Keep the front slightly flatter than the back. Add stuffing from R12 onward.
R17: [5 sc, dec] ×6 (36)
R18: [4 sc, dec] ×6 (30)
R19: [3 sc, dec] ×6 (24)
R20: [2 sc, dec] ×6 (18)
R21: [sc, dec] ×6 (12)
R22: dec ×6 (6)
Fasten off. Leave 35 cm tail.
Raised Eye Pads Make 2
Yarn: olive green — Source: standard amigurumi math; frog patterns commonly use separate eye pieces.
R1: 6 sc in MR (6)
R2: inc ×6 (12)
R3: [sc, inc] ×6 (18)
R4–5: sc around (18)
Insert one 10–12 mm safety eye between R3 and R4, centered toward the front curve.
R6: [sc, dec] ×6 (12)
R7: dec ×6 (6)
Fasten off. Leave 30 cm tail.
Cream Belly Patch Make 1
Yarn: cream — Source: standard amigurumi math; accent belly quantity checked against white accent yarn data.
R1: 6 sc in MR (6)
R2: inc ×6 (12)
R3: [sc, inc] ×6 (18)
R4: [2 sc, inc] ×6 (24)
R5: [3 sc, inc] ×6 (30)
R6: [4 sc, inc] ×6 (36)
R7: sc around (36)
Fasten off. Leave 45 cm tail. Pull the circle into a vertical oval during sewing.
Arms / Front Legs Make 2
Yarn: olive green — Source: standard amigurumi math; comparable frog patterns include separate arms and legs.
R1: 6 sc in MR (6)
R2: inc ×6 (12)
R3: [sc, inc] ×6 (18)
R4–12: sc around (18)
Stuff the lower half only. Leave the shoulder end soft for clean sewing.
R13: [sc, dec] ×6 (12)
R14: sc around (12)
R15: flatten opening; sc through both layers across (6)
Fasten off. Leave 30 cm tail.
Back Legs Make 2
Yarn: olive green — Source: standard amigurumi math; sitting frog stability requires larger front-facing feet.
R1: 6 sc in MR (6)
R2: inc ×6 (12)
R3: [sc, inc] ×6 (18)
R4: [2 sc, inc] ×6 (24)
R5–7: sc around (24)
Stuff the foot firmly. Keep the ankle lightly stuffed.
R8: [2 sc, dec] ×6 (18)
R9–11: sc around (18)
R12: [sc, dec] ×6 (12)
R13: sc around (12)
R14: flatten opening; sc through both layers across (6)
Fasten off. Leave 35 cm tail.
Cheek Patches Make 2
Yarn: pink — Source: standard amigurumi math; small cheek disks appear in comparable frog pattern structures.
R1: 6 sc in MR (6)
R2: inc ×6 (12)
Fasten off. Leave 20 cm tail.
Mouth and Nostril Embroidery Make 1 Set
Yarn: black embroidery yarn — Source: photo match and standard face finishing.
Cut 45 cm of black yarn. Stitch a curved mouth between head R12 and R13, about 12–14 stitches wide. Add one small vertical anchor stitch at the lowest center point of the smile. Place the cheek patches just outside the smile ends, between R11 and R14. Bury the black yarn ends inside the head.
Backpack Pouch Make 1
Yarn: dark green — Source: photo match and standard amigurumi math.
R1: 6 sc in MR (6)
R2: inc ×6 (12)
R3: [sc, inc] ×6 (18)
R4: [2 sc, inc] ×6 (24)
R5: [3 sc, inc] ×6 (30)
R6: [4 sc, inc] ×6 (36)
R7–14: sc around (36)
R15: [4 sc, dec] ×6 (30)
R16: sc around (30)
Fasten off. Leave 45 cm tail. Do not overstuff; the pouch should sit flat against the back.
Leaf Flap Make 1
Yarn: dark green — Source: photo match; rows used for a flat leaf shape.
Ch 11.
Row 1: sc in 2nd ch from hook and across (10)
Row 2: inc, sc 8, inc (12)
Row 3: sc across (12)
Row 4: inc, sc 10, inc (14)
Rows 5–8: sc across (14)
Row 9: dec, sc 10, dec (12)
Row 10: dec, sc 8, dec (10)
Row 11: dec, sc 6, dec (8)
Row 12: dec, sc 4, dec (6)
Row 13: dec, sc 2, dec (4)
Row 14: dec ×2 (2)
Fasten off. Leave 35 cm tail. Embroider one center vein and four diagonal veins with surface slip stitches or backstitch.
Backpack Straps and Cords Make 2 Straps + 2 Cords
Yarn: dark green — Source: photo match.
For each strap: ch 38.
Row 1: sc in 2nd ch from hook and across (37)
Fasten off. Leave 25 cm tail at each end.
For each cord: ch 46.
Row 1: sl st in 2nd ch from hook and across (45)
Fasten off. Leave 15 cm tail.
Drawstring Beads Make 2
Yarn: dark green — Source: photo match and standard amigurumi math.
R1: 6 sc in MR (6)
R2: inc ×6 (12)
R3: sc around (12)
R4: dec ×6 (6)
Fasten off. Leave 15 cm tail. Attach one bead to the end of each cord.
Backpack Flower Make 1
Yarn: pink center, white petals — Source: photo match.
Center:
R1: 6 sc in MR (6)
Fasten off. Leave 15 cm pink tail.
Petals: attach white yarn to any stitch of the center.
Round 2: [ch 3, hdc and dc in same stitch, ch 3, sl st in next stitch] repeat 5 times around (5 petals)
Fasten off. Leave 20 cm white tail.
Assembly
- Sew the head to the body first, using the head tail and matching the head base to the body top.
- Pin the cream belly patch from body R8 to R18, then sew it as a vertical oval.
- Place both raised eye pads on the top-front of the head, two stitches apart at the closest point, then sew around each base.
- Sew the cheek patches outside the mouth ends and complete the black smile after the cheeks are fixed.
- Attach the arms from body R8 to R14, angled slightly forward.
- Sew the back legs low on body R15 to R21 so the feet project in front of the body.
- Sew the backpack pouch to the rear of the body, centered from body R7 to R17.
- Attach the leaf flap over the backpack opening, then sew the white flower to the lower right side of the flap.
- Sew one strap from upper backpack corner to lower backpack corner on each side; add cords along the flap edge.
- Check that the frog sits without tipping, then weave every tail through at least 3 cm of dense fabric.
The frog is complete when it sits upright and the backpack lies flat against the back.
7 Technical Tips
- Marker drift: a shifted beginning of round can move the frog’s smile off-center by 3–4 stitches. Reset the front marker after head R10 before closing the head.
- Eye placement failure: low eye pads make the frog look like a bear. Pin the pads on the top curve first, with the safety eyes facing slightly forward and outward.
- Stuffing collapse: loose stuffing under the eye pads causes dents around the safety eyes. Pack the eye pads firmly before sewing, then add a small stuffing roll under each pad base.
- Invisible decrease gaps: chenille can leave holes at R15–R20 on the head. Use front-loop invisible decreases and pull each decrease tight before making the next stitch.
- Belly distortion: sewing the cream patch too tightly turns the body front into a ridge. Pin the patch at four compass points and stitch one round inside the patch edge.
- Backpack imbalance: overstuffing the pouch pulls the frog backward. Fill it to half firmness only, then test the sitting angle before sewing the lower edge closed.
- Tail weaving failure: short chenille tails can slip out after handling. Leave at least 30 cm on limbs and bury each tail through three separate stitch paths.
Conclusion
Use the finished sample as a fit test before cutting tails. The backpack adds rear weight, so the next step is to sit the frog on a flat table and adjust the back legs until both feet touch the surface. Save the finished frog to Pinterest with a close crop of the eye pads, then post an Instagram reel showing the leaf flap opening and closing. Tag the post with #LeafBackpackFrog. This frog amigurumi crochet pattern is strongest when the eye pads stay high, the belly stays centered, and the straps do not pull the arms backward. Which leaf vein layout—single midrib or three split veins—matches your backpack best?









