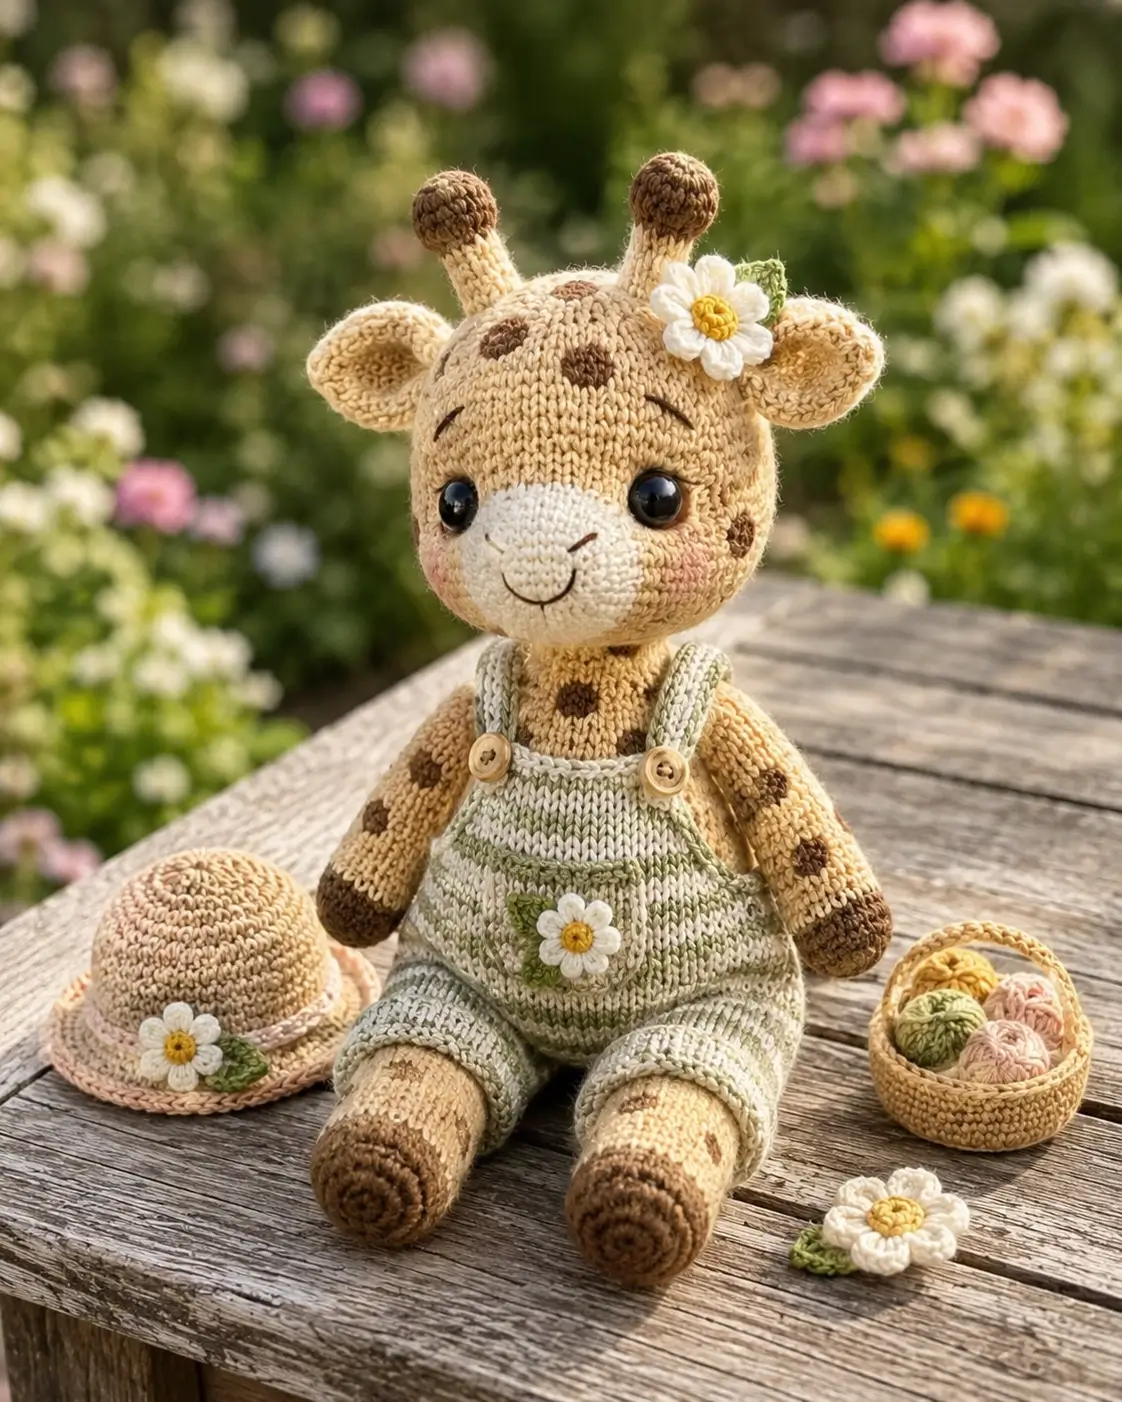
A giraffe amigurumi crochet pattern fails the moment the ossicones read as antennae instead of rounded horn knobs. This version uses DK cotton-blend yarn, a 3.5 mm hook, 12 mm safety eyes, and intermediate shaping for a 25 cm seated toy. Make it when a nursery shelf needs a stable sitting animal with recognizable spots, not a long-necked cylinder.
The Design: What Makes Daisy Meadow Giraffe Different
This giraffe uses a large 42-stitch head plateau, short neck support, and broad seated legs because the real visual weight is at the face, ears, and ossicones. The cream muzzle is made separately, not color-worked into the head, so the nose area stays round and can be adjusted before sewing. Brown hooves and spot appliqués add giraffe structure without forcing many color changes in the main rounds.
The overalls are detachable-style surface pieces: a waistband, bib, two straps, cuffs, pocket, and buttons. That choice keeps the body stable. A common mistake with a crochet giraffe amigurumi is making the neck too long for the head mass; the toy then tips backward. This free giraffe crochet pattern keeps the neck compact and lets the ears and horns supply height.
Project Info at a Glance
| Skill Level | Time | Finished Size | Hook | Best For |
|---|---|---|---|---|
| Advanced beginner / intermediate | 7–9 hours | 25 cm seated | 3.5 mm | Nursery display, spring market table, photo prop |
Materials and Tools
Yarn
- Warm tan / golden beige — DK cotton blend — 90–100 g — Scheepjes Softfun DK or similar
- Dark brown — DK cotton blend — 25–50 g — hooves, spots, ossicone tops
- Cream — DK cotton blend — 20–50 g — muzzle and overalls stripes
- Sage green — DK cotton blend — 25 g — overalls and leaves
- White — DK cotton blend — 10 g — daisy petals
- Mustard yellow — DK cotton blend — 5 g — daisy centers
- Blush pink — DK cotton blend — 5 g — cheek patches
- Straw beige — DK cotton blend — 25 g — hat and basket
Tools
- Hook 3.5 mm
- 12 mm safety eyes
- Polyester stuffing
- Yarn needle
- Locking stitch markers
- Straight pins
- Two 10–12 mm wooden buttons
- Black embroidery thread for mouth, nostrils, and brows
Plastic safety eyes can be a choking risk for children under three; embroidered eyes are the safer build choice for that age group.
Abbreviations
MR = magic ring; sc = single crochet; inc = 2 sc in one stitch; dec = invisible decrease over 2 stitches; sl st = slip stitch; ch = chain; BLO = back loop only; FLO = front loop only; hdc = half double crochet; dc = double crochet; FO = fasten off.
Invisible decrease means working through the front loops of the next two stitches before the yarn-over, which reduces the visible gap on curved decreases.
Pattern — Step by Step
Continuous spiral unless noted. This original pattern uses standard amigurumi math with MR 6, six-stitch increase rounds, and six-stitch decrease rounds. Plateau size: large, 42 stitches.
Head
Yarn: warm tan
R1: 6 sc in MR (6)
R2: inc ×6 (12)
R3: (sc, inc) ×6 (18)
R4: (2 sc, inc) ×6 (24)
R5: (3 sc, inc) ×6 (30)
R6: (4 sc, inc) ×6 (36)
R7: (5 sc, inc) ×6 (42)
R8–R15: sc around (42)
R16: (5 sc, dec) ×6 (36)
R17: (4 sc, dec) ×6 (30)
Place 12 mm eyes between R11 and R12, 10–11 stitches apart. Stuff the head firmly before closing.
R18: (3 sc, dec) ×6 (24)
R19: (2 sc, dec) ×6 (18)
R20: (sc, dec) ×6 (12)
R21: dec ×6 (6)
FO. Close the hole and weave in the tail.
Body
Yarn: warm tan
R1: 6 sc in MR (6)
R2: inc ×6 (12)
R3: (sc, inc) ×6 (18)
R4: (2 sc, inc) ×6 (24)
R5: (3 sc, inc) ×6 (30)
R6: (4 sc, inc) ×6 (36)
R7: (5 sc, inc) ×6 (42)
R8–R12: sc around (42)
R13: (5 sc, dec) ×6 (36)
R14–R15: sc around (36)
R16: (4 sc, dec) ×6 (30)
R17–R18: sc around (30)
R19: (3 sc, dec) ×6 (24)
R20–R21: sc around (24)
R22: (2 sc, dec) ×6 (18)
R23–R25: sc around (18)
Stuff the belly firmly. Leave the neck section dense, not soft.
FO. Leave a 35 cm tail for sewing.
Arms / Front Legs — Make 2
Yarn: dark brown, then warm tan
R1: 6 sc in MR with dark brown (6)
R2: inc ×6 (12)
R3: (sc, inc) ×6 (18)
R4–R5: sc around (18)
R6: (sc, dec) ×6 (12)
R7: change to warm tan, sc around (12)
R8–R14: sc around (12)
Stuff lower half only. Flatten the top.
R15: sc through both layers to close (6)
FO. Leave a 25 cm tail.
Back Legs — Make 2
Yarn: dark brown, then warm tan
R1: 6 sc in MR with dark brown (6)
R2: inc ×6 (12)
R3: (sc, inc) ×6 (18)
R4: (2 sc, inc) ×6 (24)
R5–R7: sc around (24)
R8: (2 sc, dec) ×6 (18)
R9: change to warm tan, sc around (18)
R10–R12: sc around (18)
R13: (sc, dec) ×6 (12)
R14–R16: sc around (12)
Stuff the hoof and lower leg. Leave the top slightly flat for sitting.
R17: sc through both layers to close (6)
FO. Leave a 30 cm tail.
Ears — Make 2
Yarn: warm tan
R1: 6 sc in MR (6)
R2: inc ×6 (12)
R3: (sc, inc) ×6 (18)
R4–R5: sc around (18)
R6: (sc, dec) ×6 (12)
Do not stuff. Fold the base in half.
R7: sc through both layers to close (6)
FO. Leave a 25 cm tail.
Ossicones / Horns — Make 2
Yarn: dark brown, then warm tan
R1: 6 sc in MR with dark brown (6)
R2: inc ×6 (12)
R3–R4: sc around (12)
R5: dec ×6 (6)
R6: change to warm tan, sc around (6)
R7–R10: sc around (6)
Stuff the brown knob only. Keep the stem narrow.
FO. Leave a 25 cm tail.
Muzzle
Yarn: cream
R1: 6 sc in MR (6)
R2: inc ×6 (12)
R3: (sc, inc) ×6 (18)
R4: (2 sc, inc) ×6 (24)
R5–R6: sc around (24)
Add a light layer of stuffing before sewing. Embroider nostrils after placement.
FO. Leave a 35 cm tail.
Cheek Patches — Make 2
Yarn: blush pink
R1: 6 sc in MR (6)
R2: inc ×6 (12)
Sl st to close (12)
FO. Leave 18 cm tails for sewing.
Brown Spots — Make 9
Yarn: dark brown
Small spots, make 6:
R1: 6 sc in MR (6)
R2: inc ×6 (12)
Sl st to close (12)
Large spots, make 3:
R1: 6 sc in MR (6)
R2: inc ×6 (12)
R3: (sc, inc) ×6 (18)
Sl st to close (18)
FO. Leave sewing tails.
Overalls Waist and Shorts
Yarn: sage green and cream
Ch 43. Join with sl st, without twisting.
R1: sc around, using back bump of chain (42)
R2: change to cream, sc around (42)
R3: change to sage green, sc around (42)
R4: cream, sc around (42)
R5: sage green, sc around (42)
R6: (5 sc, dec) ×6 (36)
R7: cream, sc around (36)
R8: sage green, sc around (36)
FO. Leave a 25 cm tail. Slide onto body before final limb sewing, or seam it at the back after assembly.
Bib
Yarn: sage green and cream
Attach yarn to the front center of the overalls waistband.
Row 1: ch 1, sc 14 across front stitches (14)
Row 2: turn, sc 14 (14)
Row 3: cream, sc 14 (14)
Row 4: sage green, sc 14 (14)
Row 5: cream, sc 14 (14)
Row 6: sage green, sc 14 (14)
FO. Hide tail inside bib seam.
Shoulder Straps — Make 2
Yarn: sage green
Ch 26.
Row 1: sc in 2nd ch from hook and across (25)
Row 2: ch 1, turn, sc across (25)
FO. Leave 20 cm tails. Sew from back waistband to bib corners. Add one wooden button at each front corner.
Yarn: sage green
Ch 9.
Row 1: sc in 2nd ch from hook and across (8)
Rows 2–5: ch 1, turn, sc across (8)
Row 6: sc evenly around all four sides (24)
FO. Sew to bib center.
Daisy Appliqués — Make 3
Yarn: mustard yellow and white
Center:
R1: 6 sc in MR with mustard (6)
R2: inc ×6 (12)
Sl st to close (12)
Petals:
Join white in any front loop.
R3: (sl st, ch 3, 2 dc, ch 3, sl st) in every other stitch around (6 petals)
FO. Make one flower for the head, one for the pocket, and one loose table prop.
Leaves — Make 3
Yarn: sage green
Ch 7.
Row 1: sc in 2nd ch, hdc, dc, hdc, sc, sl st (6)
Turn along opposite side of chain.
Row 2: sl st, sc, hdc, dc, hdc, sc (6)
FO. Sew one leaf behind each daisy.
Straw Hat
Yarn: straw beige
R1: 6 sc in MR (6)
R2: inc ×6 (12)
R3: (sc, inc) ×6 (18)
R4: (2 sc, inc) ×6 (24)
R5: (3 sc, inc) ×6 (30)
R6–R8: sc around BLO (30)
R9: FLO, (4 sc, inc) ×6 (36)
R10: (5 sc, inc) ×6 (42)
R11: sc around (42)
FO. Add a pink chain band and a daisy to the brim.
Basket
Yarn: straw beige
R1: 6 sc in MR (6)
R2: inc ×6 (12)
R3: (sc, inc) ×6 (18)
R4: (2 sc, inc) ×6 (24)
R5: BLO, sc around (24)
R6–R10: sc around (24)
R11: crab stitch or reverse sc around (24)
Handle: ch 28, sl st to opposite rim, turn, sc 28 back along chain (28). FO and hide tails.
Yarn Balls for Basket — Make 3
Yarn: pink, sage, mustard
R1: 6 sc in MR (6)
R2: inc ×6 (12)
R3–R4: sc around (12)
R5: dec ×6 (6)
FO. Close each ball. Wrap a strand around each ball twice and knot inside the basket.
Assembly
- Sew the body to the underside of the head with the neck centered under the eye line.
- Sew the cream muzzle to the lower front of the head, covering R9–R15 visually.
- Embroider the mouth in a shallow U shape and add two short nostril stitches on the muzzle.
- Sew cheek patches beside the muzzle, level with the lower edge of the eyes.
- Sew ears to the head between the eye line and back crown, with 14–16 stitches between inner bases.
- Sew ossicones between the ears, spaced 7–8 stitches apart.
- Attach arms to the upper body at a slight forward angle.
- Attach back legs to the lower body so the giraffe sits without rolling backward.
- Place spots on the forehead, arms, body, and legs; stitch only around the outer edge.
- Add overalls, straps, buttons, pocket daisy, head daisy, hat, basket, and yarn balls.
The finished giraffe sits with the legs forward, the head upright, and the accessories removable except for sewn appliqués.
7 Technical Tips
- Eye placement failure mode: eyes too low. Keep the eyes between R11 and R12; placing them below the muzzle midpoint makes the giraffe look like a calf with a compressed face.
- Stuffing failure mode: collapsing neck. Pack the neck area until it resists finger pressure by about 5 mm, then sew through both body and head stitches twice.
- Ossicone failure mode: antenna shape. Stuff only the brown knob and leave the tan stem narrow, because a fully packed stem becomes too thick.
- Spot failure mode: puckered body fabric. Pin every spot first, then sew with one strand of yarn and catch only the surface bars of the body stitches.
- Overalls failure mode: waistband too tight. Test the 42-stitch waistband before sewing the body to the head; it should slide over the belly with 2–3 mm of ease.
- Daisy failure mode: curled petals. Block each daisy under a damp cloth for 20 minutes, then sew through the yellow center and petal bases only.
- Tail weaving failure mode: visible knots near the face. Route all head, muzzle, and cheek tails toward the back of the head, then bury each tail for at least 4 cm.
Conclusion
This build works because the giraffe structure is solved before decoration: broad seated legs, compact neck, large head, rounded ossicones, and a raised cream muzzle. The overalls, hat, basket, and daisies are added after balance is tested, so the toy keeps its seated posture. Make the head and body first, pin every feature, then attach the accessories only after the face is finished. Share the finished giraffe on Pinterest and Instagram with the front, side, and accessory layout visible. Use #DaisyMeadowGiraffe. For your next giraffe amigurumi crochet pattern variation, would you place the daisy on the left ossicone side or move it onto the straw hat?









