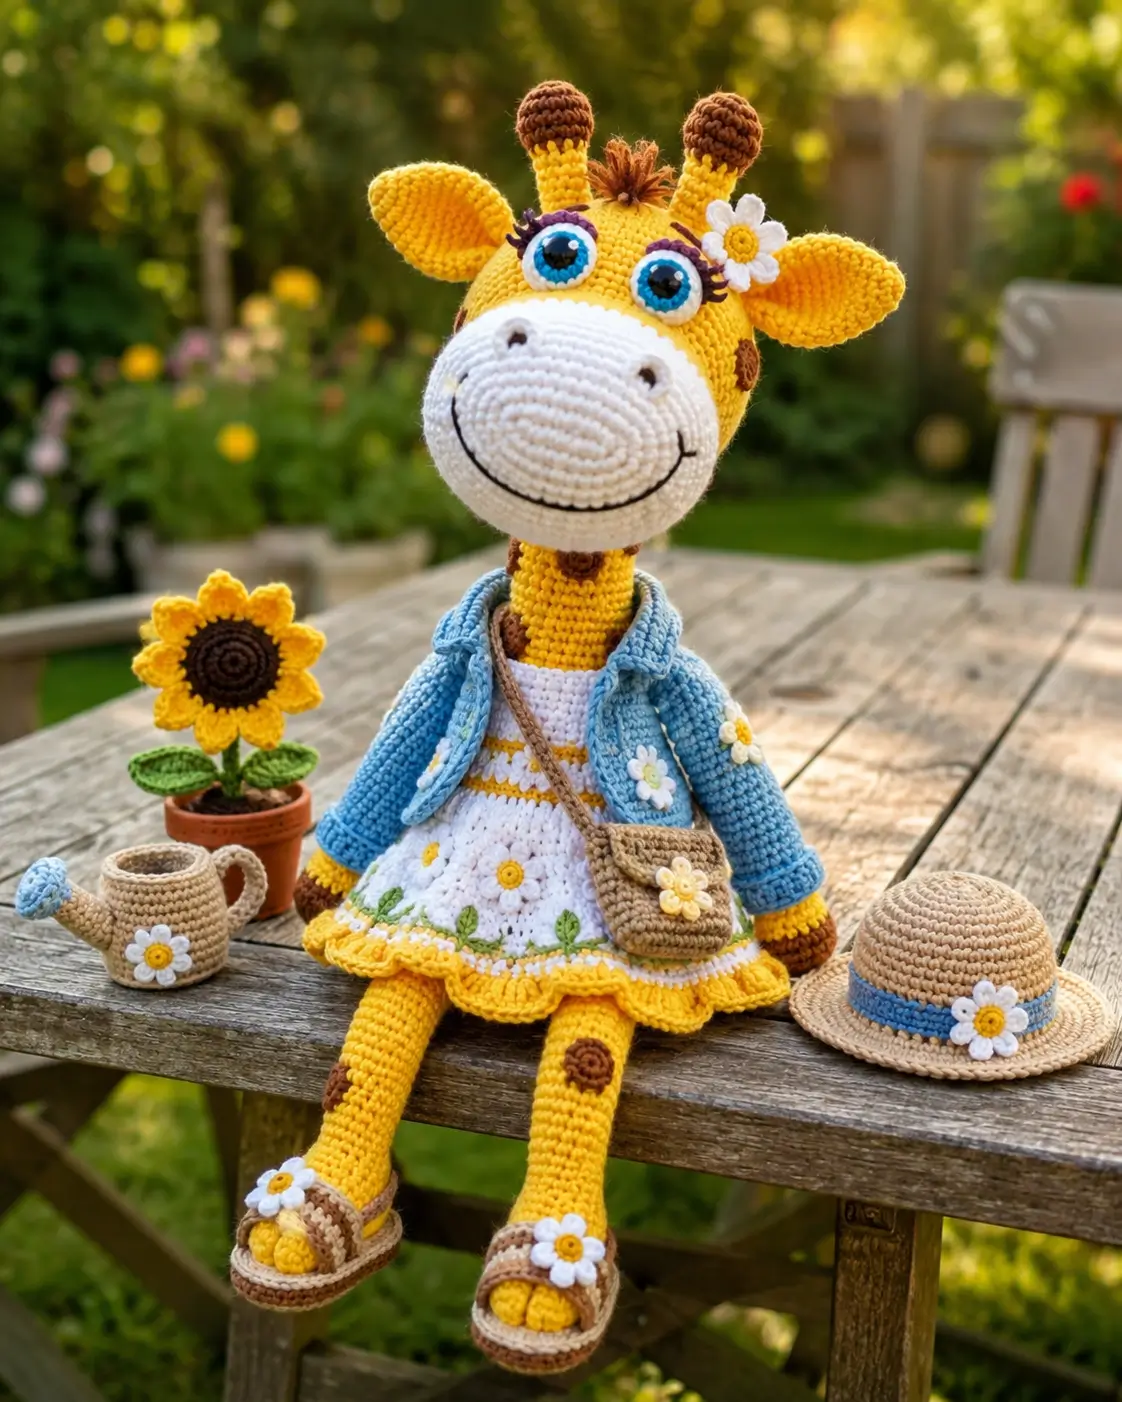
A giraffe has ossicones, not horns, and this garden version has to hold them above a wide white muzzle. This giraffe amigurumi crochet pattern uses sport-weight cotton, a 2.5 mm hook, 8 mm safety-eye centers, and a 27 cm seated target for an intermediate maker. Make it when a shelf doll needs clothing, posture, and clear character features.
The Design: What Makes Daisy Different
This design solves three giraffe problems before the outfit begins. First, the head uses a 42-stitch plateau because the face carries large eye discs, a raised muzzle, ears, ossicones, and a small mane. A smaller head would crowd those parts. Second, the body narrows into an 18-stitch neck, so the head sits high without a wire frame. The maker still has to pack that neck firmly, because a loose neck folds forward under the muzzle weight. Third, the limbs stay long and narrow while the dress adds visual width at the hips. That contrast keeps the dressed giraffe amigurumi readable from the front. Many free giraffe crochet pattern posts miss clothing tension; they treat the toy as one plain animal, not as a crochet giraffe pattern with removable-looking garments.
Project Info at a Glance
| Skill Level | Time | Finished Size | Hook | Best For |
|---|---|---|---|---|
| Intermediate | 8–10 hours | 27 cm seated | 2.5 mm | Display doll, outfit practice, safari nursery shelf |
Materials and Tools
Yarn
- Golden yellow — fine sport #2 / 4 ply — 100 g — YarnArt Jeans 35 or similar.
- Dark brown — fine sport #2 / 4 ply — 25–50 g — YarnArt Jeans 40 or similar.
- White — fine sport #2 / 4 ply — 50 g — YarnArt Jeans 01 or similar.
- Light brown / beige — fine sport #2 / 4 ply — 30–50 g — YarnArt Jeans 07 or similar.
- Sky blue — fine sport #2 / 4 ply — 35–40 g — for jacket, eye accents, hat band, and watering can.
- Leaf green — fine sport #2 / 4 ply — 10 g — for stems and dress embroidery.
- Daisy yellow — fine sport #2 / 4 ply — 5 g — for flower centers.
- Black embroidery thread — 1 m — for smile, nostrils, and lashes.
Tools
- Hook 2.5 mm
- 8 mm safety eyes, black, used as eye centers
- Polyester stuffing
- Yarn needle
- Locking stitch markers
- Straight pins
- Small scissors
- Optional: 5 mm buttons or snaps for display clothing only
Abbreviations
MR = magic ring; sc = single crochet; inc = 2 sc in next stitch; dec = single crochet 2 stitches together; sl st = slip stitch; ch = chain; BLO = back loop only; FLO = front loop only; dc = double crochet; hdc = half double crochet.
Invisible decrease: insert the hook under the front loops of the next two stitches, yarn over, pull through both front loops, yarn over again, and pull through both loops on the hook.
Pattern — Step by Step
Work in a continuous spiral unless a row section says otherwise. This original pattern is drafted from the uploaded photo and uses published giraffe pattern data only for scale, material, and part benchmarking.
Head
Yarn: golden yellow.
R1: 6 sc in MR (6)
R2: inc ×6 (12)
R3: (sc, inc) ×6 (18)
R4: (2 sc, inc) ×6 (24)
R5: (3 sc, inc) ×6 (30)
R6: (4 sc, inc) ×6 (36)
R7: (5 sc, inc) ×6 (42)
R8–R15: sc around (42)
R16: (5 sc, dec) ×6 (36)
R17: (4 sc, dec) ×6 (30)
R18: (3 sc, dec) ×6 (24)
R19: (2 sc, dec) ×6 (18)
R20: (sc, dec) ×6 (12)
R21: dec ×6 (6)
Stuff firmly before R19. Close the opening with the front loops of R21.
Fasten off. Leave a 20 cm tail if the closing point will be hidden under the mane.
Muzzle
Yarn: white.
R1: 6 sc in MR (6)
R2: inc ×6 (12)
R3: (sc, inc) ×6 (18)
R4: (2 sc, inc) ×6 (24)
R5: (3 sc, inc) ×6 (30)
R6: (4 sc, inc) ×6 (36)
R7–R9: sc around (36)
R10: (4 sc, dec) ×6 (30)
Stuff lightly. Shape it wider than tall while pinning.
Fasten off. Leave a 35 cm sewing tail.
Cheek Patches
Yarn: white. Make 2.
R1: 6 sc in MR (6)
R2: inc ×6 (12)
Sl st to finish (12)
Fasten off. Leave a 15 cm tail on each patch.
Eye Whites
Yarn: white. Make 2.
R1: 6 sc in MR (6)
R2: inc ×6 (12)
R3: (sc, inc) ×6 (18)
Sl st to finish (18)
Fasten off. Leave a 20 cm sewing tail.
Blue Irises
Yarn: sky blue. Make 2.
R1: 6 sc in MR (6)
R2: inc ×6 (12)
Insert one 8 mm safety eye through the center of each iris before attaching it to the eye white.
Fasten off. Sew the blue iris to the white disc.
Body and Neck
Yarn: golden yellow.
R1: 6 sc in MR (6)
R2: inc ×6 (12)
R3: (sc, inc) ×6 (18)
R4: (2 sc, inc) ×6 (24)
R5: (3 sc, inc) ×6 (30)
R6: (4 sc, inc) ×6 (36)
R7: (5 sc, inc) ×6 (42)
R8–R13: sc around (42)
R14: (5 sc, dec) ×6 (36)
R15–R17: sc around (36)
R18: (4 sc, dec) ×6 (30)
R19–R20: sc around (30)
R21: (3 sc, dec) ×6 (24)
R22–R28: sc around (24)
R29: (2 sc, dec) ×6 (18)
R30–R35: sc around (18)
R36: (sc, dec) ×6 (12)
R37: dec ×6 (6)
Stuff the belly medium-firm and the neck very firm. The neck should not collapse when held sideways.
Fasten off. Leave a 35 cm tail for sewing the head.
Arms / Front Legs
Yarn: dark brown, then golden yellow. Make 2.
R1: with dark brown, 6 sc in MR (6)
R2: inc ×6 (12)
R3: BLO sc around (12)
R4: dec ×6, change to golden yellow on final pull-through (6)
R5–R12: sc around (6)
Stuff only the brown hoof end. Leave the upper arm flat so it hangs under the jacket sleeve.
Fasten off. Leave a 20 cm tail.
Back Legs
Yarn: golden yellow with dark brown hoof patch optional. Make 2.
R1: 6 sc in MR (6)
R2: inc ×6 (12)
R3: (sc, inc) ×6 (18)
R4–R5: sc around (18)
R6: (sc, dec) ×6 (12)
R7–R23: sc around (12)
Stuff from foot through thigh. Stop 1 cm below the top so the leg can sit flat against the body.
Fasten off. Leave a 30 cm tail.
Ears
Yarn: golden yellow. Make 2.
R1: 6 sc in MR (6)
R2: inc ×6 (12)
R3: (sc, inc) ×6 (18)
R4–R5: sc around (18)
R6: (sc, dec) ×6 (12)
R7–R8: sc around (12)
Do not stuff. Flatten and pinch the base to make a leaf-shaped ear.
Fasten off. Leave a 25 cm tail.
Ossicones
Yarn: dark brown cap, golden yellow stem. Make 2.
R1: with dark brown, 6 sc in MR (6)
R2: inc ×6 (12)
R3–R4: sc around (12)
R5: dec ×6, change to golden yellow (6)
R6–R10: sc around (6)
Stuff the cap only. Roll the yellow stem between fingers before sewing so it stands upright.
Fasten off. Leave a 25 cm tail.
Brown Spots
Yarn: dark brown.
Small spot, make 6:
R1: 6 sc in MR (6)
R2: inc ×6 (12)
Sl st to finish (12)
Large spot, make 3:
R1: 6 sc in MR (6)
R2: inc ×6 (12)
R3: (sc, inc) ×6 (18)
Sl st to finish (18)
Fasten off each spot with a 15 cm tail.
Mane and Tail
Yarn: dark brown and golden yellow.
Mane: cut 12 strands of dark brown yarn, each 10 cm long. Lark’s-head knot them along the center top of the head between the ossicones, then trim to 2 cm.
Tail:
Row 1: with golden yellow, ch 13 (13)
Row 2: sc in 2nd ch from hook and across (12)
Tail tuft: tie 5 dark brown strands, each 8 cm long, to the tail end and trim to 2 cm.
Fasten off. Leave a 20 cm tail for sewing.
White Daisy Dress
Yarn: white, daisy yellow, green.
R1: with white, ch 42 and join without twisting (42)
R2: sc around (42)
R3: change to daisy yellow, sc around (42)
R4: change to white, sc around (42)
R5: FLO (6 sc, inc) ×6 (48)
R6: sc around (48)
R7: (7 sc, inc) ×6 (54)
R8: sc around (54)
R9: (8 sc, inc) ×6 (60)
R10: change to daisy yellow, sc around (60)
R11: (sl st, skip 1, 5 dc in next st, skip 1) ×15 (15 shells)
Fasten off. Add green embroidered stems and small white daisy stitches after the dress is on the body.
Blue Jacket
Yarn: sky blue.
Back panel:
Row 1: ch 31, sc in 2nd ch from hook and across (30)
Rows 2–12: ch 1, turn, sc across (30)
Fasten off.
Front panels, make 2:
Row 1: ch 11, sc in 2nd ch from hook and across (10)
Rows 2–12: ch 1, turn, sc across (10)
Fasten off. Sew shoulder seams over 6 stitches on each side.
Sleeves, make 2:
R1: ch 18 and join (18)
R2–R9: sc around (18)
R10: change to golden yellow, sc around (18)
Fasten off. Sew sleeves into jacket sides, leaving the front open.
Collar: attach blue yarn at right front neck edge. Sc evenly around front, neck, and left front edge (44). Fasten off.
Crossbody Bag
Yarn: beige.
R1: 6 sc in MR (6)
R2: inc ×6 (12)
R3: (sc, inc) ×6 (18)
R4–R7: sc around (18)
R8: fold flat and sc through both layers across the top (9)
Flap Row 1: attach yarn to back loops of R8, sc across (9)
Rows 2–4: ch 1, turn, sc across (9)
Strap: ch 75 (75)
Fasten off. Sew strap to bag sides and add one tiny daisy to the flap.
Sandals
Yarn: beige and dark brown.
Sole, make 2:
R1: with dark brown, 6 sc in MR (6)
R2: inc ×6 (12)
R3: (sc, inc) ×6 (18)
R4: (2 sc, inc) ×6 (24)
Fasten off.
Top straps, make 4:
Row 1: with beige, ch 12 (12)
Row 2: sl st in 2nd ch from hook and across (11)
Fasten off. Sew two straps over each foot and add one small white daisy per sandal.
Daisy Hair Clip
Yarn: daisy yellow and white.
Center:
R1: with daisy yellow, 6 sc in MR (6)
R2: inc ×6 (12)
Petals: change to white. (ch 4, sc in 2nd ch from hook, hdc, dc, sl st into next center stitch) ×6 (6 petals)
Fasten off. Sew near the right ossicone.
Straw Hat Prop
Yarn: beige and sky blue.
R1: 6 sc in MR (6)
R2: inc ×6 (12)
R3: (sc, inc) ×6 (18)
R4: (2 sc, inc) ×6 (24)
R5: (3 sc, inc) ×6 (30)
R6: (4 sc, inc) ×6 (36)
R7: (5 sc, inc) ×6 (42)
R8–R10: sc around (42)
R11: FLO (6 sc, inc) ×6 (48)
R12: (7 sc, inc) ×6 (54)
R13: sc around (54)
Fasten off. Add a blue band with a 54-chain strip and sew on one daisy.
Sunflower Pot Prop
Yarn: terracotta, dark brown, green, daisy yellow.
Pot:
R1: 6 sc in MR (6)
R2: inc ×6 (12)
R3: (sc, inc) ×6 (18)
R4: BLO sc around (18)
R5–R7: sc around (18)
R8: FLO (2 sc, inc) ×6 (24)
Fasten off.
Soil:
R1: with dark brown, 6 sc in MR (6)
R2: inc ×6 (12)
R3: (sc, inc) ×6 (18)
Sew soil into the pot rim.
Flower center:
R1: with dark brown, 6 sc in MR (6)
R2: inc ×6 (12)
R3: (sc, inc) ×6 (18)
Petals: with yellow, (ch 5, sc in 2nd ch from hook, hdc, dc, dc, sl st to next center stitch) ×12 (12 petals).
Stem: with green, ch 18 (18). Insert a folded yarn strand inside the chain if the stem bends.
Watering Can Prop
Yarn: beige and sky blue.
Can body:
R1: 6 sc in MR (6)
R2: inc ×6 (12)
R3: (sc, inc) ×6 (18)
R4: (2 sc, inc) ×6 (24)
R5–R10: sc around (24)
R11: (2 sc, dec) ×6 (18)
R12: (sc, dec) ×6 (12)
Fasten off.
Spout:
R1: with sky blue, 6 sc in MR (6)
R2–R7: sc around (6)
Fasten off. Sew at an upward angle.
Handle:
Row 1: with beige, ch 20 (20)
Row 2: sl st in 2nd ch from hook and across (19)
Fasten off. Sew handle to the side opposite the spout and add one daisy patch.
Assembly
- Pin the head to the closed neck with the muzzle area facing forward.
- Sew the head to the neck twice around the join, using the body tail and adding stuffing under the chin as needed.
- Sew the muzzle across the lower half of the head, then embroider two nostrils and one black smile.
- Sew the eye whites above the muzzle, add blue irises with safety-eye centers, then add cheek patches and lashes.
- Attach the arms at the upper body under the jacket line, then sew the back legs to the lower front so the doll sits.
- Sew ears, ossicones, mane, and tail to the head and back body.
- Place brown spots on the head, neck, body, and legs, then sew each flat with matching yarn.
- Slide on the dress, sew only two back tack points, then place the blue jacket over the shoulders.
- Add sandals, crossbody bag, and daisy hair clip after the limbs are fixed.
- Finish with the straw hat, sunflower pot, and watering can as separate display props.
The dressed giraffe is complete when the neck holds the head upright and both legs touch the table edge evenly.
7 Technical Tips
- Stitch marker drift: If the marker shifts more than 3 stitches by Head R12, mark the face center with pins instead of trusting the spiral join. A drifting marker will place the muzzle off-center by one visible column.
- Stuffing firmness: The 18-stitch neck needs dense stuffing from R30 to R35. Under-filled necks bend forward because the muzzle, eye discs, and ossicones add weight above the join.
- Invisible decrease ridges: Use front-loop invisible decreases on Head R16–R21 and Body R29–R37. Standard decreases make six raised spokes that show through yellow yarn.
- Eye placement timing: Lock each 8 mm safety eye into the blue iris before sewing the iris to the white disc. Late insertion can stretch the 12-stitch iris and expose the washer edge.
- Ear angle: Pin each ear base across 4 stitches, with the lower edge level with the eye top. A narrow 2-stitch base makes the ear curl backward instead of spreading sideways.
- Dress clearance: Leave at least 1 cm between the dress waistband and leg join. A lower waistband traps the legs and stops the doll from sitting flat.
- Tail weaving: Weave every clothing and accessory tail for at least 8 cm through matching stitches. Short tails under 3 cm work loose when the jacket and bag are adjusted.
Conclusion
This project works because the animal structure is finished before the costume is added. Start with the 42-stitch head, firm 18-stitch neck, and broad white muzzle; then test the seated balance before sewing on dress details. The next step is to pin the muzzle, eyes, and ossicones together for a front-view photo before final stitching. Share the finished giraffe amigurumi crochet pattern on Pinterest and Instagram with a clear side view showing the neck support. Use #DaisyGardenGiraffe. For your version, would you keep the brown spots on the legs only, or add one small spot to the white muzzle edge?









