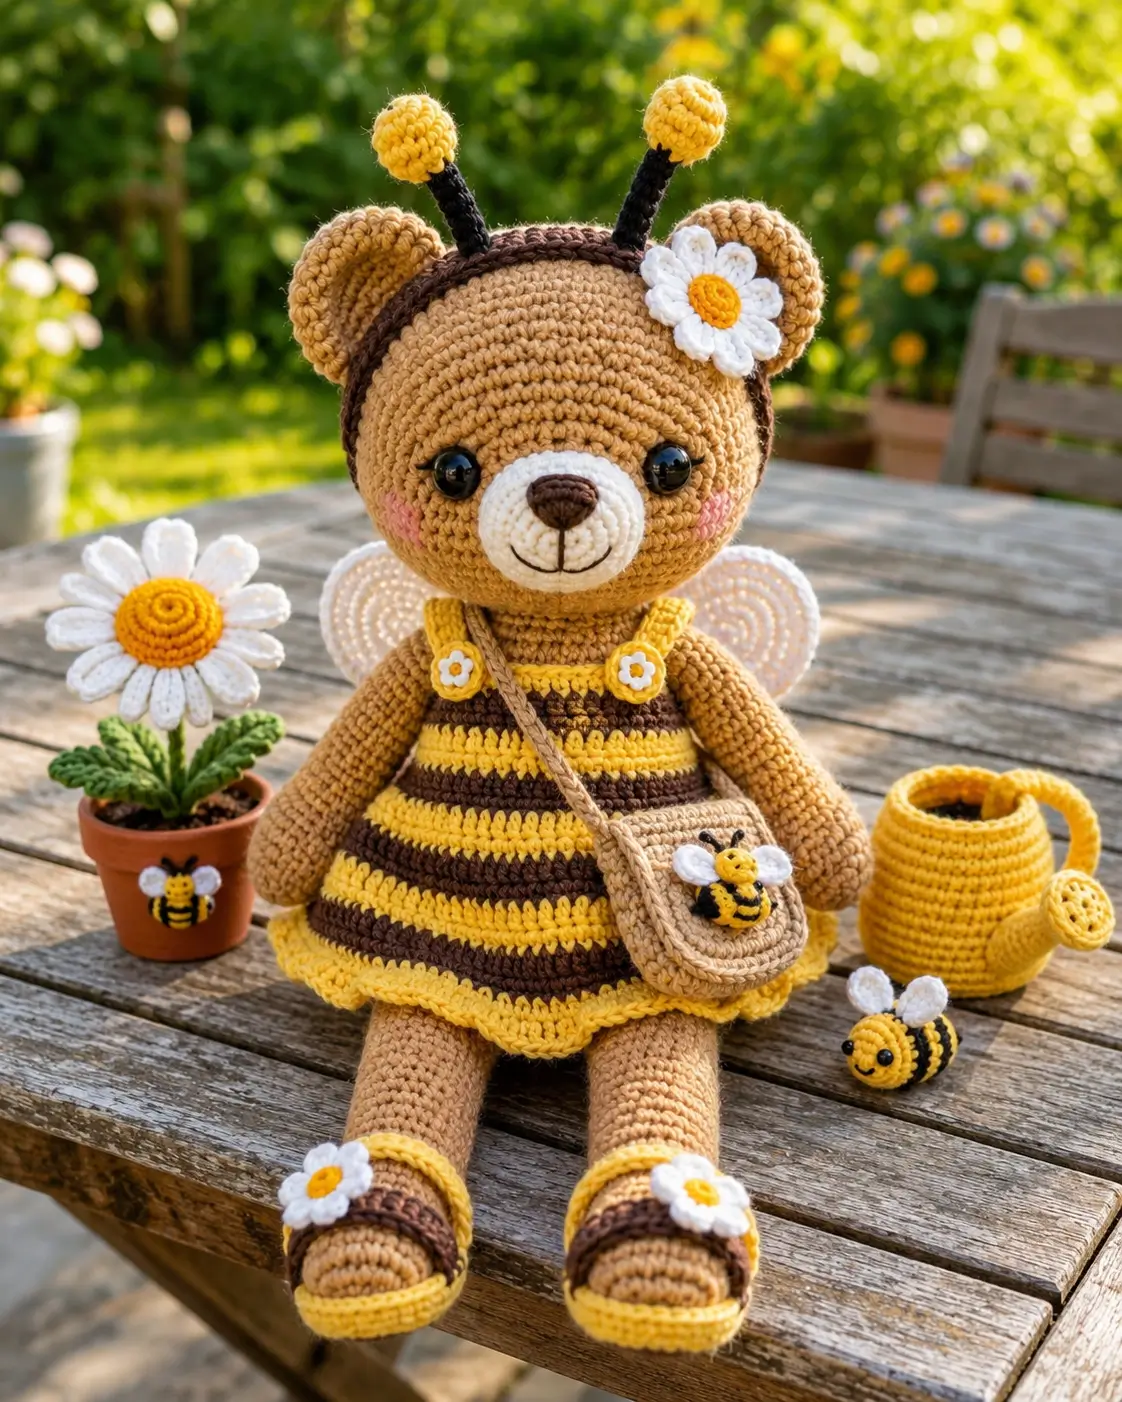
A bee bear needs two ears, two antennae, and no crown of clutter; this bee bear amigurumi crochet pattern solves that spacing problem. Use DK or light worsted cotton-blend yarn with a 3 mm hook for an 18–22 cm seated toy, plus safety eyes, stuffing, wings, daisies, and a small bag. The skill level is intermediate because stripes and face placement must align. Make it as a display piece that tests controlled color changes.
The Design: What Makes This Bee Bear Different
Round ears and upright antennae compete for the same head space, so the antennae sit on a narrow headband instead of being sewn directly through the crown. That keeps the bear silhouette readable while still making the bee costume clear. A striped body works better than a loose dress here because the weight stays centered over the sitting legs. Wings are placed high on the back, near the shoulder line, so they do not drag the body backward. One common mistake with a bee bear crochet pattern is placing the muzzle too low after the eyes are installed. The face then becomes dog-like. For this crochet bee bear amigurumi, the muzzle overlaps the lower eye line and the cheek patches stay outside the muzzle edge.
Project Info at a Glance
| Skill Level | Time | Finished Size | Hook | Best For |
|---|---|---|---|---|
| Intermediate | Not published in checked sources | 21 cm benchmark | 3.0 mm photo-style build; 2.0 mm verified source build | Color changes, sewn parts, display amigurumi |
Published bee-bear references show wide size variation: 11 cm for a 3 mm small bear, 21 cm for a fingering-weight bear with bee, and about 19 cm for a plush bear-bee set.
Materials and Tools
Yarn
- Honey tan — DK/light worsted cotton blend — 50 g — Paintbox Cotton DK or similar.
- Yellow — DK/light worsted cotton blend — 30 g — for stripes, antenna balls, watering can, flowers.
- Dark brown — DK/light worsted cotton blend — 25 g — for stripes, nose, sandals, soil.
- White — DK/light worsted cotton blend — 15 g — for wings, muzzle, daisy petals.
- Beige — DK/light worsted cotton blend — 15 g — for crossbody bag and strap.
- Pink — DK/light worsted cotton blend — 3–5 g — for cheek patches.
- Terracotta — DK/light worsted cotton blend — 10 g — for the flower pot.
- Green — DK/light worsted cotton blend — 5 g — for stem and leaves.
Tools
- Hook 3.0 mm
- Safety eyes 12–14 mm
- Polyester stuffing
- Yarn needle
- Stitch markers
- Pins
- Embroidery needle
- Scissors
Abbreviations
MR = magic ring; sc = single crochet; inc = 2 sc in one stitch; dec = single crochet decrease; sl st = slip stitch; ch = chain; BLO = back loop only; hdc = half double crochet; dc = double crochet.
Use invisible decrease by working through the front loops only on each decrease to reduce visible gaps on the head and body.
Pattern — Step by Step
Continuous spiral unless noted.
Head
Yarn: honey tan.
R1: 6 sc in MR (6)
R2: inc ×6 (12)
R3: (1 sc, inc) ×6 (18)
R4: (2 sc, inc) ×6 (24)
R5: (3 sc, inc) ×6 (30)
R6: (4 sc, inc) ×6 (36)
R7: (5 sc, inc) ×6 (42)
R8–R15: sc around (42)
R16: (5 sc, dec) ×6 (36)
R17: (4 sc, dec) ×6 (30)
R18: (3 sc, dec) ×6 (24)
R19: (2 sc, dec) ×6 (18)
R20: (1 sc, dec) ×6 (12)
R21: dec ×6 (6)
Place eyes between R12 and R13, 8 stitches apart. Stuff firmly before the final rounds.
Fasten off. Leave 20 cm tail and close the opening.
Muzzle
Yarn: white.
R1: 6 sc in MR (6)
R2: inc ×6 (12)
R3: (1 sc, inc) ×6 (18)
R4–R5: sc around (18)
Fasten off. Leave 25 cm tail.
Flatten into an oval while sewing. Embroider a dark brown triangle nose over R2–R4 of the muzzle, then add a short vertical mouth line.
Cheek Patches
Yarn: pink.
R1: 6 sc in MR (6)
R2: inc ×6 (12)
Sl st to close.
Fasten off with 15 cm tail.
Make two. Sew one patch outside each eye, not touching the muzzle.
Ears
Yarn: honey tan.
R1: 6 sc in MR (6)
R2: inc ×6 (12)
R3: (1 sc, inc) ×6 (18)
R4–R5: sc around (18)
Fasten off. Leave 25 cm tail.
Do not stuff. Flatten each ear and sew from R4 to R9 of the head.
Body with Bee Stripes
Yarn: honey tan, yellow, dark brown.
R1: 6 sc in MR with honey tan (6)
R2: inc ×6 (12)
R3: (1 sc, inc) ×6 (18)
R4: (2 sc, inc) ×6 (24)
R5: (3 sc, inc) ×6 (30)
R6: (4 sc, inc) ×6 (36)
R7: (5 sc, inc) ×6 (42)
R8–R9: sc around in yellow (42)
R10–R11: sc around in dark brown (42)
R12–R13: sc around in yellow (42)
R14: (5 sc, dec) ×6 in dark brown (36)
R15: sc around in dark brown (36)
R16: (4 sc, dec) ×6 in yellow (30)
R17: sc around in yellow (30)
R18: (3 sc, dec) ×6 in dark brown (24)
R19: sc around in dark brown (24)
R20: (2 sc, dec) ×6 in honey tan (18)
Fasten off. Leave 35 cm tail for sewing to the head.
Stuff the lower body firmly and keep the neck opening slightly flexible.
Skirt Hem
Yarn: yellow.
Attach yarn to front loop of Body R13.
R1: sc around the unworked front loops (42)
R2: (sl st, ch 2, 2 hdc in next st, ch 2, sl st in next st) repeat around (42 base sts)
Fasten off and weave in ends.
Arms / Front Legs
Yarn: honey tan.
R1: 6 sc in MR (6)
R2: inc ×6 (12)
R3–R11: sc around (12)
R12: (1 sc, dec) ×4 (8)
Fasten off. Leave 25 cm tail.
Make two. Stuff only the lower half so the arms hang downward.
Back Legs
Yarn: honey tan.
R1: 6 sc in MR (6)
R2: inc ×6 (12)
R3: (1 sc, inc) ×6 (18)
R4–R8: sc around (18)
R9: (1 sc, dec) ×6 (12)
R10–R15: sc around (12)
Fasten off. Leave 30 cm tail.
Make two. Stuff the foot firmly and the upper leg lightly.
Sandals
Yarn: yellow and dark brown.
Sole band, make two in yellow: ch 18, join with sl st.
R1: sc around chain ring (18)
R2: sc around (18)
Fasten off.
Top strap, make two in dark brown: ch 13.
R1: sc in second ch from hook and across (12)
Fasten off with 20 cm tail.
Wrap sole band around each foot. Sew the dark strap over the front third of the foot.
Wings
Yarn: white.
R1: 6 sc in MR (6)
R2: inc ×6 (12)
R3: (1 sc, inc) ×6 (18)
R4: (2 sc, inc) ×6 (24)
R5: sc around (24)
Fasten off. Leave 30 cm tail.
Make two. Flatten each wing into a soft oval and sew to the back between Body R9 and R14.
Headband
Yarn: dark brown.
Ch 50, join with sl st without twisting.
R1: sc around (50)
R2: sc around (50)
Fasten off and weave in ends.
Test around the head before sewing. Add or remove chains in pairs if the band is too loose or tight.
Antennae Stems
Yarn: dark brown.
R1: 6 sc in MR (6)
R2–R8: sc around (6)
Fasten off. Leave 20 cm tail.
Make two. Insert a short folded yarn tail inside each tube for stiffness, not wire.
Antennae Balls
Yarn: yellow.
R1: 6 sc in MR (6)
R2: inc ×6 (12)
R3–R4: sc around (12)
R5: dec ×6 (6)
Fasten off and close.
Make two. Sew one ball to each stem, then sew stems to the headband above the ears.
Daisy Hair Clip
Yarn: yellow center, white petals.
Center:
R1: 6 sc in MR with yellow (6)
R2: inc ×6 (12)
Sl st to close.
Petals: join white to any stitch.
R1: (ch 4, dc in second ch from hook, hdc, sc, sl st into next center st) repeat 8 times (8 petals)
Fasten off. Leave 20 cm tail.
Sew the daisy to the right side of the headband, slightly in front of the ear.
Tiny Daisy Buttons
Yarn: yellow and white.
Center:
R1: 6 sc in MR with yellow (6)
Petals: join white, (ch 3, sl st into next st) repeat 6 times (6 petals)
Fasten off.
Make two. Sew to the top front of the striped body like dress buttons.
Crossbody Bag
Yarn: beige.
R1: 6 sc in MR (6)
R2: inc ×6 (12)
R3: (1 sc, inc) ×6 (18)
R4: (2 sc, inc) ×6 (24)
R5–R8: sc around (24)
R9: BLO sc around (24)
R10: (2 sc, dec) ×6 (18)
Fasten off. Leave 25 cm tail.
Strap: ch 70. R1: sc in second ch from hook and across (69). Fasten off.
Flatten the pouch slightly, sew the top edge closed across the back half, and attach strap ends to the sides.
Bee Applique for Bag
Yarn: yellow, dark brown, white.
Body:
R1: 6 sc in MR with yellow (6)
R2: inc ×6 (12)
R3: sc around in yellow (12)
R4: sc around in dark brown (12)
R5: sc around in yellow (12)
R6: dec ×6 (6)
Fasten off and close.
Wings, make two:
R1: 6 sc in MR with white (6)
R2: inc ×6 (12)
Fasten off.
Sew the bee body to the bag front, then add wings above the stripe line.
Loose Mini Bee Prop
Yarn: yellow, dark brown, white.
R1: 6 sc in MR with yellow (6)
R2: inc ×6 (12)
R3: sc around in yellow (12)
R4: sc around in dark brown (12)
R5: sc around in yellow (12)
R6: sc around in dark brown (12)
R7: (1 sc, dec) ×4 (8)
R8: dec ×4 (4)
Fasten off and close.
Wings, make two: R1: 6 sc in MR (6), R2: inc ×6 (12).
Add 6 mm eyes or embroider eyes with black thread.
Potted Daisy Prop
Yarn: terracotta, dark brown, green, yellow, white.
Pot:
R1: 6 sc in MR (6)
R2: inc ×6 (12)
R3: (1 sc, inc) ×6 (18)
R4: (2 sc, inc) ×6 in BLO (24)
R5–R8: sc around (24)
R9: (2 sc, dec) ×6 (18)
Fasten off.
Soil:
R1: 6 sc in MR with dark brown (6)
R2: inc ×6 (12)
R3: (1 sc, inc) ×6 (18)
Sew inside pot.
Stem:
R1: 6 sc in MR with green (6)
R2–R12: sc around (6)
Fasten off.
Flower: use the Daisy Hair Clip instructions.
Sew the stem into the soil, then sew the daisy to the stem top.
Watering Can Prop
Yarn: yellow.
Can body:
R1: 6 sc in MR (6)
R2: inc ×6 (12)
R3: (1 sc, inc) ×6 (18)
R4: (2 sc, inc) ×6 (24)
R5–R9: sc around (24)
R10: (2 sc, dec) ×6 (18)
R11: sc around (18)
Fasten off.
Spout:
R1: 6 sc in MR (6)
R2–R6: sc around (6)
Fasten off.
Rose end:
R1: 6 sc in MR (6)
R2: inc ×6 (12)
Fasten off.
Handle: ch 22.
R1: sc in second ch from hook and across (21).
Sew the spout to one side, rose end to the spout tip, and handle to the opposite side.
Assembly
- Sew the head to the body with the body stripe seam centered at the back.
- Sew the muzzle between Head R12 and R17, then embroider nose and mouth.
- Sew cheek patches outside the muzzle, level with the lower eye edge.
- Sew ears to the head from R4 to R9, then fit the headband between ears.
- Attach antenna stems and balls to the headband before sewing the daisy clip.
- Sew arms to Body R15–R17 with a slight forward angle.
- Sew back legs to the lower front of the body so the toy sits without tilting.
- Sew wings to the back between Body R9 and R14.
- Add sandals, daisy buttons, crossbody bag, and bee applique.
- Place the potted daisy, watering can, and loose mini bee beside the finished bear.
The finished build is a seated bee bear with attached costume elements and separate garden props.
7 Technical Tips
- Stitch marker drift: A spiral can lean 2–3 stitches left by R15. Reset the visual center before eye placement, not after the safety backs are attached.
- Stuffing firmness: A 42-stitch head needs firm stuffing at the crown and cheeks. Under-stuffing leaves a flat temple beside each eye.
- Invisible decrease gaps: Dark brown stripe rounds show white stuffing through ordinary decreases. Use front-loop invisible decreases on every R16–R21 head and R14–R20 body reduction.
- Eye placement timing: Install the eyes before Head R19 while the opening still fits two fingers. The target is between R12 and R13 with 8 stitches between posts.
- Stripe jog failure: Color changes can stair-step across the front belly. Put all joins and yarn carries at the back center, then cover minor jogs with the wing line.
- Wing symmetry: Uneven wings show when one starts 1 round lower than the other. Pin both wings across Body R9–R14 and measure 3 stitches from the center back on each side.
- Tail weaving: Short yarn tails pull out of accessories smaller than 12 stitches. Weave each tail through at least 8 neighboring stitches before trimming.
Conclusion
This build works because the bee costume is planned around the bear structure, not added after the toy is closed. Keep the antennae on the headband, align the wing tops with the shoulder area, and sew the bag only after the arms are fixed. That order prevents crowding across the face and upper body. For the next step, crochet the head, body, and ears first, then pin every accessory before sewing. Save the front, side, and back views for Pinterest, and post the finished figure on Instagram with #BeeBearDaisyBag. This bee bear amigurumi crochet pattern leaves one design choice open: should the antenna balls sit higher than the ears or level with them?









