Introduction
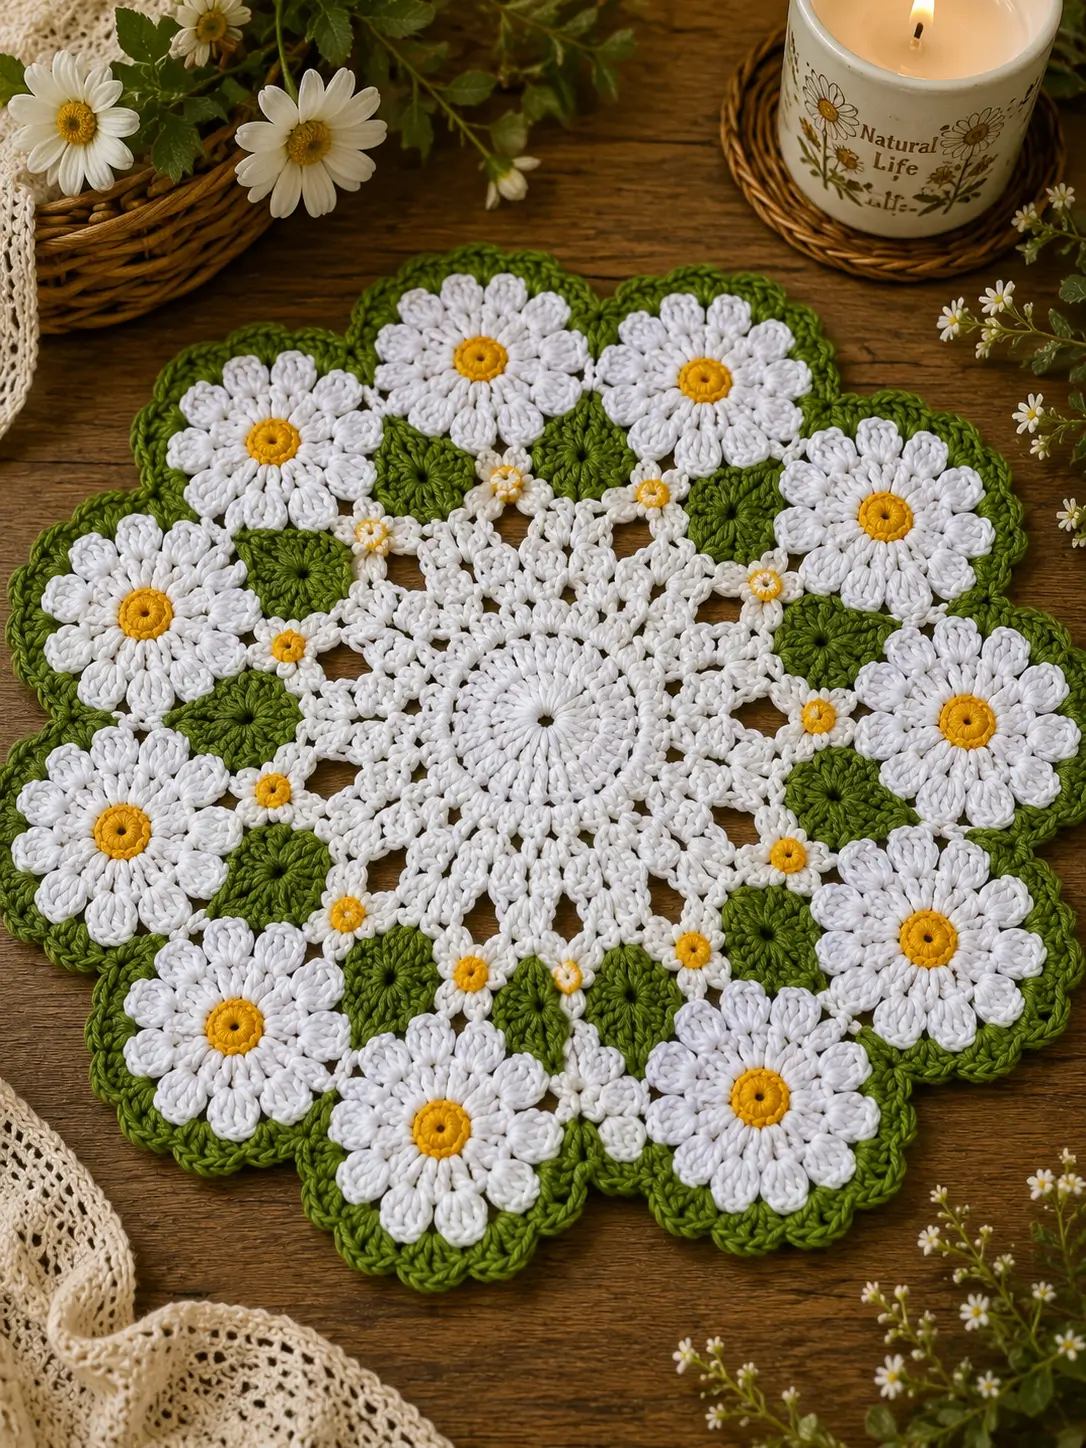
Daisy petals collapse fast when the yellow disc rises too high. That is the first structural issue in a daisy crochet doily pattern. This photo-inspired version uses cotton yarn, a small hook, separate floral motifs, and a joined lace center to produce a flat round mat about 41 cm across. Skill level sits at advanced beginner to intermediate. The practical payoff is simple: it works as a table centerpiece without adding bulk.
The Design: What Makes This Daisy Different
This design is not built like a generic flower coaster scaled up. The center remains a lace wheel, not a solid circle, because the photographed piece depends on negative space to keep the outer ring from looking heavy. Second, the large daisies are separate motifs joined around the perimeter rather than worked directly from the core. That keeps petal spacing cleaner and helps the round edge read as individual blooms. Third, pointed leaves sit between flowers to break the white mass and sharpen the silhouette.
One common mistake with a crochet daisy placemat is overstuffing the petal count with tall stitches and too few joins. The result buckles. Better structure comes from balanced joins, fixed petal repeats, and blocking at the end. In a floral crochet doily, proportion matters more than speed.
Project Info at a Glance
| Skill Level | Time | Finished Size | Hook | Best For |
|---|---|---|---|---|
| Easy–Intermediate | 15–27 rounds in comparable patterns; weekend project | about 41 cm | 1.5 mm lace version | centerpiece, tray mat, spring table decor |
Materials and Tools
Yarn
- White cotton — size 10 crochet thread or fine sport cotton — about 30–55 g comparable usage — Aunt Lydia’s or Drops Safran as reference lines from published daisy patterns.
- Yellow cotton — same weight — small amount for centers.
- Green cotton — same weight — small to moderate amount for leaves and outer scallops.
Tools
- Hook 1.5 mm for a lace-style finish.
- Tapestry needle
- Fine stitch markers
- Sharp scissors
- Blocking mat and rustproof pins
Abbreviations
MR / ch / sc / hdc / dc / tr / sl st / sp / rep / FO
Invisible decrease is not a core technique in this flat motif design, so shaping stays cleaner with joined decreases or skipped spaces rather than stuffed-toy reductions.
Pattern — Step by Step
This is an original, photo-inspired modular layout, not a transcription of any published pattern. Work in joined rounds unless noted.
Center Medallion (Make 1)
Yarn: white — Source: photo analysis plus standard lace-doily construction; comparable daisy doilies use white cotton thread and a small hook.
R1: 12 dc in MR, join. (12 dc)
R2: ch 3, dc in same st, 2 dc in each st around, join. (24 dc)
R3: ch 4, dc in next st, ch 1 around, join. (12 dc, 12 ch-1 sps)
R4: sl st to first sp, ch 3, 2 dc in same sp, 3 dc in next sp around, join. (36 dc)
R5: ch 1, sc in first 2 sts, ch 3, skip 1, sc in next 2 sts, ch 3, skip 1 around, join. (24 sc, 12 ch-3 sps)
R6: sl st to first ch-3 sp, ch 5, dc in same sp, dc in next sc pair center, (dc, ch 2, dc) in next ch-3 sp around, join. (24 dc, 12 ch-2 corners/spokes)
R7: sl st to ch-2 sp, ch 1, (sc, ch 5, sc) in ch-2 sp, ch 3 around, join. (24 sc, 12 ch-5 loops)
R8: sl st into first ch-5 loop, ch 4, 4 tr in loop, ch 1, 5 tr in same loop, sc in next ch-3 sp, [5 tr, ch 1, 5 tr] in next loop around, join. (120 tr, 12 sc, 12 petal fans)
FO. Wet block lightly.
Lace Connector Round (Make 1)
Yarn: white — Source: standard motif-joining math based on 10 outer flowers in the photo.
Join white in any valley between fan groups.
R1: ch 6, sc in next valley, ch 6 around. (12 ch-6 loops)
R2: sl st to loop center, ch 1, 7 sc in each loop around. (84 sc)
R3: sc 3, ch 3, skip 1 around, adjusting evenly to create 21 ch-3 join points.
FO.
Note: Those 21 join points give you attachment spots for large daisies, leaves, and small fillers.
Large Daisy Motif (Make 10)
Yarn: yellow center, white petals — Source: photo analysis and standard daisy motif math.
R1: With yellow, 8 sc in MR. (8 sc)
R2: inc around. (16 sc)
Change to white.
R3: sl st in next st, ch 7, work 5 dc in 4th ch from hook and next 2 ch, sl st in next st around to form petals. (8 petals)
R4: Working behind petals, join white to any back loop of R2, sc in next 2 back loops, hdc in next 2 around. (16 backing sts)
FO.
Petal note: Pull the yellow ring flat before changing to white. A domed center tips the whole border upward.
Pointed Leaf Motif (Make 10)
Yarn: green — Source: photo analysis; pointed leaves are visible between the large flowers.
Ch 7.
R1: sc in 2nd ch from hook, hdc, dc, dc, hdc, 3 sc in last ch; working on opposite side: hdc, dc, dc, hdc, sc. (13 sts)
R2: ch 1, sc, hdc, dc, 2 dc, hdc, sc 3 in tip, hdc, 2 dc, dc, hdc, sc. (15 sts)
FO, leave 20 cm tail for joining.
Mini Daisy Motif (Make 10)
Yarn: yellow center, white petals — Source: photo analysis; small daisies fill the inner gaps.
R1: With yellow, 6 sc in MR. (6 sc)
Change to white.
R2: ch 4, sl st in next st around. (6 loops)
R3: In each loop work (sc, hdc, sc). (6 petals)
FO.
Outer Green Scallop Edging (Make 1)
Yarn: green — Source: photo analysis; the photographed edge finishes as repeated rounded scallops around the floral ring.
This round is worked after all motifs are pinned and joined.
Join green to outer edge of any large daisy.
R1: sc in petal edge, hdc in next, 3 dc in next, hdc in next, sc in join between petals to create one scallop. Repeat around each outer flower edge and over exposed leaf tips as needed. Keep spacing even.
R2: sl st in first st of scallop, ch 3, skip 1, sl st in next across each scallop for a picot-like corded finish.
FO.
Joining Layout
Yarn: white for structural joins, green where visible.
- Pin the center medallion flat.
- Join the lace connector round around it.
- Place 10 large daisies evenly around the outside.
- Sew one pointed leaf between each pair of large daisies, with the leaf tip facing outward.
- Attach one mini daisy in the inner gap between the medallion and every second leaf, then distribute the remaining fillers where the ring still looks open.
- Add the green scallop edging only after the full ring is balanced.
Blocking note: Pin every petal tip and leaf point before steaming or wet blocking. The photographed look depends on a rigid outer outline.
Assembly
- Block the center medallion first so the spokes open fully.
- Mark ten equal positions around the outer connector round.
- Stitch each large daisy at one marked position.
- Check that opposite daisies sit on the same axis before securing the rest.
- Insert one green leaf between every pair of large daisies.
- Add mini daisies to the inner gaps created by the leaf bases.
- Recheck roundness on a flat table.
- Work the outer green scallop edging across exposed petal and leaf edges.
- Weave in all tails on the back, splitting the thread through existing stitches.
- Wet block and pin each point, valley, and petal tip until dry.
The finished piece should lie flat with a crisp floral outline and a visible lace center.
7 Technical Tips
- Mark the ten large-daisy positions before sewing. Off by even one join point, the ring drifts and the doily turns oval instead of round.
- Keep the yellow centers shallow. A raised center as small as 2–3 mm can tilt surrounding petals upward.
- Block each motif before final joining. Unblocked leaves shrink inward and leave visible gaps between motifs.
- Use the same hook for all motifs. Switching from 1.5 mm to 1.75 mm can widen the outer ring enough to create a wave.
- Pin every petal tip. Missing alternate tips during blocking makes the edge read jagged rather than scalloped.
- Weave tails at least 4 cm through dense stitch paths. Short tails slip free faster in cotton thread because the fiber has less grab than fuzzy yarn.
- Do not overpack the filler daisies. Ten large flowers already dominate the edge; extra fillers crowd the lace center and blur the design.
Conclusion
A flat flower ring is harder than it looks. The center has to stay open, the petals have to sit low, and the leaves have to break the outline without distorting the circle. That is why this photo-inspired daisy crochet doily pattern works best as a modular build rather than one uninterrupted round. Start with the medallion, pin the ten outer flowers before sewing, then block the whole piece hard for a table-ready finish. Share your version on Pinterest and Instagram with #DaisyDoilyPattern. One question remains useful here: would you keep the ten-petal border, or reduce the ring to eight larger daisies for a bolder vintage silhouette?









