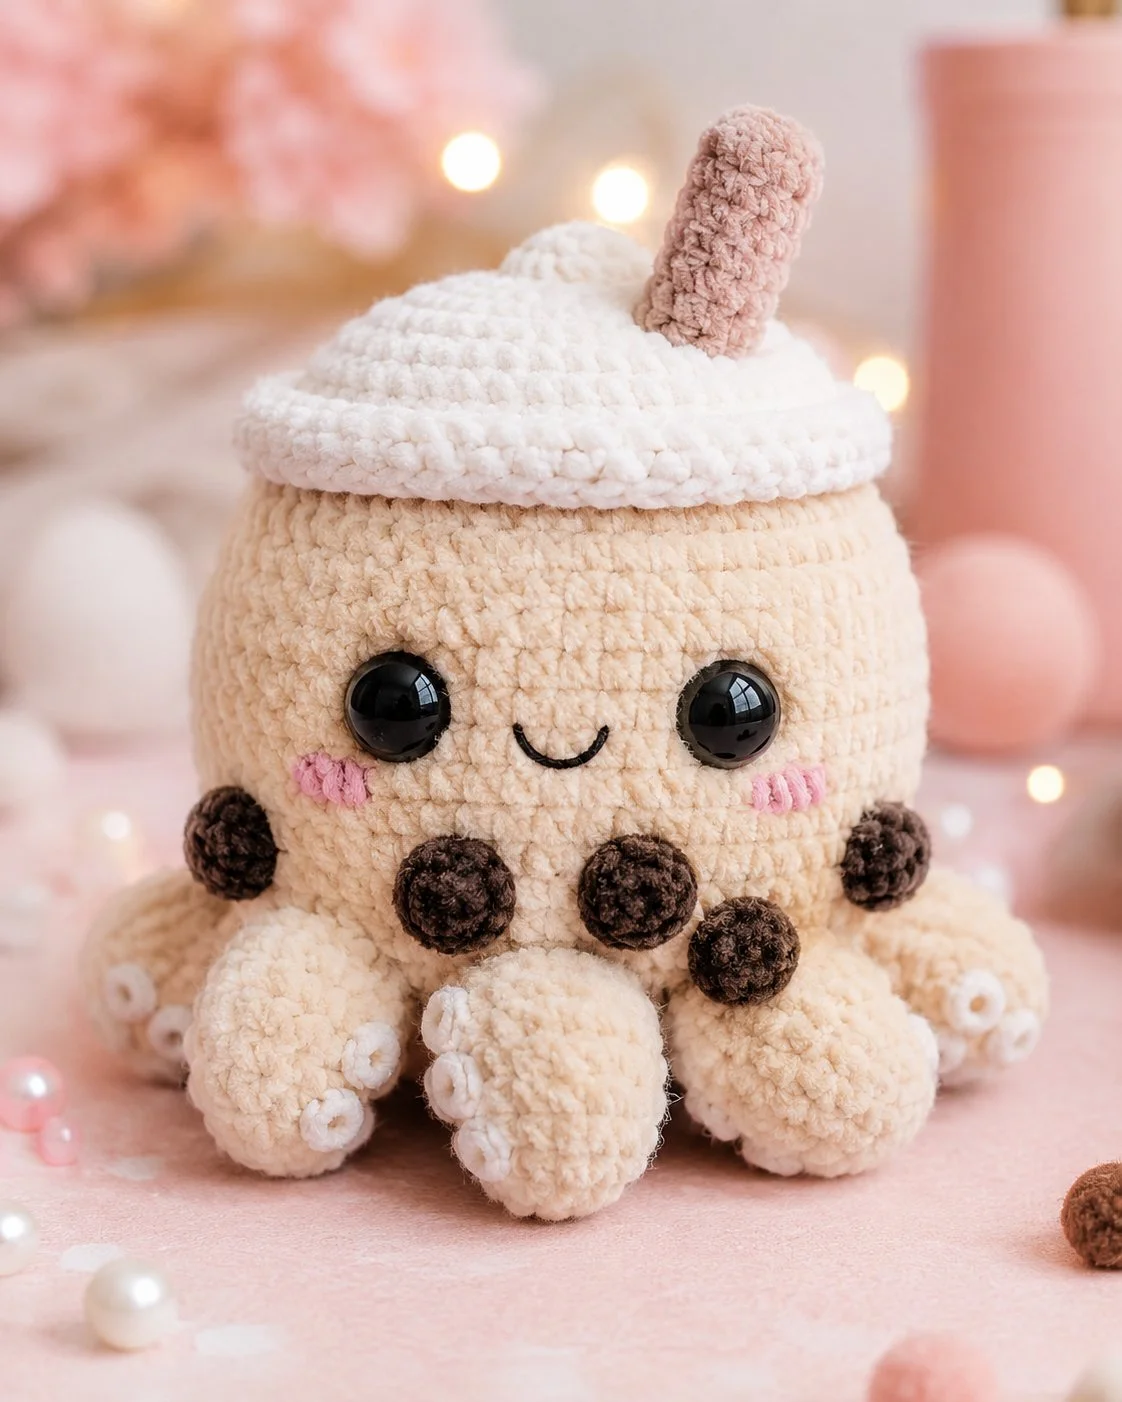
An octopus cannot hide eight tentacles under a whipped-cream lid unless the body wall stays almost vertical. This bubble tea octopus amigurumi crochet pattern solves that with chenille yarn, a 5 mm hook, a compact 12 cm finish, and simple intermediate shaping. You make it for display, desk decor, or gift stock because the hybrid silhouette reads clearly from the front and from above.
The Design: What Makes Bubble Tea Octopus Different
A standard octopus plush usually rounds outward from crown to tentacles. This one does not. The body is held in a straighter cylinder so the milk-tea cup reference stays visible. Next comes the cap. Instead of crocheting the top as part of the head, a separate whipped-cream piece sits over the crown line and creates a second silhouette break. That matters because food-animal hybrids fail when the accessory disappears into the body shape.
Placement also changes the face. Safety eyes stay low on the front wall rather than high on a dome, which keeps the expression readable beneath the cream cap. Makers often crowd the tentacles too high on this character type. Then the boba pearls compete with the limbs and the front becomes cluttered. For a clean velvet octopus crochet finish, keep the facial plane open and cluster the pearls below the smile. That is what separates a plain boba amigurumi cup from an octopus that still reads instantly as an animal.
Project Info at a Glance
Skill LevelTimeFinished SizeHookBest ForIntermediate4–6 hours12 cm5.0 mmDesk plush, shop sample, kawaii display
Project sizing and hook choice are based on published chenille and velvet octopus references in the 12 cm range.
Materials and Tools
Yarn
- Light beige chenille — super bulky — 30 g — Himalayan Dolphin Baby or similar chenille weight
- White chenille — super bulky — 6 g — same base for whipped cream and suckers
- Dark brown chenille — super bulky — 8–10 g — for boba pearls
- Dusty pink chenille — super bulky — 3–4 g — for straw
- Pink cotton or chenille scrap — small amount — for cheek patches
Tools
- Hook 5.0 mm
- Safety eyes 14–16 mm
- Polyfill stuffing
- Tapestry needle
- Stitch markers
- Black embroidery thread
- Pins
Abbreviations
MR / sc / inc / dec / sl st / ch / BLO / FO
Invisible decrease keeps the front wall smoother than a standard decrease, which matters on plush chenille where exposed joins show quickly.
Pattern — Step by Step
Continuous spiral unless noted.
Head (Make 1)
Yarn: light beige — Source: Standard amigurumi math using medium 36-stitch plateau supported by published octopus body counts.
R1: 6 sc in MR (6)
R2: inc x6 (12)
R3: (sc, inc) x6 (18)
R4: (2 sc, inc) x6 (24)
R5: (3 sc, inc) x6 (30)
R6: (4 sc, inc) x6 (36)
R7: sc around (36)
R8: sc around (36)
R9: sc around (36)
R10: (4 sc, dec) x6 (30)
R11: (3 sc, dec) x6 (24)
R12: (2 sc, dec) x6 (18)
Stuff firmly. Keep the lower edge slightly flatter than a ball so it sits cleanly on the body opening.
Fasten off. Leave a 25 cm tail.
Body (Make 1)
Yarn: light beige — Source: Photo adaptation using octopus 36-stitch plateau plus cylindrical boba-cup logic from published boba cup shaping.
R1: 6 sc in MR (6)
R2: inc x6 (12)
R3: (sc, inc) x6 (18)
R4: (2 sc, inc) x6 (24)
R5: (3 sc, inc) x6 (30)
R6: (4 sc, inc) x6 (36)
R7: BLO sc around (36)
R8: sc around (36)
R9: sc around (36)
R10: sc around (36)
R11: sc around (36)
R12: sc around (36)
R13: sc around (36)
R14: sc around (36)
R15: (4 sc, dec) x6 (30)
R16: (3 sc, dec) x6 (24)
R17: (2 sc, dec) x6 (18)
R18: (sc, dec) x6 (12)
Insert a cardboard circle only if you want a very rigid base. Polyester stuffing alone gives a softer, more toy-like finish.
Fasten off. Leave a 30 cm tail.
Tentacles (Make 8)
Yarn: light beige — Source: Standard amigurumi math, scaled from short separate tentacle references.
R1: 6 sc in MR (6)
R2: inc x6 (12)
R3: sc around (12)
R4: (sc, dec) x4 (8)
R5: sc around (8)
Light stuffing only. Overstuffing makes the front tentacles push the face upward.
Fasten off. Leave a 20 cm tail.
Suckers (Make 24)
Yarn: white — Source: Photo adaptation.
R1: 6 sc in MR (6)
Fasten off. Leave a 10 cm tail.
Boba Pearls (Make 5)
Yarn: dark brown — Source: Photo adaptation for raised pearls.
R1: 6 sc in MR (6)
R2: inc x6 (12)
R3: sc around (12)
R4: (sc, dec) x4 (8)
Stuff each very lightly or leave unstuffed for flatter pearls.
Fasten off. Leave a 20 cm tail.
Whipped-Cream Cap Base (Make 1)
Yarn: white — Source: Standard amigurumi math; brim enlarged to overhang body edge.
R1: 6 sc in MR (6)
R2: inc x6 (12)
R3: (sc, inc) x6 (18)
R4: (2 sc, inc) x6 (24)
R5: (3 sc, inc) x6 (30)
R6: (4 sc, inc) x6 (36)
R7: (5 sc, inc) x6 (42)
R8: sc around (42)
R9: BLO sc around (42)
Fasten off. Leave a 35 cm tail.
Whipped-Cream Dome (Make 1)
Yarn: white — Source: Standard amigurumi math.
R1: 6 sc in MR (6)
R2: inc x6 (12)
R3: (sc, inc) x6 (18)
R4: (2 sc, inc) x6 (24)
R5: (3 sc, inc) x6 (30)
R6: (4 sc, inc) x6 (36)
R7: sc around (36)
R8: sc around (36)
R9: (4 sc, dec) x6 (30)
R10: (3 sc, dec) x6 (24)
Stuff lightly. This piece should look like a soft mound, not a ball.
Fasten off. Leave a 30 cm tail.
Straw (Make 1)
Yarn: dusty pink — Source: Straw concept adapted from published boba tea patterns.
R1: 6 sc in MR (6)
R2-R8: sc around (6)
Do not overstuff. A pipe cleaner is optional, but chenille yarn usually holds a slight lean on its own at this size.
Fasten off. Leave a 18 cm tail.
Cheek Patches (Make 2)
Yarn: pink — Source: Flat circle standard.
R1: 6 sc in MR (6)
Fasten off. Leave a 12 cm tail.
Assembly
- Sew the head to the top of the body, matching the 12-stitch opening of the head to the narrowed top of the body.
- Stuff the join area again from the last opening if the neck line looks soft.
- Place the safety eyes on the front between body rounds 9 and 10, about 8 stitches apart if you have not already inserted them earlier.
- Embroider a shallow smile centered one round below the eyes.
- Sew the cheek patches one stitch outward from each eye, slightly lower than the eye line.
- Attach the five boba pearls in a loose arc below the mouth, keeping one centered and the others staggered.
- Sew four tentacles along the front half of the base, then four along the back half, spacing them evenly around the underside.
- Stitch three suckers under each of the three most visible tentacles, or distribute them across the front-facing limbs to match the photo.
- Sew the whipped-cream dome to the cap base, then attach the completed cap to the crown of the head with the brim extending slightly past the body wall.
- Attach the straw off-center on the cap and angle it slightly backward.
The piece is complete when the front view still shows eight tentacle placements, a clean facial panel, and a visible cap overhang.
7 Technical Tips
- Mark round 1 and every increase round. Chenille hides stitch heads fast, and a missed increase on round 5 shifts the whole body from 30 to 29 before you notice it.
- Stuff the body firmer than the head. A soft lower cylinder collapses under the cap weight and the side wall bows outward instead of staying cup-like.
- Use invisible decreases on the face side only. Standard decreases create small bars that catch light around the eye line and look rough in close photos.
- Install eyes before the front tentacles go on. Once the pearls and limbs are attached, reaching the washers cleanly inside a 12 cm plush gets awkward.
- Pin all five boba pearls before sewing. A gap smaller than about 1 cm between pearls makes the front look crowded and steals space from the smile.
- Keep tentacle stuffing to the first two rounds. Fill the whole piece and the tentacle becomes sausage-shaped instead of softly tapered.
- Weave each tail through at least 4–5 internal stitches. Plush yarn sheds from the cut end, so a short bury can work loose after handling.
Related Patterns
- Plain Velvet Octopus Plush — Useful when you want the same tentacle base without the food-theme cap. — [INTERNAL LINK NEEDED: velvet octopus crochet pattern]
- Kawaii Bubble Tea Cup — Good reference for straw angles, brim treatment, and drink-themed colorways. — [INTERNAL LINK NEEDED: bubble tea amigurumi pattern]
- Mini No-Sew Octopus — Faster version for testing eye spacing and tentacle balance. — [INTERNAL LINK NEEDED: mini octopus amigurumi]
- Crochet Dessert Plush Collection — Helps group this project with display-friendly food characters. — [INTERNAL LINK NEEDED: dessert amigurumi roundup]
Conclusion
This build works because the structure stays disciplined. The body keeps a near-vertical wall, the tentacles sit low, and the cap creates a second silhouette instead of blending into the crown. That is the main advantage of this bubble tea octopus amigurumi crochet pattern over a standard octopus plush with random accessories. Crochet the sample once in beige and white, then test flavor variations such as strawberry, taro, or matcha. Share the finished piece on Pinterest and Instagram with #BubbleTeaOctopusPattern. One detail matters most with this character: did you place the center boba pearl directly under the smile or slightly offset for a looser cafe look?









