Coral Crochet Baby Dress Set Pattern: Dress, Bonnet, Headband & Booties
Introduction
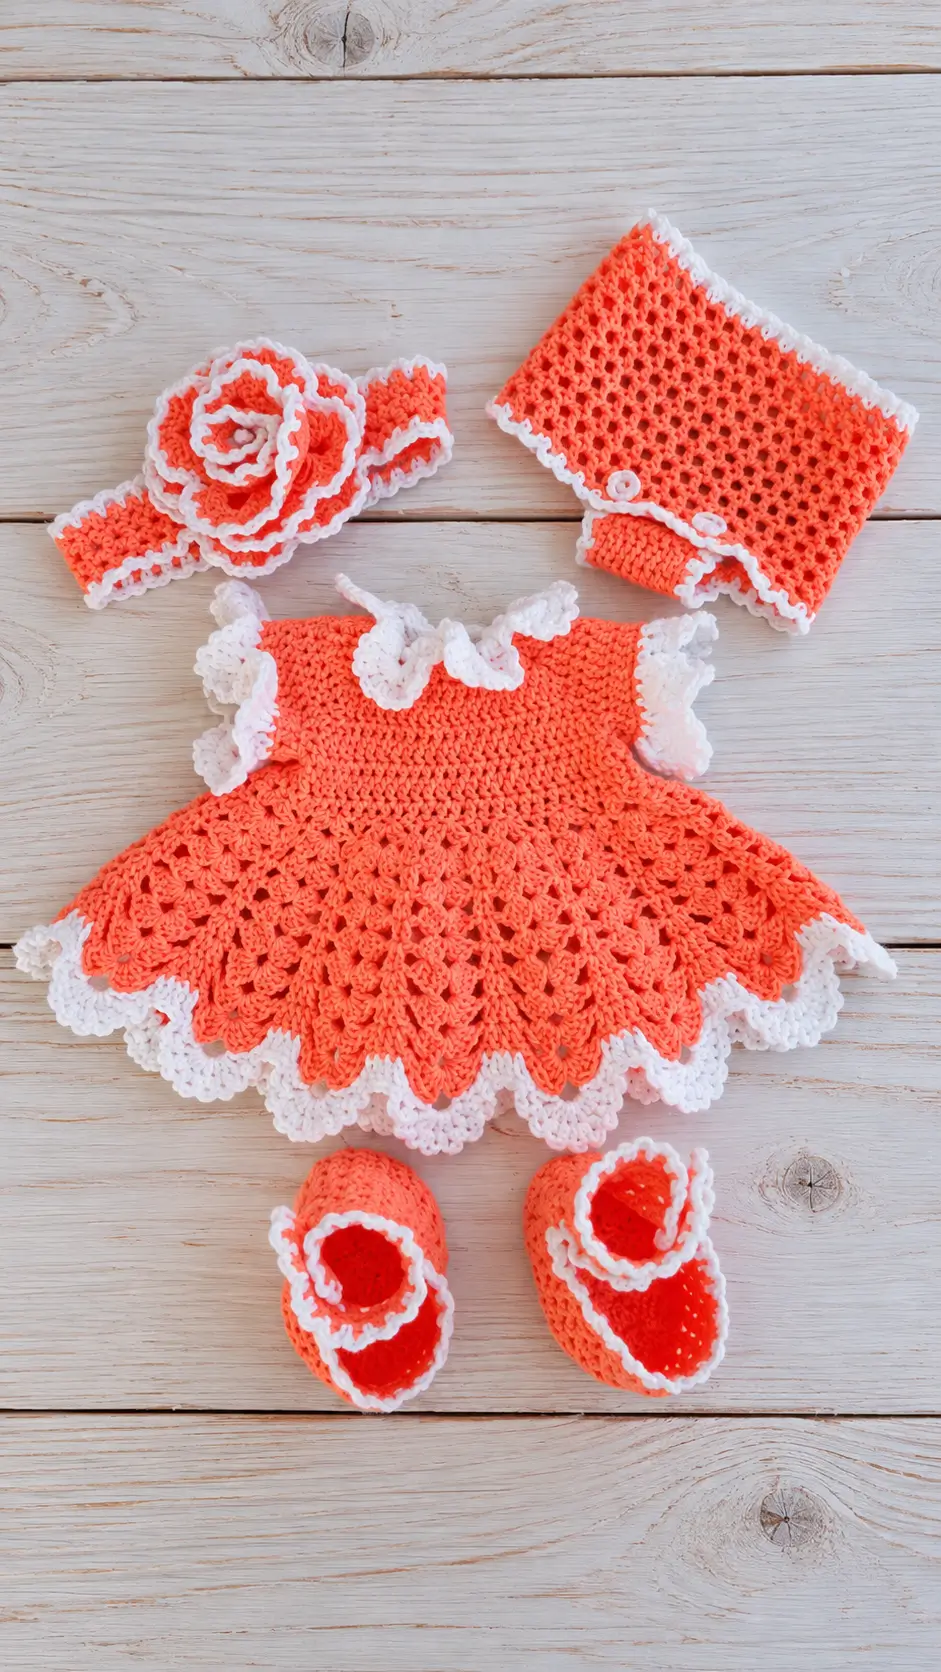
A coral skirt ending in two tiers of pointed white scallops dictates the construction of this four-piece set. This crochet baby dress set pattern uses DK yarn, a 3.5 mm hook and 0–3 month proportions, with a dress length near 35 cm. The project is intermediate because lace spacing and garment gauge matter. Making all four pieces from one yarn weight also keeps the color and trim consistent.
The Design: What Makes This Coral Baby Set Different
The dress separates a relatively solid yoke from an aggressively flared openwork skirt. That choice matters: increasing below the chest gives the skirt its width without making the armholes excessively large. White ruffles then mark the sleeves and lower edge, producing the sharp contrast visible in the reference photograph.
A second structural decision concerns the accessories. The cap uses open crochet through its main panel but needs a firmer lower edge, while the crochet flower headband requires a flat band beneath its oversized spiral rose. Booties are worked more densely than the skirt because lace would give the shoes insufficient shape.
For a coral crochet baby dress, the frequent sizing mistake is treating skirt width as chest ease. Keep bodice dimensions controlled first. The crochet baby girl dress pattern can flare only after the armholes are established.
Project Info at a Glance
| Skill Level | Time | Finished Size | Hook | Best For |
|---|---|---|---|---|
| Intermediate | 10–14 hours estimated | 0–3 months; dress about 35 cm long | 3.5 mm | Coordinated infant outfit |
The 35 cm target and DK/3.5 mm combination are based on comparable 0–3 month coral crochet baby dress specifications. Actual fit still depends on gauge.
Materials and Tools
Yarn
- Coral/orange-coral — DK / Light #3 — approximately 200 g — smooth baby acrylic, cotton-acrylic or comparable baby DK.
- White — DK / Light #3 — approximately 50–60 g — choose yarn with similar meterage and fiber behavior to the coral yarn.
Tools
- 3.5 mm crochet hook
- 10–12 mm securely sewn button or flat closure
- Yarn needle
- Locking stitch markers
- Measuring tape
- Scissors
- Blocking mat and pins
No safety eyes or stuffing are required. Those materials belong to stuffed amigurumi construction rather than this wearable crochet project.
Before beginning, make a 10 cm swatch. A practical starting target is about 20 dc across 10 cm. More important than matching a generic gauge number is producing the required finished chest measurement without creating stiff fabric.
Abbreviations
- ch — chain
- sc — single crochet
- hdc — half double crochet
- dc — double crochet
- inc — two stitches in one stitch
- dec — decrease
- hdc2tog — half double crochet two together
- sc2tog — single crochet two together
- sl st — slip stitch
- BLO — back loop only
- sp — space
- V-st — dc, ch 1, dc in the same space
An invisible decrease is normally used to hide reductions in amigurumi; the booties below use hdc2tog because a flatter reduction is more appropriate across the toe.
Pattern — Step by Step
The dress is worked from the top down. Turn where instructed. Joined skirt rounds begin after the back opening.
Dress Yoke
Yarn: coral DK.
Foundation: Ch 58.
Row 1: Dc in 3rd ch from hook and across. (56)
Row 2: Ch 2, turn. Dc 7, 2 dc in next st, dc 10, 2 dc in next st, dc 18, 2 dc in next st, dc 10, 2 dc in next st, dc 7. (60)
Row 3: Ch 2, turn. Dc 8, inc, dc 10, inc, dc 20, inc, dc 10, inc, dc 8. (64)
Row 4: Ch 2, turn. Dc 9, inc, dc 10, inc, dc 22, inc, dc 10, inc, dc 9. (68)
Row 5: Ch 2, turn. Dc 10, inc, dc 10, inc, dc 24, inc, dc 10, inc, dc 10. (72)
Row 6: Ch 2, turn. Dc 11, inc, dc 10, inc, dc 26, inc, dc 10, inc, dc 11. (76)
Row 7: Ch 2, turn. Dc 12, inc, dc 10, inc, dc 28, inc, dc 10, inc, dc 12. (80)
Check the yoke against the intended infant measurement before forming the armholes. Crochet garments should be sized from finished measurements rather than age alone.
Dress Bodice and Armholes
Row 8: Ch 2, turn. Dc 14, ch 6, skip 12, dc 28, ch 6, skip 12, dc 14. (68 working stitches/chains)
Row 9: Ch 2, turn. Dc in every dc and underarm ch across. (68)
Row 10: Ch 2, turn. Dc across. (68)
At the end of Row 10, join the two back edges only if the neckline can still pass comfortably during dressing. Otherwise, retain the upper opening and join farther down.
Round 11: Ch 2, dc around; add four evenly distributed increases. Join. (72)
The bodice should lie flat with no diagonal pulling from the neckline toward either armhole.
Lace Skirt
Round 12: Ch 3, *(dc, ch 1, dc) in next st, skip 2 sts* around. Join. (24 V-st groups)
Round 13: Sl st to each ch-1 sp. Work 3 dc in every ch-1 sp. (72 dc)
Round 14: Sl st to center dc. Work V-st in center stitch of each group. (24 V-sts)
Round 15: Work 4 dc into every ch-1 sp. (96 dc)
Round 16: V-st between the middle two dc of every 4-dc group. (24 V-sts)
Round 17: Work 5 dc into every V-st space. (120 dc)
Round 18: V-st into the center dc of each group. (24 V-sts)
Rounds 19–30: Repeat Rounds 17–18 six times.
Stop and measure from shoulder to hem. The lace section can be lengthened by repeating the two-round sequence, but check the approximately 35 cm finished target before adding the border.
Dress Scalloped Hem
Yarn: coral and white.
Round 31: In every V-st space work 7 dc; sl st into the valley between groups.
Change to white.
Round 32: Sc in the first two dc, *(sc, ch 3, sl st in first ch)* over the center of the scallop, sc across remaining dc, sl st in valley. Repeat around.
Round 33: Work a loose line of sc around the lower edge, placing an extra ch 2 at each pointed picot.
Fasten off. Leave a 10 cm tail.
Armhole Ruffles — Make 2
Yarn: white.
Join at the bottom of one armhole.
Round 1: Work 24 sc evenly around. (24)
Round 2: *(Sl st in next sc, 3 dc in next sc)* ×12. (12 ruffles)
Fasten off. Repeat on the second armhole.
The ruffles should sit outside the arm opening rather than fold toward the inside.
Neckline and Back Opening
Yarn: white.
Join at the lower back opening and work sc evenly upward, around the neckline and down the opposite edge.
At one upper corner, ch 4 and sl st into the same base to create a small button loop. Check the loop against the actual button before fastening off.
Sew the button securely through several yarn strands. Small detached components can present a hazard on infant clothing, so inspect the attachment before use.
Ruffled Bonnet
Yarn: coral.
Round 1: Ch 4, join into a ring. Work 12 dc into ring. (12)
Round 2: 2 dc in every stitch. (24)
Round 3: *(Dc 1, inc)* ×12. (36)
Round 4: *(Dc 2, inc)* ×12. (48)
Round 5: *(Dc 3, inc)* ×12. (60)
Stop increasing if the crown begins to ripple.
Row 6: Ch 2, turn. Dc across 52 sts, leaving 8 unworked for the neck opening. (52)
Row 7: Ch 3, turn. Dc, *ch 1, skip 1, dc* across.
Rows 8–13: Repeat Row 7, placing each dc above the dc from the preceding row.
Change to white.
Row 14: *(Sc in dc, 3 dc in ch-1 sp)* across.
Row 15: Sc across, adding a ch-3 picot above the middle of each ruffle.
Fasten off.
For the lower neck edge, rejoin coral and work approximately 46–50 sc evenly across the raw edge. Avoid long loose cords on clothing intended for an infant.
Flower Headband
Yarn: coral.
Ch 65.
Row 1: Hdc in 2nd ch and across. (64)
Row 2: Ch 1, turn, hdc across. (64)
Change to white.
Row 3: Sc across. (64)
Fasten off.
Before seaming, measure the band against the intended wearer. An approximately 33–34 cm unstretched headband is a useful 0–3 month reference, but the baby’s actual head measurement takes priority.
Seam the short edges with a flat mattress-style join.
Spiral Rose
Yarn: coral and white.
Ch 41.
Row 1: Starting in the second chain, work 2 dc into every ch. (80)
The strip should curl naturally.
Change to white.
Row 2: *Sl st in next dc, (sc, ch 2, sc) in next dc* across.
Fasten off with a 30 cm sewing tail.
Roll the strip from one end to form the rose. Keep its foundation edge level while rolling; otherwise the flower becomes cone-shaped. Stitch through every layer several times.
Attach the finished rose across a broad section of the headband rather than sewing through only its center.
Bootie Soles — Make 2
Yarn: coral.
Ch 12.
Round 1: 2 hdc in second ch, hdc in next 9, 5 hdc in final ch. Work along opposite side: hdc in next 9, 3 hdc in first foundation point. Join. (28)
Round 2: Increase around the curved heel and toe while maintaining straight side sections. Add eight stitches total. (36)
Round 3: Hdc around. (36)
Check both soles against each other before proceeding. For the 0–3 month reference size, aim for approximately 8–9 cm in finished sole length.
Bootie Uppers — Make 2
Round 4: BLO hdc around. (36)
Round 5: Hdc 8, hdc2tog ×10, hdc 8. (26)
Round 6: Sc 7, sc2tog ×6, sc 7. (20)
Round 7: Sc around. (20)
Change to white.
Round 8: *(Sl st, 3 dc in next st)* ×10. (10 ruffles)
Fasten off with a 10 cm tail.
Compare the two finished shoes sole-to-sole. Toe reduction, heel height and opening should match before the final yarn ends are buried.
Assembly
- Block the dress lightly and measure from the shoulder to the lowest coral scallop before arranging the white border.
- Close the lower back section while keeping enough upper opening for dressing.
- Work the white neckline edging and attach the button only after checking the overlap.
- Arrange both armhole ruffles so each has 12 evenly spaced decorative groups.
- Shape the bonnet crown and flatten the openwork panel without stretching its face edge.
- Seam the headband flat, then pin the spiral rose at four or more attachment points.
- Sew through every rose layer so the outer coils cannot separate from the band.
- Compare both booties for an approximately equal sole length and matching toe reduction.
- Weave structural yarn tails through several stitches, reverse direction and pass through another section before trimming.
- Inspect the button, rose, seams and every decorative attachment before the set is worn.
The completed project contains one coral lace dress, one ruffled bonnet, one flower headband and two matching booties.
7 Technical Tips for Better Results
- Marker drift: Mark the first stitch of each joined skirt round. A marker displaced by one stitch repeatedly will push the lace columns diagonally across the dress.
Final Measurements and Finishing
Measure every component before final finishing. The dress should approach the 35 cm target for this 0–3 month version, while each bootie should measure approximately 8–9 cm along the sole. Check the headband against the intended wearer’s actual head circumference rather than relying only on an age label.
The next step is to crochet a DK gauge swatch with the 3.5 mm hook, record its width, and adjust the hook size before making the yoke. This prevents a small gauge difference from multiplying across the finished bodice.
Save this crochet baby dress set pattern to Pinterest or share your completed coral-and-white version on Instagram with #CoralLaceBabySet. When you finish the set, compare the proportions of the two strongest details: the layered spiral rose and the pointed lace skirt border.









