Introduction
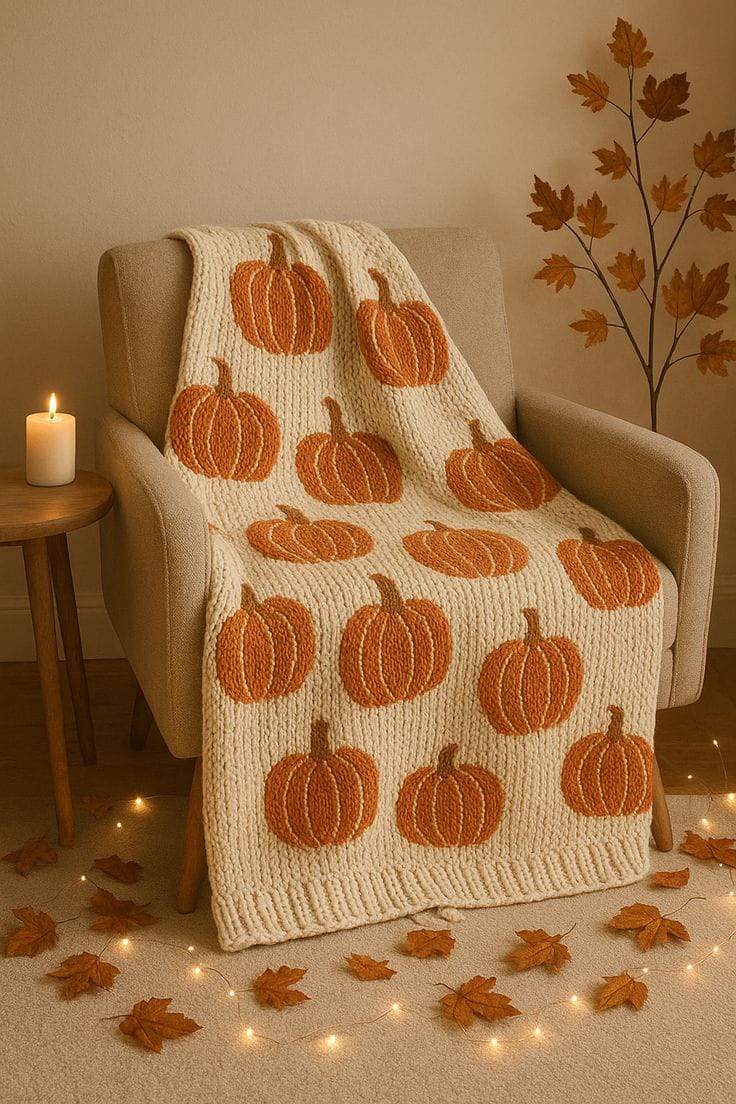
Fifteen orange pumpkins can only look scattered when their stems avoid forming obvious vertical columns. This pumpkin crochet blanket pattern uses Aran yarn and a 5 mm hook to make an approximately 114 × 152 cm throw. A cream single-crochet field carries staggered intarsia pumpkins, while deep ribbed bands stabilize the top and bottom edges for an intermediate autumn blanket.
The Design: What Makes This Pumpkin Blanket Different
The blanket uses isolated pumpkin motifs instead of one continuous orange graph, allowing broad areas of cream to remain visible between the shapes. Each pumpkin spans roughly 25 stitches and 22 rows, which is large enough to show a rounded five-lobe silhouette without turning the entire throw into dense colorwork. Motifs shift sideways from row to row; that stagger prevents the stems from forming rigid vertical stripes. A brown stem occupies only the upper center of each motif, while subtle orange shading lines divide the pumpkin body into lobes. Deep back-loop ribbing at the lower and upper edges adds weight and keeps the long throw visually squared. One frequent error in a pumpkin intarsia blanket is carrying orange through the cream background. The unused color can show through pale yarn, so use separate orange bobbins for widely spaced motifs instead.
Project Info at a Glance
| Skill Level | Time | Finished Size | Hook | Best For |
|---|---|---|---|---|
| Intermediate | 28–36 hours | Approx. 114 × 152 cm | 5.0 mm | Armchairs, sofas and autumn bed layers |
Materials and Tools
Yarn
- Warm cream / ivory — Aran or worsted #4 — approximately 750–900 g — used for the blanket field, side edges and ribbed borders.
- Burnt pumpkin orange — matching Aran / worsted #4 — approximately 350–450 g — used for the pumpkin motifs.
- Medium chestnut brown — matching Aran / worsted #4 — approximately 40–60 g — used for stems.
Choose cream and orange yarns with similar thickness and elasticity. Intarsia sections worked with a softer orange yarn can become wider than the surrounding cream fabric even when the stitch count remains correct.
Tools
- 5.0 mm crochet hook
- Yarn bobbins or small wound balls for each active pumpkin
- Locking stitch markers
- Yarn needle
- Blocking mats
- Rust-resistant blocking pins
- Scissors
- Measuring tape
Abbreviations
- ch — chain
- sc — single crochet
- sl st — slip stitch
- BLO — back loop only
- RS — right side
- WS — wrong side
- CC — contrast color
- MC — main color
For an intarsia color change, complete the final yarn-over of the stitch before the change with the new color and leave the previous yarn hanging on the wrong side for the next section.
Gauge
Work a single-crochet swatch before starting the full throw.
Target gauge: approximately 12 sc × 14 rows = 10 cm.
This corresponds closely to the documented 6 stitches × 7 rows per 5 cm gauge used by a published Aran pumpkin throw.
Wash and dry the swatch according to the yarn label before measuring. Intarsia blankets can widen noticeably after laundering if the background stitches are worked loosely.
Pattern — Step by Step
The blanket field is worked flat from the lower edge upward. Pumpkin motifs are added by intarsia during the rows rather than sewn on afterward.
Main Cream Blanket Foundation
Yarn: warm cream.
Ch 138.
Row 1: Sc in second ch from hook and in every ch across. Turn. (137)
Rows 2–12: Ch 1, sc across. Turn. (137)
Measure the width after Row 12. At the target gauge, the field should measure approximately 113–115 cm before side edging.
Pumpkin Motif Chart
Each pumpkin occupies a maximum area of 25 stitches wide × 22 rows high.
Use O for orange, B for brown and C for cream.
Row 22: CCCCCCCCCCCBBBCCCCCCCCCCC
Row 21: CCCCCCCCCCCBBBCCCCCCCCCCC
Row 20: CCCCCCCCCCCBBBCCCCCCCCCCC
Row 19: CCCCCCCCCCOOOOOCCCCCCCCCC
Row 18: CCCCCCCOOOOOOOOOOOCCCCCCC
Row 17: CCCCCOOOOOOOOOOOOOOOCCCCC
Row 16: CCCCOOOOOOOOOOOOOOOOOCCCC
Row 15: CCCOOOOOOOOOOOOOOOOOOOCCC
Row 14: CCOOOOOOOOOOOOOOOOOOOOOCC
Row 13: COOOOOOOOOOOOOOOOOOOOOOOC
Row 12: OOOOOOOOOOOOOOOOOOOOOOOOO
Row 11: OOOOOOOOOOOOOOOOOOOOOOOOO
Row 10: OOOOOOOOOOOOOOOOOOOOOOOOO
Row 09: OOOOOOOOOOOOOOOOOOOOOOOOO
Row 08: OOOOOOOOOOOOOOOOOOOOOOOOO
Row 07: COOOOOOOOOOOOOOOOOOOOOOOC
Row 06: CCOOOOOOOOOOOOOOOOOOOOOCC
Row 05: CCCOOOOOOOOOOOOOOOOOOOCCC
Row 04: CCCCOOOOOOOOOOOOOOOOOCCCC
Row 03: CCCCCOOOOOOOOOOOOOOOCCCCC
Row 02: CCCCCCCOOOOOOOOOOOCCCCCCC
Row 01: CCCCCCCCCCOOOOOCCCCCCCCCC
The chart gives the outer silhouette. Vertical lobe lines are embroidered after the blanket is complete so the intarsia section remains manageable.
How to Work One Pumpkin Motif
Work cream stitches until the first orange square shown in the chart.
On the final cream stitch before the motif, insert hook, yarn over, pull up a loop, then complete the stitch with orange.
Work the required orange stitches.
Before returning to cream, complete the final orange stitch with cream yarn.
Use a separate orange bobbin for each pumpkin when two motifs appear on the same blanket row.
Do not carry orange across more than approximately 5 background stitches. Long carried floats can show through the cream field.
First Pumpkin Row
Work Rows 13–34 of the blanket with three pumpkin motifs positioned across the width.
Suggested horizontal placement:
Pumpkin 1: stitches 10–34
Pumpkin 2: stitches 57–81
Pumpkin 3: stitches 104–128
Follow the 22-row pumpkin chart at each position.
Keep approximately 22 cream stitches between the large motifs. The exact spacing may be shifted by one or two stitches to match gauge.
Cream Spacer Section
Rows 35–42: Ch 1, sc across in cream. Turn. (137)
This eight-row band creates visual separation before the next staggered motif group.
Second Pumpkin Row
Work two motifs between Rows 43–64.
Suggested placement:
Pumpkin 1: stitches 33–57
Pumpkin 2: stitches 82–106
The second row shifts sideways relative to the first row. This stagger is one of the main visual features visible in the reference blanket.
Second Cream Spacer
Rows 65–72: Sc across in cream. (137)
Third Pumpkin Row
Work three pumpkins across Rows 73–94.
Use the same positions as the first motif row or shift each by approximately 3–4 stitches.
Keep at least eight cream stitches between each pumpkin and the blanket side edge.
Third Cream Spacer
Rows 95–102: Sc across in cream. (137)
Fourth Pumpkin Row
Work three slightly varied pumpkins across Rows 103–124.
Suggested positions:
Pumpkin 1: stitches 15–39
Pumpkin 2: stitches 57–81
Pumpkin 3: stitches 99–123
For the flatter pumpkin appearance visible in some motifs, omit the first and final chart rows and begin with the width shown on Row 2.
Fourth Cream Spacer
Rows 125–132: Sc across in cream. (137)
Fifth Pumpkin Row
Work two or three motifs across Rows 133–154 depending on the final layout.
For a 15-pumpkin arrangement, use three motifs.
Shift their centers relative to the row below so no three stems form one straight vertical line.
Upper Cream Field
Rows 155–174: Ch 1, sc across in cream. Turn. (137)
Fasten off after Row 174.
Before adding borders, the blanket field should measure approximately 124–126 cm long. The ribbed bands supply the remaining finished length.
Pumpkin Lobe Embroidery
Yarn: pumpkin orange in the same shade or one slightly lighter shade.
Thread approximately 120 cm of yarn through a tapestry needle.
For each pumpkin, identify its vertical center.
Work one long surface line from approximately two rows below the stem to approximately two rows above the lower pumpkin edge.
Add one curved line on the left and one on the right, following the pumpkin outline.
Add an optional second pair closer to the outside edges for larger motifs.
Keep the embroidered ridges loose enough that the fabric remains flat. Tight lines can shorten a pumpkin motif by 5–10 mm.
Lower Ribbed Border
Yarn: warm cream.
Ch 15.
Row 1: Sc in second ch from hook and across. (14)
Row 2: Ch 1, BLO sc across. Turn. (14)
Repeat Row 2 until the ribbed strip matches the full blanket width without stretching.
Measure against the actual blanket rather than using a fixed row count.
Fasten off, leaving a sewing tail approximately three times the blanket width.
Attach Lower Border
Pin the ribbing evenly across the blanket bottom.
Mattress stitch the long rib edge to the blanket foundation edge.
Match approximately one rib row to each background stitch or distribute slight differences evenly across the width.
Upper Ribbed Border
Repeat the 14-stitch BLO ribbing for the top edge.
Attach it to Row 174 using the same method.
The upper and lower ribbing should finish at the same depth, approximately 9–11 cm.
Side Edging — First Side
Yarn: warm cream.
Join at the lower corner.
Row 1: Work sc evenly along the complete long side, placing approximately 3 sc for every 4 row ends.
Row 2: Ch 1, sc across.
Row 3: Ch 1, BLO sc across.
Fasten off.
Side Edging — Second Side
Repeat the same three-row edging on the opposite long side.
Count both side edges before Row 2 so their finished lengths remain equal.
Colorwork Management
Wind one small orange bobbin for each simultaneously active pumpkin. When a row contains three pumpkin motifs, three orange bobbins prevent long floats behind the cream field.
At each color transition, cross the inactive and active yarns once on the wrong side before completing the new stitch. This closes the small gap that otherwise forms between cream and orange.
Brown stem sections are only three stitches wide. Use a separate short brown strand for each stem rather than carrying brown through the surrounding cream.
Blocking
Wash or dampen the finished blanket according to the yarn-care instructions.
Lay the throw flat and bring the corners to approximately 114 × 152 cm.
Pin the outer ribbing first, then align the long side edges.
Adjust each pumpkin with your fingers so its stem sits vertical and its embroidered lobe lines remain relaxed.
Allow the blanket to dry completely before removing the pins.
Assembly and Finishing
- Work the complete 137-stitch cream field and mark the starting row of every pumpkin group before introducing orange yarn.
- Use separate orange bobbins for widely spaced motifs and cross the yarns once at every cream-to-orange transition.
- Complete all five pumpkin groups before adding any embroidered lobe ridges so the blanket can be measured while still flat.
- Embroider the center lobe line on every pumpkin first, then add matching curved lines to the left and right.
- Check the total blanket length before crocheting the borders and adjust the ribbing depth if the field differs from target gauge.
- Work the lower 14-stitch BLO rib band to the exact blanket width and attach it without stretching either piece.
- Repeat the same ribbing for the top edge and compare both finished border depths before weaving the tails.
- Add matching side edging, placing the same number of single crochet stitches along both long sides.
- Block the throw to approximately 114 × 152 cm and correct any pumpkin whose embroidered lines pull the surrounding cream fabric inward.
- Weave all color-change tails through at least 4–5 cm of matching stitches, reverse direction once and trim after blocking.
The finished throw should remain rectangular with staggered orange pumpkins distributed across a broad cream field and matching ribbed bands at the upper and lower edges.
7 Technical Tips
- Orange showing through cream: Carrying a dark strand behind more than about five pale stitches can create visible shadows. Drop the orange and use a separate bobbin when the next motif is farther away.
- Gaps at color changes: Intarsia sections can open by 3–5 mm where orange meets cream. Cross the old and new yarn once on the wrong side before completing the first stitch in the new color.
- Pumpkins becoming different widths: Tight orange tension can make one 25-stitch motif several centimeters narrower than another. Measure the first completed pumpkin and keep the same hand tension through all later color sections.
- Embroidered lobes puckering: Pulling surface lines tightly shortens the motif vertically. Leave each line loose enough that a finger can lift it approximately 2–3 mm from the blanket before settling it into the fabric.
- Rib border flaring: A border strip longer than the blanket edge produces waves after sewing. Lay the ribbing beside the unblocked blanket and stop when it matches the width without stretching.
- Side edges becoming unequal: Guessing row-end stitches can make one side several centimeters longer. Count the first side edging and repeat that exact stitch total on the second edge.
- Motifs forming unwanted columns: Pumpkin stems aligned directly above one another make the layout look gridded rather than scattered. Shift alternate motif rows approximately 20–25 stitches sideways and inspect the entire throw before beginning each new pumpkin group.
Conclusion
Check the pumpkin spacing before adding the deep ribbed borders because the border strengthens every vertical alignment already present in the field. The next practical step is to lay the unblocked throw flat and inspect stem positions from several feet away, shifting the final motif row if it creates an unintended column. After the colorwork is complete, add the embroidered lobe ridges and finish both ribbed ends to equal depth. Share the finished pumpkin crochet blanket pattern project on Pinterest with a full-length vertical photograph, then post a close view of the intarsia pumpkins on Instagram using #AutumnPumpkinCrochetBlanket. For this blanket specifically, would you keep every pumpkin burnt orange or mix in two muted rust motifs?









