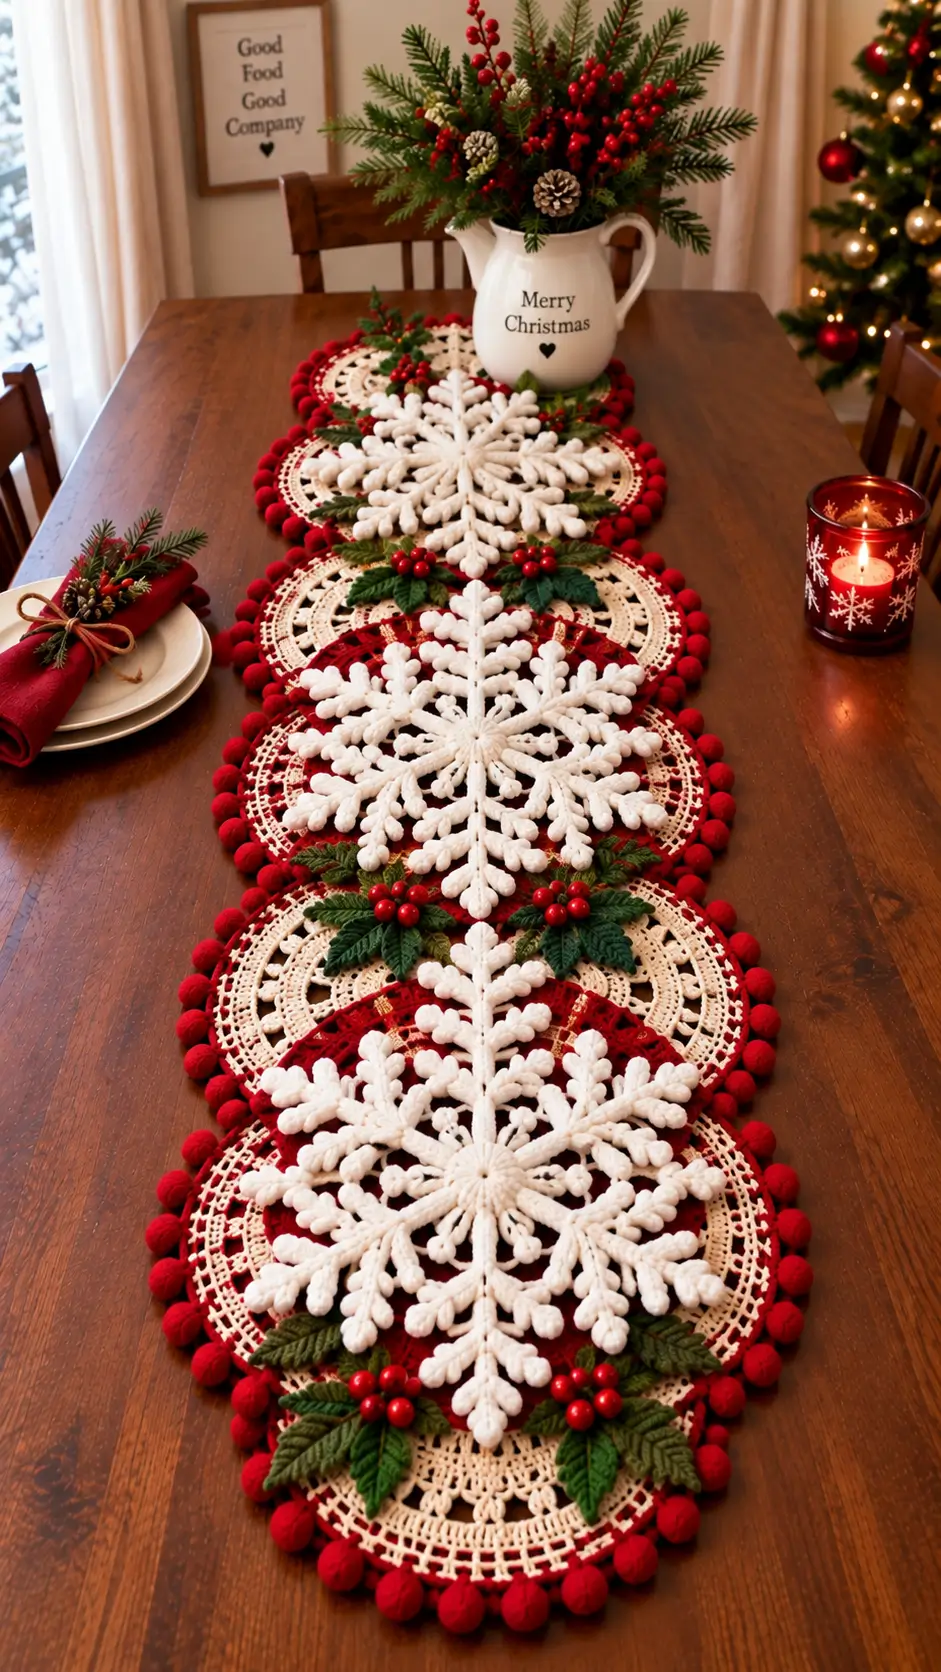
Six-point snowflakes need radial symmetry, but this runner also has to remain flat beneath plates and serving pieces. This crochet snowflake table runner pattern uses layered medallions, raised white snowflakes, green holly and red berry details with worsted yarn and a 5.5 mm hook. The target format is about 36 × 145 cm. Intermediate crochet skills are appropriate, particularly for joining, surface assembly and blocking.
The Design: What Makes This Snowflake Runner Different
The photographed runner gets its structure from three separate visual levels. A red-and-cream circular base creates width; a white six-branch snowflake supplies the central geometry; green holly and berries cover transitions between neighboring medallions. That separation matters because trying to crochet all three elements as one continuous piece would make tension control unnecessarily difficult.
The second decision is repetition. Each crochet snowflake motif follows the same six-way geometry so the eye reads one continuous runner even when individual medallions are joined. The Christmas crochet table runner also uses strong color boundaries rather than subtle tonal changes.
A common mistake is attaching dimensional decorations before blocking the base. That can pull circular medallions into an oval and leave the snowflake branches pointing at inconsistent angles.
Project Info at a Glance
| Skill Level | Time | Finished Size | Hook | Best For |
|---|---|---|---|---|
| Intermediate | 12–18 hours | Approx. 36 × 145 cm | 5.5 mm | Dining tables, sideboards, Christmas displays |
The finished dimensions use the documented 14 × 57 inch benchmark of a published snowflake table runner. Actual dimensions depend on yarn, motif count, crochet tension and blocking.
Materials and Tools
Yarn
- Cream/white: worsted weight — approximately 110 g — smooth acrylic or cotton-blend suggested
- Deep red: worsted weight — approximately 100 g — smooth acrylic suggested
- Holly green: worsted weight — approximately 45 g
- Berry red: worsted weight — approximately 20 g
- Optional dark green: worsted weight — 10–15 g for leaf variation
The gram amounts by individual color are working estimates for this original construction. Yarn consumption changes with gauge, fiber, motif diameter and the final number of medallions.
Tools
- 5.5 mm crochet hook
- Yarn needle
- Locking stitch markers
- Scissors
- Rust-resistant blocking pins
- Blocking mats
- Measuring tape
No safety eyes or stuffing are required for the main runner construction.
Abbreviations
- MR — magic ring
- ch — chain
- sc — single crochet
- hdc — half double crochet
- dc — double crochet
- tr — treble crochet
- inc — two stitches in one stitch
- sl st — slip stitch
- st/sts — stitch/stitches
- sp — space
- picot — ch 3, sl st in first chain
- FO — fasten off
Invisible decrease is primarily an amigurumi technique and is not required for this flat crochet runner.
Crochet Snowflake Table Runner Pattern
Pattern note: This is an original crochet construction developed from the visible components of the reference design. Individual measurements may need minor adjustment according to your yarn and tension.
Cream Center Medallion — Make 5
Yarn: cream/white.
R1: MR, ch 3, work 11 dc into ring; join with sl st. (12 dc)
R2: Ch 3, dc in same st, 2 dc in each remaining st; join. (24 dc)
R3: Ch 1, sc in same st, ch 3, skip 1 st, sc in next st; repeat around, ending with ch 3; join. (12 ch-3 spaces)
R4: Sl st into first ch-3 sp, ch 3, work 3 dc in same sp, ch 2; work 4 dc in each remaining ch-3 sp with ch 2 between groups; join. (12 groups)
R5: Sl st across to first ch-2 sp. Ch 1, *(sc, ch 5, sc) in ch-2 sp, ch 3*; repeat around; join.
R6: Sl st into first ch-5 loop. Work *(3 sc, picot, 3 sc) in ch-5 loop, 3 sc in next ch-3 loop* around. Join.
Fasten off. Weave in the tail before blocking.
The completed medallion should remain circular. If it cups, move up 0.5 mm in hook size. If it develops pronounced waves around the perimeter, reduce the hook size.
Red Outer Medallion Ring — Make 5
Yarn: deep red.
Join red yarn to any R6 picot of the cream medallion.
R1: Ch 1, sc in same point, *ch 5, sc in next picot* around; join.
R2: Sl st into first ch-5 sp, ch 3, 5 dc in same sp, ch 1; work 6 dc in each remaining ch-5 sp with ch 1 between groups. Join.
R3: Ch 1, sc in each dc, working 2 sc into each ch-1 sp. Join.
Fasten off and leave a 25 cm tail where the medallion will be joined to its neighbor.
Large White Snowflake — Make 5
Yarn: cream/white.
The raised six-point snowflake is worked separately and attached to the medallion after blocking.
R1: MR, work 12 sc into ring; join with sl st. (12)
R2: *Ch 7, sl st into second ch from hook, sc in next ch, hdc in next, dc in next 2 ch, tr in final ch; skip 1 base sc, sl st in next sc.* Repeat five more times. (6 main branches)
Do not fasten off.
R3: Work along the edge of each branch. *Sl st upward until the middle of the branch, ch 5, sl st into second ch from hook, sc in next ch, hdc in next, dc in last ch, sl st back into branch; repeat once higher on the same branch. Continue to branch tip, work picot, then work two matching side twigs down the opposite edge.*
Repeat for all six branches.
Fasten off after the sixth branch. Leave approximately 30 cm of yarn for sewing.
Block each completed snowflake to approximately 14–15 cm point-to-point. Measure all six branches from the center before removing the blocking pins.
Small White Snowflake — Make 2 Optional End Motifs
Yarn: cream/white.
R1: MR, 12 sc; join. (12)
R2: *Ch 5, sl st in second ch from hook, sc in next, hdc in next, dc in last ch, skip 1 sc, sl st in next sc.* Repeat six times.
R3: At the tip of each branch, work ch 3 and sl st into the same point to create a picot.
Fasten off. Leave approximately 20 cm for sewing.
Use these smaller snowflakes near an end medallion when a full-size motif would extend too far beyond the runner.
Holly Leaf — Make 16–20
Yarn: holly green.
Foundation: Ch 11.
Row 1: Sl st in second ch from hook, sc in next, hdc in next, dc in next 4, hdc in next, sc in next, 3 sc in final chain.
Rotate the work and crochet down the unused side of the foundation chain: sc, hdc, dc in next 4, hdc, sc, sl st.
For the serrated edge, work around the leaf with *sl st, ch 2, sl st into same or next edge stitch* at regular intervals.
Fasten off with a 20 cm sewing tail.
Each finished leaf should measure approximately 7–9 cm depending on tension and yarn choice. Keep the center line straight so overlapping leaves remain controlled during assembly.
Holly Leaf Vein
Yarn: optional dark green.
Surface-slip-stitch from the stem end toward the pointed end of the leaf.
Keep the surface stitches slightly relaxed. Tight surface crochet can pull the leaf into a permanent curve.
Fasten off on the wrong side.
Crochet Berry — Make 24–30
Yarn: berry red.
R1: MR, 6 sc in ring. (6)
R2: 2 sc in each st. (12)
R3: Sc around. (12)
R4: Work sc2tog around. (6)
Insert a very small amount of yarn scrap or stuffing if a raised berry is required.
Close the opening with the yarn tail.
For a flatter table surface, omit the filling and gather R4 firmly instead. Arrange the berries primarily in clusters of three.
Red Dimensional Border Bobble
Yarn: deep red.
The dimensional red perimeter can be reproduced with crochet bobbles rather than separate manufactured pom-poms.
Ch 3.
Work 4 unfinished dc into the first chain, retaining the final loop of each dc on the hook. Yarn over and pull through all loops.
Ch 1 to close the cluster.
Make a second cluster into the same base. Fold the two clusters together and sl st at the base.
Fasten off when making individual bobbles, or continue directly into the border when working a connected edging.
Continuous Bobble Border
Join deep red yarn at the outer edge of the first medallion.
R1: Work sc evenly around the complete joined runner. Place approximately 2 sc per row-end equivalent and 1 sc in each established stitch. At an inside joining point, skip one stitch if the border begins to flare.
R2: *Sc in next 2 sts, make one bobble, sc in next 2 sts.* Repeat around.
At the curved ends, shorten the interval to one sc between selected bobbles only when additional fullness is required.
Join with sl st and fasten off.
Joining the Medallions
Block all five medallions before joining them.
Place the blocked pieces in a straight line with a small overlap between neighboring red outer rounds. Measure along the center of the arrangement rather than relying only on visual alignment.
Use deep red yarn to whipstitch a joining zone approximately 4–5 cm wide. Work through both loops on the wrong side where possible.
The medallions should not rotate independently after the seam is completed. Extend a loose seam by approximately 1 cm when necessary.
Positioning the Snowflakes
Center one large white snowflake over each medallion.
Pin all six points before making the first permanent stitch. Measure from the snowflake’s center ring to the medallion perimeter at every branch. Keep those measurements within approximately 5 mm of each other.
Sew the center first. Add anchoring stitches at the midpoint of each branch, followed by the tips.
Avoid stitching every section of each branch directly against the base. Leaving controlled sections unattached produces the dimensional appearance of the raised white motifs.
Adding the Holly Clusters
Arrange two to four leaves across each major transition between neighboring medallions.
Point the tips away from the center seam. Place three red berries around the bases of selected leaves.
Stitch each leaf mainly through its center line and tack its outer points only where movement needs to be restricted.
Sew berries through their gathered undersides so the attachment thread stays concealed.
Keep the thickest berry and leaf combinations away from the main center line where serving dishes are most likely to rest.
Assembly
- Block all five cream-and-red medallions to the same diameter before attaching dimensional decorations.
- Arrange the medallions in one straight line and mark the center axis with removable stitch markers.
- Join neighboring medallions with 4–5 cm seams, checking the developing runner length after every join.
- Block the joined runner base again so the perimeter forms a controlled, symmetrical outline.
- Center one large white snowflake over each medallion and pin all six branch tips before sewing.
- Sew the snowflake centers first, then anchor each branch at its midpoint and tip.
- Position the green holly leaves across medallion joins while keeping bulky overlaps away from the central serving area.
- Sew red berry clusters in groups of three at the bases of selected holly leaves.
- Crochet the deep-red perimeter and distribute the dimensional bobbles evenly around the complete edge.
- Weave every yarn tail into matching-color stitches on the wrong side, measure the finished runner and complete a final light blocking.
The completed piece forms a layered five-medallion Christmas table runner with raised snowflakes, holly leaves, red berries and a dimensional red perimeter.
7 Technical Tips for a Better Snowflake Table Runner
- Mark every medallion round at the join. A misplaced joining point shifts a decorative repeat by one section and makes the radial structure visibly uneven.
- Block the large snowflakes to 14–15 cm point-to-point. A difference greater than approximately 1 cm between motifs can make identical base medallions appear different in diameter.
- Check alignment after every medallion seam. A seam that extends approximately 1 cm farther on one side can gradually bend the center axis of the runner.
- Pin all six snowflake tips before sewing. Attaching one branch at a time without preliminary positioning can produce unequal sectors and an off-center motif.
- Keep berry filling minimal. Overfilled berries create raised pressure points beneath dishes; use only a small amount of stuffing or yarn scrap when dimensional berries are required.
- Control the bobble interval. Excess bobbles force the outer edge to ruffle, while irregular wide gaps interrupt the border. Begin with one bobble approximately every four base stitches and modify spacing only around curves.
- Weave tails through at least 4–5 cm of matching stitches. Very short woven ends can work loose at holly leaves, berries and snowflake tips after repeated handling.
Finishing and Blocking
Place the completed runner on blocking mats and establish a straight center axis before pinning the outer perimeter. Measure the width at every medallion rather than checking only the two ends.
Pin each large snowflake independently so its six points remain evenly distributed. Correct any holly leaf that has folded beneath a neighboring motif.
Allow the runner to dry completely in position according to the care requirements of the chosen yarn. Acrylic, cotton and wool respond differently to heat and moisture, so follow the yarn manufacturer’s care instructions.
After blocking, inspect the underside for unsecured tails and joining threads. Trim yarn only after each tail has been woven securely into the corresponding color section.
Adjusting the Table Runner Length
The modular construction makes length changes possible without changing the individual snowflake pattern. For a shorter centerpiece, work three or four medallions. For a long dining table, add another complete medallion rather than increasing the spacing between existing pieces.
Keep every joining seam approximately the same width. Increasing the gaps to gain extra length weakens the visual continuity and makes the runner more likely to bend at the joins.
Before making additional medallions, measure one completely blocked unit. Multiply that working length by the planned number of repeats, then account for the overlap created by each join. This gives a more reliable finished-length estimate than measuring an unblocked motif.
Conclusion
Block one complete medallion and snowflake before committing yarn to the remaining repeats; that sample establishes the final diameter, branch length and border spacing. Once the dimensions are stable, repeat the construction and join the bases before adding raised decorations. For a longer table, add another complete medallion instead of stretching the joining seams. Save the finished crochet snowflake table runner pattern to Pinterest and share your completed runner on Instagram with #SnowflakeHollyRunner. Photograph the runner flat so its six-point geometry remains visible. Which detail would you repeat between additional medallions: the three-berry holly cluster or another full white snowflake?









