Introduction
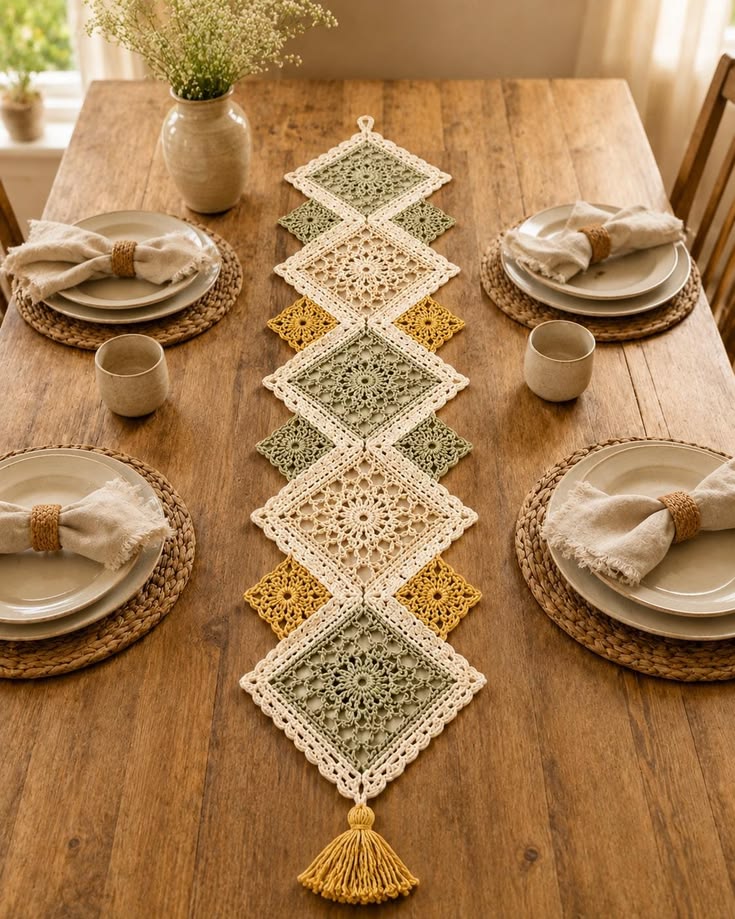
Five large lace diamonds have to meet point-to-point without turning the runner into a narrow rope down the center of the table. This crochet lace square table runner pattern uses cotton yarn, a 3.5 mm hook, floral openwork motifs, smaller accent diamonds, and one tassel. The intermediate reconstruction targets approximately 30 × 150 cm and works well on long dining tables where width must remain restrained.
The instructions below are an original photo-inspired reconstruction based on visible structure; published patterns cited later are used only for sizing, gauge, and material benchmarks.
The Design: What Makes This Diamond Table Runner Different
The photographed runner is not a conventional strip of side-by-side granny squares. Five large floral motifs are rotated 45 degrees and joined at their points, while pairs of smaller sage and mustard diamonds fill selected side gaps. Cream borders unify the alternating sage and natural centers and create the layered lace effect. The large motifs need firm outer rounds because a diamond crochet table runner stretches along its diagonal more readily than a square aligned with the table edge. Small joining points keep the negative spaces visible instead of converting the runner into solid fabric. One tassel finishes the near end without adding fringe along the sides. The main construction error is joining unblocked motifs; even a 5 mm size difference accumulates visibly along a five-diamond center line.
Project Info at a Glance
| Skill Level | Time | Finished Size | Hook | Best For |
|---|---|---|---|---|
| Intermediate | Approx. 10–14 hours | Reconstruction target: approx. 30 × 150 cm including tassel | 3.5 mm | Dining tables, sideboards, seasonal tablescapes |
The dimensions are photo-based reconstruction targets rather than measurements of an identifiable published runner. Current published granny-square runners provide useful scale references: Lynne Samaan’s 2024 design measures approximately 31 × 12.25 inches / 78.75 × 31.11 cm after blocking with a 4.5 mm hook, while Stitching Together publishes a longer floral-square runner at approximately 95 × 11 inches / 241 × 28 cm using worsted cotton and a 5.5 mm hook.
Materials and Tools
Yarn
- Warm cream / natural — DK #3 cotton or cotton blend — approximately 120–140 g
- Sage green — DK #3 cotton or cotton blend — approximately 70–85 g
- Mustard gold — DK #3 cotton or cotton blend — approximately 30–40 g
Choose a smooth, plied cotton rather than fuzzy acrylic. The design depends on visible chain spaces, picots, floral spokes, and sharply blocked corners. Cotton also gives the finished diamonds enough weight to remain flat on a wooden tabletop.
Tools
- 3.5 mm crochet hook
- Blocking mats
- Rust-resistant blocking pins
- Tapestry needle
- Stitch markers
- Scissors
- Measuring tape
- Small piece of cardboard approximately 12 cm wide for the tassel
Abbreviations
- MR — magic ring
- ch — chain
- sc — single crochet
- hdc — half double crochet
- dc — double crochet
- tr — treble crochet
- sl st — slip stitch
- sp — space
- st/sts — stitch/stitches
- picot — ch 3, sl st into first ch
An invisible decrease is not used because every motif expands outward in flat rounds and is shaped by corners rather than decreases.
Motif Gauge
Gauge is controlled by the blocked dimensions of the motifs.
Target each large completed square at approximately 20 × 20 cm. When rotated into a diamond, its point-to-point diagonal will measure roughly 28 cm.
Target each small accent square at approximately 8–9 cm before rotation.
Make one complete large motif first. If it finishes below 19 cm after blocking, test a 4 mm hook. If it exceeds 21 cm, test a 3.25 mm hook.
Color and Motif Layout
The reconstruction uses:
- 3 large sage-center diamonds
- 2 large cream-center diamonds
- 4 small sage accent diamonds
- 4 small mustard accent diamonds
- 1 cream hanging loop
- 1 mustard tassel
The five large motifs alternate sage – cream – sage – cream – sage. Small accent diamonds sit in selected side spaces rather than forming a continuous second row.
Pattern — Step by Step
Large Floral Lace Square — Center
Make 5 total: 3 in sage and 2 in cream for Rounds 1–5. All receive cream outer rounds.
R1: In MR, ch 3, 15 dc. Join with sl st. (16 dc)
R2: Ch 1. *Sc in next dc, ch 3, skip next dc.* Repeat around. Join. (8 ch-3 spaces)
R3: Sl st into first ch-3 sp. Ch 3, 2 dc, ch 2, 3 dc in same sp. In each remaining ch-3 sp work 3 dc, ch 2, 3 dc. Join. (8 petal groups)
R4: Sl st to first ch-2 sp. *Sc in ch-2 sp, ch 5.* Repeat around. Join. (8 ch-5 spaces)
R5: Sl st into first ch-5 sp. Work sc, ch 5, sc in each ch-5 sp around. Join. (8 open loops)
Do not fasten off if continuing in the same color. Otherwise change to cream.
Large Square — Converting the Flower to Four Corners
Yarn: cream.
R6: Join cream in any loop. Ch 3, 3 dc, ch 3, 4 dc in the same loop to form Corner 1. In next loop work 4 dc. In next loop work 4 dc, ch 3, 4 dc for Corner 2. Work 4 dc in next loop. Continue this sequence around until four corners are established. Join.
R7: Ch 1. Sc in each dc across the first side. In each ch-3 corner work 2 sc, ch 3, 2 sc. Repeat around. Join.
R8: Sl st into corner. Ch 3, dc, ch 2, 2 dc in corner. *Ch 2, skip 2 sts, 2 dc in next 2 sts.* Repeat across the side, adjusting the final spacing so the side ends symmetrically. In next corner work 2 dc, ch 2, 2 dc. Repeat around. Join.
R9: Ch 1. Sc in each dc and work 2 sc in each ch-2 side space. In every corner work 2 sc, ch 3, 2 sc. Join.
R10: Ch 1. Sc in first st. *Ch 3, skip 2 sts, sc in next st.* Repeat along each side. At each corner work sc, ch 3, picot, ch 3, sc. Join.
Fasten off with a 25 cm tail.
Optional Scalloped Large-Motif Edge
The reference shows a softly scalloped cream outline around the large diamonds. If more definition is required, add one additional round before joining.
Join cream in any non-corner ch-3 space.
Work 5 dc in next ch-3 sp, sc in following ch-3 sp around each side.
At each corner, work 3 dc, picot, 3 dc.
Keep the shells relaxed. Tight scallops will pull the diamond points inward.
Small Sage Accent Square — Make 4
Yarn: sage DK cotton.
R1: In MR, ch 3 and work 11 dc. Join. (12 dc)
R2: Ch 1. *Sc in next dc, ch 3, skip next dc.* Repeat around. Join. (6 loops)
R3: Sl st into first loop. Work sc, ch 3, 2 dc, ch 3, sc in each loop. Join.
R4: Establish four corners by working 2 dc, ch 2, 2 dc at four evenly spaced positions, with ch-2 spaces between the corner groups.
R5: Sc around, working sc, ch 2, sc in each corner.
Fasten off with a 20 cm tail.
Small Mustard Accent Square — Make 4
Yarn: mustard gold DK cotton.
Work exactly as for the small sage accent square.
Block each finished motif to approximately 8–9 cm square.
When rotated 45 degrees, each small motif should create a compact side diamond that sits behind the edges of two neighboring large motifs without extending beyond the runner’s intended width.
Blocking the Motifs Before Joining
Blocking is part of the construction, not a final cosmetic step.
Pin every large square to exactly the same dimensions. Check both diagonals as well as all four sides.
A 20 cm square should have diagonals close to 28.3 cm. Small variation is acceptable, but all five large motifs should match one another within approximately 5 mm.
Dampen according to the yarn manufacturer’s instructions and leave the pieces pinned until fully dry.
Large Diamond Placement
Rotate every large motif 45 degrees.
Lay them in one vertical line:
Sage → Cream → Sage → Cream → Sage.
Bring the lower point of one motif to the upper point of the next.
The motifs may slightly overlap at their cream borders, as suggested by the photograph, but the floral centers should remain completely visible.
Joining the Five Large Diamonds
Thread a tapestry needle with cream yarn.
At each meeting point, sew through approximately 3–4 cm of neighboring border stitches rather than making a single point connection.
Use a flat whipstitch or mattress-style seam.
Keep the join flexible.
A single tight stitch at each point can act as a hinge and cause the runner to twist when lifted.
Placing the Small Accent Diamonds
Position the four sage accent motifs near the joins surrounding the upper and central large diamonds.
Position the four mustard motifs in two pairs near the lower cream diamonds.
Slide approximately one-third of each small diamond beneath the adjacent large borders.
This creates the layered arrangement visible in the photograph while keeping the central line structurally dominant.
Joining the Accent Diamonds
Pin every small motif before sewing any of them permanently.
Attach each accent through two short sections approximately 2–3 cm long.
Do not sew the entire edge to the large motif.
The unsewn side points create the open, floating appearance that distinguishes this crochet lace square table runner pattern from a solid strip of joined squares.
Top Hanging Loop
Yarn: cream.
Join at the upper point of the first sage diamond.
Ch 14.
Sl st back into the same corner.
Turn and work approximately 18–20 sc around the chain loop.
Join, fasten off, and weave in the tail.
The finished loop should project approximately 3–4 cm beyond the corner.
Mustard Tassel
Yarn: mustard gold.
Wrap yarn around a 12 cm piece of cardboard approximately 35–40 times.
Thread a separate 30 cm strand under the upper wraps and tie tightly.
Cut through the lower loops.
Wrap another strand around the tassel approximately 2 cm below the top knot eight to ten times.
Knot securely and bury the ends inside the tassel.
Trim the finished strands to approximately 9–10 cm.
Attaching the Tassel
Sew the tassel through the lower corner space of the final sage diamond.
Pass the attachment yarn through the corner at least three times.
The tassel should hang from the exact center line rather than from one side of the corner.
Check alignment by laying the runner flat before knotting permanently.
Assembly
- Crochet one complete large floral motif and block it to the 20 × 20 cm target before making the remaining four large squares.
- Make three large sage-center motifs and two large cream-center motifs, finishing all five with matching cream lace borders.
- Crochet four small sage and four small mustard accent squares, then block each one to approximately 8–9 cm square.
- Rotate the five large motifs into diamonds and arrange them sage, cream, sage, cream, sage along one straight center line.
- Pin neighboring large diamonds together and sew approximately 3–4 cm of border at each meeting point rather than attaching only the corner tips.
- Position the small sage accent diamonds around the upper and central joins, keeping approximately one-third of each motif beneath the larger borders.
- Place the four mustard diamonds in two balanced pairs near the lower cream motifs and check that both sides of the runner have equal visual width.
- Sew each small accent through two short 2–3 cm sections, leaving its outer point and most of its side edges free.
- Add the cream loop at the upper sage diamond and attach the 9–10 cm mustard tassel to the exact center of the opposite end.
- Weave all tails, damp-block the assembled runner to approximately 30 × 150 cm including the tassel, and align all five large diamond centers before drying.
The finished runner should form a narrow line of five floral diamonds with alternating sage and cream centers, cream lace borders, sage and mustard side accents, and one mustard tassel.
7 Technical Tips
- The center line bends after joining: measure both diagonals of every 20 cm large square before sewing. A motif that differs from its neighbors by more than approximately 5 mm can pull the five-diamond chain sideways.
- The large motifs buckle at their corners: reduce the corner chain space by one chain on the final round if blocking cannot flatten it. Excess corner chains add diagonal length and create a raised point rather than a flat diamond.
- The point-to-point joins act like loose hinges: sew through 3–4 cm of neighboring border instead of using one corner stitch. A single-point connection allows the runner to rotate whenever it is moved.
- The small accent squares disappear beneath the large motifs: leave at least two-thirds of each 8–9 cm diamond visible. Excessive overlap removes the sage and mustard side rhythm shown in the reference.
- The cotton lace loses definition: block every large square to exactly 20 cm before assembly and let it dry completely. Joining damp or unblocked motifs makes chain spaces contract at different rates.
- The tassel twists off center: attach it through the exact lower corner space with at least three passes of yarn. Moving the attachment even 1 cm sideways is noticeable along a runner built around a single diamond axis.
- The final runner stretches during storage: support the full 150 cm length when lifting it instead of holding one end. Repeated suspension from the loop or tassel can lengthen the point joins and distort the blocked lace.
Why Cotton Works Better for This Runner
Open lace requires predictable blocking. Cotton fibers relax when damp and retain crisp motif geometry after drying, particularly when the stitches are worked at a moderate gauge.
Acrylic can also be used, but its response to blocking depends on fiber construction and heat. The raised floral spokes and chain arches may remain softer.
Published granny-square table runners frequently specify cotton or cotton blends. Lynne Samaan’s 2024 pattern uses an Aran cotton/acrylic blend, while Salena Baca’s sample uses approximately 250 yards of worsted 100% cotton.
Published 2024 Table Runner Benchmark
Lynne Samaan’s Granny Square Table Runner, published in March 2024, uses Lion Brand Made With Love The Cottony One, an Aran-weight 60% cotton and 40% acrylic yarn.
The Ravelry listing specifies a 4.5 mm hook, approximately 160–185 yards / 146–169 m, and a blocked size of 31 × 12.25 inches / 78.75 × 31.11 cm.
That width is particularly useful here: the photographed lace runner also occupies a relatively narrow central strip of the dining table.
Published Long Floral Runner Benchmark
Stitching Together’s Boho Floral Granny Square Table Runner uses category 4 cotton with a 5.5 mm hook.
Each published square measures approximately 4.5 × 4.5 inches / 11.4 × 11.4 cm, while the complete runner measures approximately 95 × 11 inches / 241 × 28 cm.
The design demonstrates how repeated square motifs can produce substantial length while keeping a runner near 28 cm wide.
Published Cotton Join-As-You-Go Benchmark
Salena Baca’s Granny Square Table Runner uses a sample made with worsted-weight 100% cotton and approximately 250 yards.
The published instructions treat the finished size as adjustable and use a join-as-you-go approach in which squares are repeated until the required length is reached.
This reconstruction instead uses sewn partial joins because the photographed large diamonds overlap and leave significant open spaces between the smaller accent motifs.
Published 115 cm Runner Benchmark
A current handmade floral granny-square runner listing measures approximately 115 × 30 cm and uses cotton and wool.
That 30 cm width closely matches the reconstruction target selected for the photographed runner.
The reference image appears longer, however, because five large motifs are arranged point-to-point down the center of a full dining table.
Why the Large Squares Are Rotated
A conventional square places one full edge perpendicular to the table length. Rotating the motif places a corner on the runner’s axis instead.
This changes the apparent width dramatically.
A 20 cm square has a diagonal of approximately 28.3 cm. That diagonal becomes the maximum width when the motif is turned 45 degrees.
The same geometry also produces pointed gaps where the smaller colored motifs can be inserted.
Adjusting the Runner Length
Length is easiest to modify by changing the number of large diamonds.
For a shorter table, use three large motifs. For a longer table, use seven.
Always retain an odd number if you want one large diamond centered exactly at the table midpoint.
Lay the blocked motifs on the actual table before joining because overlap at each connection changes the total length.
Making a Three-Diamond Runner
Use two sage large motifs and one cream large motif.
Place the cream motif in the center.
Add one pair of sage accent diamonds and one pair of mustard diamonds.
Finish one end with the tassel and the opposite end with the loop, or use matching tassels if the runner will not be hung for storage.
Making a Seven-Diamond Runner
Make four sage-center and three cream-center large motifs.
Continue the alternating color sequence.
Add small accents only where they remain clear of plates and placemats; every large join does not require a side motif.
Block the complete runner on a long surface after assembly because small alignment errors become more visible over seven repeated diamonds.
Making the Runner Wider
Increase each large square to approximately 22–24 cm by adding one or two openwork border rounds.
A 24 cm square has a diagonal close to 34 cm, so the finished runner will occupy substantially more table width.
Check place-setting clearance before enlarging. A runner should not force dinner plates onto raised crochet edges.
Making the Runner Narrower
Stop the large motifs one round earlier and target approximately 17–18 cm square.
An 18 cm square has a diagonal around 25.5 cm.
Reduce the accent motifs to approximately 7 cm so their proportions remain subordinate to the large diamonds.
Using Fingering-Weight Cotton
Fingering yarn produces finer lace and smaller motifs unless additional rounds are added.
Pattern Princess publishes a granny-square table runner using light fingering yarn and a 5.5 mm hook, with approximately 500–502 yards / 457–459 m listed.
Its finished measurement is approximately 49.5 × 71 cm. The relatively large hook compared with the fine yarn creates open fabric, which is useful when adapting this design toward a more delicate lace appearance.
Using Worsted Cotton
Worsted cotton creates firmer, heavier diamonds.
A 4–5.5 mm hook is common among published granny-square runner designs, but the exact hook should be selected from the motif dimensions rather than the yarn category alone.
If a worsted test motif reaches 20 cm before all decorative rounds are completed, use a smaller hook or remove one outer round rather than accepting an oversized center.
Changing the Color Palette
The photographed palette combines natural cream, muted sage, and ochre mustard.
For the closest match, keep cream as the common outer color on all five large motifs. That repeated border visually connects the otherwise alternating centers.
Other controlled three-color combinations include cream with dusty blue and rust, natural with olive and terracotta, or ivory with charcoal and muted gold.
Keep one color dominant across the joining borders.
Making All Five Centers Sage
Crochet Rounds 1–5 of every large motif in sage.
Retain cream for Rounds 6–10.
This produces a more regular runner and increases the visual repetition of the floral centers.
Use mustard only for the small side diamonds and tassel so the gold remains an accent rather than a competing primary color.
Making a Neutral Version
Use cream for three large centers and light taupe for two.
Replace sage accents with stone or mushroom and mustard accents with camel.
Maintain enough tonal contrast for the smaller diamonds to remain visible against the wooden table.
Using five nearly identical beige values can make the layered structure disappear from normal viewing distance.
Joining as You Go
Join-as-you-go is widely used in granny-square table runners. Salena Baca’s published pattern, for example, replaces selected chain spaces with slip stitches into the neighboring motif.
The technique can be applied here by joining during the final cream round.
However, blocking every motif first and sewing the connections afterward gives more control over the overlapping point geometry visible in the photograph.
Replacing the Tassel with a Second Loop
Make another ch-14 loop at the lower point instead of attaching the mustard tassel.
This creates symmetrical ends and reduces the finished length by approximately 9–10 cm.
It also makes the runner easier to wash because there are no long tassel strands to tangle.
Adding a Second Tassel
For symmetrical ends, omit the top loop and make a second mustard tassel.
Match the number of wraps and the 9–10 cm trimmed length.
Weigh or count the wraps rather than estimating visually; tassels of different density are obvious at opposite ends of a narrow runner.
Correcting a Motif That Cups
Cupping means the outer rounds do not contain enough circumference for the expanding square.
First confirm that every side repeat and corner chain is present.
If the stitch count is correct, increase the corner spaces slightly or move up 0.25–0.5 mm in hook size for the outer rounds.
Do not force severe cupping flat with blocking pins because the distortion will return after washing.
Correcting a Motif That Ruffles
Ruffling indicates excessive circumference.
Count every chain space and decorative shell.
If the counts are correct, reduce the hook size for the final rounds or shorten selected side chain spaces.
The blocked square should lie flat without needing extreme pin tension.
Correcting Uneven Diamond Points
Measure from the floral center to each of the four corners.
All measurements should be nearly equal.
If one corner is longer, check the chain count in that corner and the number of side repeats immediately beside it.
Correct the motif before assembly; the center line magnifies unequal points.
Correcting a Crooked Finished Runner
Lay a measuring tape through the centers of all five large flowers.
The centers should sit on one line.
If one motif rotates, reopen only that connection and adjust its 3–4 cm seam.
Do not try to correct a rotated diamond by pulling the opposite side with a small accent motif.
Final Blocking
After assembly, dampen the complete runner according to the yarn’s care instructions.
Pin the five large centers on one straight axis.
Set the widest large diamonds to approximately 28–30 cm from side point to side point.
Arrange the small accent motifs symmetrically but do not stretch them until they become the same width as the large diamonds.
Comb the mustard tassel straight and leave the runner untouched until completely dry.
Care and Storage
Wash according to the selected cotton yarn label. Place the runner in a mesh laundry bag if machine washing is permitted, particularly when the tassel remains attached.
Reshape the lace while damp.
Store the runner flat or loosely rolled around an acid-free cardboard tube. Avoid hanging the full weight from the small cream loop; the repeated load can stretch the upper corner and first motif connection.
Sources
Current size, gauge, hook, yarn-weight, and yardage benchmarks were checked against Lynne Samaan’s Granny Square Table Runner on Ravelry. The March 2024 pattern specifies Aran cotton-blend yarn, a 4.5 mm hook, 160–185 yards, and a blocked measurement of approximately 78.75 × 31.11 cm.
The designer’s original project page was also checked at D60 Crochet’s Granny Square Table Runner, which documents the use of traditional granny squares, granny stripes, and a single-crochet border.
A long floral-motif size comparison came from Stitching Together’s Boho Floral Granny Square Table Runner. Its published specifications include worsted cotton, a 5.5 mm hook, 4.5-inch squares, and an approximately 95 × 11-inch finished runner.
Adjustable cotton motif construction and join-as-you-go methodology were checked against Salena Baca’s Granny Square Table Runner on Ravelry, whose sample uses approximately 250 yards of worsted 100% cotton.
A second cotton granny-square benchmark came from Christina Hadderingh’s Granny Square Table Runner on Ravelry. The published design uses Aran 100% cotton with a 4 mm hook and measures approximately 76 × 45 cm.
A current 2026 tutorial showing granny-square joining and tassel finishing was reviewed through Handkala by Amrita’s Crochet Table Runner Tutorial.
Additional long-runner sizing was compared with the Stitching Together Granny Square Table Runner listing, which specifies an approximately 95 × 11-inch customizable runner in worsted yarn.
Conclusion
The five-diamond center line is the measurement that controls this runner. Block every large motif to the same 20 cm square before joining, align the floral centers, and attach the smaller sage and mustard diamonds only after that central structure lies flat. Your next step is to make one complete sage test motif and measure both its sides and diagonals after blocking. Save this crochet lace square table runner pattern to Pinterest or share the finished runner on Instagram with #SageLaceDiamondRunner. Would you keep the mustard side diamonds concentrated near the cream motifs as shown, or distribute all eight small accents evenly along the full runner? “`0









