Introduction
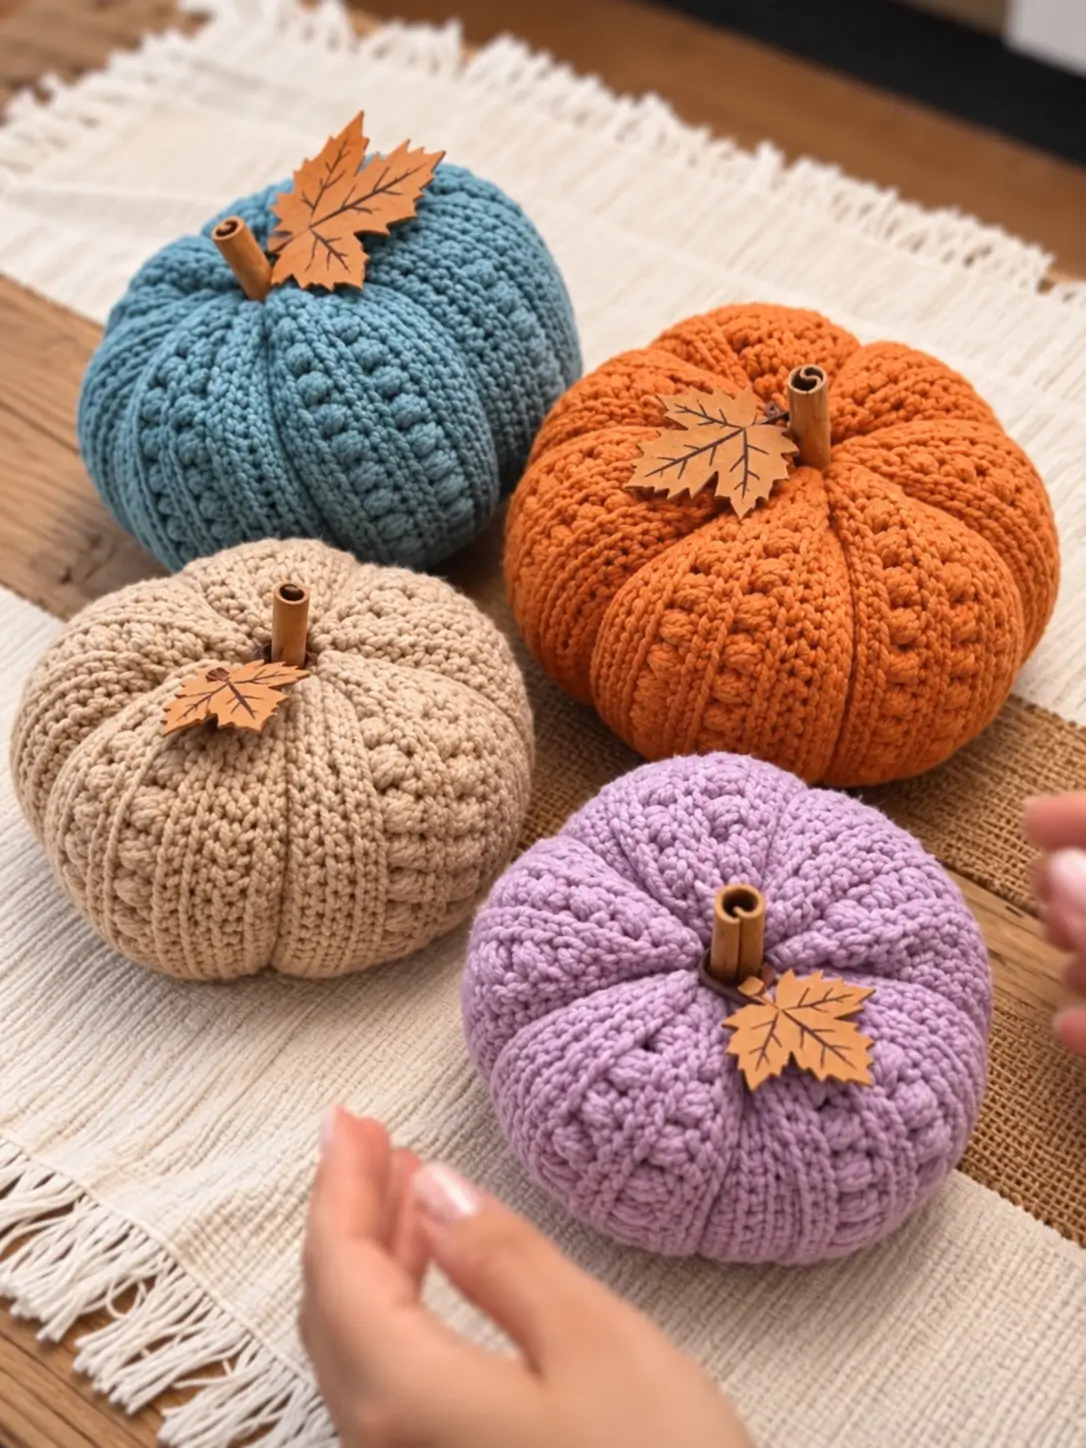
Each pumpkin in this set needs six deep valleys and raised cable panels before the cinnamon-stick stem can sit naturally in the crown. This textured cable crochet pumpkin pattern uses worsted yarn, a 4.5–5 mm hook, fiberfill, and post-stitch texture. The intermediate reconstruction makes four approximately 18–23 cm pumpkins in blue, orange, cream, and lavender for grouped tabletop displays.
The instructions below are an original photo-inspired reconstruction based on visible structure; published patterns cited later are used only for sizing, gauge, and material benchmarks.
The Design: What Makes These Cable Pumpkins Different
The photographed pumpkins combine two kinds of structure: narrow recessed ribs and broad raised panels carrying small cable-like motifs. That division matters because a uniformly ribbed rectangle would not reproduce the alternating surface visible in the image. Six external shaping strands compress the stuffed body into lobes, while post stitches and bobble-style crossings add relief inside each lobe. A deep gathered crown supports the cinnamon-stick stem without requiring a crocheted stalk. The four-color crochet pumpkin centerpiece also varies diameter slightly, preventing the group from reading as four identical copies. A common maker error is pulling the sculpting strands before the pumpkin is fully stuffed. The resulting grooves become narrow cuts instead of the broad, rounded valleys visible between the photographed lobes.
Project Info at a Glance
| Skill Level | Time | Finished Size | Hook | Best For |
|---|---|---|---|---|
| Intermediate | Approx. 3–5 hours each | Reconstruction target: 18–23 cm diameter | 4.5–5 mm | Fall centerpieces, shelves, tabletop displays |
The photographed dimensions cannot be measured directly, so the figures above are reconstruction targets. A useful published comparison is Salena Baca’s 2024 Cable Crochet Pumpkins design for Yarnspirations, which measures approximately 18 cm in diameter × 11.5 cm tall when stuffed. That pattern uses super-bulky Bernat Forever Fleece and a 6.5 mm hook. The reconstruction below uses a smaller hook with worsted yarn to produce more sharply defined ribs and cable texture.
Materials and Tools
Yarn
- Dusty blue — worsted #4 — approximately 100–125 g
- Pumpkin orange — worsted #4 — approximately 110–140 g
- Natural cream — worsted #4 — approximately 90–115 g
- Soft lavender — worsted #4 — approximately 90–115 g
- Matching shaping yarn — reserve approximately 8–12 g per pumpkin
A tightly plied matte acrylic, cotton-acrylic blend, or sturdy cotton gives better definition than fuzzy yarn. The cable panels rely on shadows between raised stitches, so a yarn that separates easily will make the post work harder to control.
Tools
- 4.5 mm crochet hook for dense worsted yarn
- 5 mm crochet hook if your fabric is excessively firm
- Polyester fiberfill — approximately 120–180 g per pumpkin
- Tapestry needle with a large eye
- Locking stitch markers
- Scissors
- Measuring tape
- Cinnamon sticks — approximately 6–8 cm long
- Decorative maple-leaf tags — optional
- Strong sewing thread — optional for securing natural stems
Abbreviations
- ch — chain
- sc — single crochet
- hdc — half double crochet
- dc — double crochet
- FPdc — front post double crochet
- BPdc — back post double crochet
- FPtr — front post treble crochet
- BLO — back loop only
- sl st — slip stitch
- st/sts — stitch/stitches
- RS — right side
- WS — wrong side
An invisible decrease is not required because the pumpkin body is constructed as a textured rectangle and shaped after seaming rather than decreased in continuous rounds.
Construction Overview
Each pumpkin begins as one flat rectangular panel.
The short dimension becomes the pumpkin’s approximate height. The long dimension wraps around the circumference.
After the short edges are joined, one opening is gathered, the body is stuffed, and the second opening is gathered around the cinnamon-stick stem. Six long strands then travel from the crown to the base and back, creating the pronounced lobes.
This construction is supported by several published crochet-pumpkin methods. Sarah Maker uses a ribbed rectangle that is seamed and gathered, while contemporary rectangle-pumpkin tutorials commonly recommend a panel length approximately 2.3–2.5 times its height.
Gauge and Panel Dimensions
Make a textured swatch before beginning.
Target approximately 15–17 stitches per 10 cm with worsted yarn and a 4.5–5 mm hook. Exact gauge is less important than producing fabric that conceals the stuffing while remaining flexible enough to gather.
For the medium pumpkin, target a finished panel approximately 18 cm high × 44–46 cm long.
The larger orange and blue pumpkins can use a panel approximately 20 cm high × 49–52 cm long. For the smaller cream and lavender versions, aim for approximately 16–17 cm high × 40–43 cm long.
Pattern — Step by Step
Medium Textured Pumpkin Body
Yarn: blue, orange, cream, or lavender worsted #4.
Ch 29.
Row 1: Hdc in second ch from hook and in every ch across. Turn. (28)
Row 2: Ch 1. Hdc BLO in first 4 sts, FPdc around next 4 sts, hdc BLO in next 4 sts, FPdc around next 4 sts, hdc BLO in next 4 sts, FPdc around next 4 sts, hdc BLO in final 4 sts. Turn. (28)
Row 3: Ch 1. Hdc BLO in first 4 sts, BPdc around next 4 post sts, hdc BLO in next 4 sts, BPdc around next 4 post sts, hdc BLO in next 4 sts, BPdc around next 4 post sts, hdc BLO in final 4 sts. Turn. (28)
Row 4: Repeat Row 2. (28)
Row 5: Ch 1. Hdc BLO in first 4 sts. Skip next 2 post sts, FPtr around each of following 2 posts, then work FPtr around each of the 2 skipped posts, crossing the second pair in front. Hdc BLO in next 4 sts. Repeat the cable crossing over the next 4-post panel. Hdc BLO in next 4 sts. Repeat the cable crossing over the final 4-post panel. Hdc BLO in final 4 sts. Turn. (28)
Row 6: Ch 1. Hdc BLO in first 4 sts, BPdc around next 4 posts, hdc BLO in next 4 sts, BPdc around next 4 posts, hdc BLO in next 4 sts, BPdc around next 4 posts, hdc BLO in final 4 sts. Turn. (28)
Row 7: Repeat Row 2. (28)
Row 8: Repeat Row 3. (28)
Rows 2–8 establish the alternating rib and cable texture.
Main Body Repeat
Repeat Rows 2–8 until the panel measures approximately 44–46 cm along its long edge without stretching.
Finish after Row 8 whenever possible so the seam joins equivalent texture sections.
Count 28 stitches after every row. A dropped edge stitch creates a tapered panel and will make the finished pumpkin noticeably narrower at one side of the seam.
Fasten off with a 90 cm tail.
Alternative Simplified Rib Panel
If the crossed FPtr stitches are too dense in the selected yarn, substitute four FPdc on every right-side cable row and four BPdc on every wrong-side cable row.
The pumpkin will retain raised vertical panels without the crossing motif.
This variation is useful for the smaller cream pumpkin because compact cable crossings can become visually crowded when the body diameter is reduced.
Large Orange Pumpkin
For the largest orange version shown in the photograph:
Ch 33.
Work the same textured arrangement across 32 stitches, distributing the additional stitches into the BLO sections.
A practical arrangement is:
5 hdc BLO, 4 cable sts, 5 hdc BLO, 4 cable sts, 5 hdc BLO, 4 cable sts, 5 hdc BLO. (32)
Continue until the panel measures approximately 49–52 cm.
The finished reconstruction target is approximately 21–23 cm diameter after stuffing and sculpting.
Large Dusty Blue Pumpkin
Use the same 32-stitch panel as the orange pumpkin.
Stop at approximately 48–50 cm if you want the blue version slightly taller and less broad.
Stuff the crown firmly enough to support the cinnamon stick but leave the outer 2–3 cm of each lobe compressible for sculpting.
Small Cream Pumpkin
Ch 25.
Hdc in second ch from hook and across. (24)
Divide the texture as:
3 hdc BLO, 4 cable sts, 4 hdc BLO, 4 cable sts, 3 hdc BLO, 3 cable sts, 3 hdc BLO.
Where only three cable stitches are available, work raised FPdc/BPdc rather than a four-stitch crossing.
Continue until the rectangle measures approximately 40–42 cm.
Finished reconstruction target: approximately 17–19 cm diameter.
Small Lavender Pumpkin
Work the same 24-stitch body used for the cream version.
Continue until the rectangle measures approximately 41–43 cm for a slightly fuller silhouette.
The lavender pumpkin in the reference is low and broad, so compress it vertically during shaping rather than overstuffing the crown.
Seaming the Body
Fold the rectangle so the two short ends meet.
Keep the textured right side facing inward while sewing.
Thread the long yarn tail onto the tapestry needle.
Whipstitch the two short edges together, matching every row carefully. Do not offset the rows.
Pull the seam only until the edges touch. An excessively tight seam creates one narrow vertical groove that differs from the sculpted grooves around the rest of the pumpkin.
Turn the tube right side out.
Closing the Bottom
Thread approximately 90 cm of matching yarn onto the tapestry needle.
Work a running stitch around one open edge, placing the needle through approximately every row end.
Pull gradually until the opening closes.
Pass the needle across the opening three or four times to reinforce the center.
Knot securely and carry the yarn into the inside of the tube.
Stuffing the Pumpkin
Add fiberfill in small pieces.
Fill the outer circumference first, then the center.
Rotate the pumpkin frequently so one side does not become denser than the others.
The body should be firm enough to recover when pressed but not packed so tightly that the external shaping strands cannot sink into the surface.
Leave a shallow depression at the crown.
Closing the Crown
Thread another long matching strand through the remaining open edge.
Work a running stitch around the full circumference.
Pull until the opening is approximately 1.5–2 cm wide.
Do not close it completely if using a cinnamon-stick stem.
Knot the gathering yarn securely but leave a long tail for additional crown shaping.
Creating Six Pumpkin Lobes
Cut a strand of matching yarn approximately 180–220 cm long.
Insert the needle through the bottom center and bring it out beside the crown opening.
Run the yarn down the outside of the pumpkin and insert the needle through the bottom center again.
Pull until a distinct groove forms.
Repeat at approximately equal intervals around the circumference until six grooves divide the body into six lobes.
Make a second pass through each groove if additional definition is needed.
Balancing the Lobes
Do not tighten one groove fully before positioning the others.
Make the first six passes with moderate tension.
Place the pumpkin on the table and inspect it from above.
Adjust the spacing until the six lobes are approximately equal.
Only then make the final tightening pass.
This technique prevents one large lobe from forcing the remaining five into narrow sections.
Cinnamon-Stick Stem
The reference uses a short brown tubular stem that can be reproduced with a real cinnamon stick.
Choose a piece approximately 6–8 cm long and 8–12 mm diameter.
Insert approximately 2–3 cm into the crown opening.
Pack a small amount of fiberfill around its base from inside if the opening remains accessible.
Use the gathering yarn to cinch the crown closely around the stem.
If the finished pumpkin is intended for households with small children or pets, substitute a sewn crochet stem instead of a loose natural stick.
Optional Crochet Stem
Yarn: brown worsted #4.
R1: 6 sc in MR. (6)
R2: Sc around. (6)
R3: Sc around. (6)
R4: Sc around. (6)
R5: Sc around. (6)
R6: Sc around. (6)
Fasten off with a 30 cm tail.
Stuff only the lower half lightly and sew the stem into the crown depression.
This six-stitch tubular construction is consistent with published pumpkin-stem methods that begin with six single crochet stitches and continue without increasing.
Optional Maple Leaf Accent
The photographed leaves appear to be decorative cut pieces rather than crochet. For an all-yarn version, add a small leaf beside the stem.
Yarn: rust, mustard, or brown DK/worsted.
Ch 11.
Starting in second ch from hook: sc in next 2 ch, hdc in next 2 ch, dc in next 3 ch, hdc in next ch, sc in next ch, 3 sc in final ch.
Rotate to work along the opposite side of the foundation chain.
Sc in next ch, hdc in next ch, dc in next 3 ch, hdc in next 2 ch, sc in final 2 ch.
Sl st at the base.
Fasten off with a 25 cm tail and sew beside the stem.
Optional Curled Vine
Yarn: matching leaf color.
Ch 21.
Starting in second ch from hook, work 2 sc in each chain across.
The increased stitches cause the chain to curl naturally.
Fasten off with a 25 cm tail and attach the vine beside the stem.
Published pumpkin topper patterns use the same principle of multiple stitches in each chain to form compact twirls.
Assembly
- Crochet one complete textured rectangle in the selected pumpkin color, maintaining the same stitch count on every row and checking the panel dimensions before seaming.
- Fold the panel so its short edges meet, align the textured rows, and whipstitch the seam without pulling it narrower than the surrounding rib sections.
- Gather the bottom opening with a running stitch through every row end, pull the center closed, and reinforce the closure with three or four crossing stitches.
- Turn the body right side out and add fiberfill gradually, keeping the circumference firm while leaving the crown slightly softer for compression.
- Gather the top edge to an opening approximately 1.5–2 cm wide and create a shallow crown depression before securing the gathering strand.
- Run six long matching yarn passes from crown to base at equal intervals, initially using moderate tension so the lobe spacing can still be corrected.
- Inspect the pumpkin from above, redistribute the six grooves, then tighten each shaping strand until the lobes become rounded and clearly separated.
- Insert the 6–8 cm cinnamon stick approximately 2–3 cm into the crown, or sew the optional six-stitch crochet stem into the same recessed position.
- Attach one decorative maple leaf or crocheted leaf beside the stem and add the optional curled vine without covering the central cable panels.
- Weave all remaining yarn tails through at least 6 cm of dense fabric, reshape the lobes by hand, and set the pumpkin on a flat surface to check that the base remains stable.
The completed pumpkin should have six rounded lobes, alternating rib and cable texture, a recessed crown, and a short centered brown stem.
7 Technical Tips
- The cable panels flatten after stuffing: keep the stuffing approximately 2–3 cm behind the outer surface rather than packing hard fiberfill directly beneath each post stitch. Excessive pressure from inside can spread the cable crossings and reduce their visible relief.
- The rectangle tapers toward one end: count all 28 stitches after every fifth row and mark both edge stitches. Losing only one edge stitch repeatedly produces a diagonal seam that remains visible after gathering.
- The six lobes have different widths: place six temporary markers around the crown before tightening the shaping strands. Each groove should occupy roughly one-sixth of the circumference before the final compression pass.
- The crown forms a pointed cone: remove a small amount of stuffing from the upper 2–3 cm and pull the gathering yarn downward through the center. Too much stuffing directly beneath the stem prevents the shallow depression visible in the reference.
- The cinnamon stick leans sideways: insert at least 2 cm of stem into the center and compress stuffing evenly around its base. A stem supported only by the gathered surface opening acts as a loose pivot.
- The bottom rocks on the table: push the gathered base approximately 1 cm upward into the pumpkin after closing it. Leaving the gathering knot below the surrounding lobes creates a hard central bump.
- The sculpting yarn becomes visible: use matching yarn and guide each strand into a natural recessed rib before tightening. A strand crossing the center of a raised cable panel remains visible even after strong compression.
Published Cable Pumpkin Benchmark
Salena Baca’s Cable Crochet Pumpkins, published through Yarnspirations in August 2024, provides a particularly relevant technical comparison. The design uses Bernat Forever Fleece, classified as super bulky, with a 6.5 mm hook.
The published finished measurement is approximately 7½ inches / 18 cm in diameter × 4½ inches / 11.5 cm tall. The construction combines continuous single crochet rounds with cable texture formed from double-crochet post stitches. A cinnamon stick is used as the topper.
Those documented features closely support the scale, post-stitch texture, and natural-stem approach selected for this reconstruction, while the body construction here remains independently written.
Rectangle Pumpkin Benchmark
Rectangle construction is widely documented for crochet pumpkins. Sarah Maker’s three-size pumpkin begins with a flat BLO panel and uses a 4 mm hook with worsted yarn.
The large version uses a 30-stitch shaped row repeated until the piece measures approximately 12 inches / 30.5 cm along the long dimension. After seaming, both openings are gathered and long vertical stitches may be added to shape the pumpkin.
This establishes a useful precedent for using a flat ribbed panel when the final object needs strong vertical segmentation.
Published Ribbed Pumpkin Size Benchmark
Handy Little Me publishes another ribbed rectangle pumpkin with a finished rectangle around 5 × 8 inches. Its finished pumpkin measures approximately 13 inches in circumference × 6 inches high.
The documented gauge is approximately 6.6 stitches × 8 rows per 10 cm in back-loop single crochet.
That design is considerably smaller than the pumpkins in the reference, but it demonstrates how a relatively simple ribbed rectangle expands into a rounded stuffed form after gathering.
Why the Reconstruction Uses Worsted Yarn
The photograph shows individual stitch anatomy more clearly than many plush super-bulky pumpkin patterns. Raised posts, narrow recessed ribs, and cable crossings remain sharply visible.
Worsted yarn supports that definition.
It also allows the smaller cream and lavender pumpkins to retain the same structural pattern without becoming disproportionately large. Super-bulky yarn can reproduce the overall form faster, but each cable crossing occupies considerably more surface area.
Using Super-Bulky Yarn Instead
For a faster version closer to the published Yarnspirations cable pumpkin scale, use super-bulky yarn and begin testing with a 6.5 mm hook.
Do not retain the 28-stitch worsted panel automatically.
Make a swatch and calculate the number of stitches required for an 18–20 cm panel height. Fewer stitches and fewer repeat rows will be required because each super-bulky stitch covers more area.
Choosing the Four Colors
The reference combines dusty teal-blue, burnt pumpkin orange, oatmeal cream, and soft lavender.
The colors are deliberately different in temperature while sharing similar saturation. None is neon, and the cream provides a neutral break between the stronger shades.
For the closest reconstruction, select:
- Muted blue / dusty teal
- Burnt orange / pumpkin
- Oatmeal / natural cream
- Lavender / pale violet
Changing the Pumpkin Size
The rectangle method scales predictably.
Choose the desired pumpkin height first. Crochet a panel whose short edge is close to that measurement.
Then make the long edge approximately 2.3–2.6 times the short edge. A longer rectangle creates a broader pumpkin; a shorter rectangle creates a more upright shape.
Recent rectangle-pumpkin tutorials use essentially the same proportion, with approximately 2.5 times the panel height as a practical circumference starting point.
Mini Pumpkin Version
For a mini approximately 10–12 cm diameter, use DK yarn and a 3.5–4 mm hook.
Make a panel approximately 10 cm high × 24–26 cm long.
Use four narrow raised panels rather than three large four-stitch cables. Small pumpkins need finer texture so the cable motif does not occupy an entire lobe.
Extra-Large Pumpkin Version
For a pumpkin approximately 28–30 cm diameter, use worsted yarn held double or bulky #5 yarn.
Target a panel approximately 24 cm high × 60–64 cm long.
Increase the number of cable panels rather than simply widening the plain rib sections. Keeping raised texture distributed across the circumference prevents large blank areas between motifs.
Stuffing Density
The correct stuffing density is firm but compressible.
Test by pressing one lobe inward approximately 2 cm. It should recover without leaving a permanent hollow.
If the surface feels hard and the shaping yarn cannot sink into the grooves, remove fiberfill. If the lobes collapse under their own weight, add small amounts around the outer circumference.
Creating a Flatter Pumpkin
Use a slightly longer rectangle but reduce the stuffing at the crown and base.
After closing both ends, run a separate strong yarn strand directly through the center from top to bottom.
Pull until the pumpkin loses approximately 2–3 cm of height.
Secure that compression before adding the six external sculpting grooves.
Creating a Taller Pumpkin
Increase the short panel dimension without increasing the long dimension at the same rate.
For example, a 20 cm high panel with a 46 cm circumference panel creates a more upright form than an 18 × 46 cm panel.
Do not overcompress the top-to-bottom center strand after stuffing.
Why Six Lobes Work Here
The photographed pumpkins show approximately six major rounded sections. Six provides enough segmentation to produce a recognizable pumpkin without dividing the cable panels into narrow strips.
Eight shaping strands would create smaller lobes and a more deeply fluted appearance.
Four would create very broad quarters. That can work for miniature pumpkins but would not reproduce the proportions visible in this group.
Making Eight Lobes
Mark the crown into eight equal intervals.
Run eight sculpting passes from top to bottom.
Use slightly less tension than for the six-lobe version because eight grooves collectively compress the body more strongly.
Position the grooves between raised cable sections wherever possible.
Replacing the Cinnamon Stick
A small twig can replace the cinnamon stick if it is clean, dry, and free from loose bark.
A crocheted stem is the washable alternative.
For decorations likely to be stored in humid conditions, yarn is more predictable than natural plant material. Remove natural stems before washing the crochet body.
Adding the Decorative Leaf
The reference shows a flat maple-style leaf near each stem. A wooden, felt, faux-leather, or crocheted leaf can reproduce that element.
Keep the leaf between approximately 4 and 6 cm wide on the medium pumpkins.
A larger leaf can conceal the crown shaping and obscure the textured cable work immediately below the stem.
Correcting a Loose Cable
Post stitches need slightly more working yarn than ordinary hdc because they travel around the stitch body.
Do not compensate by drawing the loop excessively high.
If the crossing forms a loose arch, remake it with the working loop close to the hook shaft. The cable should project from the surface without forming an open loop.
Correcting a Tight Cable
A cable crossing that pulls the panel inward needs additional loop height.
Use FPtr rather than FPdc for the crossing row if necessary.
The extra height allows one pair of stitches to travel across the other without shortening the width of the four-stitch panel.
Correcting a Visible Seam
Match every row before sewing the short edges.
Place a marker at both ends and another at the midpoint.
Whipstitch from marker to marker while keeping the tension equal to the surrounding fabric.
After stuffing, position the seam inside one of the six sculpted grooves so the compression hides most of it.
Correcting an Off-Center Stem
View the pumpkin directly from above before permanently tightening the crown.
The stem must sit where the six grooves converge.
If it falls inside one lobe, reopen the gathering slightly and reposition the crown center. Do not compensate by bending the cinnamon stick because the underlying geometry will remain visibly uneven.
Correcting an Uneven Base
A gathered base often creates a small central knot.
Push that knot upward into the stuffed body with your thumb.
Add a few horizontal reinforcement stitches across the opening if necessary.
The surrounding lobes should contact the table before the center closure does.
Making the Set as a Centerpiece
Varying the diameters by approximately 2–4 cm creates a more natural grouped arrangement.
Place the two larger pumpkins toward the rear and the cream and lavender versions toward the front.
Keep the cinnamon stems at slightly different angles rather than forcing every one perfectly vertical.
The cable texture remains the common structural element that connects the four colors.
Care and Storage
Follow the yarn manufacturer’s washing instructions. Remove cinnamon sticks, wooden leaves, and other natural or rigid embellishments before washing whenever they are detachable.
Reshape the lobes while the crochet is dry or nearly dry.
For seasonal storage, place the pumpkins in a container large enough that the lobes are not compressed for months. Long-term pressure can flatten the cable relief and permanently bend natural stems.
Sources
Salena Baca / Yarnspirations — Cable Crochet Pumpkins: published August 2024; super-bulky Bernat Forever Fleece, 6.5 mm hook, post-stitch cable construction, cinnamon-stick topper, and an approximately 18 cm diameter × 11.5 cm finished size. 0
Sarah Maker — Free Crochet Pumpkin Pattern: 3 Sizes + Any Yarn: documents worsted yarn with a 4 mm hook, BLO rectangle construction, seaming, gathering, stuffing, optional vertical shaping stitches, and both natural and crocheted stem options. 1
Handy Little Me — Crochet Pumpkin Pattern: provides a ribbed rectangle benchmark, including an approximately 5 × 8-inch panel, 13-inch finished circumference, 6-inch height, and documented back-loop single-crochet gauge. 2
ChristaCoDesign — Crochet Pumpkin Stem, Leaf and Vine Pattern: documents a worsted cotton pumpkin topper with a 5 mm hook, six-stitch stem construction, leaf instructions, and curled-vine components. 3
HanJan Crochet — Easy Crochet Pumpkins Pattern: provides another six-stitch crochet stalk together with chain-based twirls and a shaped crochet leaf, useful as technical references for washable topper alternatives. 4
Crochet Pattern Studio — Ribbed Pumpkin From a Rectangle: documents hdc BLO rectangle construction and a practical long-edge proportion of approximately 2.3–2.5 times the short edge for stuffed pumpkin shaping. 5
SeeLoveShare — Cable Stitch Crochet Pumpkin: provides a current market comparison for decorative crochet pumpkins using raised cable-stitch texture rather than plain ribbing. 6
Conclusion
The defining measurements are the panel proportion, six evenly spaced sculpting grooves, and a crown deep enough to support the short cinnamon stem. Make the cream or lavender size first if you want to test the cable crossings with less yarn, then scale the same construction for the larger blue and orange pumpkins. Keep every shaping strand between raised panels and check the silhouette from above before tightening. Save this textured cable crochet pumpkin pattern to Pinterest or share the completed four-color set on Instagram with #CablePumpkinSet. Your next step is a 15 cm cable swatch: would you arrange the finished centerpiece blue-orange-cream-lavender as pictured, or make all four pumpkins in one autumn color? “`7









