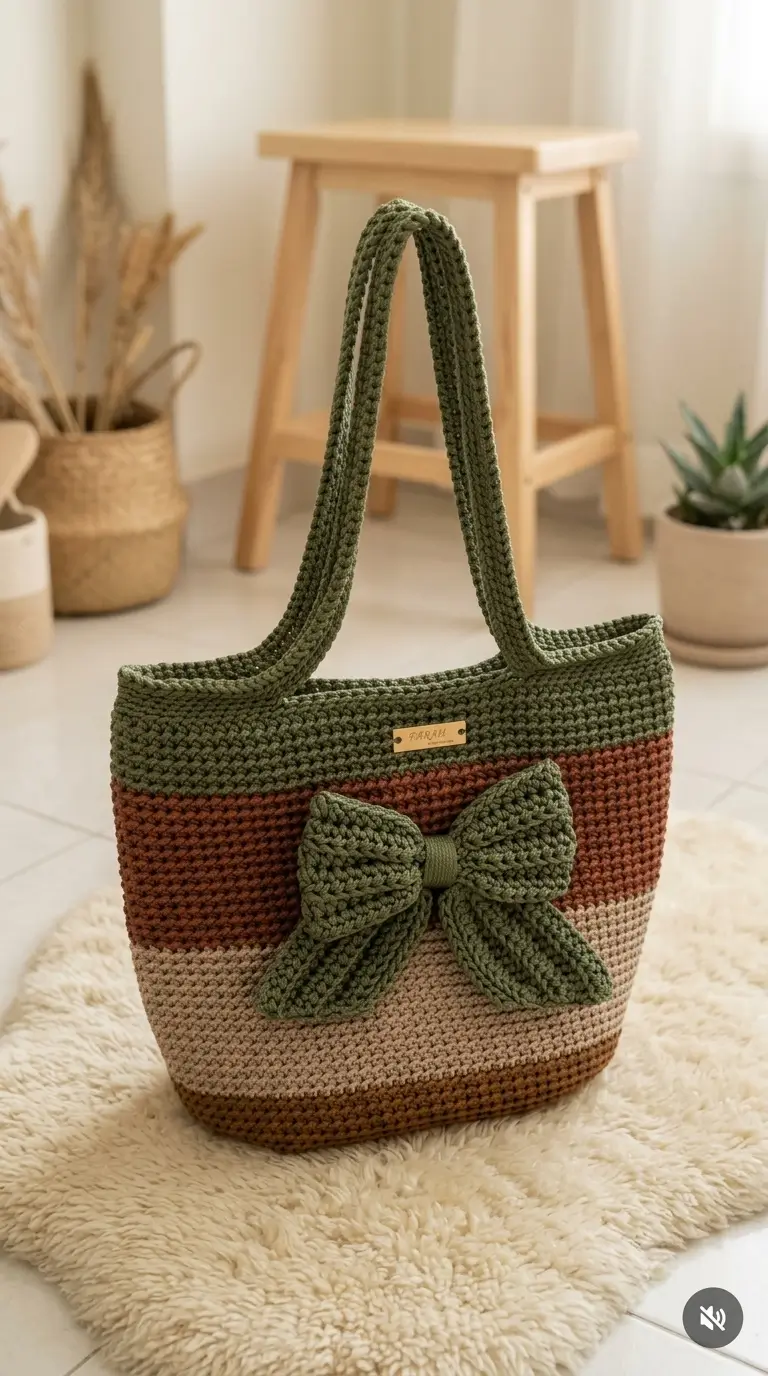
The bow on this tote spans almost half the front panel, so its weight has to be controlled before the first tail is attached. This striped crochet tote bag with bow pattern uses 2 mm cord, a 3.0 mm hook and four color zones to produce a roughly 38 × 26 × 10 cm shoulder bag. The project suits an intermediate crocheter and produces a structured everyday carrier with fewer stretch problems than loose mesh construction.
The Design: What Makes This Bow Tote Different
Three structural decisions define the photographed bag. First, the base is worked flat before the wall is picked up around all four edges; that gives the lower brown section a rectangular footprint rather than a rounded bucket shape. Second, every body round maintains the same stitch count, so the rust, beige and olive stripes rise vertically without unintended flare. Third, the oversized bow is built separately and stitched across several rows of the upper panel. Spreading its attachment points prevents the crochet bow tote bag decoration from pulling one small area inward.
Handle width matters too. A narrow cord strap can cut into the hand and stretch its anchor stitches, so this crochet cord tote bag uses eight-stitch-wide straps. A common error is placing both strap ends too close to the side seams; that makes the mouth fold sharply when loaded.
Project Info at a Glance
| Skill Level | Time | Finished Size | Hook | Best For |
|---|---|---|---|---|
| Intermediate | 10–14 hours | Approx. 38 × 26 × 10 cm | 3.0 mm | Shoulder carry, everyday items, yarn projects |
The 38 × 26 × 10 cm sizing and 3.0 mm hook are based on a documented tote made with 2 mm polypropylene cord.
Materials and Tools
Yarn
For the closest visual result, choose firm 2 mm braided cord. Polypropylene gives a crisp bag body; cotton-polyester cord gives a softer surface while still retaining more shape than ordinary spun acrylic.
- Olive green — 2 mm cord — about 170 g working allowance — use for upper body, handles and bow
- Rust brown — 2 mm cord — about 90 g working allowance
- Warm beige — 2 mm cord — about 90 g working allowance
- Medium brown — 2 mm cord — about 50 g working allowance
The 400 g total is a practical benchmark for a similarly sized tote made with 2 mm polypropylene cord. The per-color division above is based on the relative areas visible in the photographed bag.
Actual cord consumption can vary considerably with cord diameter, stitch tension and finished measurements. Purchase a small additional allowance when exact dye-lot matching matters.
Tools
- 3.0 mm crochet hook
- 4 locking stitch markers
- Yarn needle suitable for cord
- Sharp scissors
- Tape measure
- Pins or removable clips
- Optional 3–4 cm rectangular maker label
- Optional lightweight fabric lining
Abbreviations
- ch = chain
- sc = single crochet
- sl st = slip stitch
- st / sts = stitch / stitches
- BLO = back loop only
- RS = right side
- R = row
- Rnd = round
An invisible decrease is not required in this rectangular bag; reducing the body count would taper the sides and change the photographed silhouette.
Pattern — Step by Step
The base is worked in rows. After the perimeter pickup, the bag wall is worked in a continuous spiral. Place a marker in the first stitch and move it at every round.
Base
Yarn: medium brown
Ch 49.
R1: Sc in 2nd ch from hook and across. (48)
R2: Ch 1, turn, sc across. (48)
R3: Ch 1, turn, sc across. (48)
R4: Ch 1, turn, sc across. (48)
R5: Ch 1, turn, sc across. (48)
R6: Ch 1, turn, sc across. (48)
R7: Ch 1, turn, sc across. (48)
R8: Ch 1, turn, sc across. (48)
R9: Ch 1, turn, sc across. (48)
R10: Ch 1, turn, sc across. (48)
R11: Ch 1, turn, sc across. (48)
R12: Ch 1, turn, sc across. (48)
Do not fasten off.
Measure the rectangle. The target is approximately 38 cm long × 10 cm deep after the first perimeter round settles. If your cord creates a substantially shorter rectangle, add foundation stitches in pairs rather than switching to a loose hook.
Body Wall
Yarn: medium brown → warm beige → rust brown → olive green
Work around all four edges of the base.
Rnd 1: Sc 48 across long edge, sc 12 evenly down short edge, sc 48 across opposite long edge, sc 12 up final short edge. (120)
Place the marker before the next stitch.
Rnd 2: Sc around. (120)
Rnd 3: Sc around. (120)
Rnd 4: Sc around. (120)
Rnd 5: Sc around. (120)
Rnd 6: Sc around. (120)
Change to warm beige.
Rnd 7: Sc around. (120)
Rnd 8: Sc around. (120)
Rnd 9: Sc around. (120)
Rnd 10: Sc around. (120)
Rnd 11: Sc around. (120)
Rnd 12: Sc around. (120)
Rnd 13: Sc around. (120)
Rnd 14: Sc around. (120)
Rnd 15: Sc around. (120)
Rnd 16: Sc around. (120)
Rnd 17: Sc around. (120)
Rnd 18: Sc around. (120)
Rnd 19: Sc around. (120)
Change to rust brown.
Rnd 20: Sc around. (120)
Rnd 21: Sc around. (120)
Rnd 22: Sc around. (120)
Rnd 23: Sc around. (120)
Rnd 24: Sc around. (120)
Rnd 25: Sc around. (120)
Rnd 26: Sc around. (120)
Rnd 27: Sc around. (120)
Rnd 28: Sc around. (120)
Rnd 29: Sc around. (120)
Rnd 30: Sc around. (120)
Rnd 31: Sc around. (120)
Rnd 32: Sc around. (120)
Rnd 33: Sc around. (120)
Change to olive green.
Rnd 34: Sc around. (120)
Rnd 35: Sc around. (120)
Rnd 36: Sc around. (120)
Rnd 37: Sc around. (120)
Rnd 38: Sc around. (120)
Rnd 39: Sc around. (120)
Rnd 40: Sc around. (120)
Rnd 41: Sc around. (120)
Rnd 42: Sc around. (120)
Rnd 43: Sc around. (120)
Rnd 44: Sc around. (120)
Rnd 45: Sc around. (120)
Rnd 46: Sc around. (120)
Rnd 47: BLO sc around to form a defined top edge. (120)
Rnd 48: Sc around through both loops. (120)
Sl st into the next 2 sts to soften the height transition. Fasten off and weave the tail through at least 5 cm of dense fabric.
The finished wall should measure approximately 26 cm high.
Shoulder Handles — Make 2
Yarn: olive green
Ch 9.
R1: Sc in 2nd ch from hook and across. (8)
R2: Ch 1, turn, sc across. (8)
R3–R70: Repeat R2. (8)
After R70, measure the strap. Continue in 8-sc rows until the strip reaches approximately 54 cm, because cord gauge can alter row height significantly.
Do not make the second handle by counting rows alone if its tension differs. Lay the completed strips together and match their physical lengths.
Fasten off. Leave a 30 cm sewing tail at both ends of each handle.
Bow Loop Panel
Yarn: olive green
Ch 31.
R1: Sc in 2nd ch from hook and across. (30)
R2: Ch 1, turn, sc across. (30)
R3: Ch 1, turn, sc across. (30)
R4: Ch 1, turn, BLO sc across. (30)
R5: Ch 1, turn, sc across. (30)
R6: Ch 1, turn, sc across. (30)
R7: Ch 1, turn, BLO sc across. (30)
R8: Ch 1, turn, sc across. (30)
R9: Ch 1, turn, sc across. (30)
R10: Ch 1, turn, BLO sc across. (30)
R11: Ch 1, turn, sc across. (30)
R12: Ch 1, turn, sc across. (30)
R13: Ch 1, turn, BLO sc across. (30)
R14: Ch 1, turn, sc across. (30)
R15: Ch 1, turn, sc across. (30)
R16: Ch 1, turn, BLO sc across. (30)
R17: Ch 1, turn, sc across. (30)
R18: Ch 1, turn, sc across. (30)
Fasten off. Leave a 25 cm tail.
Fold the two short ends toward the center so they overlap by roughly 1 cm. Stitch through the overlap to form one broad loop. Compress the center into three accordion folds before adding the wrap.
Bow Tails — Make 2
Yarn: olive green
Ch 19.
R1: Sc in 2nd ch from hook and across. (18)
R2: Ch 1, turn, sc across. (18)
R3: Ch 1, turn, sc across. (18)
R4: Ch 1, turn, sc across. (18)
R5: Ch 1, turn, sc across. (18)
R6: Ch 1, turn, sc across. (18)
R7: Ch 1, turn, sc across. (18)
R8: Ch 1, turn, sc across. (18)
R9: Ch 1, turn, sc across. (18)
R10: Ch 1, turn, sc across. (18)
R11: Ch 1, turn, sc across. (18)
R12: Ch 1, turn, sc across. (18)
R13: Ch 1, turn, sl st first 2 sts, sc 14, leave final 2 sts unworked. (14)
R14: Ch 1, turn, sl st first 2 sts, sc 10, leave final 2 sts unworked. (10)
R15: Ch 1, turn, sl st first 2 sts, sc 6, leave final 2 sts unworked. (6)
R16: Ch 1, turn, sl st first st, sc 4, leave final st unworked. (4)
Fasten off and leave a 20 cm sewing tail.
The stepped reductions create the pointed lower end. Place one tail slightly behind the other when assembling the bow so the pair angles outward rather than hanging as one thick block.
Bow Center Wrap
Yarn: olive green
Ch 8.
R1: Sc in 2nd ch from hook and across. (7)
R2: Ch 1, turn, sc across. (7)
R3: Ch 1, turn, sc across. (7)
R4: Ch 1, turn, sc across. (7)
R5: Ch 1, turn, sc across. (7)
R6: Ch 1, turn, sc across. (7)
R7: Ch 1, turn, sc across. (7)
R8: Ch 1, turn, sc across. (7)
R9: Ch 1, turn, sc across. (7)
R10: Ch 1, turn, sc across. (7)
R11: Ch 1, turn, sc across. (7)
R12: Ch 1, turn, sc across. (7)
Fasten off with a 25 cm tail.
Wrap the strip around the compressed bow center and both tail tops. Overlap the short ends on the back and stitch them together before attaching the finished bow to the bag.
Optional Maker Label
The photographed tote includes a small rectangular label centered above the bow. This is not a crocheted component.
Choose a washable sew-on label around 30–40 mm wide. Stitch only through the outer crochet layer if a fabric lining has already been fitted, or attach the label before lining installation.
Assembly
- Shape the empty bag to approximately 38 cm wide × 26 cm high × 10 cm deep. Do not stretch the cord beyond its natural resting dimensions.
- Mark the center of the front and back panels, then mark each side fold. Check that both 60-stitch panel halves are equal before adding the handles.
- Position the first handle ends about 9–10 cm from the center line, keeping both attachment patches the same distance below the top edge. Pin or clip each end across approximately 5 cm of the olive band.
- Attach each strap with two horizontal rows of small backstitches plus one vertical pass along both outer edges. Repeat for the second handle and compare their finished heights before securing the tails.
- Place the bow loop horizontally on the front panel. Its center should sit on the vertical midpoint of the bag, with the upper loop below the maker label.
- Position the two pointed tails beneath the loop. Angle them approximately 25–35 degrees away from the vertical center so both lower points remain visible.
- Stitch the tail tops to the bag first, then attach the bow loop through its center folds. Add two hidden anchoring stitches near each outer loop if heavy cord makes the bow tip forward.
- Sew the center wrap firmly against the bag through its back layer. Do not stitch through the visible front face of the wrap.
- Attach the optional maker label above the bow, then inspect the inside for loose cord ends. Weave every load-bearing tail through multiple neighboring stitches rather than trimming beside a knot.
- Add a fabric lining if the tote will carry pens, keys or other narrow objects. The bag is complete when both straps share the load evenly and the bow remains centered while the tote is suspended.
7 Technical Tips
- Stitch-marker drift: Move the round marker after every completed lap of the 120-stitch body. Missing the true first stitch by even one position per round creates a diagonal color-change seam.
- Wall distortion: Do not stretch the bag over a rigid form that is more than 10 cm deep. Excess outward pressure at the base rounds the side transitions.
- Unwanted decreases: An accidental decrease in a 120-stitch body round creates a visible inward track through the stripes. Count every fifth round and confirm that 120 sts remain.
- Handle-placement failure: Keep paired handle attachment points within 3 mm of the same height on both sides. A higher anchor on one end produces a twisted strap when the tote hangs.
- Cord-tension failure: With 2 mm polypropylene, check that the 3.0 mm hook can pass through each stitch without splitting or whitening the cord. If the fabric becomes rigid enough to crease, reduce hand tension.
- Bow-pinning failure: Pin the bow at its center and at least two points on each outer loop before sewing. A single central attachment allows a cord bow this large to rotate or curl away from the front panel.
- Tail-weaving failure: Leave at least 20–30 cm for handle and bow attachment tails. Weave them through several stitch directions so repeated flexing does not pull the ends free.
Conclusion
Before cutting the remaining olive cord, load the finished bag with roughly the weight you expect it to carry and check both handle anchors for equal tension. Photograph the front while the tote is hanging; that angle makes bow rotation, uneven tail placement and a sloping top edge easier to detect. Save the finished striped crochet tote bag with bow pattern to Pinterest and share the completed version on Instagram with #StripedBowTote. Record any hook or cord changes beside the pattern before making a second bag. For the next version, would you keep the photographed olive bow or switch its color to the rust stripe for stronger contrast?









