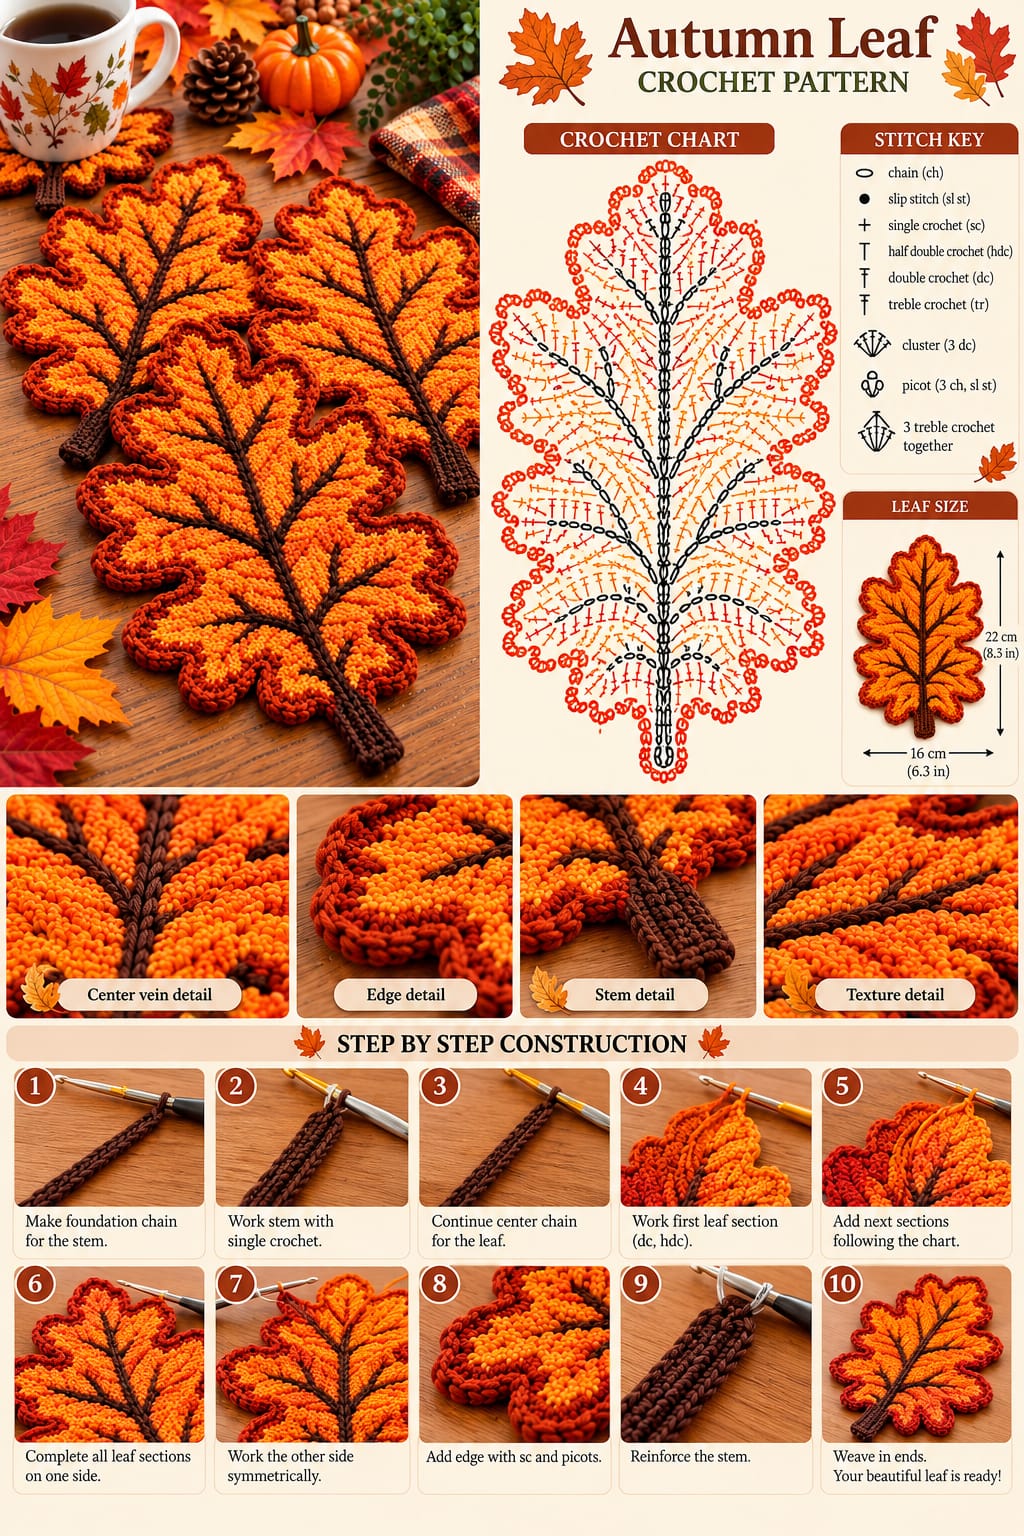
Oak leaves need rounded lobes, not maple-style points, and that distinction controls the entire construction. This crochet oak leaf pattern recreates the large orange reference using DK yarn, contrasting rust and brown, and a 3–3.5 mm hook. The target size is approximately 22 × 16 cm, making the finished piece suitable for a table mat, oversized appliqué, wreath component, or autumn garland centerpiece.
The Design: What Makes This Oak Leaf Different
The first structural decision is scale. Published oak-leaf motifs commonly measure roughly 7–15 cm, while the reference is labeled 22 cm long, so this version uses an extended central spine and broad lobes rather than simply changing to an oversized hook.
Second, the autumn crochet leaf has three visible color systems: orange for the blade, rust for the border, and dark brown for the veins and stem. That surface crochet changes a plain crochet leaf applique into a more botanical graphic.
The third decision concerns the edge. Oak lobes must rise and fall gradually. Tall stitches create outward curves; short stitches pull the fabric inward between lobes. A common error is replacing those transitions with sharp picots, which makes the silhouette read more like a maple leaf.
Project Info at a Glance
| Skill Level | Time | Finished Size | Hook | Best For |
|---|---|---|---|---|
| Intermediate | 2–3 hours | Approx. 22 × 16 cm | 3–3.5 mm | Table décor, wall pieces, garlands, large appliqués |
The 22 × 16 cm dimensions correspond to the reference design. Hook size, yarn thickness, individual tension, and blocking can change the final measurements.
Materials and Tools
Yarn
- Burnt orange — DK/light-worsted — allow 20–30 g — a smooth cotton or cotton-acrylic yarn gives the lobes clear definition.
- Rust red — DK/light-worsted — allow 5–10 g — used for the contrasting perimeter.
- Dark brown — DK/light-worsted — allow 5–10 g — used for the center vein, branching veins, and stem.
The yarn quantities are working allowances for the enlarged leaf. Actual consumption depends on yarn construction, tension, hook size, and the number of surface-crochet details added.
Tools
- 3.5 mm crochet hook
- Yarn needle
- Scissors
- 8–12 stitch markers
- Blocking pins
- Blocking mat
- Optional fabric stiffener for decorative leaves that need to remain flat
Abbreviations
- ch — chain
- sl st — slip stitch
- sc — single crochet
- hdc — half double crochet
- dc — double crochet
- tr — treble crochet
- dtr — double treble crochet
- st/sts — stitch/stitches
- RS — right side
- FO — fasten off
- BLO — back loop only
Invisible decreases are unnecessary here because the motif is constructed flat and shaped through changes in stitch height rather than reductions in stuffed rounds.
Crochet Oak Leaf Pattern — Step by Step
This construction works around a long foundation chain. Changes between single crochet, half double crochet, double crochet, and treble crochet create the rounded oak lobes.
Central Spine and Foundation
Yarn: burnt orange.
Ch 32.
Working into the second chain from the hook:
Row 1A: sc in next 5 ch, hdc in next 5 ch, dc in next 10 ch, hdc in next 5 ch, sc in next 5 ch. Work 5 sc into the final chain to turn around the tip.
Continue down the unused loops on the opposite side:
Row 1B: sc in next 5, hdc in next 5, dc in next 10, hdc in next 5, sc in next 5.
Do not cut the yarn. The narrow oval produced here acts as the structural core of the leaf.
Place markers at the tip, base, and approximate positions where each lobe will rise.
First Lower Lobe — Side A
Work sc, hdc, 2 dc across the next stitches.
In the next stitch work (2 tr, ch 2, 2 tr).
Work 2 dc, hdc, sc across the following stitches.
Sl st into the next stitch to create the indentation between lobes.
The tall center stitches push this section outward while the slip stitch pulls the following valley inward.
Second Lobe — Side A
Sc in next st, hdc in next st, dc in next st.
Work (dc, 3 tr, dc) into the next stitch.
Dc in next st, hdc in next st, sc in next st.
Sl st in next st.
Keep this lobe slightly wider than the first. The leaf expands toward the middle rather than maintaining identical lobe sizes from base to tip.
Third Lobe — Side A
Hdc in next st, dc in next st.
Work 2 tr in next st, (tr, dtr, tr) in next st, 2 tr in next st.
Dc in next st, hdc in next st.
Sl st in next st.
This section forms one of the widest portions of the leaf.
Upper Lobe — Side A
Sc in next st, hdc in next st, dc in next st.
Work (2 dc, 2 tr, 2 dc) into the next stitch.
Dc in next st, hdc in next st, sc in next st.
Sl st toward the terminal section.
Terminal Lobe
Work hdc, dc, tr toward the center tip.
At the marked tip work (2 tr, dtr, ch 2, sl st in second ch from hook, dtr, 2 tr).
Mirror the preceding stitches with tr, dc, hdc.
The small chain detail sharpens the terminal end without turning every side lobe into a pointed maple-style section.
Side B Lobes
Work down the second side by reversing the sequence:
Upper lobe → third/widest lobe → second lobe → lower lobe.
Match each indentation to the corresponding indentation on Side A. Exact symmetry is more important than adding an extra stitch simply to fill an unexpected gap.
Fold the leaf lengthwise along its foundation chain to check the shape. Corresponding lobes should overlap within roughly 5 mm.
Fasten off orange.
Rust Contrast Edge
Yarn: rust red.
Join the rust yarn at the base with the right side facing upward.
Work one sl st or tight sc in each available edge stitch around the leaf. At each rounded lobe, place 2 sc into the highest stitch if the edge pulls inward.
At every valley between lobes, use a sl st instead of an increase. This preserves the indentation.
At the terminal point work (sc, ch 1, sc).
Continue down the second side and join at the base.
Fasten off, leaving a 12 cm tail.
The border should frame the orange section rather than create another full lobe. If the edge begins to ruffle, remove unnecessary increases.
Brown Center Vein
Yarn: dark brown.
Work the center vein using surface crochet on the right side.
Insert the hook near the leaf base and pull up a brown loop from the wrong side. Work surface slip stitches directly over the central foundation line, travelling toward the terminal point.
Keep each surface stitch approximately the width of one orange stitch.
At the terminal lobe, fasten off and pull the yarn tail to the back.
The center vein should remain visibly raised. Avoid pulling the surface stitches so tightly that the orange fabric contracts along the middle.
Side Veins
Yarn: dark brown.
Make approximately seven or eight branches in total, corresponding to the major lobes.
For each branch, attach the brown yarn to the center vein. Surface sl st diagonally toward the center of the corresponding lobe.
Stop approximately 1–1.5 cm before the rust border.
Fasten off on the wrong side.
Repeat the process on the opposite half of the leaf.
Branch angles should point toward the outer lobes rather than travel horizontally. This directional structure helps the brown lines read as leaf veins.
Stem
Yarn: dark brown.
Join the brown yarn at the base.
Ch 14.
Starting in the second chain from the hook, sl st in each chain back toward the leaf.
Turn.
Ch 1, sc in each stem stitch to the end.
Work 3 sc across the tip, rotate, then sc down the opposite side.
Join to the base with a sl st.
For a thicker stem similar to the reference, work one additional row of sc around the stem perimeter.
Fasten off. Leave a 15 cm tail and weave it into the back of the center vein.
Optional Reinforced Vein Layer
The reference uses unusually prominent brown veins. A second pass can reproduce that proportion.
Thread dark-brown yarn onto a tapestry needle. Sew a chain-like line immediately beside the crocheted center vein, keeping both strands close enough to read visually as one raised rib.
Add only one reinforcement line to the main vein. Side veins should remain thinner.
The intended hierarchy is thick center vein, medium stem, narrow side branches.
Assembly and Finishing
- Lay the completed orange leaf flat with the right side facing upward.
- Compare matching left and right lobes before adding the surface details.
- Pin the terminal point and each major lobe to the target 22 × 16 cm outline.
- Add the rust border and correct any ruffling before proceeding.
- Work the dark-brown center vein from the base toward the terminal lobe.
- Add side veins in opposing pairs so their angles remain balanced.
- Attach and reinforce the brown stem at the base of the center vein.
- Weave all orange and rust tails through matching-color stitches on the wrong side.
- Wet-block or steam-block according to the yarn fiber and the care instructions on its label.
- Leave the motif pinned until completely dry, then remove the pins and check the final dimensions.
The completed piece should present a flat oak silhouette with a dominant center rib, rounded side lobes, contrasting perimeter, and narrow brown stem.
7 Technical Tips for a Better Crochet Oak Leaf
- Lobe collapse: Place a marker in every valley before working the outer shaping. A misplaced valley of even two stitches can make one half visibly longer than the other.
- Border ruffling: Do not automatically place two stitches into every edge stitch. If the rust perimeter starts forming waves, return to a one-for-one stitch ratio until the fabric lies flat.
- Missing oak silhouette: Keep the side lobes rounded rather than pointed. Repeated picots on every lobe can make the finished shape resemble a maple-style leaf.
- Vein distortion: Surface slip stitches pulled too tightly shorten the center of the fabric. Each brown loop should sit on the surface without drawing the orange foundation inward.
- Stem twisting: Pin the stem directly in line with the center vein before blocking. A deviation greater than approximately 5–10 degrees becomes noticeable on a 22 cm leaf.
- Asymmetrical sides: Fold the unfinished leaf along its center before adding the border. Matching lobes should land within approximately 5 mm of each other.
- Loose yarn tails: Weave brown tails through at least 4–5 cm of matching stitches on the wrong side. Cutting directly beside a surface-crochet attachment point can allow the vein to loosen during handling.
How to Keep the Leaf Flat
A large crochet leaf can curl because tall stitches place more fabric along the outside of each lobe than along the center. Blocking corrects moderate distortion, but severe ruffling usually indicates excess stitches rather than a blocking problem.
Pin the central vein first. Next, position the terminal lobe and stem so they form one continuous axis. Pin corresponding left and right lobes in pairs, moving from the center outward.
Measure the width only after the major points are pinned. For this version, use approximately 22 cm in length and 16 cm at the widest point as the target dimensions.
If the leaf is intended as a table decoration, keep it flexible. A wall hanging or wreath component can be lightly stiffened after blocking.
Changing the Size
The safest way to resize this crochet oak leaf pattern is to change yarn and hook size while retaining the same proportions. A thinner yarn and smaller hook produce an appliqué-sized leaf; thicker yarn produces a larger table or wall decoration.
Changing the foundation-chain count requires more adjustment. Adding chains lengthens the center but does not automatically widen the lobes, so their stitch groups must also be redistributed.
For a matched set, crochet one complete leaf first, block it, and record its final dimensions. Use the same yarn, hook, tension, foundation length, and blocking measurements for subsequent leaves.
Conclusion
Block the leaf only after the rust border, brown veins, and stem have been completed because those additions can change both width and length. Measure against the 22 × 16 cm target while the work is pinned, then correct individual lobes rather than stretching the entire motif. For the next version, record the foundation length and blocked dimensions so matching leaves can be reproduced for a table set or garland. Save this crochet oak leaf pattern to Pinterest and share the finished version on Instagram with #CrochetOakLeafPattern. Will you keep the side veins short like the reference, or extend them into the contrasting rust border?









