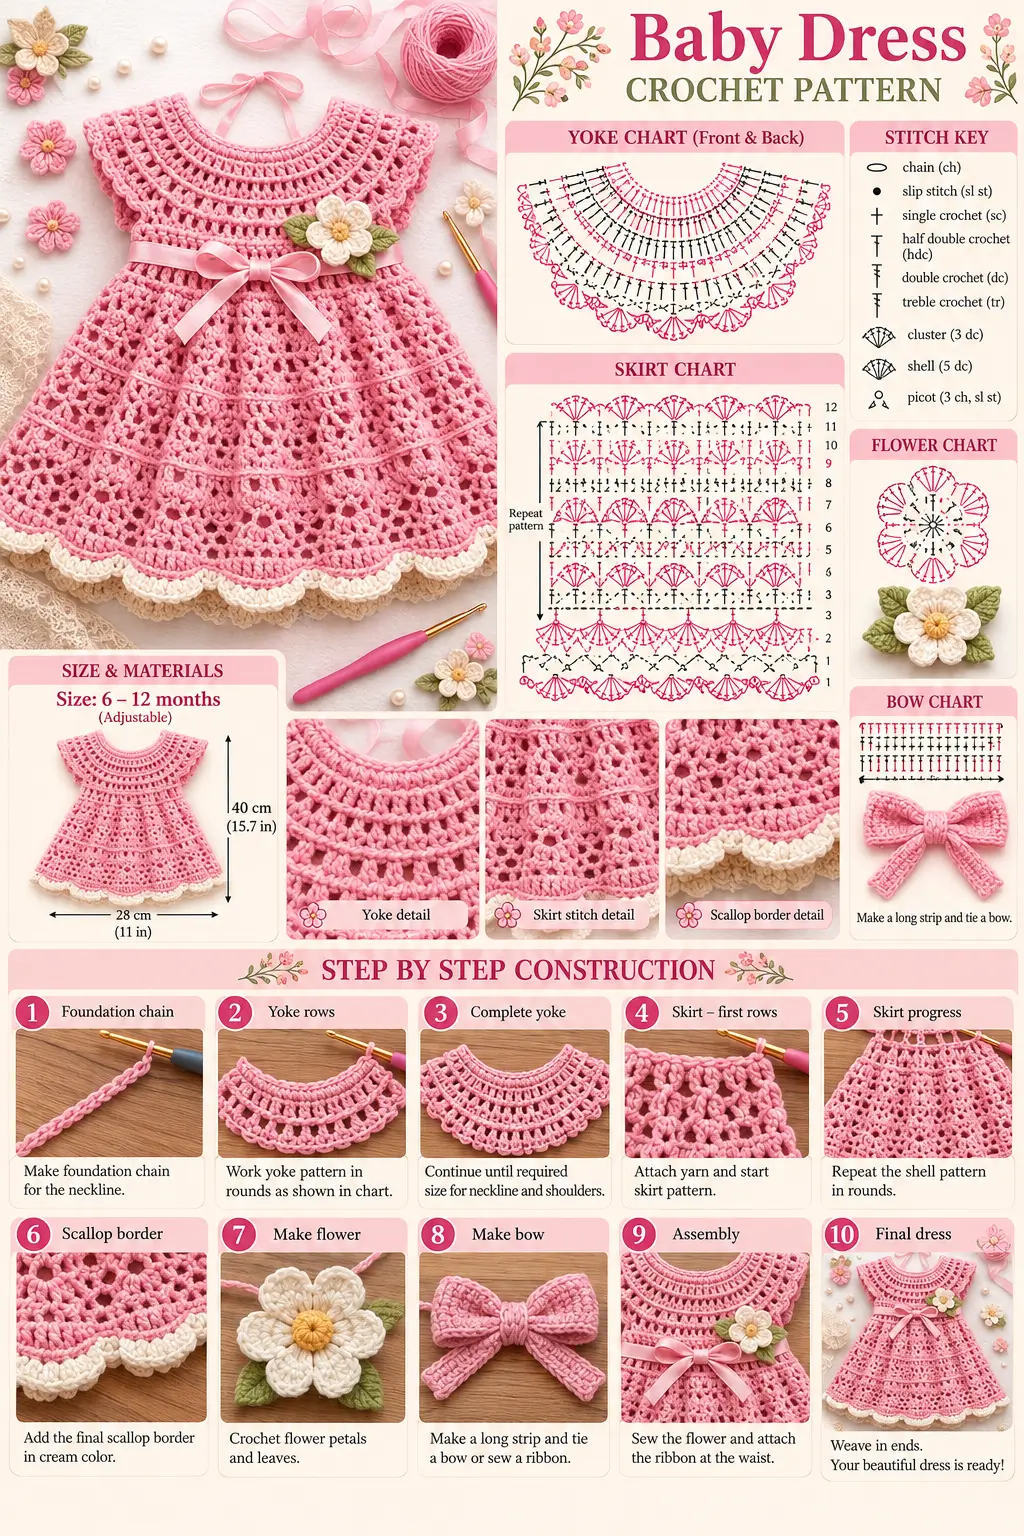
A circular yoke has to expand enough for a baby’s shoulders before the skirt can flare, and that calculation controls the fit of this dress. This crochet baby dress pattern recreates the pink 6–12 month design with an openwork yoke, shell-pattern skirt, cream scalloped border, crochet flower, green leaves, and satin-style waist bow. The reference measures approximately 40 cm long and 28 cm wide.
The Design: What Makes This Baby Dress Different
The dress is built from the neckline downward. A circular yoke gradually increases in circumference before the work is divided at the underarms. This construction reduces seaming and creates the rounded neckline visible in the reference.
The skirt changes from relatively structured yoke stitches to an open crochet shell stitch pattern. Increasing the amount of fabric below the waist creates the A-line shape without requiring separate skirt panels.
Three finishing elements define the design: a cream scalloped hem, a layered flower with green leaves, and a pink waist bow. The most common construction error with this type of crochet baby dress is concentrating on age labels instead of finished measurements. Babies of the same age can differ considerably in size, so gauge and actual garment measurements must be checked before continuing into the skirt.
Project Info at a Glance
| Skill Level | Size | Reference Length | Reference Width | Hook |
|---|---|---|---|---|
| Intermediate | 6–12 months | Approx. 40 cm | Approx. 28 cm laid flat | 3.5–4 mm |
The 40 × 28 cm measurements come from the reference design. Treat them as target dimensions rather than universal measurements for every 6–12 month baby.
Materials and Tools
Yarn
- Pink — DK/light-worsted baby yarn — approximately 250–300 g allowance for the main dress.
- Cream — DK/light-worsted — approximately 20–30 g for the hem and flower.
- Light green — DK/light-worsted — approximately 10 g for the leaves.
- Yellow — small scrap for the flower center.
Yarn consumption changes with fiber, gauge, skirt fullness, and finished length. Purchase enough yarn from the same dye lot to complete the main pink section.
Tools
- 3.5 mm crochet hook for the main dress
- 3 mm crochet hook for flower and leaves if a firmer motif is required
- Yarn needle
- Scissors
- Stitch markers
- Measuring tape
- Pink ribbon, approximately 1–1.5 cm wide
- Optional small buttons for a back-neck opening
Abbreviations
- ch — chain
- sl st — slip stitch
- sc — single crochet
- hdc — half double crochet
- dc — double crochet
- tr — treble crochet
- sp — space
- st/sts — stitch/stitches
- sk — skip
- RS — right side
- FO — fasten off
This dress is worked as a garment rather than amigurumi, so invisible decreases are not required for the main construction.
Gauge and Sizing
Make a gauge swatch before beginning the neckline. For baby garments, matching the finished dimensions is more important than matching an age label.
Use the hook size that gives a flexible but stable fabric. If your stitches are considerably tighter than the sample, move up a hook size. If the fabric is loose enough that the yoke loses its structure, move down a hook size.
The reference target is approximately 40 cm from shoulder to hem and 28 cm wide when laid flat. Check the yoke against the intended wearer or a reliable garment measurement before separating the armholes.
Crochet Baby Dress Pattern — Step by Step
The dress is worked from the neckline downward. The yoke is completed first, followed by the skirt, hem, flower, leaves, and bow.
Foundation Neckline
Yarn: pink.
Ch 72 loosely.
Join with a sl st to form a ring, taking care not to twist the foundation chain.
If a larger head opening is required, work the first rows back and forth instead and add a small button opening at the center back.
Round 1: Ch 2, dc in each ch around. Join with sl st. (72 dc)
Round 2: Ch 2, dc in next 2 sts, 2 dc in next st; repeat around. Join.
The stitch count increases evenly around the neckline so the yoke begins to spread outward rather than forming a vertical tube.
Yoke
Round 3: Ch 3, dc in each st around. Join.
Round 4: Ch 3, work 3 dc, then 2 dc in next st; repeat the increase sequence evenly around.
Round 5: Ch 3, dc in each st around.
Round 6: Ch 3, work 4 dc, 2 dc in next st; repeat evenly around.
Round 7: Ch 1, sc in each st around. Join.
Round 8: Ch 4, sk 1 st, dc in next st, ch 1; repeat around to create an eyelet row.
Round 9: Sl st into first ch-1 sp. Ch 3, 2 dc in same sp, then 3 dc in each ch-1 sp around. Join.
Round 10: Ch 1, sc evenly around.
Measure the yoke before proceeding. It should reach approximately from the neckline to the underarm without pulling tightly across the chest.
Divide for the Armholes
Lay the yoke flat and mark the front, back, and two arm sections.
Place four stitch markers at the intended underarm positions. The front and back sections should contain approximately equal stitch counts.
Work across the back to the first marker.
Ch 6–10 stitches for the first underarm, depending on the required circumference.
Skip the sleeve section and continue across the front.
At the second armhole, ch the same number of stitches.
Skip the second sleeve section and complete the round across the remaining back stitches.
Join with a sl st.
Before continuing, check that both armholes are the same size and that the bodice sits flat.
Waist Foundation
Round 1: Ch 3, dc in every stitch and underarm chain around. Join.
Round 2: Ch 1, sc in each stitch around.
Round 3: Ch 4, sk 1 st, dc in next st, ch 1; repeat around.
This eyelet round can also function as the ribbon channel.
Round 4: Work 2 or 3 dc into each ch-1 space, adjusting the distribution so the skirt begins to flare without forming heavy ruffles.
Skirt — First Shell Section
The skirt uses repeating shell groups to create the open texture shown in the reference.
Round 1: Ch 1, sc around, spacing stitches evenly.
Round 2: Ch 3, work 4 dc in same base area to form the first 5-dc shell. Sk 2 sts, sc in next st, sk 2 sts, 5 dc in next st; repeat around.
Round 3: Ch 4, dc in center dc of first shell, ch 2, sc in next sc, ch 2, dc in center of next shell; repeat around.
Round 4: Work a 5-dc shell into each appropriate ch-space and sc into the corresponding valley between shells.
Continue the established shell alignment around the skirt.
Skirt — Second Pattern Section
After approximately 5–7 cm of shell fabric, add a stabilizing row.
Round 1: Ch 1, sc evenly around.
Round 2: Ch 3, dc in each st around.
Round 3: Ch 4, sk 1, dc in next st, ch 1; repeat around.
Round 4: Work shell groups into the ch-spaces.
Repeat the shell pattern for another 5–7 cm.
The horizontal solid rows between openwork sections help control the skirt width and reproduce the tiered appearance of the reference.
Lower Skirt
Continue alternating open shell sections with narrow solid bands.
Add increases only when additional flare is required. The skirt should widen gradually from the waist toward the hem rather than expanding abruptly in a single round.
Continue until the dress measures approximately 37–38 cm from the shoulder, leaving about 2–3 cm for the decorative border.
Lay the dress flat and check both side lengths before starting the cream edging.
Cream Scalloped Border
Change to cream yarn.
Round 1: Ch 1, sc evenly around the entire lower edge. Join.
Round 2: Sl st into next st, sk 1 st, work 5 dc in next st, sk 1 st, sl st in next st.
Repeat the scallop sequence around.
If the stitch count does not divide evenly, distribute one or two additional skipped stitches across the back of the dress rather than forcing an extra shell into the border.
Fasten off and weave in the cream yarn.
Crochet Flower
Yarn: cream and yellow.
With yellow, ch 2.
Round 1: Work 6 sc into the second chain from the hook. Join. (6)
Change to cream.
Round 2: Ch 2, work 3 dc in same stitch, ch 2, sl st in same stitch.
Repeat the petal sequence in each of the remaining stitches to make six petals.
Fasten off, leaving a long sewing tail.
For a fuller flower, work a second layer behind the first petals using slightly taller stitches.
Green Leaves — Make 2
Yarn: light green.
Ch 8.
Starting in the second chain from the hook, work:
sl st, sc, hdc, dc, hdc, sc, sl st.
Work around the end of the foundation chain and repeat the same sequence along the opposite side.
Fasten off with a long sewing tail.
Make the second leaf in the same manner.
Waist Bow
The reference uses a smooth pink ribbon bow at the waist. A removable ribbon is preferable when the dress needs to be washed frequently.
Cut a ribbon long enough to pass through the waist eyelets and form two tails after tying.
Thread the ribbon alternately over and under the openings in the waist row.
Bring both ends to the front or slightly off-center.
Tie a balanced bow and trim both tails to equal lengths.
If a crocheted bow is preferred, make a rectangular strip of sc or hdc, pinch its center, and wrap a narrow crocheted band around the middle.
Flower Placement
Position the two green leaves near the upper waist or lower yoke, following the reference.
Pin the leaves before sewing.
Place the cream flower over their inner ends so the leaf attachment stitches are hidden.
Sew the flower through the crochet fabric rather than through the ribbon.
Secure every yarn tail on the wrong side.
Assembly and Finishing
- Lay the dress flat and check that the neckline remains round and unrestricted.
- Measure both armholes and correct any visible difference before weaving in the underarm tails.
- Check the finished chest and compare it with the intended baby’s measurements.
- Measure from the shoulder to the hem and compare the result with the approximate 40 cm reference length.
- Weave all pink yarn tails into stitches of the same color.
- Attach the two green leaves near the waist and secure them individually.
- Sew the cream flower over the inner edges of the leaves.
- Thread the pink ribbon through the waist eyelet row and form the bow.
- Block the skirt lightly so the shell repeats and cream scallops lie evenly.
- Check all attached decorations before the garment is worn and remove or reinforce anything that can be pulled loose.
The completed dress should have a rounded yoke, unrestricted armholes, gradually flared openwork skirt, cream scalloped hem, floral decoration, and defined waist.
7 Technical Tips for This Crochet Baby Dress
- Neck opening too small: Test the neckline circumference before completing the yoke. A beautiful yoke is unusable if the finished opening cannot pass comfortably over the baby’s head.
How to Adjust the Dress Size
Do not resize this dress solely by adding random stitches to the foundation chain. The neckline, yoke depth, chest circumference, armhole depth, and finished length interact with one another.
For a slightly larger dress, first increase the neckline only as much as necessary. Continue the yoke until it reaches the required shoulder and chest dimensions, then reposition the four underarm markers.
For a smaller size, a thinner DK yarn and smaller hook may reduce the entire garment, but gauge must still be measured. Changing yarn without checking gauge can produce a neckline that is too tight even when the skirt length appears correct.
The skirt is easier to modify independently. Add or remove complete pattern repeats to change its length while maintaining the established shell sequence.
Choosing Yarn for a Baby Crochet Dress
A smooth DK or light-worsted baby yarn works well for the open stitch pattern because the shell structure remains visible without making the garment excessively heavy.
Washability also matters. Check the yarn manufacturer’s care instructions before starting, especially if the flower, leaves, and main dress use different yarn lines.
A very fuzzy yarn can obscure the openwork pattern and make it difficult to identify individual stitches. Highly rigid yarn can produce a skirt that stands away from the body rather than falling into the intended A-line shape.
Make the gauge swatch large enough to measure several stitches away from its edges. Wash and dry the swatch according to the intended care method before using its dimensions to calculate the finished garment.
Working the Shell Skirt Correctly
The skirt depends on consistent placement of shells and valleys. Each shell should sit above the correct space in the previous pattern row, while the shorter stitch between shells pulls the fabric inward.
If the shell columns begin moving sideways, check the start of the round. A missed stitch near the join can shift every subsequent repeat.
Do not compensate for a missing stitch by placing a large increase in one location. Spread any necessary adjustment across the round so the extra fabric is not concentrated at one side of the dress.
Measure skirt length with the garment hanging naturally. Open crochet fabric can lengthen slightly under its own weight, particularly when made from cotton or other fibers with limited elasticity.
Finishing the Yoke and Neckline
The neckline should remain flexible after the final round. If it stretches excessively, add one round of single crochet using the same hook or one size smaller.
For a neckline that needs additional room, leave a short opening at the center back. Edge both sides with single crochet and add a small chain loop for a button closure.
Any button used on baby clothing must be sewn securely and inspected before wear. Avoid attaching purely decorative components that can be easily pulled away from the garment.
Blocking the Finished Dress
Blocking should refine the stitch pattern rather than compensate for major sizing errors. Wash or dampen the dress according to the yarn manufacturer’s instructions.
Lay it flat and position the neckline first. Align both shoulders and armholes, then smooth the skirt downward.
Arrange the shell sections so corresponding repeats have approximately equal width. Shape the cream scallops individually along the lower edge.
Check the final shoulder-to-hem measurement against the approximate 40 cm target. Allow the garment to dry completely before removing it from the blocking surface.
Conclusion
Check the chest, neckline, armhole depth, and shoulder-to-hem measurement before treating the dress as finished; age labels alone do not determine garment fit. The flower should be sewn independently of the ribbon so the bow can be removed for washing, while the cream border should lie flat without adding unwanted circumference. Record the final gauge and yoke stitch count before making another size. Save this crochet baby dress pattern to Pinterest and share the finished dress on Instagram with #PinkBabyCrochetDress. For your version, will you keep the cream flower at the side of the yoke or position it directly above the waist bow?









