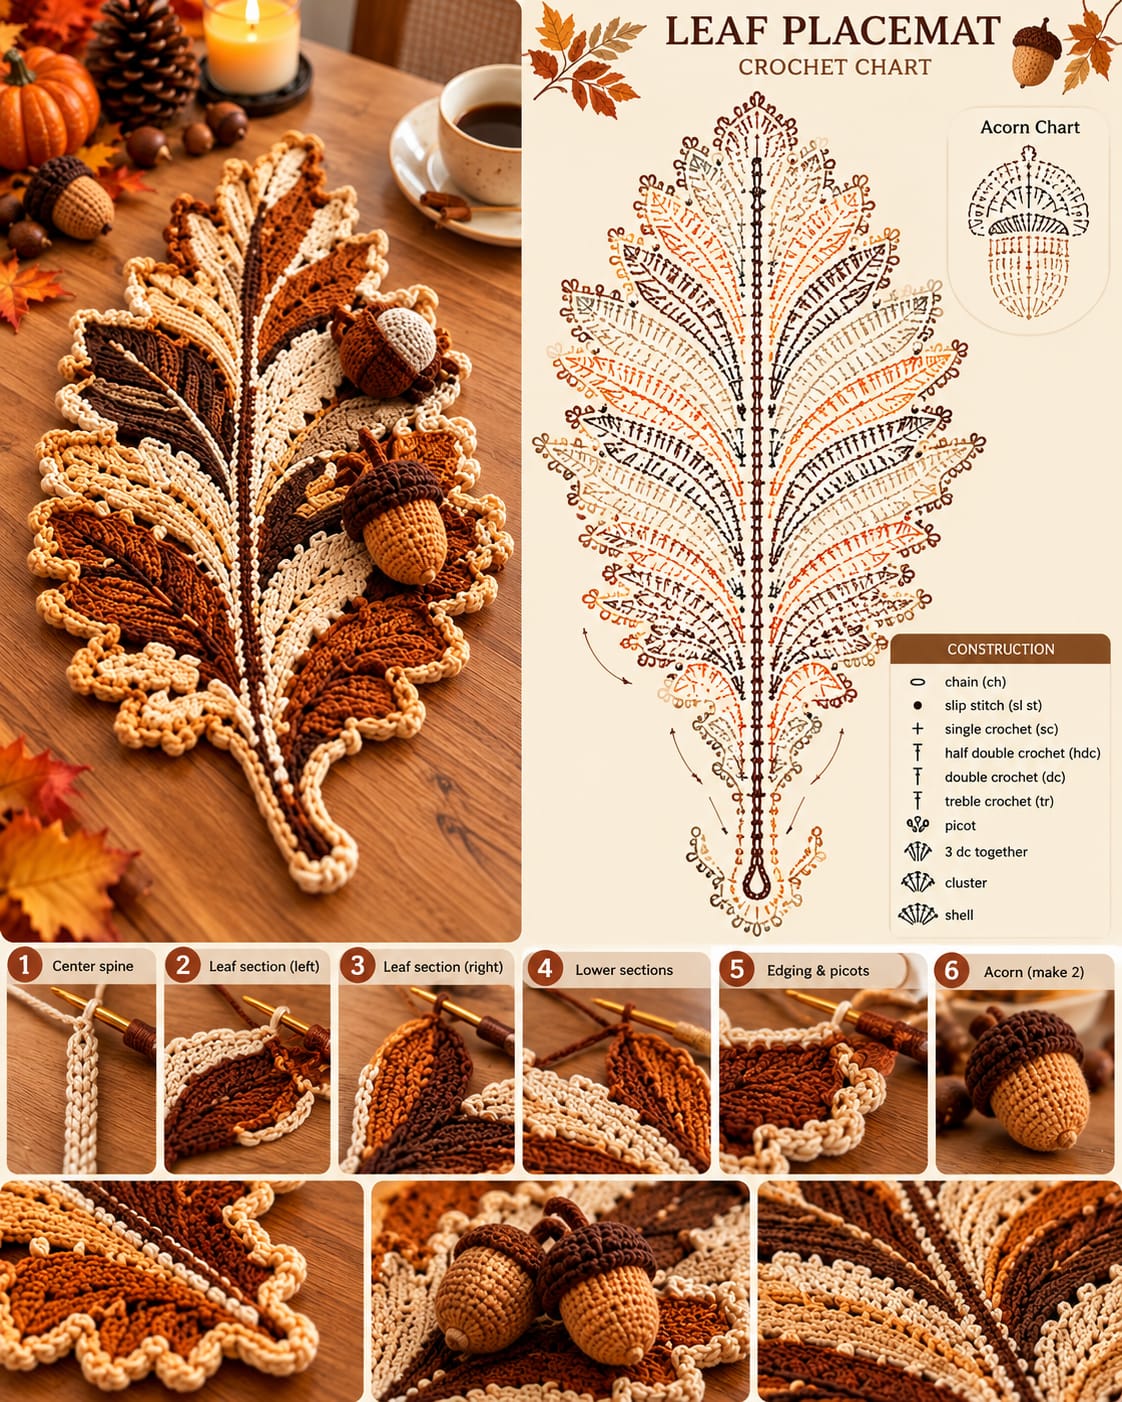
Oak leaves need deep lobes rather than a smooth oval edge, and that geometry controls this entire project. This crochet leaf placemat pattern combines a reinforced center spine, individually shaped autumn sections, picot edging and two stuffed acorns. Use DK cotton with a 3.5 mm hook for a target length near 40 cm. The skill level is intermediate. Its flat construction also makes the finished piece practical beneath serving dishes.
The Design: What Makes This Leaf Different
The center vein does structural work instead of acting as surface embroidery. Building the lobes outward from a firm spine reduces twisting and gives both sides a common alignment point.
Second, the autumn crochet placemat uses unequal lobe lengths. Oak-type leaves narrow toward both the stem and tip, so repeating one identical motif would produce a feather rather than the broad silhouette shown in the reference image. Cream picots create the third structural distinction. They sharpen the outer profile while separating rust, caramel and brown sections visually.
The attached acorns convert an ordinary crochet leaf pattern into dimensional fall table decor. Keep them small and light. A frequent mistake is overstuffing these pieces, which makes the nut body spherical instead of tapered.
Project Info at a Glance
| Skill Level | Time | Finished Size | Hook | Best For |
|---|---|---|---|---|
| Intermediate | 5–8 hours | Approx. 40 cm long | 3.5 mm | Fall table settings and seasonal centerpieces |
The 40 cm target is consistent with published cotton leaf placemat dimensions. Final measurements can change according to yarn, hook size, gauge and blocking.
Materials and Tools
Yarn
For a placemat close to the photographed palette, divide approximately 100 g of DK cotton or cotton-blend yarn across the following colors:
- Rust orange — DK — approximately 30 g — smooth mercerized or matte cotton
- Cream — DK — approximately 25 g — smooth cotton
- Dark brown — DK — approximately 20 g — smooth cotton
- Caramel/tan — DK — approximately 20 g — smooth cotton
- Acorn-cap brown — DK — approximately 5 g — use the dark-brown remainder
DK yarn paired with a 3.5 mm hook gives the leaf enough definition for the narrow center vein, shaped lobes and decorative perimeter.
Tools
- 3.5 mm crochet hook
- Polyester stuffing for the acorns
- Tapestry needle
- Locking stitch markers
- Scissors
- Blocking pins and mat
Safety eyes are not required. The acorns in this design have no faces.
Abbreviations
- MR — magic ring
- sc — single crochet
- inc — two single crochets in one stitch
- dec — single crochet decrease
- sl st — slip stitch
- ch — chain
- BLO — back loop only
- hdc — half double crochet
- dc — double crochet
- tr — treble crochet
- picot — ch 3, sl st into first chain
For an invisible decrease, insert the hook through the front loops of the next two stitches before completing one single crochet through both loops.
Pattern — Step by Step
The placemat is worked flat. Only the stuffed acorns use continuous spiral rounds.
Center Spine
Yarn: cream
Ch 57.
Row 1: Starting in the second ch from hook, 56 sc. (56)
Row 2: Ch 1, turn, 56 sc. (56)
Do not cut the working yarn if cream will also form the lower stem.
The long double row provides an anchor for the colored leaf sections. If your gauge produces a spine substantially longer than 36 cm before the outer lobes are added, move down a hook size or remove chains symmetrically.
Lower Stem
Yarn: cream
Continue from the base of the spine.
Row 1: Ch 14. (14)
Row 2: Starting in second ch, 13 sl st. (13)
Join to the spine with a sl st. Fasten off, leaving a 15 cm tail.
The stem should remain relatively flat because excess thickness beneath a plate can make the finished placemat rock.
Lower Leaf Sections — Make 2 Mirrored Panels
Yarn: caramel or rust
Ch 15.
Row 1: Sc in second ch, hdc, 8 dc, 2 hdc, sc, 3 sc in final ch. Work along opposite side: sc, 2 hdc, 8 dc, hdc, sc.
Row 2: Ch 1, work sc toward the rounded end, switching to hdc and dc across the widest section. Place 3 dc at the tip, then mirror the stitch heights down the second edge.
Fasten off with a 20 cm sewing tail.
Pin one section on either side of the lower spine before sewing. The lower pair should angle upward rather than extend at 90 degrees.
Middle Leaf Sections — Make 4
Yarn: alternate dark brown, rust and cream
Ch 19.
Row 1: Sc in second ch, hdc, 12 dc, 2 hdc, sc, 3 sc in final ch. Continue along the unused chain loops with sc, 2 hdc, 12 dc, hdc, sc.
Row 2: Ch 1. Sc across the narrow base, hdc through the transition, dc across the broad center, then 3 dc at the tip. Mirror the stitch heights down the opposite edge.
Fasten off. Leave a 20 cm tail on every panel.
These are the widest structural elements and should occupy the central third of the placemat.
Upper Leaf Sections — Make 4
Yarn: cream, rust and caramel
Ch 16.
Row 1: Sc in second ch, hdc, 9 dc, 2 hdc, sc, 3 sc in final ch. Continue down the opposite edge: sc, 2 hdc, 9 dc, hdc, sc.
Row 2: Repeat the graduated sc/hdc/dc shaping used for the middle sections.
Fasten off with a 20 cm tail.
Place the upper sections at a steeper angle than the middle lobes. That reduction in width creates the pointed crown of the oak-style silhouette.
Top Leaf Section
Yarn: rust orange
Ch 21.
Row 1: Sc in second ch, hdc, 15 dc, 2 hdc, sc, 3 sc in final ch. Continue along opposite side with sc, 2 hdc, 15 dc, hdc, sc.
Row 2: Work graduated stitches toward the tip, placing 3 dc at the point, then mirror the stitch sequence.
Fasten off with a 25 cm tail.
Center this section directly over the spine. Do not tilt it.
Joining the Leaf Sections
Lay the center spine vertically. Arrange the lower pair first, followed by the four middle and four upper sections. The bases may overlap slightly, but the tips should remain independent.
With cream yarn, work surface slip stitches through the inner edge of each section and the spine. Keep every join flat.
The light-colored joins emphasize the central vein while allowing the spine to carry the structural load of the placemat.
Edging and Picots
Yarn: cream
Join yarn at the bottom of the stem.
Work sc evenly around the entire leaf perimeter. At each prominent lobe tip, work:
(sc, picot, sc) in the tip stitch.
Along longer outer curves, add another picot approximately every 4–6 stitches. At inward valleys, use a decrease or skip one edge stitch if the border begins to flare.
Continue around both sides and the stem. Sl st into the first sc.
Fasten off and weave in the tail.
The border must lie in the same plane as the leaf. A ruffled perimeter indicates too many edging stitches.
Acorn Body — Make 2
Yarn: caramel/tan
R1: 6 sc in MR (6)
R2: inc ×6 (12)
R3: (sc, inc) ×6 (18)
R4: (2 sc, inc) ×6 (24)
R5: (3 sc, inc) ×6 (30)
R6–R10: 30 sc (30)
R11: (3 sc, dec) ×6 (24)
R12: 24 sc (24)
R13: (2 sc, dec) ×6 (18)
Stuff firmly enough to retain an oval form but leave the opening slightly flexible.
R14: (sc, dec) ×6 (12)
R15: dec ×6 (6)
Fasten off. Draw the tail through the remaining six stitches and close.
The 30-stitch plateau produces a compact decorative acorn. Avoid adding excessive stuffing near the final decrease rounds because the lower end should remain tapered.
Acorn Cap — Make 2
Yarn: dark brown
R1: 6 sc in MR (6)
R2: inc ×6 (12)
R3: (sc, inc) ×6 (18)
R4: (2 sc, inc) ×6 (24)
R5: (3 sc, inc) ×6 (30)
R6: BLO 30 sc (30)
R7: 30 sc (30)
Fasten off with a 25 cm tail.
Fit the cap over the broad end of the tan acorn body. The BLO round turns the cap edge downward without requiring another increase round.
Acorn Stem — Make 2
Yarn: dark brown
Ch 7.
Starting in the second chain from the hook, sl st in each chain. (6)
Fasten off with a 15 cm tail. Fold the strip slightly before attaching it to the center of the cap.
Optional Acorn Tip
Yarn: tan
Attach yarn at the narrow end of the acorn.
Ch 2, sl st into the second ch from the hook, then sl st back into the acorn body.
Fasten off and bury both tails inside.
This small projection distinguishes the bottom of the nut from the stem end without changing the stuffed form.
Assembly
- Block the center spine first so the 56-stitch foundation lies flat and does not twist.
- Pin the lower leaf sections symmetrically, keeping their lowest edges clear of the stem.
- Position the middle sections so their widest points create the maximum width of the placemat.
- Attach the upper sections at progressively steeper angles toward the center spine.
- Sew the top section directly in line with the central vein, checking the whole silhouette before tightening the final stitches.
- Inspect the cream perimeter edging and correct any section that cups upward or produces a visible ruffle.
- Fit each dark-brown cap over an acorn body and sew around the lower edge of the cap.
- Sew one short stem into the center of each cap and bury the tail inside the stuffed body.
- Position the two acorns asymmetrically on the upper surface, leaving enough open area for a plate or serving dish. Tack them down only if permanent attachment is wanted.
- Block the leaf to approximately 40 cm long, allow it to dry flat, then trim no yarn until every woven tail has been checked.
The completed piece consists of one flat lobed leaf, a defined central spine, contrasting picot border and two dimensional acorns.
7 Technical Tips for a Flat, Balanced Placemat
- Prevent spine twisting: Place a stitch marker every 10 foundation chains while making the spine. A half-turn in the starting chain will force the attached lobes out of plane.
- Control acorn stuffing: Stop adding fiber when the body is firm but still compresses roughly 5 mm under finger pressure. Packing the final decrease rounds too tightly turns the tapered nut into a ball.
- Hide decrease lines: Use the invisible-decrease method on R11, R13, R14 and R15 of each acorn. Conventional decreases can leave horizontal bars across the visible surface.
- Check attachment angles: Pin every leaf section before sewing and compare the left and right tips against the center spine. A difference greater than approximately 1 cm becomes visible on a symmetrical table piece.
- Stop edging ruffles early: Do not force one border stitch into every available side-loop opening. If waves appear after 8–10 cm, reduce the number of stitches in the following section.
- Secure the acorn caps: Catch one full stitch from the cap and one surface loop from the body at each attachment point. Sewing only through the cap loops can allow the edge to lift after repeated handling.
- Secure yarn tails: Weave each tail at least 4–5 cm through stitches of the same color, reverse direction once, then trim. A single straight pass can pull free during blocking or washing.
Finishing and Blocking
Lay the completed leaf on a blocking mat and align the central spine first. Measure from the stem end to the uppermost leaf point. Aim for approximately 40 cm if your yarn and gauge match the project specifications.
Pin the corresponding left and right lobes at equal distances from the spine. Do not stretch individual points merely to reach a measurement. The objective is symmetry and a flat surface rather than maximum width.
Shape every picot while the piece is pinned. The cream border should follow the rust, caramel and brown panels without forming waves. Allow the placemat to dry completely before removing the pins.
If the acorns are permanently attached, sew them on after the main leaf has been blocked. This prevents the stuffed pieces from interfering with the blocking surface.
Conclusion
Measure the blocked leaf before attaching the acorns permanently: a target near 40 cm keeps the project in placemat territory rather than coaster scale. Check the central spine for twisting, confirm that every lobe lies flat, then inspect the picot border for excess stitches. The two acorns can remain removable if the surface will regularly hold serving dishes. Save this crochet leaf placemat pattern to Pinterest with a finished-project photo, or share the final color arrangement on Instagram with #AutumnLeafPlacemat. For the next version, record the yarn weight and blocked dimensions so gauge changes are repeatable. Which lobe pair would you make dark brown: the broad middle pair or the narrower upper pair?









