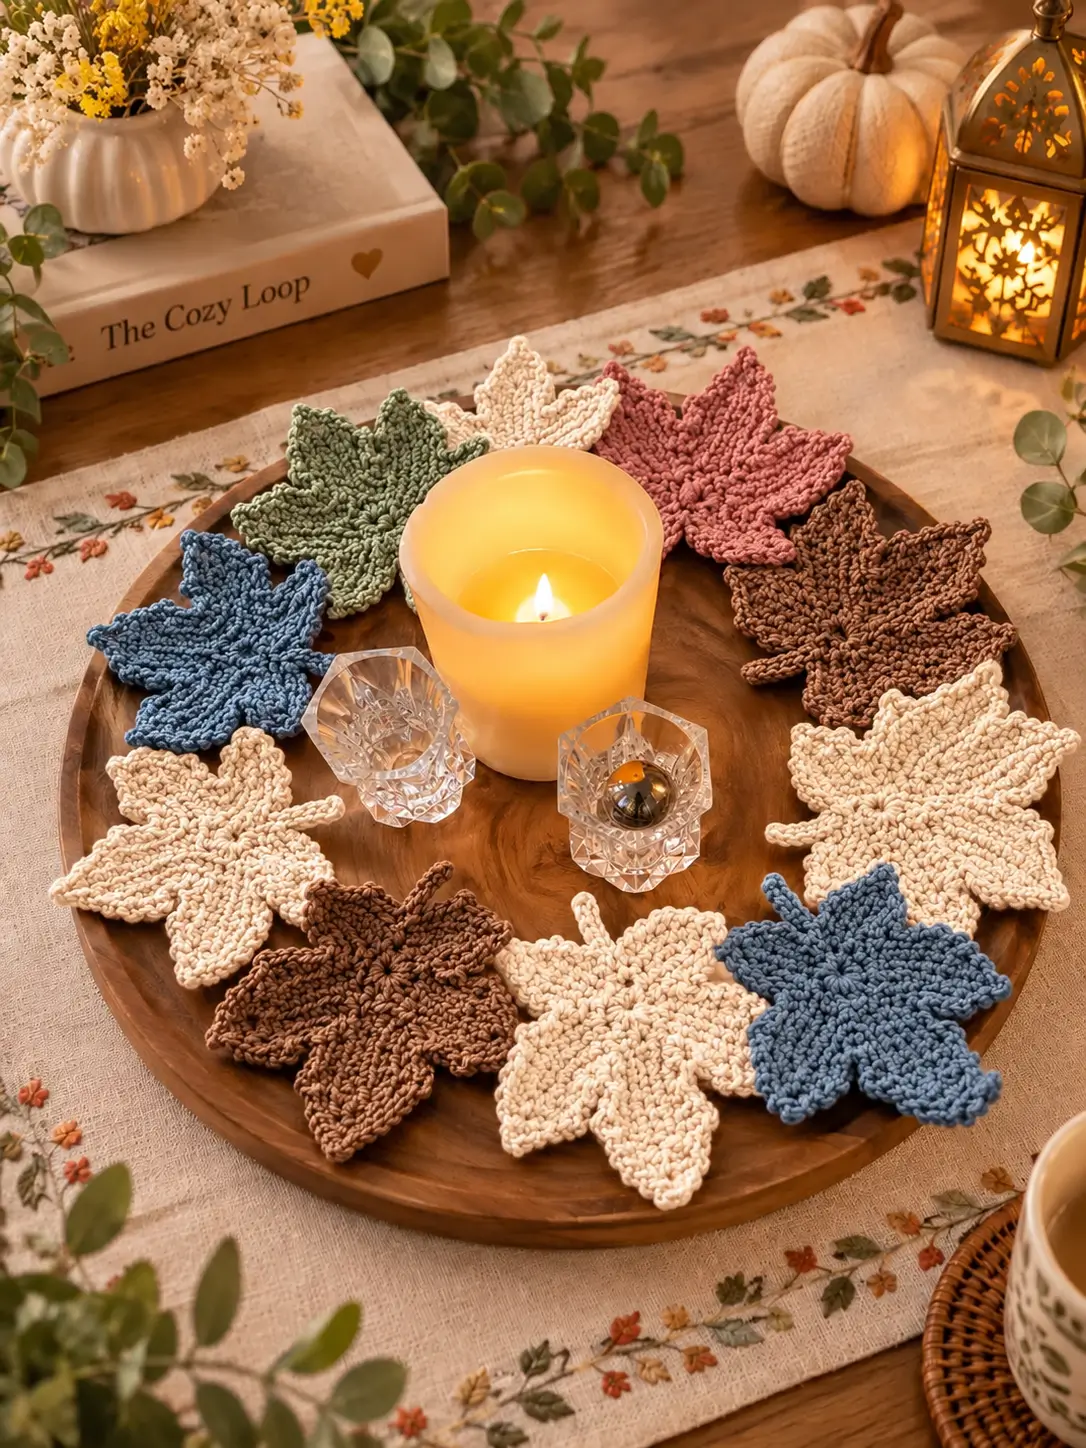
Seven pointed lobes give these leaves enough surface area for a mug while preserving the cut silhouette associated with autumn maple foliage. This crochet maple leaf coaster pattern uses cream, mustard, burnt orange, coral, burgundy and olive yarn to create the coordinated set shown in the reference image. Worked in cotton with a 3.5–4.0 mm hook, each finished leaf measures approximately 13–15 cm across.
The Design: What Makes These Maple Leaf Coasters Different
The photographed set uses one construction repeatedly while changing the yarn color. Each leaf has a compact circular center, seven pronounced lobes, raised lines running toward the points and a short curved stem. The result is flatter and broader than a decorative hanging leaf, which makes the motif more practical as a crochet leaf coaster.
Stitch height controls the silhouette. Taller stitches form the major points, while single crochet and slip stitches pull the valleys inward. A narrow surface ridge can then be added from the center toward each lobe to imitate leaf veins.
One common mistake is increasing evenly around the perimeter. That creates a circular motif instead of an autumn maple leaf crochet pattern. The increases belong near the points; the valleys need fewer stitches so the outline remains sharply divided.
Project Info at a Glance
| Skill Level | Time | Finished Size | Hook | Best For |
|---|---|---|---|---|
| Intermediate | 45–75 minutes per leaf | Approx. 13–15 cm | 3.5–4.0 mm | Coasters, fall table décor and garlands |
The finished measurement is a photo-inspired target. Yarn thickness and tension can change the final dimensions by several centimeters, so make one sample leaf and block it before producing the complete set.
Materials and Tools
Yarn
- Cream — DK or light worsted cotton — approximately 15–20 g per coaster.
- Mustard — DK or light worsted cotton — approximately 15–20 g per coaster.
- Burnt orange — DK or light worsted cotton — approximately 15–20 g per coaster.
- Coral or terracotta — DK or light worsted cotton — approximately 15–20 g per coaster.
- Burgundy — DK or light worsted cotton — approximately 15–20 g per coaster.
- Olive green — DK or light worsted cotton — approximately 15–20 g per coaster.
For a set of eight to ten leaves like the arrangement in the image, approximately 150–200 g total is a practical starting budget. Actual consumption should be calculated from the weight of one finished motif.
Tools
- 3.5 mm crochet hook for DK cotton
- 4.0 mm crochet hook for light worsted cotton
- Tapestry needle
- Scissors
- Locking stitch marker
- Blocking mat
- Rust-resistant pins
- Measuring tape
Abbreviations
- MR — magic ring
- ch — chain
- sc — single crochet
- hdc — half double crochet
- dc — double crochet
- tr — treble crochet
- dtr — double treble crochet
- sl st — slip stitch
- sp — space
- st/sts — stitch/stitches
- FO — fasten off
An invisible decrease is made through the front loops of two adjacent stitches before completing one single crochet. This motif mainly uses stitch-height changes rather than decreases to shape the valleys.
Color Plan for a Fall Coaster Set
The reference arrangement works because the leaf shape stays consistent while the colors change. For a set of ten coasters, use two cream leaves, two mustard leaves, two burgundy leaves, one olive leaf, one coral leaf and two burnt-orange leaves.
Another option is to crochet one leaf in each color first, place them together and then repeat the shades that best fit the intended table setting.
Crochet Maple Leaf Coaster Pattern — Step by Step
This is an original photo-inspired construction for a broad seven-lobed leaf. Work one color throughout each coaster unless a contrasting vein is wanted.
Leaf Center
Yarn: selected leaf color. Hook: 3.5–4.0 mm.
R1: 6 sc in MR (6).
R2: inc ×6 (12).
R3: [sc, inc] ×6 (18).
R4: [2 sc, inc] ×6 (24).
Join with sl st.
The center should measure approximately 3.5–4.5 cm across and lie flat. If it cups upward, check the hook size and tension before proceeding.
Seven Lobe Foundations
The seven lobes are not identical. The central upper point is longest, the two adjacent upper lobes are slightly shorter and the remaining side lobes decrease gradually toward the base.
Place seven markers approximately evenly around R4.
Minor spacing adjustments are acceptable because 24 stitches do not divide evenly into seven sections.
Central Top Lobe
Join yarn at the marker designated for the central point.
Row 1: Ch 7.
Starting in the second chain from the hook work:
sl st, sc, hdc, dc, tr, dtr.
Sl st into the next available stitch on the center.
Row 2: Turn slightly and work along one side of the lobe: sc, hdc, dc, tr.
At the tip work:
tr, ch 2, sl st into first ch, tr.
Work down the opposite side:
tr, dc, hdc, sc.
Sl st back to the center.
Upper Left Lobe
Move to the next marked position.
Ch 6.
Starting in second chain:
sl st, sc, hdc, dc, tr.
Attach to the center with sl st.
Work around the lobe with:
sc, hdc, dc, tr, ch 2, sl st into first ch, tr, dc, hdc, sc.
Sl st into the valley.
Upper Right Lobe
Mirror the upper-left lobe.
Ch 6.
Work:
sl st, sc, hdc, dc, tr.
Attach to the center.
Work around both sides with:
sc, hdc, dc, tr, ch 2, sl st into first ch, tr, dc, hdc, sc.
Finish with sl st in the valley.
Middle Left Lobe
Ch 5.
Starting in second chain:
sl st, sc, hdc, dc.
Attach to the center.
Work around the lobe:
sc, hdc, dc, ch 2, sl st into first ch, dc, hdc, sc.
Sl st into the next valley.
Middle Right Lobe
Mirror the middle-left lobe.
Ch 5.
Work:
sl st, sc, hdc, dc.
Attach to the center.
Shape the perimeter with:
sc, hdc, dc, ch 2, sl st into first ch, dc, hdc, sc.
Finish with sl st.
Lower Left Lobe
Ch 4.
Starting in second chain:
sl st, sc, hdc.
Attach to the center.
Work around:
sc, hdc, ch 2, sl st into first ch, hdc, sc.
Sl st into the base.
Lower Right Lobe
Mirror the lower-left lobe.
Ch 4.
Starting in second chain:
sl st, sc, hdc.
Attach to the center.
Work:
sc, hdc, ch 2, sl st into first ch, hdc, sc.
Sl st into the base.
Connecting the Seven Lobes
After all seven sections have been formed, work around the complete perimeter to make the silhouette continuous.
Join yarn at the base of the lower-left lobe.
Work sc along the first edge.
Change to hdc as the lobe widens.
At each pointed tip work:
sc, ch 2, sc.
Work back down toward the valley using hdc and sc.
At the deepest part of each valley, work one sl st.
Continue around all seven lobes.
Do not add extra stitches simply to fill every visible edge loop. Excess stitches make the perimeter ripple.
Creating the Raised Leaf Veins
The reference leaves show strong lines radiating from the center toward the tips.
Surface crochet provides a practical way to reproduce that texture while keeping the coaster relatively flat.
Central Vein
Join matching yarn at the lower center of the motif.
Surface-crochet loose slip stitches from the base toward the center.
Continue toward the central top lobe.
Stop approximately 8–10 mm before the pointed tip.
Fasten off on the reverse.
Side Veins
Join yarn near the center.
Work a line of surface slip stitches toward the first upper side lobe.
Stop before reaching its point.
Repeat for the remaining side lobes.
The finished veins should form a radial structure. Keep every surface stitch relaxed so the motif remains flat.
Alternative Embroidered Veins
If surface crochet creates too much thickness for a coaster, embroider the veins with a tapestry needle.
Cut approximately 60 cm of matching yarn.
Begin at the center and work long backstitches toward each lobe.
Keep the stitches on the upper surface while carrying only short lengths across the reverse.
Avoid large loose floats on the back because they can catch on tableware or decorative objects.
Crochet Stem
Join yarn at the lower center between the two smallest lobes.
Ch 10–14.
Starting in the second chain from the hook, sl st back along every chain.
Sl st into the leaf base.
Fasten off.
For the slightly curved stems shown in the reference image, work one or two return stitches tighter near the base and keep the remaining stitches relaxed.
Optional Thicker Stem
For a stem with more definition, ch 12.
Starting in the second chain work:
sl st in 3 chains, sc in 5 chains, sl st in remaining chains.
This creates a slightly thicker middle section while keeping the tip narrow.
Do not make the stem heavily padded. A raised stem can destabilize a mug if it extends beneath the main coaster area.
Blocking the Maple Leaf Coasters
Blocking is required to establish the pointed silhouette.
Pin the central upper lobe first.
Pin the two adjacent upper lobes approximately 1–1.5 cm lower than the center point.
Pin the middle lobes next.
Finish with the two lower lobes.
Use additional pins in the valleys only when needed.
Aim for approximately 13–15 cm across the broadest part of the leaf.
Allow the motif to dry completely before removing the pins.
Making the Cream Maple Leaf
The cream leaf uses exactly the same construction as the colored versions.
Light-colored yarn makes stitch definition less obvious, so the raised veins become more important.
Use surface crochet with matching cream yarn and slightly tighter stitches than on the darker motifs, but stop immediately if the leaf begins to cup.
A cream leaf also shows dirt more readily when used beneath drinks. Cotton yarn is preferable when frequent washing is expected.
Making the Burgundy Maple Leaf
Burgundy yarn produces the strongest visual contrast in the set.
Dark yarn can make individual stitches harder to see. Place a stitch marker in each lobe tip during construction so the perimeter round does not accidentally add stitches to the wrong location.
Use the same hook size as the cream and mustard motifs. Changing hook size according to color can produce noticeably different coaster dimensions.
Making the Mustard Maple Leaf
Mustard works particularly well for the larger center and upper lobes because the raised texture remains visible without additional contrast yarn.
If the mustard yarn is slightly thicker than the other colors, reduce the hook by approximately 0.25–0.5 mm only after making a gauge sample.
The blocked dimensions, rather than the yarn label alone, should determine whether a hook adjustment is required.
Making the Olive Green Maple Leaf
Olive adds a transitional color between summer foliage and the warmer fall shades.
Keep the central vein particularly clear on the green version. Without that line, a seven-lobed green motif can read more like a generic foliage shape than a maple-inspired leaf.
Matching yarn keeps the design monochrome. A slightly darker olive can be used for the veins when additional definition is wanted.
Making the Burnt Orange Maple Leaf
Burnt orange can function as the dominant color when making a larger set.
Use two or three orange leaves among cream, mustard, burgundy and green motifs rather than dividing every shade equally.
For a more varied arrangement, replace one orange leaf with terracotta or brick red while retaining the same yarn weight and hook size.
Using the Leaves as Coasters
For functional coasters, cotton or a cotton-rich blend is preferable because the fibers tolerate moisture and repeated washing more predictably than many decorative yarns.
Keep the central area flat. The raised veins should add texture without creating a hard ridge directly beneath a mug.
Test the finished coaster with an empty mug before making the full set.
If the mug rocks, replace the thickest surface-crochet veins with embroidered backstitches.
Using the Leaves as Fall Table Decorations
The motifs can also be used decoratively around a candle holder, vase or serving tray as shown in the reference composition.
Arrange the darker burgundy and olive leaves opposite each other.
Use cream motifs between stronger colors to create visual separation.
Position mustard and orange leaves near wood or neutral table surfaces where their outlines remain clearly visible.
Keep crochet motifs away from direct candle flames and other heat sources. When candles are part of the display, use an appropriate nonflammable holder and maintain clear separation between the flame and yarn decorations.
Making a Maple Leaf Garland
Complete 7–11 leaves using the same pattern.
Block all motifs before joining them.
With cream, brown or olive yarn, ch approximately 40 cm for the first hanging end.
Attach the first leaf through the upper section of its stem.
Ch approximately 12–15 cm.
Attach the next leaf.
Repeat until every motif is connected.
Finish with another 40 cm chain.
Connecting through the stem rather than a pointed lobe protects the blocked silhouette.
Making a Fall Table Runner from the Leaves
For a modular table runner, make approximately 15–25 leaves depending on table length.
Arrange the motifs in three staggered rows.
Overlap neighboring lobes by approximately 1 cm.
Using matching yarn, sew only through the overlapping perimeter stitches.
Leave most lobe points free.
The result retains the individual leaf shapes while forming a connected textile that can be moved as one piece.
Assembly
- Crochet the 24-stitch center. Confirm that it lies flat before beginning any lobe construction.
- Mark seven lobe positions. Identify the central upper point before working the remaining sections.
- Make the central and upper lobes. Keep the middle point longest and the two neighboring points slightly shorter.
- Add the four side and lower lobes. Reduce their foundation length gradually toward the stem.
- Work the perimeter. Place additional height near each point and use slip stitches in the valleys.
- Add the raised veins. Stop each line approximately 8–10 mm before the lobe tip.
- Crochet the stem. Keep it narrow and flexible so it does not interfere with the flat center.
- Block all seven points. Keep the central lobe higher than the adjacent pair and define every valley separately.
- Check the coaster on a flat surface. Remove or loosen any vein that causes rocking or cupping.
- Weave all yarn tails. Keep tails inside matching-color stitches and trim only after blocking.
The finished leaf should remain flat through its center while the seven lobes, radial veins and short stem retain clear definition.
7 Technical Tips for Better Crochet Maple Leaf Coasters
- Prevent circular shaping. Do not distribute increases evenly around the perimeter. Concentrate stitch height near the seven tips and use slip stitches in the valleys to maintain the cut leaf outline.
- Keep the center flat. Check the 24-stitch center before adding lobes. A center that rises more than a few millimeters will not become flatter after surface veins are added.
- Control the central point. The top lobe should finish approximately 1–1.5 cm higher than its neighboring lobes. Equal-height points make the motif look radial rather than leaf-shaped.
- Avoid wavy edges. Do not force one perimeter stitch into every visible side loop. Skip selected loops when necessary to keep the edge flat.
- Stop vein puckering. Surface slip stitches need loose tension. If a lobe becomes more than approximately 3 mm shorter after adding its vein, remove that line and crochet it again.
- Check mug stability. Place an empty mug on the blocked coaster. If the base rocks, replace thick central surface crochet with flatter embroidered stitches.
- Prevent twisted stems. Work the return slip stitches loosely along the 10–14 chain foundation. Excess tension causes the stem to spiral instead of forming a controlled curve.
How to Keep Every Leaf the Same Size
Color changes can affect gauge even when all skeins carry the same yarn-weight label. Some dyes and fibers produce slightly different thickness or elasticity.
Measure the first completed leaf from the tip of the central lobe to the base and across the widest two side lobes.
Record both measurements.
Check every second or third coaster against that reference before blocking.
Differences of a few millimeters can be corrected during blocking. A difference approaching 1 cm usually indicates a tension or yarn-thickness problem that should be corrected before producing additional motifs.
Choosing Yarn for Crochet Leaf Coasters
Cotton is a practical choice for table use because it produces defined stitches and can absorb small amounts of condensation. A smooth cotton yarn also makes the radial vein structure easier to see.
Mercerized cotton gives stronger stitch definition and a firmer finished motif. Softer unmercerized cotton creates a more relaxed surface.
Avoid highly fuzzy yarn when the pointed outline is important. Halo can obscure the small valleys separating adjacent lobes.
Use the same yarn line for every color when possible. Matching fiber content and thickness reduces the amount of size correction required during blocking.
How Much Yarn Do You Need?
For the photo-inspired 13–15 cm version, budget approximately 15–20 g per leaf. The exact amount depends on yarn weight, vein technique and stem length.
A six-coaster set therefore requires roughly 90–120 g total.
Eight leaves require approximately 120–160 g, while ten motifs require approximately 150–200 g.
For a more accurate calculation, weigh one completed and blocked coaster on a digital kitchen scale. Multiply its weight by the number of leaves required and add approximately 10 percent for swatching and tails.
How to Adjust the Leaf Size
For smaller appliqués, use sport-weight yarn with a 2.75–3.25 mm hook.
For the coaster size shown here, use DK cotton with approximately a 3.5 mm hook or light worsted cotton with approximately a 4.0 mm hook.
For larger placemat-style leaves, use worsted or Aran yarn with a 4.5–5.5 mm hook.
Do not increase the stem proportionally for every larger version. A very long stem can curl under the placemat and create an uneven table surface.
Washing and Reshaping
Follow the care instructions supplied with the selected yarn.
After washing, place each damp leaf on a flat towel or blocking mat.
Pull the central point into position first, followed by the neighboring upper lobes and then the lower points.
Reshape the valleys with your fingers.
Allow the coaster to dry completely while flat.
Repeated high heat can change the texture of some fibers, so fiber-specific care instructions take priority over general blocking methods.
Conclusion
The strongest maple silhouette comes from controlling seven unequal lobes rather than working a uniformly increased circle. Crochet one complete test leaf first, block it to approximately 13–15 cm and check that a mug sits flat before producing the remaining colors. Keep the center compact, place the tallest point opposite the stem and use relaxed surface stitches for the radiating veins. Your next step is to make one mustard or burnt-orange sample and record its blocked dimensions and yarn weight. Save this crochet maple leaf coaster pattern to Pinterest and share the finished fall set on Instagram with #MapleLeafCrochetCoasters. Which color would you make most often for your set: burgundy, mustard, cream, olive or burnt orange?









