Introduction
Maple leaves have five prominent points, but their smaller edge projections determine whether the finished shape looks botanical or resembles a star. This crochet maple leaf pattern focuses on five autumn colors, shaped edges, embroidered brown veins, and short stems. Using worsted-weight yarn and a 4 mm hook, you can create decorative leaves approximately 10 cm wide. The project suits crocheters familiar with basic stitches, shaping, and simple embroidery.
The Design: What Makes These Maple Leaves Different
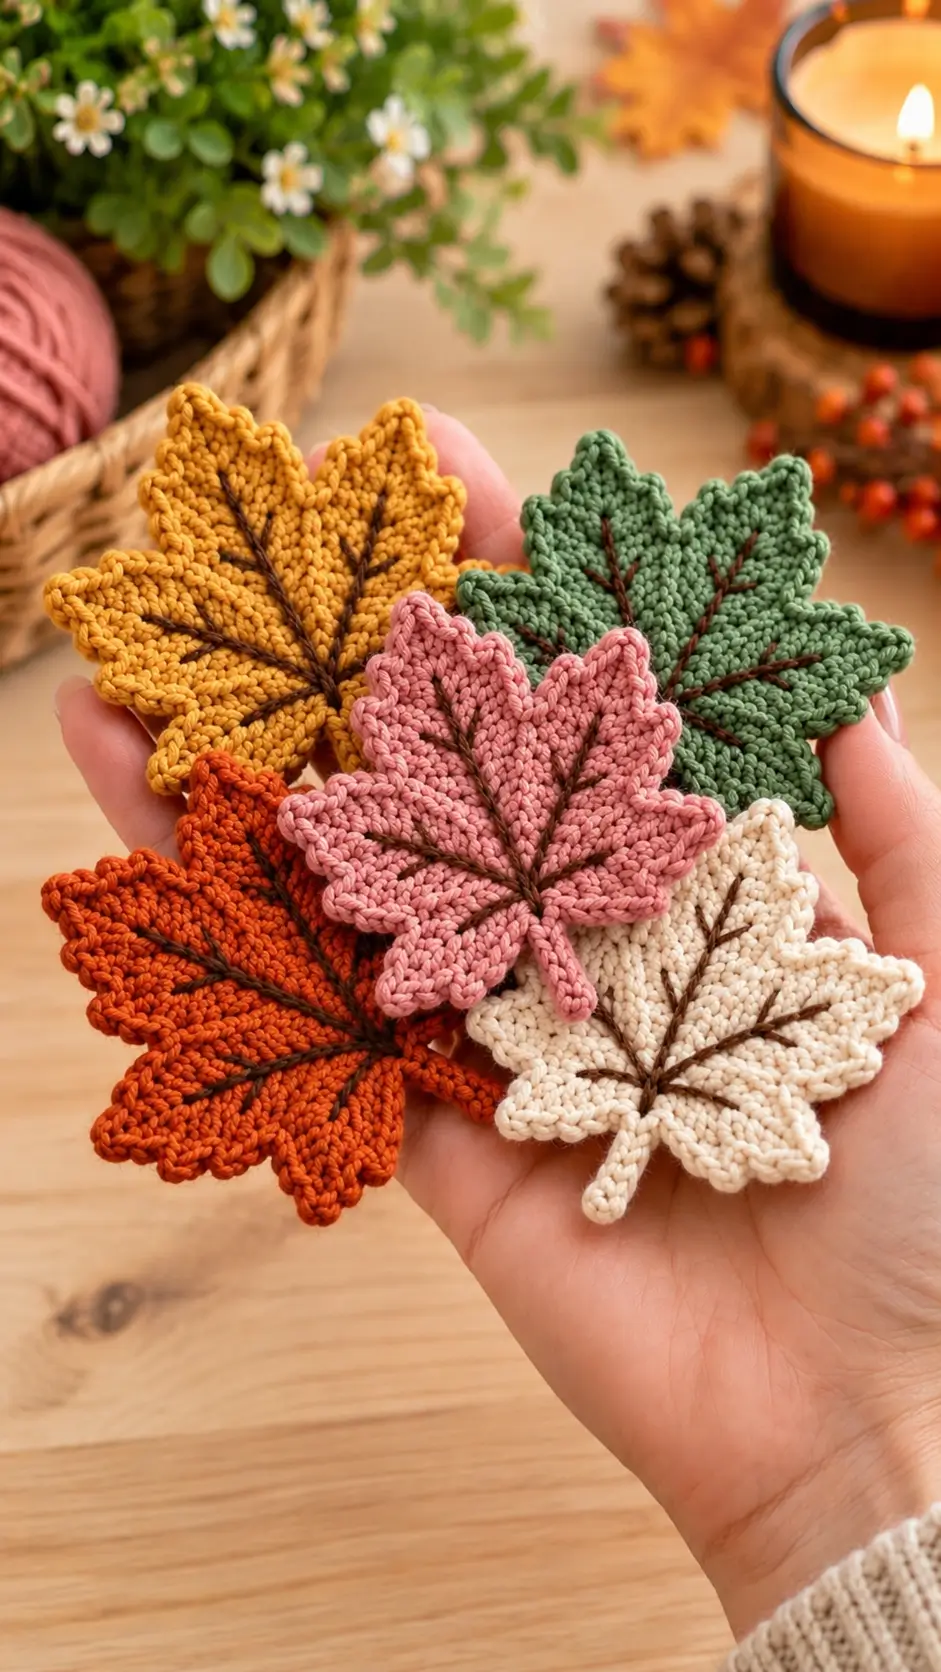
The photograph shows five individual crochet leaves arranged in a coordinated autumn palette. Each leaf has a compact center, several pointed lobes, a narrow stem, and dark brown veins extending from the base toward the outer edges.
Unlike openwork maple-leaf motifs, these leaves use relatively dense stitches. This construction creates a more substantial surface for embroidery and allows the individual points to retain their shape.
The brown veins are particularly important. They divide the crochet autumn leaf appliqué into recognizable sections without requiring multiple yarn colors within each leaf.
Another distinguishing feature is the combination of traditional and unconventional fall colors. Mustard, sage, and burnt orange establish the seasonal palette, while dusty pink and cream add contrast.
A common mistake is making every point the same length. The central point should remain dominant, with shorter lobes toward the stem.
Project Info at a Glance
| Skill Level | Time | Finished Size | Hook | Best For |
|---|---|---|---|---|
| Advanced Beginner | 30–60 minutes per leaf, estimated | Approx. 10 × 10 cm | 4.0 mm | Appliqués, garlands, gifts, fall decorations |
The size and hook are based on a comparable published maple-leaf appliqué. The embroidered version shown here may have different finished measurements.
Materials and Tools
Yarn
Use medium-weight cotton or acrylic yarn in the following colors:
- Mustard yellow yarn — worsted weight #4 — approximately 5–10 g.
- Sage green yarn — worsted weight #4 — approximately 5–10 g.
- Dusty pink yarn — worsted weight #4 — approximately 5–10 g.
- Burnt orange yarn — worsted weight #4 — approximately 5–10 g.
- Cream yarn — worsted weight #4 — approximately 5–10 g.
- Dark brown yarn — a small quantity for embroidered veins.
The yarn amounts are planning estimates rather than measured consumption for the photographed leaves.
Tools
- 4.0 mm crochet hook
- Tapestry needle
- Scissors
- Stitch markers
- Blocking mat
- Rust-resistant pins
- Tape measure
Crochet Abbreviations
- MR – Magic Ring
- ch – Chain
- sl st – Slip Stitch
- sc – Single Crochet
- hdc – Half Double Crochet
- dc – Double Crochet
- tr – Treble Crochet
- inc – Increase
- st – Stitch
- FO – Fasten Off
All instructions use US crochet terminology. An invisible decrease is made through the front loops of two adjacent stitches, although decreases are not required for the basic leaf foundation below.
How to Crochet a Maple Leaf
Pattern note: The following is a simplified five-point leaf construction. It provides a starting motif for the embroidered autumn leaves, but it will not reproduce every small serration visible in the photograph. For a fully tested, detailed leaf outline, consult the linked published pattern in the references section.
Step 1: Crochet the Center
Choose your first leaf color.
Round 1: Make a magic ring and work 6 sc into the ring. (6)
Pull the ring closed.
Round 2: Work 2 sc into each stitch around. (12)
Round 3: Repeat [1 sc, inc] six times. (18)
Round 4: Repeat [2 sc, inc] six times. (24)
Join with a slip stitch.
The center should form a flat circular foundation.
If the fabric begins cupping, check the stitch count before continuing. The final round must contain exactly 24 stitches.
Step 2: Establish the Five Leaf Points
The five lobes are shaped around the outer foundation.
Place five stitch markers around the circle to indicate the approximate positions of the major points.
One point will become the tall central lobe.
Two points will extend toward the upper sides, while the remaining two will form the shorter lower lobes.
The marked positions are shaping guides. Because 24 stitches do not divide evenly into five identical groups, the spacing must be adjusted according to the intended outline.
Step 3: Shape the Central Lobe
Attach yarn at the upper center.
Chain 8.
Beginning in the second chain from the hook, work:
1 sl st, 1 sc, 1 hdc, 2 dc, 1 hdc, 1 sc.
Join back to the foundation with a slip stitch.
This creates a narrow pointed extension.
The central lobe should project farther than the surrounding sections.
Step 4: Shape the Upper Left Lobe
Move to the upper-left attachment position.
Chain 6.
Beginning in the second chain, work:
1 sl st, 1 sc, 1 hdc, 1 dc, 1 sc.
Join back to the foundation.
Keep this point slightly shorter than the central lobe.
Step 5: Shape the Upper Right Lobe
Repeat the upper-left construction on the opposite side.
Compare the two upper lobes.
Their outer tips should finish at approximately the same height.
Step 6: Shape the Lower Left Lobe
Attach yarn near the lower-left section.
Chain 5.
Beginning in the second chain, work:
1 sl st, 1 sc, 1 hdc, 1 sc.
Join to the foundation.
This lobe should angle outward rather than directly upward.
Step 7: Shape the Lower Right Lobe
Repeat the lower-left construction on the opposite side.
Check that the leaf now has five distinct points.
The center point should be longest, the upper pair should establish width, and the lower pair should sit closer to the stem.
Adding the Smaller Pointed Edges
The photographed leaves contain several small projections along their outer edges.
These details create a more realistic maple-leaf silhouette.
Attach yarn at an outer edge where a secondary point is required.
Chain 3.
Beginning in the second chain, work:
1 sl st, 1 sc.
Join back to the main fabric.
Repeat at selected positions around the major lobes.
Keep the secondary points smaller than the five principal sections.
Do not place identical points at equal intervals around the entire circumference. The spacing should follow the individual lobe shapes.
Creating the Decorative Outer Border
Work one round of single crochet around the leaf.
At each major tip, work:
sc, ch 2, sc.
At smaller projections, work:
sc, ch 1, sc.
At the deepest valleys, use a slip stitch.
The short slip stitches help separate the neighboring points.
Check the perimeter frequently.
If the edge ripples, remove unnecessary stitches from the curved sections.
If the border pulls the points inward, additional stitches may be needed along the affected edge.
Crocheting the Maple Leaf Stem
Attach the same leaf-colored yarn at the lower center.
Chain 6.
Beginning in the second chain from the hook, work one slip stitch into each chain.
Return to the leaf base and join securely.
Fasten off.
Leave a yarn tail approximately 10 cm long if the leaf will be sewn onto another project.
The stem should align with the central point.
How to Embroider the Brown Leaf Veins
The dark brown embroidery is the main detail that distinguishes the photographed set from plain crochet maple leaves.
Use a tapestry needle and a short length of brown yarn.
Work the veins after completing the crochet structure.
Central Vein
Bring the needle from the back of the leaf to the front at the base of the stem.
Work a line of short running stitches toward the central point.
Keep the line aligned with the center of the leaf.
Do not pull the embroidery tightly because this can make the crochet fabric curl.
Upper Left Vein
Bring the brown yarn to the front near the central junction.
Embroider a diagonal line toward the upper-left point.
Stop approximately 5 mm before the outer edge.
Secure the yarn on the reverse side.
Upper Right Vein
Repeat the same technique toward the upper-right point.
Keep the two branches approximately symmetrical.
Lower Left Vein
Work a shorter diagonal line toward the lower-left lobe.
The vein should follow the direction of the point rather than cross the stitches horizontally.
Lower Right Vein
Repeat the lower-left embroidery on the opposite side.
The finished leaf should contain one main central vein and four branching veins.
How to Make the Mustard Yellow Maple Leaf
Use mustard yellow yarn for the entire crochet structure.
Complete the center, major lobes, smaller points, border, and stem.
Embroider the veins using dark brown yarn.
Mustard yellow provides strong contrast against the brown lines, making the vein arrangement particularly visible.
Keep the embroidery stitches short enough to follow the textured crochet surface.
How to Make the Sage Green Maple Leaf
Use sage green yarn for the leaf body and stem.
Follow the same construction sequence as the mustard version.
Add dark brown embroidered veins.
The green leaf introduces a botanical color into the autumn set.
For a coordinated appearance, use the same brown embroidery yarn across all five leaves.
How to Make the Dusty Pink Maple Leaf
Work the leaf using dusty pink yarn.
Maintain the same foundation stitch count and hook size.
Complete the pointed edges and short stem.
Embroider the veins in brown.
The pink leaf can be placed in the center of the arrangement because its color contrasts with the more traditional autumn shades.
How to Make the Burnt Orange Maple Leaf
Use burnt orange yarn for the complete leaf.
Work the foundation and shape the five principal lobes.
Add the secondary points and finish the perimeter.
Embroider the brown veins after blocking the crochet structure lightly.
This prevents the embroidery from pulling the points out of alignment.
How to Make the Cream Maple Leaf
Use cream-colored yarn for the main leaf.
Follow the same stitch sequence as the other four versions.
Add the brown embroidery with particular attention to the central junction.
Dark veins show clearly against cream, so uneven stitch lengths are more noticeable.
Keep the embroidery consistent across all five branches.
Assembly and Finishing
- Complete the circular foundation for the first leaf.
- Shape the tall central lobe.
- Add the upper-left and upper-right lobes.
- Complete the two shorter lower lobes.
- Add the smaller pointed projections.
- Work the outer border and short stem.
- Block the leaf lightly to establish its final outline.
- Embroider the central brown vein.
- Add the four branching veins and weave in the yarn tails.
- Repeat the process in the remaining four colors and compare the finished dimensions.
The completed set contains five separate maple-leaf motifs with matching brown vein details.
7 Technical Tips for Crochet Maple Leaves
- Count the foundation stitches. Round 4 must contain 24 stitches in the simplified construction. A missing increase can distort the center before the lobes are attached.
- Keep the center point longest. If the five major points are identical, the outline may resemble a star. Compare their lengths before adding secondary details.
- Use short stitches in the valleys. Tall stitches between lobes reduce the depth of the indentations. Slip stitches create a clearer separation.
- Control embroidery tension. Brown yarn pulled too tightly can make the leaf cup. The running stitches should rest against the surface without gathering the crochet fabric.
- Measure matching lobes. The upper-left and upper-right points should finish within approximately 5 mm of one another. Check them before working the border.
- Block every major point. Pin the central tip and four side points individually. Add separate pins at the deepest valleys to preserve the silhouette.
- Hide yarn tails carefully. Weave each tail through matching stitches for approximately 5 cm before reversing direction. Avoid bringing dark brown tails across the front of a cream or pink leaf.
Blocking the Finished Leaves
Blocking helps the points retain their intended shape.
Place each completed leaf on a blocking mat.
Align the stem vertically.
Pin the tallest central point first.
Next, pin the upper-left and upper-right points at equal distances from the center.
Secure the lower lobes and any smaller projections.
Pin the valleys inward to create a more recognizable maple outline.
Allow the motifs to dry completely before removing the pins.
For a matching set, compare all five leaves against the same measurement template.
Choosing the Best Yarn
Worsted-weight cotton creates a relatively firm leaf with visible stitch definition.
Acrylic yarn can also be used for decorative appliqués and garlands.
Choose smooth yarn rather than heavily textured fibers when the embroidered veins are an important feature.
Use the same yarn weight for every color.
Mixing significantly different yarn thicknesses can produce leaves of noticeably different sizes, even when the stitch counts match.
How to Make Smaller Maple Leaves
For smaller motifs, try DK yarn and a 3.5 mm hook.
A published maple-leaf appliqué made with this combination measures approximately 8.5 × 8.5 cm.
Make one sample and measure it after blocking.
Smaller leaves can be used as gift decorations, hair accessories, scrapbook embellishments, and garland elements.
How to Make Larger Maple Leaves
Use thicker yarn and a hook appropriate for the selected fiber.
Keep the five-lobe arrangement and the same embroidery structure.
Do not enlarge the motif by adding extra stitches only around the perimeter. This increases the circumference without proportionally expanding the center.
For a larger decorative leaf, use a published pattern specifically designed for that scale or adjust the complete construction through a gauge sample.
Making a Crochet Maple Leaf Garland
A garland is one practical use for the five-color set.
Make several leaves in mustard, sage, pink, orange, and cream.
Arrange them in a repeating sequence before attaching them.
Crochet a long chain using cream or brown yarn.
Attach each leaf through its stem or upper center.
Leave approximately 8–12 cm between neighboring motifs, depending on the desired finished length.
For a more varied arrangement, alternate the direction of the leaves rather than positioning every stem vertically.
Using Maple Leaves as Appliqués
These motifs can be sewn onto tote bags, cushion covers, blankets, and seasonal accessories.
Place the leaf on the fabric and secure it temporarily with pins.
Use matching yarn to sew around the center and selected outer edges.
Avoid flattening the pointed tips with excessive sewing stitches.
For clothing, attach the leaf securely enough to withstand normal movement and washing.
Check the care requirements of both the appliqué yarn and the fabric underneath.
Autumn Color Combinations
The photographed set combines five colors that work together without repeating the same shade.
For another version, consider:
- Mustard, rust, olive, cream, and burgundy.
- Terracotta, dusty pink, sage, ivory, and copper.
- Golden yellow, burnt orange, forest green, beige, and brown.
- Plum, mauve, mustard, olive, and cream.
Use the same dark brown embroidery throughout the collection to connect the individual colors visually.
Care and Storage
Follow the care instructions for the yarn used.
After washing, reshape each point while the motif is damp.
Dry the leaves flat.
Store them without folding sharply through the embroidered center veins.
For seasonal decorations, place the leaves flat between layers of clean tissue paper.
Conclusion
The five-color collection uses a consistent maple-leaf silhouette while changing the yarn shade for each motif. Mustard yellow, sage green, dusty pink, burnt orange, and cream create variety, while brown embroidery connects the finished set visually. Begin with one sample leaf, check the five principal points, and measure it after blocking before making the remaining colors. The simplified construction is suitable for experimenting with decorative appliqués; use a tested published pattern when exact reproduction is required. Save this crochet maple leaf pattern to Pinterest and share your finished collection on Instagram using #ColorfulCrochetMapleLeaves. Which of the five colors would you choose for the center of an autumn garland?









