Introduction
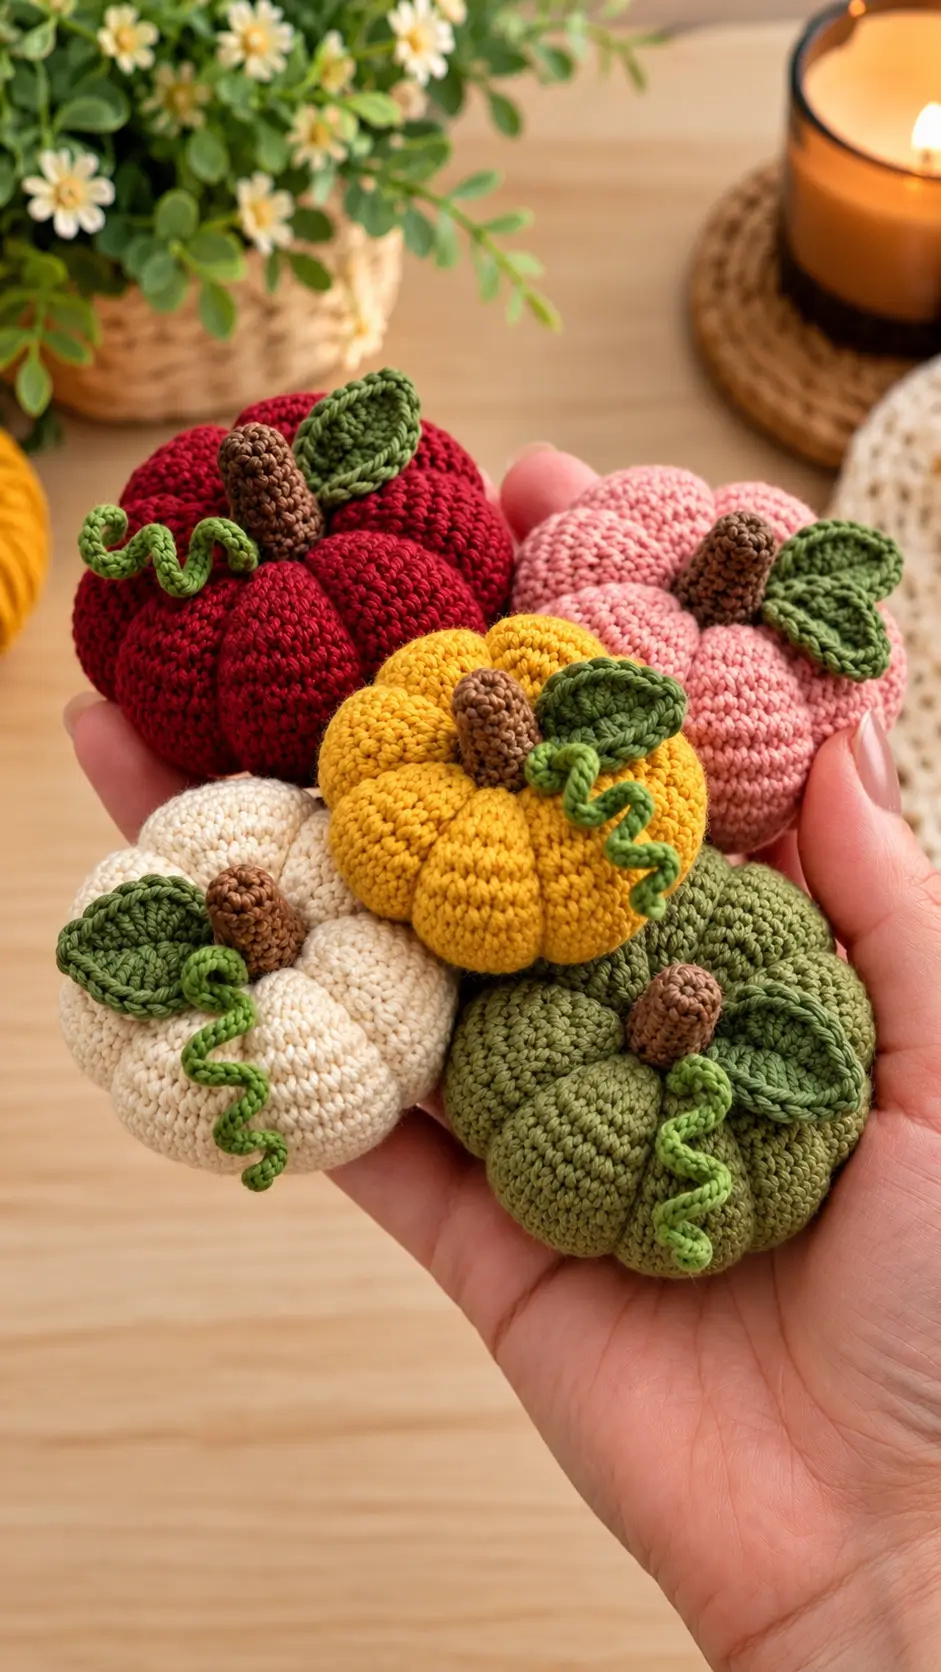
A miniature pumpkin needs deep vertical grooves to distinguish its rounded body from an ordinary stuffed ball. This mini crochet pumpkin amigurumi pattern creates five colorful pumpkins with sculpted sections, brown stems, green leaves, and curling vines. Use DK cotton yarn and a 3 mm crochet hook for an intermediate project with an estimated finished width of 7–9 cm. The completed pumpkins can decorate autumn tables, shelves, baskets, and seasonal displays.
The Design: What Makes These Mini Pumpkins Different
The photographed collection uses five contrasting colors while keeping the same structural features. Each pumpkin has a compact, flattened body divided into rounded vertical sections. A short brown stem rises from the center, accompanied by an oval green leaf and a narrow spiral vine.
The main construction decision is to crochet a stuffed sphere and then sculpt the pumpkin grooves using a separate strand of matching yarn. This technique produces deeper divisions than ordinary surface stitches.
The second decision concerns the topper. The brown stem is worked as a small tube, while the green leaf remains flat. A tightly increased chain creates the curled vine without wire.
A frequent mistake in crochet pumpkin amigurumi is overstuffing the body. Excess filling prevents the shaping thread from forming distinct sections.
Project Info at a Glance
| Skill Level | Estimated Time | Estimated Size | Hook | Best For |
|---|---|---|---|---|
| Intermediate | 60–90 minutes per pumpkin | 7–9 cm wide | 3.0 mm | Fall decorations, ornaments, handmade gifts |
These are planning estimates for the photo-inspired design. The finished dimensions depend on yarn thickness, tension, stuffing, and the depth of the sculpted grooves.
Materials and Tools
Yarn
Use DK-weight cotton or cotton-blend yarn. The following quantities are estimated for one small pumpkin.
- Pumpkin body yarn: 15–25 g in your chosen color.
- Brown yarn: approximately 2–3 g for the stem.
- Dark green yarn: approximately 2–3 g for the leaf.
- Light green yarn: approximately 1–2 g for the curling vine.
For the five-color collection, prepare:
- Deep burgundy for the red pumpkin.
- Dusty pink for the pink pumpkin.
- Golden yellow for the yellow pumpkin.
- Warm cream for the ivory pumpkin.
- Olive green for the green pumpkin.
Tools
- 3.0 mm crochet hook
- Polyester fiberfill
- Tapestry needle
- Long upholstery needle for shaping the pumpkin sections
- Stitch markers
- Scissors
- Measuring tape
These pumpkins do not require safety eyes because the photographed design has no face.
Abbreviations
- MR: Magic Ring
- sc: Single Crochet
- inc: Increase – 2 sc in the same stitch
- dec: Decrease – crochet 2 stitches together
- sl st: Slip Stitch
- ch: Chain
- hdc: Half Double Crochet
- dc: Double Crochet
- BLO: Back Loop Only
- FO: Fasten Off
An invisible decrease is made by inserting the hook through the front loops of two consecutive stitches before completing one single crochet.
Mini Crochet Pumpkin Pattern – Step by Step
Work the pumpkin body in continuous spiral rounds unless otherwise stated. Place a stitch marker in the first stitch of each round.
Pumpkin Body (Make 5)
Yarn: burgundy, pink, yellow, cream, or olive green.
R1: 6 sc in MR. (6)
R2: inc × 6. (12)
R3: (1 sc, inc) × 6. (18)
R4: (2 sc, inc) × 6. (24)
R5: (3 sc, inc) × 6. (30)
R6: (4 sc, inc) × 6. (36)
R7: 36 sc. (36)
R8: 36 sc. (36)
R9: 36 sc. (36)
R10: 36 sc. (36)
R11: 36 sc. (36)
R12: 36 sc. (36)
R13: (4 sc, dec) × 6. (30)
R14: (3 sc, dec) × 6. (24)
R15: (2 sc, dec) × 6. (18)
Begin stuffing the pumpkin. Fill the outer sections evenly while leaving enough flexibility for shaping.
R16: (1 sc, dec) × 6. (12)
R17: dec × 6. (6)
Fasten off, leaving a 20 cm tail.
Thread the tail through the front loops of the remaining six stitches and pull the opening closed.
Weave in the tail securely.
How to Shape the Pumpkin Sections
The crocheted body initially resembles a rounded ball. The pumpkin shape develops when matching yarn is pulled around the stuffed surface.
Cut a separate strand of body-colored yarn approximately 100–120 cm long.
Thread it through a long upholstery needle.
Insert the needle through the bottom center of the pumpkin and bring it out through the top center.
Wrap the yarn around the outside of the body, following a straight vertical line.
Insert the needle through the bottom center again and bring it back through the top.
Pull gently until a visible groove forms.
Repeat this process at evenly spaced positions around the pumpkin.
For the photographed appearance, divide the body into approximately six sections.
After completing the grooves, check the pumpkin from above. The sections should radiate evenly from the central opening.
Secure the shaping yarn inside the top center, where the stem will cover the finishing stitches.
Crochet Pumpkin Stem
Brown Stem (Make 5)
Yarn: medium brown.
R1: 6 sc in MR. (6)
R2: 6 sc in BLO. (6)
R3: 6 sc. (6)
R4: 6 sc. (6)
R5: 6 sc. (6)
R6: 6 sc. (6)
Fasten off, leaving a 20 cm sewing tail.
The stem forms a short cylindrical tube with a closed top and open bottom.
For a slightly curved stem, place a small amount of stuffing inside the tube and bend it gently before sewing.
Do not overfill the stem. The photographed stems have a narrow, slightly irregular shape.
Crochet Pumpkin Leaf
Oval Green Leaf (Make 5)
Yarn: dark olive green.
Ch 9.
R1: Starting in the second chain from the hook, work 1 sl st, 1 sc, 1 hdc, 2 dc, 1 hdc, 1 sc, and 1 sl st. (8)
Ch 1 and rotate the work to crochet along the opposite side of the foundation chain.
R2: Work 1 sl st, 1 sc, 1 hdc, 2 dc, 1 hdc, 1 sc, and 1 sl st along the opposite side. (8)
Join with a slip stitch.
Fasten off, leaving a 20 cm sewing tail.
The completed leaf should have a narrow oval shape with a defined center line.
To create a more pointed tip, pinch one end of the leaf gently while shaping it.
Adding a Raised Leaf Vein
The photographed green leaves contain visible center ridges.
Thread a short strand of matching green yarn through a tapestry needle.
Bring the needle through the base of the leaf.
Work a line of short running stitches toward the pointed tip.
Keep the stitches centered and avoid pulling them tightly.
Secure the yarn on the reverse side.
For a thicker ridge, use surface slip stitches instead of embroidery.
Crochet Curly Pumpkin Vine
Green Spiral Vine (Make 5)
Yarn: light or medium green.
Ch 19.
R1: Starting in the second chain from the hook, work 2 sc into each chain across. (36)
Fasten off, leaving a 20 cm sewing tail.
The increased stitches cause the chain to curl naturally.
For a tighter spiral, gently twist the completed vine in the direction of the curl.
For a longer vine, increase the foundation chain length while maintaining two single crochet stitches in each chain.
The photographed pumpkins have vines that extend away from the stems in loose curls.
Attaching the Pumpkin Stem
Position the brown stem over the top center of the pumpkin.
The stem should cover the shaping-thread attachment points.
Thread the brown sewing tail through a tapestry needle.
Sew around the open base of the stem, catching secure stitches from the pumpkin body.
Keep the stem upright while working.
After completing the attachment, weave the remaining tail into the pumpkin.
Check that the stem does not lean excessively or expose the shaping threads underneath.
Attaching the Green Leaf
Place the green leaf beside the stem.
The leaf should angle outward rather than sit vertically.
Using the long green tail, sew the base of the leaf to the top of the pumpkin.
Attach approximately the first 1–2 cm of the leaf.
Leave the outer portion free so it can extend away from the stem.
Weave the tail into the body.
Attaching the Curly Vine
Position the spiral vine on the opposite side of the stem or slightly in front of the leaf.
Sew the foundation end securely to the pumpkin.
Leave the remaining spiral unattached.
Arrange the curl so it extends outward without covering the entire leaf.
For a natural-looking topper, allow the vine to curve in a different direction from the leaf.
How to Make the Burgundy Pumpkin
The burgundy pumpkin creates the darkest element in the five-color collection.
Work the body using deep red or wine-colored DK yarn.
Complete all 17 rounds and shape the body into six sections.
Attach a medium-brown stem, dark olive leaf, and green spiral vine.
The darker body color makes the sculpted grooves particularly important because shadows between the sections provide much of the visual definition.
How to Make the Pink Pumpkin
Use dusty pink yarn for the body.
Follow the same 17-round construction.
Keep the stuffing moderate so the six grooves remain visible.
Attach the brown stem slightly off-center if you want a less uniform appearance.
Place the green leaf beside the stem and allow the curling vine to extend toward the front.
The photographed pink pumpkin has a broad, rounded silhouette with prominent vertical divisions.
How to Make the Yellow Pumpkin
Use golden-yellow yarn for the main body.
Complete the same stitch sequence and stuffing process.
Shape the pumpkin into six rounded sections.
The yellow version can be positioned at the center of the collection because its color contrasts with the burgundy, pink, cream, and olive pumpkins.
Use dark green for the leaf and a slightly lighter green for the spiral vine.
How to Make the Cream Pumpkin
Work the pumpkin body using warm ivory or cream yarn.
Maintain consistent tension throughout the 36-stitch middle rounds.
White stuffing may become visible through loose stitches, so use a hook that produces a dense fabric.
After closing the body, create the six sculpted grooves.
Attach the brown stem and green accessories.
The cream version provides a neutral contrast to the stronger autumn colors.
How to Make the Olive Green Pumpkin
Use olive-green yarn for the body.
Follow the standard pumpkin instructions.
Choose a slightly darker shade of green for the leaf so it remains distinguishable from the pumpkin body.
Use medium brown for the stem and brighter green for the curling vine.
The finished olive pumpkin should have the same overall proportions as the other four colors.
Assembly and Finishing
- Complete the first pumpkin body through Round 17.
- Stuff the body evenly and close the remaining six stitches.
- Use matching yarn to divide the body into six sculpted sections.
- Check the pumpkin’s height and width before adding the topper.
- Crochet the brown cylindrical stem.
- Sew the stem securely over the top center.
- Crochet the oval green leaf and add its center vein.
- Attach the leaf beside the stem.
- Crochet the green spiral vine and secure one end beside the stem.
- Weave in all yarn tails and repeat the construction for the remaining four colors.
The finished collection contains five stuffed pumpkins with matching sculpted bodies, brown stems, green leaves, and curling vines.
7 Technical Tips for Better Crochet Pumpkins
- Check the stitch count after every increase round. The body must reach exactly 36 stitches at Round 6. A missing increase creates uneven expansion before the shaping process begins.
- Avoid excessive stuffing. An overfilled pumpkin resists the shaping yarn and produces shallow grooves. Leave enough flexibility for the six sections to compress slightly.
- Keep the shaping lines evenly spaced. Six sections require approximately 60 degrees between neighboring grooves when viewed from above. Uneven spacing produces noticeably different segment widths.
- Use a long needle for sculpting. A short tapestry needle may bend or emerge away from the center when passing through the stuffing. A long upholstery needle makes it easier to connect the top and bottom openings.
- Secure the stem firmly. A loose attachment allows the brown tube to lean or rotate. Sew around the complete six-stitch base rather than attaching it at only one point.
- Control the spiral tension. The vine uses 36 stitches worked into an 18-chain foundation. If the curl is irregular, check that every chain received two single crochet stitches.
- Hide the finishing tails inside the body. Exposed tails are especially visible on cream and pink pumpkins. Pass each tail through several interior stitches before trimming the excess.
How to Make Smaller Crochet Pumpkins
The standard version uses a 36-stitch plateau.
For a smaller pumpkin, reduce the body to a 30-stitch plateau.
Use the following sequence:
R1: 6 sc in MR. (6)
R2: inc × 6. (12)
R3: (1 sc, inc) × 6. (18)
R4: (2 sc, inc) × 6. (24)
R5: (3 sc, inc) × 6. (30)
R6–10: 30 sc. (30)
R11: (3 sc, dec) × 6. (24)
R12: (2 sc, dec) × 6. (18)
R13: (1 sc, dec) × 6. (12)
R14: dec × 6. (6)
Close the body and create six grooves using the same shaping method.
Use a shorter stem and smaller leaf to maintain the proportions.
How to Make Larger Crochet Pumpkins
For a larger version, increase the body to a 42-stitch plateau.
After completing the 36-stitch increase round, work:
R7: (5 sc, inc) × 6. (42)
R8–14: 42 sc. (42)
R15: (5 sc, dec) × 6. (36)
R16: (4 sc, dec) × 6. (30)
R17: (3 sc, dec) × 6. (24)
R18: (2 sc, dec) × 6. (18)
R19: (1 sc, dec) × 6. (12)
R20: dec × 6. (6)
Close the opening after stuffing.
Shape six grooves around the body and attach a proportionally larger stem, leaf, and vine.
Choosing Yarn for Mini Pumpkin Amigurumi
Smooth DK cotton provides visible stitches and a relatively firm surface.
Cotton-acrylic blends are another practical choice for small decorative pumpkins.
Use the same yarn weight across all five colors if you want matching dimensions.
Changing yarn thickness between pumpkins may produce different widths even when every body follows the same stitch counts.
A hook smaller than the yarn label’s general recommendation helps prevent stuffing from showing through the fabric.
Decorating with Mini Crochet Pumpkins
The five-color collection works well as a seasonal table arrangement.
Place the pumpkins together in a shallow basket or wooden tray.
For a balanced display, position the yellow pumpkin near the center and arrange the darker burgundy and olive pumpkins toward the outside.
The cream and pink pumpkins can separate the stronger colors.
These pumpkins can also be used as shelf decorations, seasonal ornaments, or handmade gifts.
Keep them away from open flames and hot candle containers, particularly when using acrylic yarn or polyester stuffing.
Care and Storage
Follow the washing instructions provided by the yarn manufacturer.
For decorative pumpkins, spot cleaning is often preferable to frequent machine washing.
Allow the pumpkins to dry completely before storage.
Do not compress the stuffed bodies beneath heavy objects because the sculpted sections may lose their definition.
Store the pumpkins in a dry container with enough space for the leaves and curling vines.
Conclusion
The defining feature of this five-color collection is the sculpted pumpkin body. Each piece begins with a 36-stitch circumference, closes into a stuffed form, and develops six visible sections through needle shaping. Brown stems, green leaves, and spiral vines complete the design without adding facial details. Make one sample pumpkin first, measure its finished width, and adjust stuffing firmness before producing the remaining colors. Save this mini crochet pumpkin amigurumi pattern to Pinterest and share your completed collection on Instagram using #MiniCrochetPumpkins. Which color would you place at the center of your autumn arrangement: burgundy, pink, yellow, cream, or olive green?









