Introduction
A maple leaf needs five distinct lobes and a central vein that connects directly to its stem. This autumn crochet maple leaf placemat pattern combines golden yellow, burnt orange, rust red, and cream to create a large decorative leaf with pointed edges and raised veins. Made with worsted-weight cotton and a 5 mm crochet hook, the design is intended for intermediate crocheters creating seasonal table decorations, Thanksgiving centerpieces, and handmade fall home accessories.
The Design: What Makes This Autumn Maple Leaf Different
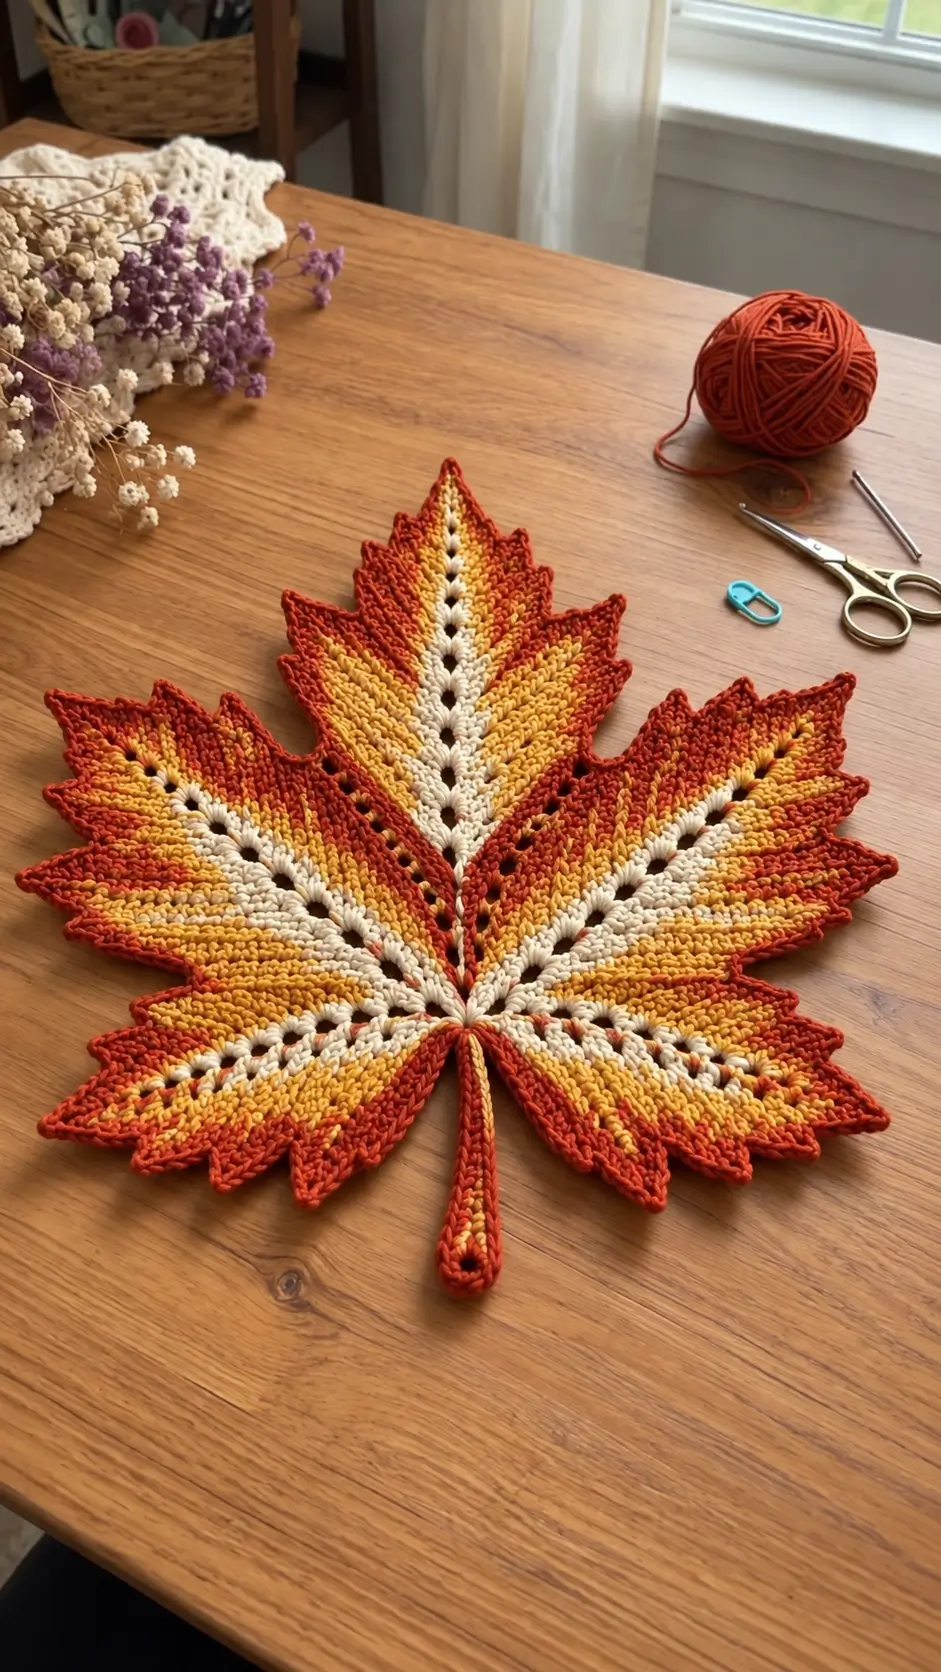
The photographed maple leaf uses color placement to define its botanical structure. Cream stitches form the central vein and branching lines, while golden yellow fills the interior sections. Burnt orange creates a gradual transition toward the rust-red perimeter.
The leaf contains five dominant lobes. The central lobe extends upward, two large side lobes establish the overall width, and two lower lobes spread outward near the stem. Smaller pointed projections create the characteristic serrated maple-leaf outline.
Unlike a basic crochet maple leaf appliqué, this larger design emphasizes dimensional texture. Raised stitches follow the veins, while small openings separate the central ridges from the surrounding fabric.
A common construction problem is excessive expansion around the pointed edges. Too many stitches produce rippling, while insufficient stitches make the leaf curl inward.
Project Information
| Feature | Details |
|---|---|
| Skill Level | Intermediate |
| Estimated Time | 4–6 hours |
| Reference Finished Size | Approximately 37 × 38 cm |
| Crochet Hook | 5.0 mm |
| Yarn Weight | Medium / Worsted Weight #4 |
| Construction | Flat crochet with shaped lobes and raised surface details |
| Best Uses | Fall table decoration, placemat, centerpiece |
The dimensions above are a reference from a comparable published maple-leaf placemat. The original photo-inspired version has not been gauge-tested, so its finished measurement may differ.
Materials and Tools
Yarn
Choose smooth cotton or cotton-blend yarn in four autumn colors.
- Cream yarn: approximately 25–35 g for the central veins and lighter interior sections.
- Golden yellow yarn: approximately 35–45 g for the main leaf sections.
- Burnt orange yarn: approximately 35–45 g for the outer portions of the lobes.
- Rust-red yarn: approximately 20–30 g for the pointed perimeter and stem.
These quantities are preliminary estimates. Actual consumption depends on the completed leaf dimensions, stitch density, and amount of surface crochet.
Tools
- 5.0 mm crochet hook
- Tapestry needle
- Scissors
- Locking stitch markers
- Blocking mat
- Rust-resistant blocking pins
- Tape measure
Crochet Abbreviations
- MR: Magic Ring
- ch: Chain
- sl st: Slip Stitch
- sc: Single Crochet
- hdc: Half Double Crochet
- dc: Double Crochet
- tr: Treble Crochet
- st: Stitch
- sp: Space
- RS: Right Side
- FO: Fasten Off
All stitch terminology follows US crochet conventions.
Understanding the Maple Leaf Construction
This design is assembled around a central junction from which five major leaf sections extend.
The center lobe is the longest section. Two upper side lobes spread diagonally outward, while the lower pair extends toward the bottom corners.
The cream-colored veins radiate from the central junction. Each major lobe contains a primary vein, and smaller branches extend toward its serrated outer edge.
Color transitions follow the direction of these veins. Cream appears closest to the center, golden yellow occupies the middle sections, and orange-red stitches form the outer areas.
The final perimeter defines the maple silhouette and connects the individual sections visually.
Autumn Crochet Maple Leaf Pattern – Step by Step
Construction note: The following sections describe a photo-inspired method for building the leaf. They are not a complete, stitch-tested row-by-row pattern. Exact attachment points and stitch counts must be established through a working sample before this design can be reproduced reliably.
Step 1: Establish the Central Foundation
Yarn: cream.
Begin with a central foundation chain.
For a large decorative leaf, a foundation of approximately 20–25 chains provides a starting structure.
Work single crochet stitches along the foundation to create a firm central strip.
Keep the strip straight because it establishes the direction of the longest lobe and the position of the stem.
Mark the lower central junction with a locking stitch marker.
This junction will become the starting position for the five primary veins.
Step 2: Shape the Tall Center Lobe
Yarn: cream and golden yellow.
The central lobe should extend farther than the neighboring upper lobes.
Begin at the upper portion of the foundation and work outward using progressively taller stitches.
A typical height progression is:
sc → hdc → dc → tr.
Reduce the stitch height approaching the pointed tip.
Use a small chain picot to emphasize the final point.
Work the opposite side with matching stitch heights.
Introduce golden yellow as the lobe becomes wider, keeping cream near the central vein.
The finished section should taper symmetrically toward its highest point.
Step 3: Create the Upper Left Lobe
Yarn: cream, golden yellow, and burnt orange.
Attach yarn at the upper-left branching position.
Extend the lobe diagonally outward from the central junction.
Use shorter stitches near the attachment point and taller stitches toward the widest section.
Shape the outer point with a small picot.
Return toward the center using the reverse stitch-height progression.
Keep the lobe slightly shorter than the central section.
Place cream near the primary vein, golden yellow through the middle, and burnt orange toward the perimeter.
Step 4: Create the Upper Right Lobe
Repeat the upper-left construction on the opposite side.
Compare both sections before continuing.
Their outer tips should sit at approximately the same height, and their widths should remain balanced.
Check that both lobes connect securely to the central junction without creating thick overlapping seams.
Step 5: Crochet the Lower Left Lobe
Yarn: golden yellow, burnt orange, and rust red.
Position the lower-left lobe beneath the upper-left section.
This lobe should be shorter than the central point but broad enough to establish the lower width of the leaf.
Work outward from the central junction, increasing stitch height toward the broadest section.
Create a pointed outer tip and return toward the base.
Use golden yellow near the center and introduce orange toward the outer edge.
Step 6: Crochet the Lower Right Lobe
Repeat the lower-left construction on the opposite side.
Check the silhouette on a flat surface.
The leaf should now have five dominant points, with the center lobe highest and the two lower lobes angled toward the stem.
Correct significant differences in lobe size before adding the decorative details.
Creating the Serrated Maple Leaf Edges
The reference leaf contains several smaller points between the five main lobes.
These projections are essential for distinguishing a maple leaf from a simple five-pointed star.
Work short pointed extensions along the outer edges.
For a small decorative point, use a short chain foundation and work progressively taller stitches toward its base.
A possible stitch sequence is:
sl st → sc → hdc → dc.
Form the tip with a short chain picot.
Return toward the main fabric using the reverse stitch sequence.
Keep secondary points noticeably smaller than the five major lobes.
Space them according to the available edge length rather than forcing an identical number onto every section.
Adding the Cream Raised Veins
The cream vein structure is the strongest visual feature of the photographed leaf.
One central vein runs from the stem junction toward the highest point.
Four major branches extend diagonally into the side lobes.
Central Vein
Place the leaf right side up.
Attach cream yarn at the lower central junction.
Work surface slip stitches along the center line toward the top point.
Keep the working yarn behind the fabric and draw each loop through to the front.
The surface stitches should sit above the leaf without pulling the underlying fabric together.
Continue until the vein approaches the central tip.
Fasten off on the reverse side.
Upper Side Veins
Attach cream yarn at the central junction.
Work a diagonal line of surface slip stitches toward the upper-left point.
Stop shortly before reaching the outer edge.
Repeat for the upper-right lobe.
Keep both veins approximately symmetrical.
Lower Side Veins
Repeat the surface-crochet technique toward the two lower lobes.
These branches should be shorter than the central vein.
Keep their attachment points close to the same central junction.
Creating the Openwork Vein Details
The reference contains small openings beside several primary veins.
These spaces make the cream lines more prominent and prevent the interior from appearing completely solid.
Openwork is best incorporated while constructing each lobe rather than cutting or altering the completed fabric.
Use chain spaces between selected stitch groups.
For example:
2 dc, ch 1, skip 1 st, 2 dc.
This creates a small opening while maintaining a connected fabric.
Position the openings along the direction of the primary veins.
Do not place too many openings close together, as this can weaken the narrow sections between neighboring lobes.
Adding the Autumn Color Gradient
The photographed leaf uses a directional color arrangement rather than horizontal stripes.
Cream begins near the central veins.
Golden yellow occupies the middle portions of each lobe.
Burnt orange extends toward the outer edges.
Rust red defines the pointed perimeter.
Change yarn colors at the end of a stitch by completing the final yarn-over with the new color.
Carry unused yarn only across short distances where it can remain hidden.
For longer sections, fasten off and rejoin the required color to avoid thick strands on the reverse side.
Rust-Red Outer Border
Yarn: rust red.
Attach rust-red yarn near the lower edge of the leaf.
Work single crochet stitches around the outer perimeter.
At each major point, use:
sc, ch 2, sc.
At smaller secondary points, use:
sc, ch 1, sc.
At deep valleys between lobes, work a slip stitch to emphasize the indentation.
Continue around the complete leaf.
Check the fabric frequently.
If the edge ripples, reduce the number of stitches along the curved sections.
If the edge pulls inward, additional stitches may be required between the points.
Optional Textured Border
For a more pronounced edge, add a second decorative round.
Work loose surface slip stitches around the perimeter.
Maintain the established points and valleys.
Avoid adding excessive stitches at the tips because the extra bulk can distort their shape.
The final border should emphasize the existing silhouette rather than substantially enlarge it.
Crochet Maple Leaf Stem
Yarn: rust red.
The stem should extend directly from the lower central junction.
For a large decorative leaf, begin with approximately 18–22 chains.
Starting in the second chain from the hook, work single crochet stitches back toward the leaf.
For a thicker stem, turn and work another row along the opposite side.
At the free end, work additional stitches to create a rounded tip.
Join the stem securely to the base.
The stem should align with the central cream vein.
Assembly and Finishing
- Prepare the central foundation. Check that the main axis remains straight.
- Shape the center lobe. Make this the longest section of the leaf.
- Add the upper side lobes. Compare their width and height before proceeding.
- Complete the lower lobes. Keep them shorter and angled toward the stem.
- Add the secondary points. Maintain clear valleys between the major sections.
- Complete the color transitions. Keep cream near the veins and rust red toward the perimeter.
- Add the raised veins. Work the central line first, followed by the four major branches.
- Finish the perimeter. Use pointed chain spaces at the tips and shorter stitches in the valleys.
- Attach the stem. Align it with the central vein and secure the connection.
- Block the finished leaf. Pin every major point, smaller projection, and valley separately.
7 Technical Tips for a Better Maple Leaf Placemat
- Keep the central lobe dominant. If all five major points finish at the same height, the silhouette begins resembling a star. Measure the center point against both upper side lobes before adding the border.
- Control the valleys. Too many stitches inside an indentation make neighboring lobes merge visually. Use shorter stitches at the deepest part of each valley.
- Check the surface-vein tension. Tight surface slip stitches can shorten the center line and make the leaf curl. Keep the raised stitches relaxed against the underlying fabric.
- Match corresponding lobes. Compare the upper-left and upper-right sections before working the lower pair. Differences greater than approximately 1 cm become noticeable on a large placemat.
- Prevent border rippling. Extra stitches around the outer curves create unwanted waves. Correct the stitch distribution before blocking rather than stretching the fabric to compensate.
- Pin every point individually. A large serrated maple leaf may require more than 15 blocking pins. Pin the smaller projections as well as the five dominant tips.
- Secure color-change tails. Weave yarn ends through matching-color stitches for at least 5 cm before reversing direction. Avoid carrying dark orange or red tails behind open cream sections.
Blocking the Finished Autumn Maple Leaf
Blocking helps establish the final proportions of the autumn crochet maple leaf placemat.
Place the completed leaf on a blocking mat with the right side facing upward.
Align the stem vertically.
Pin the highest central point first.
Next, pin the upper-left and upper-right points at matching distances from the center.
Secure the lower lobes and smaller serrated projections.
Finally, pin the valleys inward to create clear separation between the sections.
Do not stretch the raised cream veins. They should remain relaxed while the surrounding fabric is shaped.
Allow the leaf to dry completely before removing the pins.
Choosing the Best Yarn
Medium-weight cotton is a practical choice for a decorative maple-leaf placemat.
Its relatively firm structure supports the pointed edges and allows the raised veins to remain visible.
A smooth cotton blend can also work when a slightly softer fabric is preferred.
Highly fuzzy yarn may obscure the smaller openings and surface details.
Use yarns of comparable thickness for all four colors. Significant differences in yarn weight can cause individual sections to pull or ripple.
Making a Larger Maple Leaf Centerpiece
The reference photograph shows a substantial decorative leaf positioned on a wooden table.
To create a larger centerpiece, choose thicker yarn and an appropriately sized hook.
Published maple-leaf placemat designs demonstrate the difference in scale. A medium-weight version measures approximately 37 × 38 cm, while a super-bulky T-shirt-yarn version measures approximately 41 × 48 cm.
Increasing the hook and yarn size is generally more predictable than adding random stitches around the perimeter.
Make a sample before committing to a larger version.
Making a Smaller Autumn Maple Leaf
The same color arrangement can be adapted for a smaller decorative motif.
Use DK cotton with a 3.5 mm hook for a more compact leaf.
Reduce the foundation lengths and lobe dimensions proportionally while retaining the five-lobe structure.
Keep the center point taller than the upper side points and maintain clear valleys.
Smaller leaves can be used for autumn garlands, gift decorations, table accents, and seasonal appliqués.
Autumn Color Combinations
The cream, yellow, orange, and rust-red combination creates a clear progression from the center toward the perimeter.
Other combinations can use the same structural arrangement.
- Cream, mustard, burnt orange, and burgundy for a darker autumn palette.
- Ivory, golden yellow, copper, and rust for a warmer appearance.
- Beige, olive green, mustard, and brown for a more natural botanical effect.
- Cream, peach, terracotta, and dark red for a softer color transition.
Keep the lightest shade close to the central veins when you want the branching structure to remain prominent.
Using the Finished Maple Leaf for Fall Decor
A large crochet maple leaf placemat can serve as an individual table decoration or a centerpiece.
Place the leaf beneath a decorative arrangement while leaving the pointed perimeter visible.
For a coordinated table setting, make several leaves using the same yarn weight, hook size, and blocked measurements.
Alternate rust-red, mustard, olive, and orange versions to create a varied autumn arrangement.
The leaf can also be displayed on a shelf or incorporated into a seasonal wall decoration.
If used beneath dishes, remember that decorative crochet is not automatically heat-resistant. Follow the yarn manufacturer’s guidance and avoid placing hot cookware directly on fibers that are not rated for that purpose.
Care and Storage
Follow the washing instructions supplied with the yarn.
After cleaning, reshape the pointed lobes while the fabric is still damp.
Dry the leaf flat to preserve its dimensions.
For seasonal storage, place the finished piece flat rather than folding it tightly through the raised veins.
Avoid compressing the pointed edges beneath heavy objects, as this can distort the blocked silhouette.
Conclusion
The defining features of this autumn leaf are its five-lobe structure, cream branching veins, graduated yellow and orange sections, and rust-red pointed perimeter. Establish the central axis before shaping the lobes, compare corresponding sections before edging, and block every point individually. Use worsted cotton and a 5 mm hook as a reference starting combination, then measure a completed sample before making a matching set. Save this autumn crochet maple leaf placemat pattern to Pinterest and share your finished table decoration on Instagram with #AutumnCrochetMapleLeaf. Would you keep the cream veins shown in the photograph or replace them with a darker golden-yellow shade?









