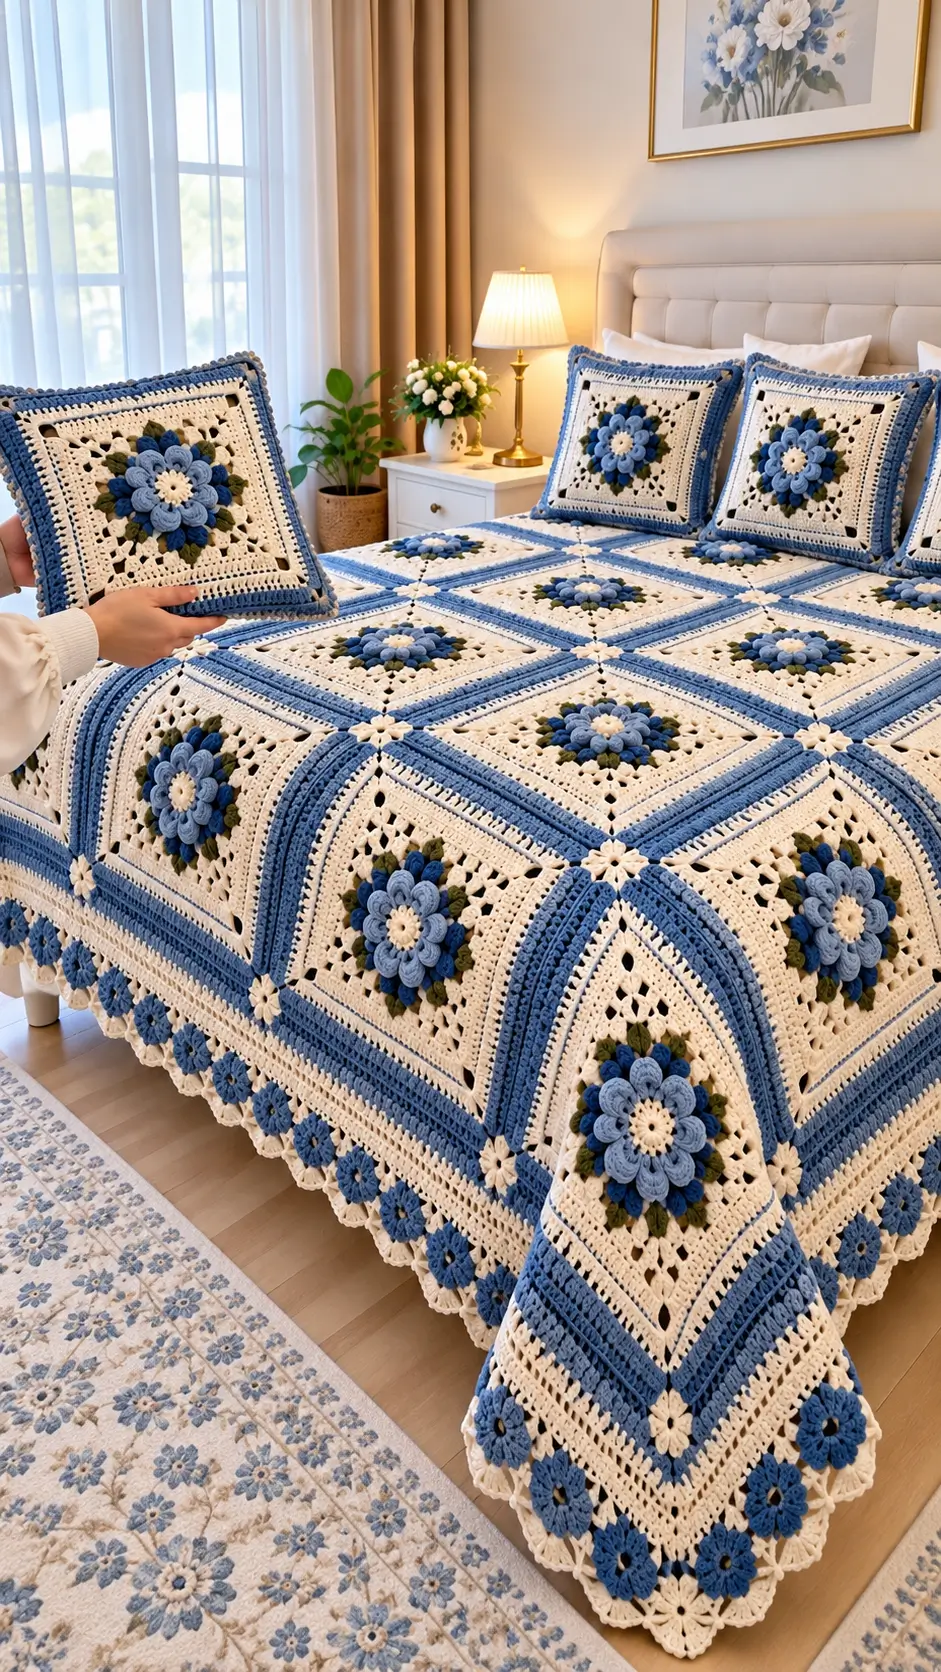
A flat flower cannot reproduce the stacked blue petals that dominate every square in this bedspread. This 3D flower granny square blanket uses layered floral motifs, cream openwork, blue framing rounds, green leaf details, and small joining flowers. Work the project in DK or worsted-weight yarn with a compatible crochet hook. The modular construction makes it practical for bedspreads, throws, and matching cushion covers.
The Design: What Makes This Flower Blanket Different
The raised flower is the main structural feature. Instead of making a conventional flat granny square and changing colors between rounds, several petal layers project above the cream background. This construction keeps the blue flowers clearly visible after the squares are joined.
Color placement provides the second important feature. Dark blue and dusty blue petals sit against cream, while muted green stitches form small leaves behind the flower. A blue frame repeats the flower colors around every square and creates continuous lines when the motifs are joined.
Small cream flowers can be positioned over selected intersections between four squares. They disguise joining points while repeating the floral structure at a smaller scale. One common problem is adding too many stitches behind the raised petals. Excess stitches cause the center of a crochet flower square to ripple instead of lying flat.
Project Info at a Glance
| Skill Level | Time | Motif Size | Hook | Best For |
|---|---|---|---|---|
| Intermediate | Multi-session project | Approximately 16 cm per blocked square | 5 mm reference hook | Bedspreads, throws and cushion covers |
Materials and Tools
Yarn
- Cream or ivory yarn — DK or worsted weight — background, joining flowers and border.
- Dusty blue yarn — matching weight — raised petals and border details.
- Denim blue yarn — matching weight — petals and square frames.
- Dark navy blue yarn — matching weight — inner flower contrast.
- Olive or sage green yarn — matching weight — leaf details.
- Light cream yarn — matching weight — flower centers and small decorative flowers.
The exact yarn quantity depends on the mattress dimensions, desired side drop, square size, border depth, yarn weight, and individual tension. Crochet and weigh one complete blocked square before calculating the total yarn requirement.
Tools
- 5 mm crochet hook
- Tapestry needle
- Locking stitch markers
- Scissors
- Blocking mats
- Rust-resistant blocking pins
- Measuring tape
Abbreviations
- MR — magic ring
- ch — chain
- sc — single crochet
- hdc — half double crochet
- dc — double crochet
- tr — treble crochet
- sl st — slip stitch
- sp — space
- st — stitch
- rep — repeat
- FLO — front loop only
- BLO — back loop only
US crochet terminology is used throughout the instructions.
3D Flower Granny Square Pattern
Make one complete sample square before beginning the full blanket. Block and measure the sample because its finished dimensions determine the number of squares required for the bedspread.
Flower Center
Use cream yarn.
Round 1: Make a magic ring. Ch 3 and work 11 dc into the ring. Join with sl st to the top of the beginning ch-3. (12)
Round 2: Ch 1. Work 2 sc in each stitch around. Join with sl st. (24)
Fasten off and weave the starting tail securely through the center.
First Blue Petal Layer
Use dark blue or medium blue yarn.
Join the blue yarn to the flower center. Work the petals as individual raised groups so they project above the center instead of forming another flat round.
Petal: Ch 3, work 2 dc, 2 tr and 2 dc into the selected attachment area. Ch 3 and sl st at the base.
Move evenly around the center and repeat the petal sequence until eight petals surround the central disk.
Check the spacing before fastening off. Each petal should occupy approximately the same amount of space around the center.
Second Blue Petal Layer
Use dusty blue yarn.
Turn the flower so the back of the first petal layer is accessible. Join dusty blue behind one petal.
Setup Round: Ch 1, sc around the rear attachment point, ch 4, then sc behind the next petal. Repeat around until eight chain spaces have been formed. Join with sl st.
Petal Round: Into each ch-4 space work sl st, ch 3, 2 dc, 3 tr, 2 dc, ch 3 and sl st.
Repeat the sequence in all eight chain spaces.
Fasten off. Arrange this second set of petals behind the first layer rather than pulling the petals through the front openings.
Green Leaf Layer
Use olive or sage green yarn.
Join the green yarn behind the second petal layer. Position four major leaf groups toward the locations that will eventually become the four corners of the granny square.
For each major leaf, work ch 3, dc, 2 tr, dc, ch 3 and sl st into the selected rear attachment space.
Add smaller green sections between the major leaves where necessary. The green should remain partly visible beyond the blue petals without covering large areas of the cream background.
This round also establishes attachment locations for converting the circular flower into a square.
Cream Squaring Round
Use cream or ivory yarn.
Attach the cream yarn behind one of the green corner leaves.
Round 1: Ch 3. Work dc groups across the first side. At the corner location work 2 dc, ch 2, 2 dc. Continue around, forming four equal sides and four ch-2 corners. Join with sl st.
Round 2: Ch 3. Dc in each stitch across the side. In every ch-2 corner space work 2 dc, ch 2, 2 dc. Repeat around and join.
Round 3: Continue the established square expansion. Maintain four clearly defined ch-2 corner spaces.
Lay the motif on a flat surface after this round. A correctly balanced square should remain flat without forcing the corners into position.
Openwork Cream Background
The photographed bedspread contains open spaces around the raised flowers rather than a completely solid background. These openings reduce weight and create the lace-like appearance visible between the central flower and blue frame.
Round 4: Ch 3. Dc across the solid corner section. Across the decorative section, alternate ch 1, skip 1 stitch, dc in the next stitch. Work 2 dc, ch 2, 2 dc into each corner.
Round 5: Work dc into the solid stitches and selected chain spaces while maintaining the four corner increases.
Repeat the same openwork arrangement on all four sides. Count each side before closing the round. Different stitch counts will distort the blue frame added next.
Blue Square Frame
Use dusty blue or denim blue yarn.
Frame Round 1: Join blue yarn in any corner. Ch 3 and dc evenly across each side. Work 2 dc, ch 2, 2 dc into each corner.
Frame Round 2: Ch 1 and sc in every stitch around. At each corner work sc, ch 2, sc.
Frame Round 3: Work one final hdc or dc round. Continue the established corner increases.
Fasten off. Measure the square after blocking rather than relying on its dimensions immediately after crocheting.
Small Joining Flowers
The small cream flowers visible between the large motifs provide decorative coverage at selected four-square intersections.
Use cream yarn.
Round 1: Make a MR. Ch 1 and work 8 sc into the ring. Join with sl st. (8)
Round 2: In each stitch work sl st, ch 2, 2 dc, ch 2 and sl st.
Repeat around until eight compact petals have been completed.
Fasten off and leave approximately 20 cm of yarn for sewing.
Sew the center of the small flower over an intersection where four large squares meet. Add a few attachment stitches at the petal tips without flattening the complete flower.
How to Join the Granny Squares
Block every large square to the same dimensions before assembly. Consistent blocking matters because even a small difference between motifs accumulates across a full bedspread.
Arrange all squares on a large flat surface. Check the direction of the flowers, green leaf sections, and blue frames before beginning the seams.
Join adjacent motifs through corresponding edge stitches. A mattress seam produces a relatively discreet join, while a crochet slip-stitch join creates a more defined line.
Complete one horizontal row at a time. After all rows have been assembled, join those rows together across the width of the bedspread.
Check every four-square intersection before fastening the seam. The corners should meet without overlapping or leaving a large opening.
Wide Crochet Bedspread Border
The border is an important part of the photographed design. It extends the blue-and-cream palette beyond the final row of granny squares and gives the bedspread a finished rectangular outline.
Border Round 1
Using blue yarn, work sc evenly around the entire assembled blanket. Maintain sufficient corner increases to keep all four corners flat.
Border Round 2
Work a solid blue dc round. Check the blanket on a flat surface before proceeding.
Border Round 3
Change to cream and work a contrasting hdc or dc round.
Border Round 4
Create an openwork round by alternating solid stitches with evenly spaced chain openings. Keep the repeat consistent along each side.
Border Round 5
Change back to blue and work a solid stabilizing round.
Decorative Flower Border
Add small blue floral motifs or flower-like clusters at regular intervals along the lower decorative section. Maintain equal spacing so the flowers form a continuous visual rhythm around the bedspread.
Final Scalloped Edge
Change to cream yarn. Work shallow scallops around the outside edge, adjusting the repeat at each corner without adding excessive stitches.
A border that begins to wave usually contains too many stitches. An edge that curls inward generally needs additional stitches or looser tension.
Matching 3D Flower Cushion Cover
The matching cushion covers repeat the same visual structure as the bedspread. A raised blue flower occupies the center, cream forms most of the square background, and blue rounds frame the outside.
For a small cushion, enlarge one flower granny square until it matches the cushion insert. Another option is to join several smaller squares into a front panel.
Create the back from plain crochet, matching granny squares, or suitable fabric. Measure the finished front panel before constructing the back so both pieces meet without stretching the flower square.
Join three sides, insert the cushion, then close the final edge. A removable version can use an overlapping crochet back or buttons.
Assembly
- Make one complete raised flower and check the spacing of all petal layers.
- Finish one entire granny square before producing the remaining motifs.
- Block the sample square and record its final dimensions.
- Calculate the number of squares required for the mattress top and desired side drop.
- Crochet the remaining flower squares with identical stitch counts and color placement.
- Block every motif to the same measurement.
- Arrange the squares and correct misplaced colors or rotated motifs before joining.
- Join individual squares into rows, then connect the completed rows.
- Attach the small cream joining flowers and crochet the wide outer border.
- Weave every yarn tail through several neighboring stitches before trimming the excess.
The finished construction should form a flat blue-and-cream grid with raised flowers projecting above the background.
7 Technical Tips for Better Results
- Mark all four corners. Missing one corner chain space changes the stitch count on the following round. Place a locking marker in every corner before continuing.
- Control the flower-center tension. An excessively tight center pulls the petals inward and creates a bowl-shaped motif. Check that the center lies flat before adding the second petal layer.
- Keep the raised petals free during blocking. Pin the perimeter of the square instead of pinning directly through every petal. Flattening the flower removes much of the intended three-dimensional structure.
- Measure the blocked square. A difference of 5 mm per motif becomes 4 cm across a row containing eight squares. Record the dimensions of the first approved sample.
- Pin squares before joining. Match the two corners and the midpoint of each edge first. This prevents a one-stitch discrepancy from shifting the seam diagonally.
- Watch the first border round. Excess stitches cause waves that become more pronounced with every additional border round. Too few stitches pull the blanket edges inward.
- Secure yarn tails over several centimeters. Weave each tail back through approximately 4–5 cm of neighboring stitches and reverse direction once. Avoid placing several bulky yarn ends inside the same corner.
How to Calculate the Bedspread Size
Calculate the number of motifs from the blocked square measurement rather than the unblocked size. The bedspread must cover both the mattress top and any required drop over the sides.
If one finished square measures approximately 16 cm, six squares provide roughly 96 cm before seam and border adjustments. Eight squares provide approximately 128 cm, while ten squares provide approximately 160 cm.
Measure the mattress width and add twice the desired side drop. Divide that measurement by the blocked width of one square. Round the result to a practical whole number of motifs.
Repeat the calculation for the bed length. Add additional length if the blanket needs to cover the pillows or extend substantially beyond the foot of the mattress.
The final border increases both dimensions, so include its planned width when determining the number of central squares.
Color Placement for the Blue Floral Effect
The restricted palette is responsible for much of the design’s visual structure. Cream occupies the largest area. Dusty and denim blues establish the flowers and grid, darker blue increases depth inside each flower, and green appears only as a small botanical accent.
Keep the darkest blue close to the flower center instead of distributing it throughout the cream background. The lighter blue can then repeat around the square perimeter.
When the motifs are assembled, those blue perimeter rounds form the continuous lattice visible across the bed.
Use the same color sequence for every major motif when reproducing the photographed appearance. Random color placement would create a substantially different blanket even if the stitch construction remained identical.
Blocking the Finished Flower Squares
Block individual motifs before joining them. Place the first square on a blocking mat and measure its width horizontally and vertically.
Pin the four corners first. Add a pin at the midpoint of each side, then use additional pins where necessary to produce straight edges.
Avoid pressing the raised flowers flat. The background requires blocking; the layered petals need to retain their height.
Use the dimensions of the first properly blocked square as the standard for all remaining motifs.
Finishing the Completed Blanket
Lay the assembled bedspread on a large flat surface before adding the final decorative edge. Inspect the horizontal and vertical blue grid lines. They should remain reasonably straight across the entire piece.
Correct severely distorted seams before working the border. Additional border rounds cannot compensate for an incorrectly joined interior motif.
After completing the border, weave in all remaining yarn tails. Inspect the small intersection flowers and reinforce any attachment point that moves excessively.
The finished bedspread can receive a final light blocking around its perimeter. Concentrate on straightening the outside edges and corners rather than flattening the central flowers.
Conclusion
Complete and block one sample before purchasing yarn for the entire bedspread. That motif establishes the actual gauge, yarn consumption, flower depth, and number of squares required for the chosen mattress. Repeat the same color sequence across the remaining blocks and check each motif before joining. Add the wide cream-and-blue border only after the complete grid lies flat. Save the finished 3D flower granny square blanket to Pinterest or share the completed project on Instagram with #Blue3DFlowerBlanket. When adapting the design, decide which feature should remain dominant: the layered blue flowers or the small cream flowers positioned at the square intersections.









