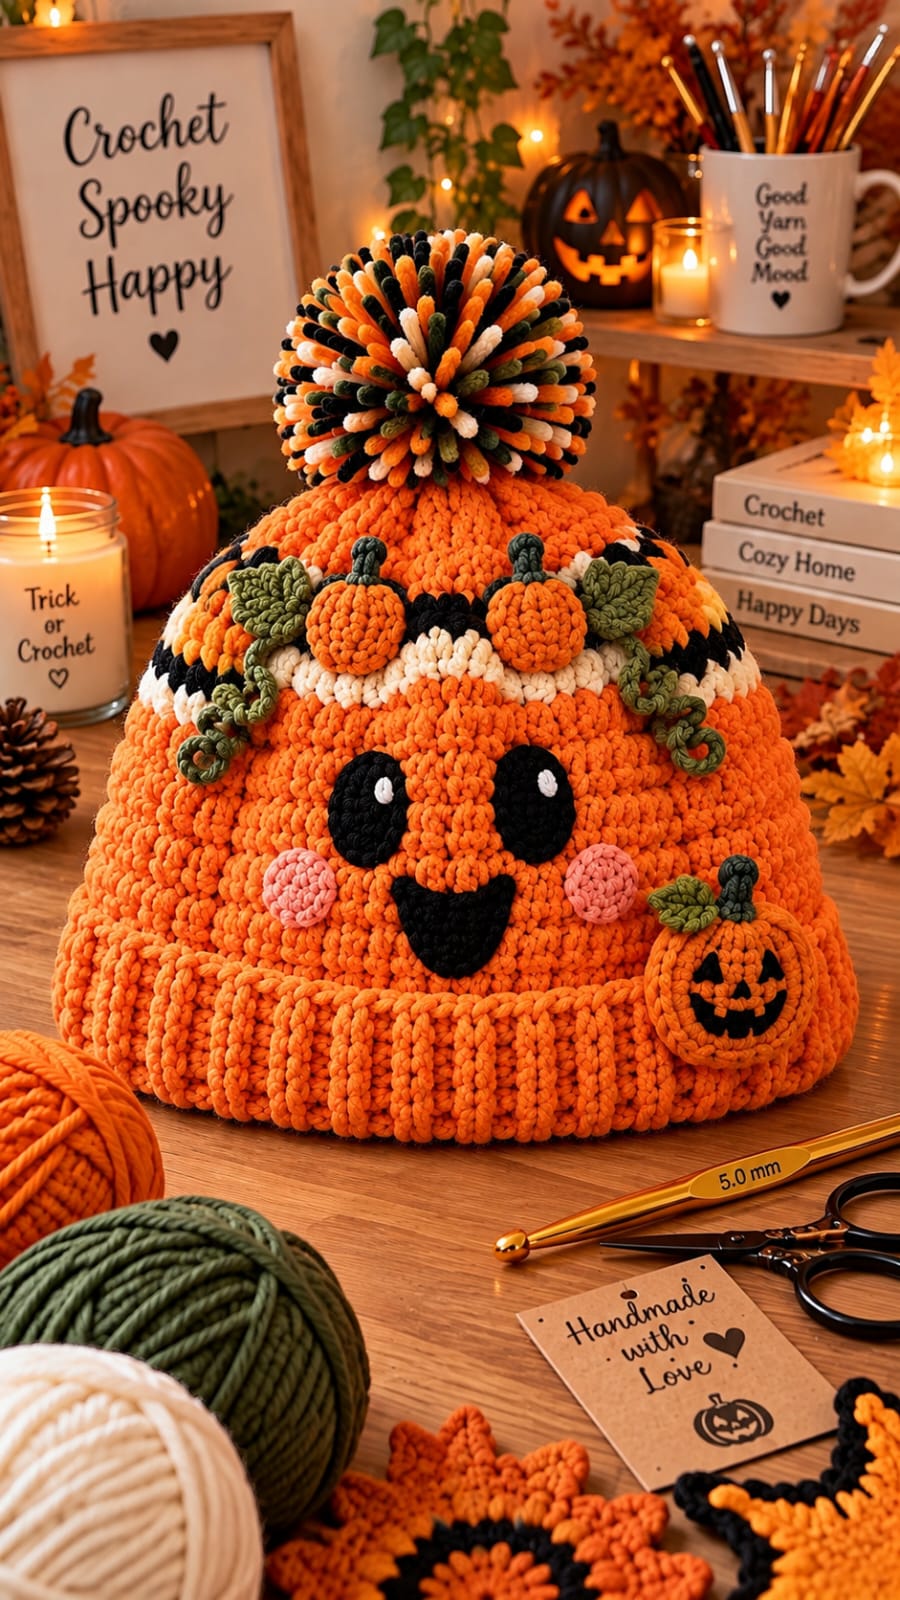
A pumpkin hat with a face this large needs its eyes, nose and ribbing aligned before the Halloween decorations are added. This Halloween pumpkin crochet hat pattern combines a chunky orange hat body with black facial appliqués, pink cheeks, miniature pumpkins, olive leaves, curly vines and an oversized multicolor pom pom. The photo-inspired adult version targets approximately 56–58 cm head circumference and 23–25 cm finished height before the pom pom.
The Design: What Makes This Pumpkin Hat Different
The hat uses an exaggerated pumpkin silhouette rather than a conventional smooth beanie. Vertical texture at the lower band suggests pumpkin ribs, while the rounded crown provides enough surface area for a large character face.
Decoration is concentrated above the eyes. A cream-and-black stripe circles the upper section, miniature orange pumpkins sit between olive leaves, and curled green vines hang into the face area. The oversized pom pom repeats orange, cream, black and olive from the appliqués.
Placement matters more than adding extra decoration. The eyes need to remain level, the nose must sit on the center line, and the two cheeks should be positioned symmetrically. A common mistake with a crochet pumpkin beanie is attaching heavy appliqués before checking fit. Complete and test the main hat first.
Project Info at a Glance
| Skill Level | Time | Finished Size | Main Hook | Yarn Weight |
|---|---|---|---|---|
| Intermediate | 7–10 hours | Approx. 56–58 cm circumference | 5 mm | Worsted / Aran #4 |
The dimensions are targets for this photo-inspired reconstruction rather than direct measurements from the photograph. Check the hat circumference before adding the face and decorative band.
Materials and Tools
Yarn
- Pumpkin orange — Worsted/Aran #4 — approximately 180–220 g
- Black — Worsted/Aran #4 — approximately 40–50 g
- Cream — Worsted/Aran #4 — approximately 35–45 g
- Olive green — Worsted/Aran #4 — approximately 35–45 g
- Dusty pink — Worsted/Aran #4 — approximately 15 g
- Dark green — Worsted/Aran #4 — approximately 10 g for pumpkin stems
Reserve additional orange, cream, black and olive yarn for the large pom pom. Approximately 350–400 g total is a practical allowance for the complete decorated hat.
Tools
- 5 mm crochet hook
- 4 mm crochet hook — appliqués
- Large pom-pom maker — approximately 10–12 cm
- Tapestry needle
- Stitch markers
- Sharp scissors
- Tape measure
Abbreviations
- MR — magic ring
- ch — chain
- sc — single crochet
- hdc — half double crochet
- dc — double crochet
- inc — 2 sc in one stitch
- dec — invisible single crochet decrease
- sl st — slip stitch
- BLO — back loop only
- FLO — front loop only
- st/sts — stitch/stitches
For an invisible decrease, insert the hook through the front loops of the next two stitches, yarn over, pull through both front loops and complete the single crochet.
Gauge and Sizing
Make a gauge swatch before beginning the crown. A useful target with worsted or aran yarn and a 5 mm hook is approximately 16 sc × 17 rows per 10 cm.
The adult hat should measure approximately 56–58 cm around and 23–25 cm from crown to lower edge before adding the pom pom.
The photographed design has a roomy shape rather than a tightly fitted skullcap. Keep approximately 1–2 cm of negative ease at most. Excessive negative ease will distort the large face appliqués.
Halloween Pumpkin Crochet Hat Pattern
Work the main hat from the crown downward in continuous rounds. Place a stitch marker in the first stitch and move it after every completed round.
Orange Hat Crown
Yarn: pumpkin orange.
R1: 6 sc in MR. (6)
R2: inc ×6. (12)
R3: (sc, inc) ×6. (18)
R4: (2 sc, inc) ×6. (24)
R5: (3 sc, inc) ×6. (30)
R6: (4 sc, inc) ×6. (36)
R7: (5 sc, inc) ×6. (42)
R8: (6 sc, inc) ×6. (48)
R9: (7 sc, inc) ×6. (54)
R10: (8 sc, inc) ×6. (60)
R11: (9 sc, inc) ×6. (66)
R12: (10 sc, inc) ×6. (72)
Measure the crown diameter at this point. Adjust the final increase round if your yarn and gauge produce a substantially different adult circumference.
Main Orange Body
R13–R22: Sc in every stitch around. (72)
Do not fasten off.
The face will later occupy the front of these rounds. Mark the approximate center-front stitch before continuing.
Halloween Color Band
The reference hat has a contrasting band near the upper face containing cream and black sections behind the miniature pumpkins.
Round 23
With orange, sc around. (72)
Round 24
Change to black.
Sc around. (72)
Round 25
Change to cream.
Sc around. (72)
Round 26
Continue with cream.
Sc around. (72)
Round 27
Change to black.
Sc around. (72)
Round 28
Return to orange.
Sc around. (72)
Fasten off black and cream securely on the inside rather than carrying long floats around the hat.
Lower Orange Face Section
R29–R38: With orange, sc in every stitch around. (72)
Try the hat on or measure from the crown before beginning the ribbed edge. The face needs enough uninterrupted orange fabric for the eyes, nose, mouth and cheeks.
Wide Ribbed Pumpkin Brim
The lower section in the reference has deep vertical ribbing. Work the brim sideways and join it to the final body round as you go.
Brim Foundation
Ch 11.
Brim Row 1
Sc in second ch from hook and across. (10)
Sl st into the next two stitches of the hat body.
Turn.
Brim Row 2
Skip the two joining slip stitches.
Sc BLO across the 10 brim stitches. (10)
Ch 1 and turn.
Brim Row 3
Sc BLO across. (10)
Sl st into the next two unused stitches of the hat body.
Turn.
Repeat Rows 2–3 around the entire circumference.
When the first and last ribbed rows meet, seam them together through corresponding loops.
Fasten off and weave the tail inside the hat.
Large Black Eyes — Make 2
Use black yarn and a 4 mm hook.
R1: 6 sc in MR. (6)
R2: inc ×6. (12)
R3: (sc, inc) ×6. (18)
To turn the circle into an oval:
R4: 2 sc, hdc in next 3 sts, dc in next 3 sts, hdc in next 3 sts, sc around the remaining stitches.
Fasten off. Leave approximately 25 cm for sewing.
Gently stretch each piece vertically before attachment. Target approximately 6–7 cm high.
White Eye Highlights — Make 2
Yarn: cream.
R1: 6 sc in MR. (6)
Fasten off and close the ring.
Sew one small highlight into the upper inner area of each black eye.
Orange Pumpkin Nose
Yarn: orange.
R1: 6 sc in MR. (6)
R2: inc ×6. (12)
R3: (sc, inc) ×6. (18)
R4: Sc around. (18)
R5: (sc, dec) ×6. (12)
Add a small amount of fiberfill.
R6: dec ×6. (6)
Fasten off. Leave a 25 cm tail.
The nose should project slightly from the hat rather than lying completely flat.
Black Smiling Mouth
Yarn: black.
Ch 13.
Starting in the second chain from the hook:
Sc in next 2 ch, hdc in next 2 ch, dc in next 4 ch, hdc in next 2 ch, sc in final 2 ch.
Fasten off.
Curve the strip into a broad smile during attachment. Add one or two hidden stitches along the lower edge to maintain the shape.
Pink Cheeks — Make 2
Yarn: dusty pink.
R1: 6 sc in MR. (6)
R2: inc ×6. (12)
R3: (sc, inc) ×6. (18)
Fasten off. Leave a 20 cm sewing tail.
Block lightly into circles approximately 4–5 cm across.
Mini Crochet Pumpkins — Make 3
Yarn: pumpkin orange.
R1: 6 sc in MR. (6)
R2: inc ×6. (12)
R3: (sc, inc) ×6. (18)
R4–R6: Sc around. (18)
R7: (sc, dec) ×6. (12)
Add a small amount of stuffing.
R8: dec ×6. (6)
Fasten off with a long tail.
Pass the tail around the outside of the pumpkin three or four times, pulling gently to create shallow ribs.
Mini Pumpkin Stems — Make 3
Yarn: dark green.
Ch 5.
Sl st in second chain from hook and across.
Fasten off.
Fold each stem slightly and sew it to the top of a miniature pumpkin.
Olive Leaves — Make 4
Yarn: olive green.
Ch 9.
Starting in the second chain from the hook work:
Sl st, sc, hdc, dc in next 2 chains, hdc, sc, then 3 sc in the final chain.
Continue along the opposite side of the foundation:
Sc, hdc, dc in next 2 loops, hdc, sc, sl st.
At the leaf tip work (sl st, ch 2, sl st) if a sharper point is required.
Fasten off. Leave a 20 cm sewing tail.
Curly Green Vines — Make 4
Yarn: olive green.
Ch 22.
Starting in the second chain from the hook, work 3 sc in every chain.
The strip will curl automatically as the stitches accumulate.
Fasten off. Leave a 15 cm tail.
Do not stretch the spiral before attachment.
Pumpkin Face Appliqué for the Side
The photograph includes a small jack-o’-lantern ornament attached near one side of the brim.
Orange Pumpkin Disc
R1: 6 sc in MR. (6)
R2: inc ×6. (12)
R3: (sc, inc) ×6. (18)
R4: (2 sc, inc) ×6. (24)
R5: Sc around. (24)
Fasten off with a long orange tail.
Jack-o’-Lantern Eyes
With black yarn, embroider two small triangles on the orange disc.
Keep each triangle approximately 1–1.5 cm wide.
Jack-o’-Lantern Mouth
Embroider a curved black smile beneath the eyes.
Add two or three short vertical orange stitches through the black smile to imitate small pumpkin teeth if desired.
Stem and Leaf
Make a short dark-green stem using ch 5 and slip stitches.
Make one small olive leaf using the leaf instructions above with a foundation of ch 6 instead of ch 9.
Sew both pieces behind the upper edge of the pumpkin disc.
Oversized Halloween Pom Pom
The multicolor pom pom is one of the strongest visual features in the reference. Target a finished diameter of approximately 10–12 cm.
Use approximately:
- 40% pumpkin orange
- 25% black
- 20% cream
- 15% olive green
Wrap the colors in short alternating sections around the pom-pom maker rather than creating four large solid blocks. This distributes the colors throughout the finished sphere.
Tie the center with a strong doubled strand of orange or black yarn.
Trim the pom pom into a dense sphere, but keep several strands slightly longer if recreating the irregular textured appearance of the photograph.
Assembly
- Complete the orange hat, contrasting stripe and ribbed brim before positioning any facial pieces.
- Fold the hat flat with the center front facing upward and mark the vertical center line.
- Position the two black eyes approximately 3–4 cm apart and pin them before sewing.
- Place the stuffed orange nose between and slightly below the eyes.
- Attach the black smiling mouth directly below the nose, keeping its center aligned with the nose.
- Sew one pink cheek outside each lower eye, checking that both sit at approximately the same height.
- Arrange the miniature pumpkins, olive leaves and green curls around the cream-and-black decorative band.
- Sew the jack-o’-lantern appliqué near one side of the lower hat, keeping it clear of the face.
- Attach the oversized multicolor pom pom securely through several crown stitches.
- Turn the hat inside out, knot and weave all remaining tails, then reshape the face and decorative elements from the right side.
The completed hat should show a large orange pumpkin face below a decorated autumn band, with the multicolor pom pom centered at the crown.
7 Technical Tips for This Halloween Crochet Hat
- Hat-size failure: Measure the circumference before attaching appliqués. A finished adult size of approximately 56–58 cm prevents later decorations from being stretched out of shape.
- Crooked eyes: Mark the horizontal eye line with removable stitch markers before sewing. A difference of even one crochet round becomes obvious with large black appliqués.
- Off-center nose: Count stitches from each side of the face instead of positioning the nose visually. Its center should align with the crown and mouth center lines.
- Brim flare: Join each ribbed row consistently to two body stitches. Changing the joining rate midway can make the lower edge ripple.
- Flat mini pumpkins: Add only enough stuffing to round each 18-stitch body. Overstuffing prevents the external sculpting strands from forming visible ribs.
- Loose pom pom: Pass the attachment yarn through the crown at least twice in different directions. A 10–12 cm pom pom puts more strain on the crown than a standard small pom pom.
- Stretched vines: Sew only the upper 1–2 cm of each green corkscrew to the hat. Attaching the entire spiral removes the curl and makes the decoration appear flat.
How to Make the Hat Smaller
For a child-size version, stop the crown increases earlier rather than simply shortening the finished adult hat.
Stop at 60 stitches for a medium child size or approximately 54 stitches for a smaller version, depending on yarn, gauge and required head measurement.
Work plain rounds until the hat reaches the required depth, then add the decorative band and brim. Reduce the eye, cheek and miniature-pumpkin sizes at the same time so the face remains proportional.
Always measure the intended wearer’s head rather than relying only on age-based sizing.
How to Position the Pumpkin Face
Place the empty hat on a head form or fill it loosely with a towel before pinning the facial pieces. A flattened hat can make correctly positioned appliqués appear too close together.
Start with the eyes because they control the scale of every remaining facial feature. Keep approximately 3–4 cm between their inner edges.
Position the nose centrally below the eyes. The upper part of the nose can overlap the imaginary eye line slightly, reproducing the prominent three-dimensional nose visible in the reference.
Add the cheeks only after the mouth has been pinned. They should sit outside the mouth rather than directly beneath the eyes.
Creating the Decorative Pumpkin Band
Pin the miniature pumpkins first. Space them around the front half of the hat rather than distributing them evenly around the entire circumference.
Place olive leaves between the pumpkins and angle their pointed ends outward. The leaves should overlap the cream-and-black stripe without completely covering it.
Add green corkscrew vines last. Allow some curls to hang below the decorative band and others to remain closer to the crown.
Keep the arrangement slightly asymmetrical. Perfectly mirrored leaves and vines make the band look more rigid than the clustered Halloween decoration in the photograph.
Making the Ribbed Brim More Pronounced
The lower edge contributes substantially to the pumpkin appearance. Back-loop-only single crochet creates vertical ridges when the brim is worked sideways.
For deeper ribs, replace BLO sc with BLO hdc. Test this modification on a short sample because hdc produces a taller and more elastic brim.
Do not pull the joining slip stitches tightly. Excessive tension along the attachment edge can cause the hat body to pucker directly above the brim.
Choosing Yarn for the Pumpkin Texture
A smooth worsted or aran yarn keeps the facial features readable and makes the small pumpkins, leaves and vines easier to shape. Highly fuzzy yarn can obscure the edges of the black eyes and mouth.
Use yarns with similar thicknesses for orange, black, cream and olive. Significant differences in yarn diameter alter the width of the decorative stripe and the size of the appliqués.
If using chenille or plush yarn, make a full gauge sample first. Plush fibers can create a substantially larger hat at the same stitch count.
Finishing and Care
Check every appliqué from the inside of the hat. Sewing strands should be secure but should not form tight lines that reduce stretch across the forehead.
Weave yarn tails horizontally through several stitches and reverse direction before trimming. Avoid large knots against the inside surface where they could create pressure points.
Reshape the pom pom after washing rather than pressing it flat. Follow the washing and drying instructions supplied with the selected yarn.
If the hat is intended for a young child, use embroidered or crocheted details instead of loose beads, buttons or other detachable decorations.
Conclusion
Finish the orange hat and ribbed brim before committing to the Halloween face placement. The actual circumference determines how far apart the eyes need to sit and how much space remains for the miniature pumpkins above them. Next, pin both eyes, the nose and mouth simultaneously and inspect the face on a rounded form before sewing. Save this Halloween pumpkin crochet hat pattern to Pinterest or share the finished version on Instagram with #PumpkinFaceCrochetHat. For this specific design, would you keep the oversized orange-black-cream pom pom or replace it with a crooked green pumpkin stem?









