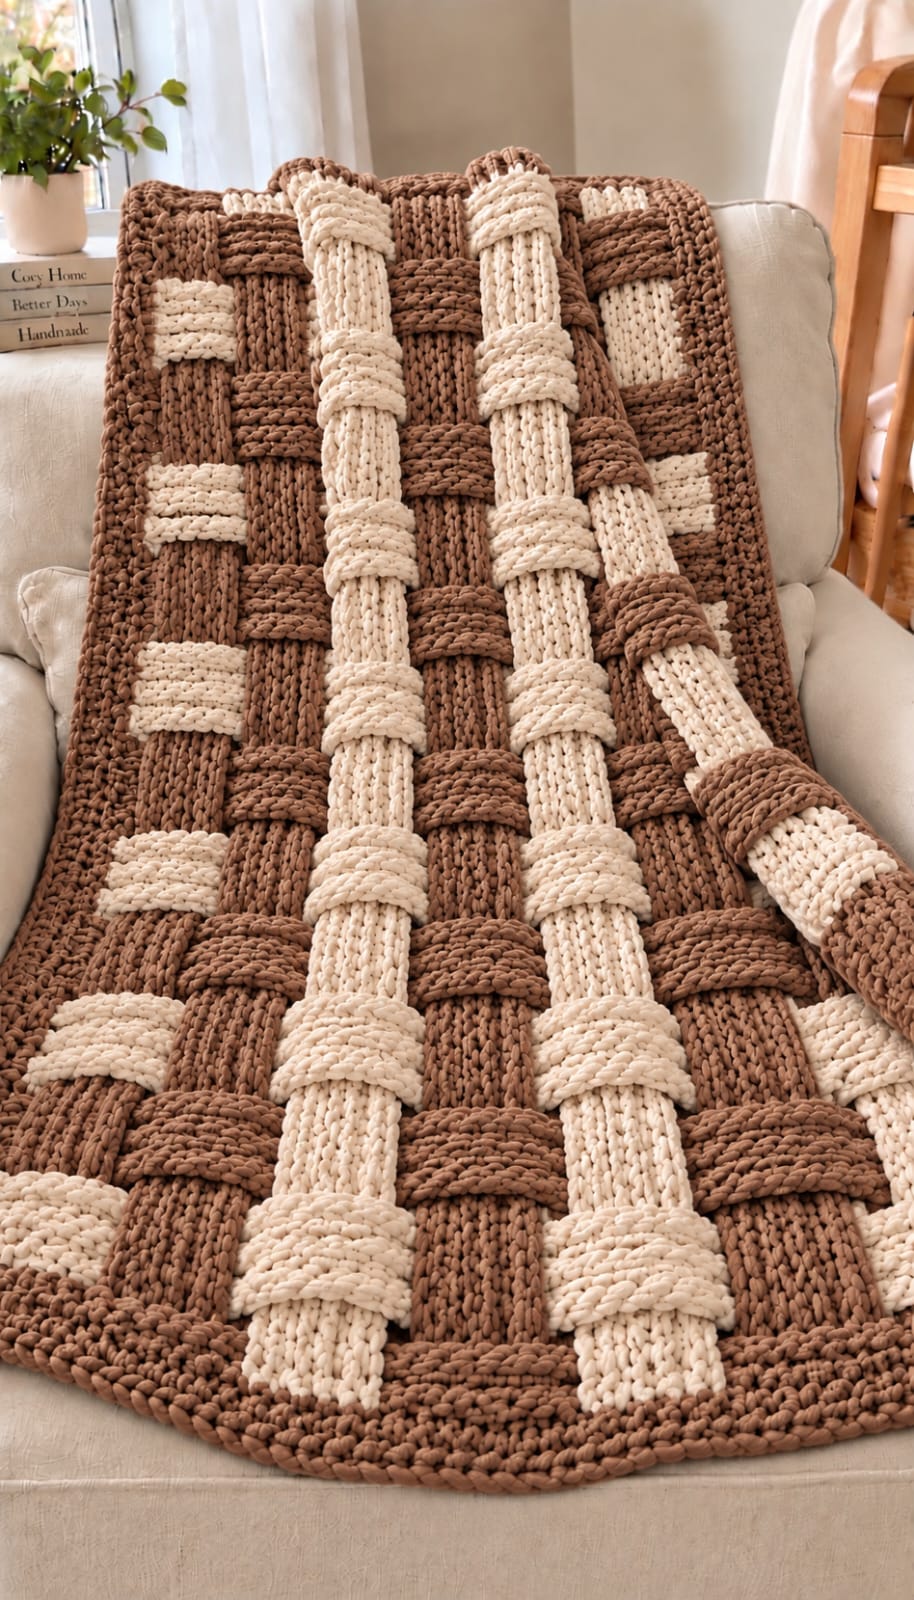
Brown and cream bands appear to pass physically over and under one another across this blanket. This chunky basket weave crochet blanket pattern recreates that oversized woven effect with super-bulky yarn, a 9 mm crochet hook and alternating raised sections. The target size is approximately 120 × 150 cm. Intermediate crochet skills are suitable because consistent tension and post-stitch placement control the final geometry.
The Design: What Makes This Basket Weave Blanket Different
The blanket uses two strongly contrasting neutral colors: medium brown and warm cream. Instead of relying on small basketweave blocks, the design enlarges the woven appearance so each section resembles a broad textile strap.
Raised horizontal sections cross vertical-looking panels at regular intervals. Changing which groups sit visually forward creates the over-and-under construction associated with a basket weave crochet blanket. The brown outer border then frames the entire field and keeps the heavy fabric visually contained.
The main technical risk is inconsistent tension. Super-bulky yarn makes even a small tension change visible. If one section is worked substantially tighter than its neighbors, the apparent woven bands change width and the blanket can pull inward along one edge.
Project Info at a Glance
| Skill Level | Time | Finished Size | Hook | Yarn |
|---|---|---|---|---|
| Intermediate | 15–22 hours | Approx. 120 × 150 cm | 9 mm | Super Bulky #6 |
The finished measurement is a target for this photo-inspired reconstruction rather than a measurement taken directly from the photograph. Comparable published chunky basketweave blankets commonly use super-bulky yarn and large hooks.
Materials and Tools
Yarn
- Medium brown — Super Bulky #6 — approximately 1,000–1,200 g
- Warm cream — Super Bulky #6 — approximately 800–1,000 g
- Brown border allowance — reserve approximately 150–200 g from the brown yarn
Plan for approximately 1,800–2,200 g total for the photo-inspired size. Yarn consumption changes substantially with fiber, gauge, hook size and the depth of the raised texture.
A smooth chenille-style blanket yarn or another flexible category 6 yarn works well for the oversized structure. Buy enough yarn from the same dye lots before beginning because broad solid-color sections make shade differences easy to see.
Tools
- 9 mm crochet hook
- 10 mm crochet hook — optional for the foundation chain
- Large tapestry needle
- Sharp scissors
- Locking stitch markers
- Tape measure
Abbreviations
- ch — chain
- sc — single crochet
- hdc — half double crochet
- dc — double crochet
- FPdc — front post double crochet
- BPdc — back post double crochet
- sl st — slip stitch
- st/sts — stitch/stitches
- RS — right side
- WS — wrong side
Front-post and back-post double crochet are worked around the post of the stitch below rather than through the two top loops.
Gauge and Sizing
Before beginning the full blanket, make a basketweave sample at least 20 × 20 cm. The exact stitch gauge matters less than maintaining identical widths across every raised band.
A useful target with super-bulky yarn and a 9 mm hook is approximately 8 stitches and 5 rows per 10 cm in the established textured pattern. If the sample is substantially narrower, increase the hook size rather than pulling the working loops upward manually.
The target finished blanket measures approximately 120 × 150 cm. For a wider blanket, add complete eight-stitch pattern repeats. Avoid adding an arbitrary number of stitches because incomplete repeats interrupt the woven geometry.
Chunky Basket Weave Crochet Blanket Pattern
The following instructions create a one-piece crochet interpretation of the broad over-and-under texture visible in the reference image. Work flat, turning after every row.
Foundation Chain
Yarn: medium brown.
Ch 104.
Keep the foundation chain loose. If the chain pulls inward compared with the first few rows, make the foundation with a 10 mm hook and return to the 9 mm hook for Row 1.
Row 1 — Foundation Row
Dc in the fourth ch from the hook.
Dc in every remaining chain across.
You should have 102 dc, counting the skipped beginning chains as the first dc.
Turn.
Row 2 — Establish the First Basketweave Section
Ch 2. The turning chain does not count as a stitch.
Dc in the first stitch.
Work:
*FPdc around each of the next 4 sts, BPdc around each of the next 4 sts.*
Repeat the eight-stitch sequence across the patterned field.
Dc in the final stitch.
Turn.
Row 3
Ch 2.
Dc in the first stitch.
Because the blanket has been turned, work the post stitches in the orientation required to keep the same groups raised on the right side:
*BPdc around the next 4 sts, FPdc around the next 4 sts.*
Repeat across.
Dc in the final stitch.
Turn.
Row 4
Ch 2.
Dc in first stitch.
*FPdc around next 4 sts, BPdc around next 4 sts.*
Repeat across.
Dc in final stitch.
Turn.
Row 5
Ch 2.
Dc in first stitch.
*BPdc around next 4 sts, FPdc around next 4 sts.*
Repeat across.
Dc in final stitch.
Turn.
Rows 2–5 establish the first visual block. Examine the right side before proceeding. Groups intended to project forward should form clearly defined rectangular bands.
Reverse the Basketweave Blocks
The next four rows exchange the raised and recessed positions. This reversal creates the illusion that one broad section passes underneath the neighboring section.
Row 6
Ch 2.
Dc in first stitch.
*BPdc around next 4 sts, FPdc around next 4 sts.*
Repeat across.
Dc in final stitch.
Turn.
Row 7
Ch 2.
Dc in first stitch.
*FPdc around next 4 sts, BPdc around next 4 sts.*
Repeat across.
Dc in final stitch.
Turn.
Row 8
Ch 2.
Dc in first stitch.
*BPdc around next 4 sts, FPdc around next 4 sts.*
Repeat across.
Dc in final stitch.
Turn.
Row 9
Ch 2.
Dc in first stitch.
*FPdc around next 4 sts, BPdc around next 4 sts.*
Repeat across.
Dc in final stitch.
Turn.
Rows 6–9 complete the reversed section.
Continue the Basket Weave
Repeat Rows 2–9 until the blanket measures approximately 142–144 cm before the final border.
Measure the blanket while it lies flat and unstretched. Super-bulky fabric can gain several centimeters if it is measured while hanging from the hook.
Keep checking the outer edges after every eight-row repeat. Both sides should remain approximately the same length.
Creating the Brown and Cream Color Layout
The reference blanket uses cream and brown to make the woven illusion more pronounced. Instead of changing color every row, maintain each color across substantial sections so the eye reads them as broad straps.
Begin the lower section in brown. Introduce cream across selected raised groups once the basketweave structure is established.
A practical repeat is:
- Brown for the primary background and alternating vertical-looking bands
- Cream for contrasting raised bands
- Brown again where the next apparent strip crosses over the cream section
Carry no unused super-bulky yarn across long distances on the reverse. Cut and join the yarn at major color changes, leaving approximately 15 cm tails for weaving.
Optional Modular Method for a More Pronounced Woven Look
The photograph has an unusually deep over-and-under appearance. For a more sculptural result than standard post stitches provide, crochet separate long strips and weave them through fixed horizontal loops.
Make each strip approximately 10–12 cm wide. Alternate brown and cream strips, keeping every strip the same finished width.
Create horizontal retaining bands across a stable crochet backing or connect the strips at each crossing point with hidden stitches. Pass one strip above a crossing, then below the next. Reverse that sequence on the neighboring strip.
This construction creates more physical depth but also increases yarn consumption and blanket weight. Secure every intersection on the reverse so the woven strips cannot shift during washing.
Brown Crochet Border
Yarn: medium brown.
The photographed blanket has a substantial brown frame. Add the border only after the main field has reached its final dimensions.
Border Round 1
Join brown yarn in any corner.
Ch 1 and sc evenly around all four sides.
Work 3 sc in each corner.
Along the row ends, distribute stitches consistently rather than forcing one sc into every visible strand.
Join with sl st to the first sc.
Border Round 2
Ch 1.
Sc in each stitch around.
Work 3 sc in the center corner stitch at each corner.
Join with sl st.
Border Round 3
Repeat Border Round 2.
Check after each side that the edge remains flat. If the border begins to ruffle, too many stitches were added. If the corners curl inward, additional corner or side stitches may be required.
Final Border Round
Work one final round of loose slip stitches or single crochet around the blanket.
Do not tighten this round. A tight final edge can pull a 120 cm blanket inward by several centimeters.
Fasten off and leave a 20 cm tail.
Finishing the Blanket
- Lay the blanket flat and inspect every eight-row basketweave repeat.
- Check that the brown and cream bands remain consistent in width.
- Secure all color-change tails on the wrong side.
- Weave each tail through several centimeters of dense crochet.
- Reverse the direction of the yarn tail before trimming it.
- Check the four corners for curling or excess fabric.
- Measure the blanket horizontally at the top, center and bottom.
- Correct any loose woven sections with hidden matching-yarn tacks if using the modular construction.
- Lay the finished blanket flat according to the care requirements of the selected yarn.
- Reshape the border to approximately 120 × 150 cm and allow the blanket to settle completely before final measurement.
The finished blanket should show a continuous brown frame surrounding alternating cream and brown woven-looking sections.
7 Technical Tips for a Chunky Basket Weave Blanket
- Foundation-chain failure: A tight chain pulls the lower edge inward. Use a hook approximately 1 mm larger for the foundation if the first row is wider than the chain.
- Post-stitch placement: Insert the hook completely around the stitch post. Catching only part of the post weakens the raised ridge and changes the width of the block.
- Block-count errors: Mark every eight-stitch repeat while establishing the pattern. One missed post stitch shifts every apparent crossing that follows it.
- Uneven strip width: Measure a raised band after every complete eight-row repeat. A difference greater than approximately 1 cm becomes conspicuous in super-bulky yarn.
- Color-change gaps: Tighten the first stitch of a new color only enough to close the join. Pulling it too firmly pinches the edge of the cream or brown band.
- Border ruffling: Lay each completed border round flat before adding another. A rippled edge indicates excess stitches and becomes harder to correct after multiple rounds.
- Loose woven sections: For the modular version, tack each crossing invisibly on the reverse. Untacked super-bulky strips can migrate several centimeters during use or washing.
How to Make the Blanket Wider or Longer
Change the width only by adding or removing complete basketweave repeats. The core repeat contains eight post stitches: four forming one visual block and four forming the neighboring block.
For additional length, continue repeating Rows 2–9. Stop when the main body is approximately 6–8 cm shorter than the desired finished measurement so the border has room to bring the blanket to its target length.
Record the number of complete pattern repeats if making a matching second blanket. Counting rows after the thick fabric has been handled repeatedly is less reliable than recording each finished repeat while crocheting.
Choosing Yarn for the Woven Texture
A category 6 super-bulky yarn gives the chunky basket weave crochet blanket pattern its exaggerated scale. Chenille-style polyester produces thick rounded bands, while a more tightly spun super-bulky yarn gives the stitch structure sharper definition.
Avoid mixing yarns with dramatically different thicknesses even when both labels state category 6. Crochet a sample of the brown and cream together first. Both colors should produce strips of approximately equal width at the same stitch count.
For a washable sofa throw, follow the laundering instructions printed on the selected yarn label. Heavy textured blankets hold considerable water, so support the full weight of the fabric when moving it after washing.
Final Measurements and Adjustment
Place the completed blanket on a flat surface without stretching it. Measure across the upper edge, center and lower edge, then measure the length at both sides and through the center.
A target of approximately 120 × 150 cm produces a substantial throw. Small differences are normal because super-bulky basketweave fabric contracts and expands with tension.
If one side is slightly shorter, reshape the fabric before considering another border round. Adding stitches only to the short side can create visible rippling.
Conclusion
Make a full eight-row swatch before committing the yarn to the blanket. That sample reveals whether the raised brown and cream blocks have enough depth and whether a 9 mm hook produces the required band width. Measure the swatch without stretching it, then calculate the number of complete repeats needed for the intended dimensions. Save this chunky basket weave crochet blanket pattern to Pinterest or share the completed blanket on Instagram with #BrownCreamBasketWeaveBlanket. For the next version, decide whether the crossing bands should remain equally wide or whether alternating narrow and wide sections would better suit the woven structure.









