Introduction
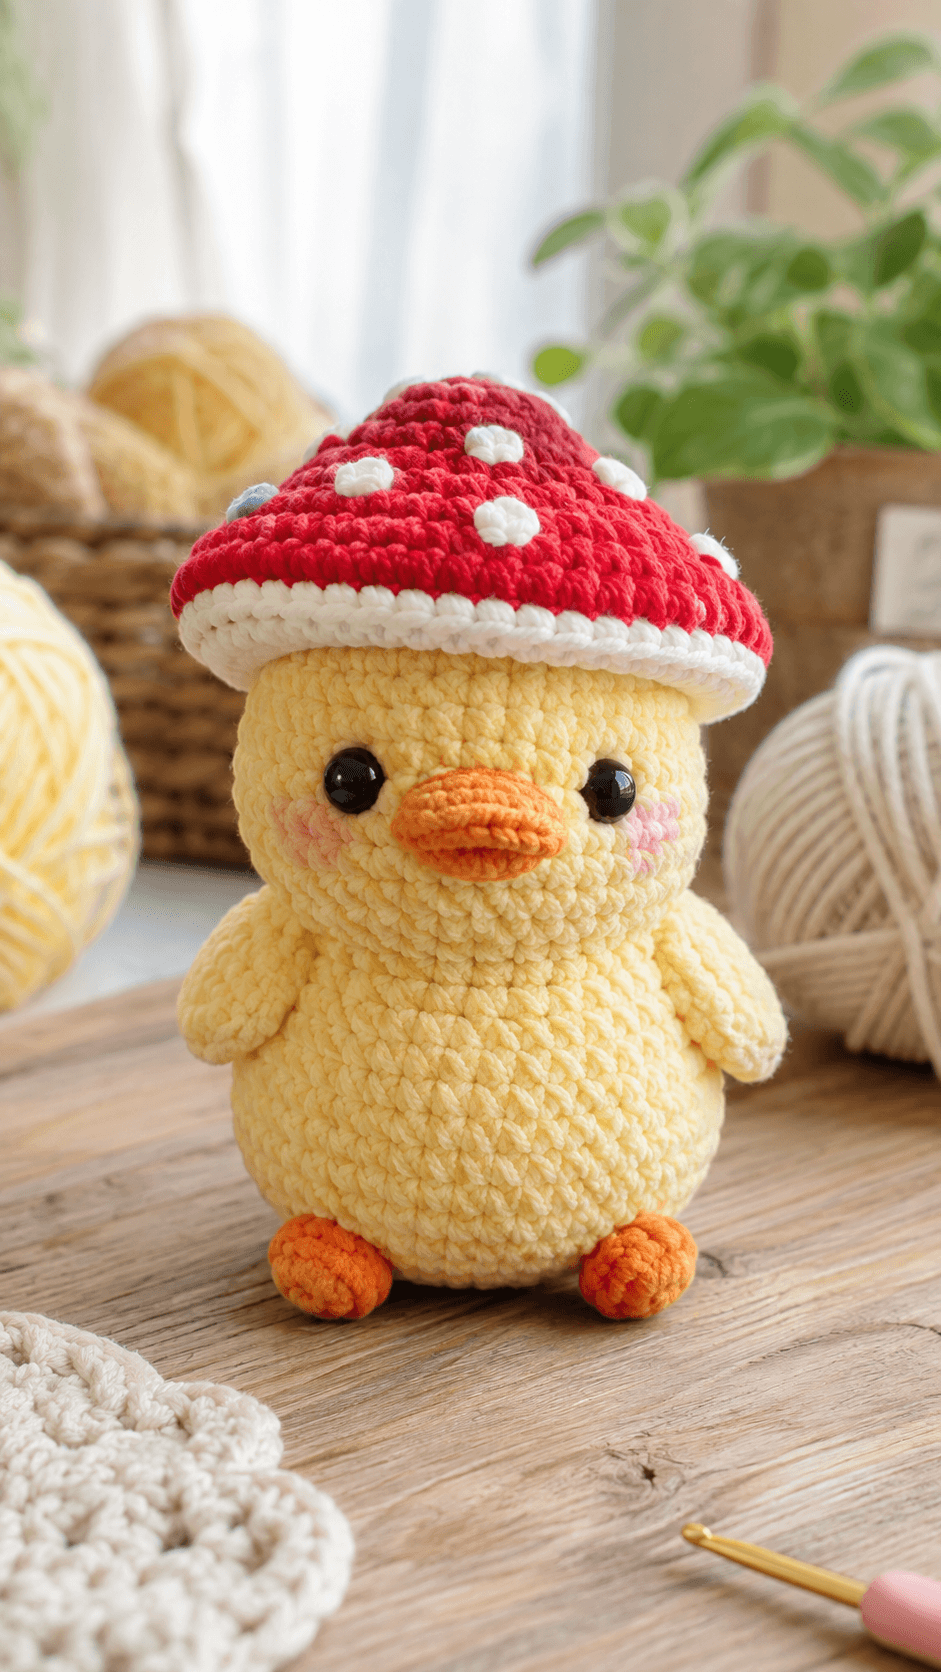
A duck bill needs to stay broad and flat even when the rest of the head is nearly spherical. This duck amigurumi crochet pattern uses worsted yarn, a 4 mm hook and 12 mm eyes to make a yellow duckling approximately 19–22 cm tall with its hat. Two wings, orange feet, pink cheeks and an oversized red mushroom cap with white spots complete the intermediate multi-piece construction.
The Design: What Makes This Mushroom Duck Different
The head reaches a 36-stitch plateau and remains round enough to support a hat considerably wider than the face. A separate bill is worked around a starting chain so it forms a horizontal oval instead of a stuffed cone. The body also reaches 36 stitches, but its longer plain section produces the egg-like torso visible below the head. Short side wings preserve the compact silhouette, while two small orange feet project only slightly beyond the lower body. The mushroom hat is the main structural feature. Its red crown expands to 48 stitches, then meets a flatter white underside that creates a clear overhanging brim. Raised white spots are sewn onto the crown afterward. A frequent mistake in a mushroom duck crochet pattern is making the brim too narrow; it should extend clearly beyond both sides of the duck’s head.
Project Information at a Glance
| Skill Level | Time | Finished Size | Hook | Best For |
|---|---|---|---|---|
| Intermediate | 9–12 hours | Approx. 19–22 cm including hat | 4 mm duck / 4.5 mm hat | Display plush and mushroom-themed collection |
Current duck patterns show a broad size range, from small 7.5–9 cm figures through 13–15 cm compact ducks and substantially larger super-bulky versions. :contentReference[oaicite:19]{index=19} The target here is based on the photographed proportions rather than one published pattern size.
Materials and Tools
Yarn
- Butter yellow — worsted/Aran yarn — approximately 80–100 g — head, body and wings
- Carrot orange — matching yarn — approximately 20–25 g — bill and feet
- Bright red — worsted or light chunky yarn — approximately 45–60 g — mushroom crown
- White — matching yarn — approximately 30–40 g — mushroom underside and spots
- Blush pink — yarn scrap — cheeks
- Black embroidery yarn — optional mouth line
Tools
- 4 mm crochet hook for duck
- 4.5 mm crochet hook for mushroom hat
- Two 12 mm black safety eyes
- Polyester toy stuffing
- Large-eye yarn needle
- Locking stitch marker
- Dressmaking pins
- Scissors
Published ducks use different eye diameters according to scale; examples range from 6 mm in small ducks to 15–16 mm in larger plush versions. :contentReference[oaicite:20]{index=20} Test the chosen eyes against the completed head before locking their washers.
Abbreviations
- MR — magic ring
- sc — single crochet
- inc — two single crochet stitches in one stitch
- dec — decrease over two stitches
- sl st — slip stitch
- ch — chain
- hdc — half double crochet
- dc — double crochet
- BLO — back loop only
- FLO — front loop only
An invisible decrease is worked through the front loops of the following two stitches before completing them together as one single crochet.
Pattern — Step by Step
Work in continuous spirals unless a section specifies otherwise. Mark the first stitch of every round and verify the bracketed count before beginning the next round.
Head
Yarn: butter yellow — original six-stitch sphere calculation.
R1: 6 sc in MR (6)
R2: inc × 6 (12)
R3: (sc, inc) × 6 (18)
R4: (2 sc, inc) × 6 (24)
R5: (3 sc, inc) × 6 (30)
R6: (4 sc, inc) × 6 (36)
R7–R11: sc around (36)
R12: (4 sc, dec) × 6 (30)
Insert the 12 mm eyes between R8 and R9 with approximately seven visible stitches between the stems. Lock the washers before continuing.
R13: (3 sc, dec) × 6 (24)
R14: (2 sc, dec) × 6 (18)
R15: sc around (18)
R16: (sc, dec) × 6 (12)
R17: dec × 6 (6)
Stuff gradually from R12 onward. Keep the lower front slightly softer where the broad bill will attach.
Fasten off. Leave a 25 cm tail, pass it through the remaining front loops and close the opening.
Body
Yarn: butter yellow.
R1: 6 sc in MR (6)
R2: inc × 6 (12)
R3: (sc, inc) × 6 (18)
R4: (2 sc, inc) × 6 (24)
R5: (3 sc, inc) × 6 (30)
R6: (4 sc, inc) × 6 (36)
R7–R12: sc around (36)
R13: (4 sc, dec) × 6 (30)
R14: sc around (30)
R15: (3 sc, dec) × 6 (24)
R16: (2 sc, dec) × 6 (18)
Stuff the lower body firmly enough to hold the duck upright. Keep the final neck area slightly softer.
R17: (sc, dec) × 6 (12)
R18: dec × 6 (6)
Fasten off and leave a 40 cm structural tail.
Bill
Yarn: carrot orange. Work around both sides of a starting chain.
Ch 7.
R1: starting in second ch from hook, 5 sc, 3 sc in final ch; continue along opposite side with 4 sc, inc in final ch (14)
R2: inc, 4 sc, inc ×3, 4 sc, inc ×2 (20)
R3: sc around (20)
R4: sc around (20)
Do not stuff heavily. Insert only a very thin layer of filling, then flatten the piece horizontally.
Fasten off and leave a 30 cm sewing tail.
Wings — Make Two
Yarn: butter yellow.
R1: 6 sc in MR (6)
R2: inc ×6 (12)
R3: (sc, inc) ×6 (18)
R4–R6: sc around (18)
R7: (sc, dec) ×6 (12)
R8–R9: sc around (12)
R10: dec ×6 (6)
Stuff only the widest end lightly. Flatten the upper attachment section.
Fasten off and leave a 30 cm tail.
Feet — Make Two
Yarn: carrot orange.
R1: 6 sc in MR (6)
R2: inc ×6 (12)
R3: (sc, inc) ×6 (18)
R4: sc around (18)
R5: (sc, dec) ×6 (12)
R6: dec ×6 (6)
Stuff lightly and compress each piece into a short horizontal oval.
Fasten off and leave a 25 cm sewing tail.
Cheek Patches — Make Two
Yarn: blush pink.
R1: 6 sc in MR (6)
Slip stitch to the first stitch and fasten off with a 12 cm tail. Pull the circle sideways while sewing so it becomes a low oval.
Mushroom Hat — White Underside
Yarn: white. Use 4.5 mm hook.
R1: 6 sc in MR (6)
R2: inc ×6 (12)
R3: (sc, inc) ×6 (18)
R4: (2 sc, inc) ×6 (24)
R5: (3 sc, inc) ×6 (30)
R6: (4 sc, inc) ×6 (36)
R7: (5 sc, inc) ×6 (42)
R8: sc around (42)
Fasten off and leave a 35 cm tail.
Mushroom Hat — Red Crown
Yarn: bright red.
R1: 6 sc in MR (6)
R2: inc ×6 (12)
R3: (sc, inc) ×6 (18)
R4: (2 sc, inc) ×6 (24)
R5: (3 sc, inc) ×6 (30)
R6: (4 sc, inc) ×6 (36)
R7: (5 sc, inc) ×6 (42)
R8: (6 sc, inc) ×6 (48)
R9–R11: sc around (48)
R12: (6 sc, dec) ×6 (42)
R13: sc around (42)
Add a shallow, evenly distributed layer of stuffing. The crown should dome upward but the brim must remain flat.
Do not fasten off yet.
Join Mushroom Crown to Underside
Place the white underside against the open red crown with wrong sides facing.
Working through both layers, sc around all 42 stitches (42).
R14: FLO sc around (42)
R15: FLO (6 sc, inc) ×6 (48)
Fasten off.
These final front-loop rounds create the visible red overhang while leaving the white underside clearly exposed.
Large White Mushroom Spots — Make Three
Yarn: white.
R1: 6 sc in MR (6)
R2: inc ×6 (12)
Fasten off and leave a 15 cm attachment tail.
Small White Mushroom Spots — Make Five
Yarn: white.
R1: 6 sc in MR (6)
Fasten off and leave a 12 cm sewing tail.
Optional Hat Inner Band
Yarn: white.
Ch 31 and join without twisting.
R1–R3: sc around (30)
Fasten off.
Sew this small band to the underside centre if you want the hat to sit more securely around the top of the duck’s head while remaining removable.
Assembly
- Centre the head above the body and sew around the neck twice using the body tail. Add one hidden rear anchor stitch so the head remains upright beneath the wide hat.
- Pin the bill horizontally between and below the eyes. Its width should exceed the distance between the eye centres; sew around the full outer edge while preserving the flattened shape.
- Attach the pink cheek patches outside the bill and below the eye line. Keep both patches at the same vertical height.
- Sew one wing to each side across the upper body. Angle the rounded lower ends slightly outward and leave the outer edges partially free.
- Attach the two orange feet across the lower front body. Set the duck on a hard surface before tightening the seams so both feet support the body equally.
- Arrange all eight white mushroom spots across the red crown before sewing. Keep the three larger spots separated and use the smaller circles to fill the remaining spaces.
- Sew each spot primarily through its centre and inner edge. Leave a little thickness at the outer edge so the white circles do not disappear into the red crown.
- Place the hat over the head and rotate it until the brim is level. The red edge should project beyond both sides of the duck’s face.
- If the hat is permanent, tack the white underside to the head at four hidden points. If removable, attach the optional inner band instead.
- Inspect the figure from front and side views, then weave every structural tail through at least three different stitch directions before trimming.
The completed duck should stand upright with the bill horizontal, both wings visible and the mushroom brim extending clearly beyond the head.
7 Technical Tips
- Bill curling: Overstuffing the 20-stitch bill turns it into a tube instead of a flat duck bill. Use only enough filling to create roughly 5–8 mm of thickness.
- Head overstuffing: Excess filling pushes the safety eyes outward and makes the hat sit high. Stop when firm finger pressure produces an indentation of approximately 5 mm.
- Decrease holes: Conventional decreases can reveal stuffing. Work every head and body reduction through the front loops of the next two stitches.
- Wing rotation: A wing attached across fewer than five body stitches can twist forward. Spread each upper seam across approximately 6–8 body stitches.
- Hat collapse: A crown filled only at the centre forms a pointed dome. Distribute stuffing in a shallow ring under R8–R12 so the top remains broad.
- Brim distortion: Pulling the 42-stitch join too tightly makes the hat bowl downward. The joined edge should match the circumference of the completed white underside without stretching.
- Spot crowding: White circles placed less than one red stitch apart visually merge. Leave at least one full red stitch of exposed crown between most neighboring spots.
Getting the Duck Bill Proportions Right
The bill is the strongest species marker in this duck amigurumi crochet pattern. It needs to remain wider than the central space between the eyes while projecting only a short distance forward.
Working around a foundation chain creates a naturally elongated oval. That construction is documented in several duck patterns because it produces a flatter bill than a conventional circular magic-ring piece. :contentReference[oaicite:21]{index=21}
Pin the finished bill before sewing. Its upper edge should sit below the eye stems, and the centre should align with the vertical midpoint of the head. A bill that rises into the eye line compresses the face; one positioned too low leaves an empty yellow band between the eyes and orange piece.
Shaping the Round Duckling Body
The body uses the same 36-stitch maximum as the head, but it holds that width longer. This produces an egg-shaped torso rather than a second sphere.
Keep the lower half firmer than the neck. The hat adds weight at the top of the figure, so a soft body can lean even when the feet are attached evenly.
The two feet are intentionally small. Enlarging them to the same scale as the wings would change the compact duckling silhouette visible in the reference.
Constructing the Mushroom Crown
The red crown reaches 48 stitches, twelve more than the duck’s head plateau. That difference creates the critical overhang around the face.
The top should be domed rather than spherical. Three plain rounds at 48 stitches add height, followed by one decrease stage that brings the crown back to the 42-stitch circumference of the white underside.
Add only shallow stuffing. A heavily filled cap resembles a red ball resting on a white disc, while the photographed mushroom has a low broad crown.
Building the White Mushroom Underside
The underside forms a flat 42-stitch circle. Its role is visual as well as structural: the white edge creates a bright horizontal line between the red cap and yellow head.
Join the red and white pieces stitch for stitch. If one component has stretched, redistribute the difference gradually rather than placing several extra stitches into one section.
The final red front-loop rounds extend beyond the white join. This creates a thin lip and prevents the white underside from reading as the outermost edge of the cap.
Placing the White Spots
Eight spots create enough variation across a hat of this size. Three larger 12-stitch circles establish the main markings, while five smaller six-stitch dots fill the gaps.
Do not place the spots in perfectly even rings. Rotate the hat and distribute them irregularly so no obvious straight line forms across the crown.
Pin every spot before sewing the first one. The front-facing area deserves at least two visible spots because that is the part most apparent from a straight-on view.
Attaching the Wings
Published duck patterns commonly treat wings as separate components, sometimes flat and sometimes worked in rounds. :contentReference[oaicite:22]{index=22} The rounded stuffed version here matches the soft side shapes visible in the photo.
Stuff only the lower half. A rigid wing projects horizontally instead of resting beside the torso.
Sew the inner upper edge securely and leave part of the outer lower edge free. That slight separation creates a visible shadow line between wing and body.
Choosing Yarn and Hook Size
Current duck patterns demonstrate that identical animals can vary dramatically with yarn choice. DIY Fluffies produces a 13 cm chenille duck using super-bulky yarn and a 5 mm hook, while a smaller DK duck pattern recommends a 3.5 mm hook. :contentReference[oaicite:23]{index=23}
The reference image appears smoother and more defined than typical thick chenille, so worsted/Aran or a light chunky yarn suits the photo-matched construction. A 4 mm hook keeps the stitches dense while preserving facial definition.
Use the slightly larger 4.5 mm hook on the mushroom if needed. The cap should be wider than the head, and a small gauge increase helps create that contrast without adding another structural round.
Controlling Eye Placement
Published duck patterns use eye sizes from approximately 6 mm through 16 mm depending on yarn and finished dimensions. :contentReference[oaicite:24]{index=24} For this medium duck, 12 mm produces a large glossy eye without consuming most of the face.
Install both eyes before the head opening narrows below 24 stitches. The locking washers become harder to reach once the decrease rounds progress.
View the head from above before finishing the stuffing. Both eyes should project by similar amounts; uneven filling behind one washer can make one eye appear closer to the viewer.
Balancing the Oversized Hat
The mushroom hat adds more width and weight than a conventional bow or miniature accessory. That extra mass changes the balance of the entire figure.
Stuff the body firmly and attach both feet before permanently tacking the hat. Set the finished duck on a level surface and rotate the hat until the figure remains vertical.
If the mushroom will be removable, use the internal white band rather than relying on an overly tight brim. Stretching the brim around the head can distort both pieces.
Adjusting Finished Size
Published duck amigurumi range from miniature projects under 10 cm to larger super-bulky ducks exceeding 25 cm. :contentReference[oaicite:25]{index=25} Changing yarn thickness is therefore the cleanest way to resize this construction.
For a smaller version, keep the written counts and use DK yarn with a 3–3.5 mm hook. Make the mushroom from the same yarn so the brim-to-head ratio remains consistent.
For a larger plush, move to bulky yarn before adding another increase round. Expanding the duck to 42 stitches while leaving the mushroom at 48 would reduce the dramatic cap overhang.
Finishing Checks
Place the finished duck on a hard, level surface before hiding the final sewing tails. Both feet should make contact while the body remains vertical beneath the head.
View the face directly from the front. The eye centres should remain level, the bill must sit horizontally and the pink cheeks need similar spacing from the orange edge.
Check the mushroom last. The brim should project beyond both sides of the head, several white spots should remain visible from the front and the red crown should not tilt enough to cover either eye.
Conclusion
Measure the finished duck both with and without the mushroom hat, then record the brim diameter beside the yarn and hook sizes used. Photograph the figure straight from the front next; that angle exposes a tilted bill, uneven feet or a mushroom crown sitting off-centre. Save this duck amigurumi crochet pattern to Pinterest and share the finished project on Instagram with #MushroomDuckling. Reshape the red brim and lift the white spots before the final photograph. For another version, would you keep the classic red mushroom cap or switch the crown to lavender with cream spots?
Sources
- DIY Fluffies — Cute Duck Amigurumi: 13 cm super-bulky chenille version, 5 mm hook and 15 mm safety-eye reference. :contentReference[oaicite:26]{index=26}
- Lucy Kate Crochet — Squishy Crochet Duck: size and eye recommendations across DK, worsted, bulky and super-bulky yarn. :contentReference[oaicite:27]{index=27}
- Grace and Yarn — Amigurumi Duck: published 100 g main yarn, 25 g orange yarn and 15 mm eye reference. :contentReference[oaicite:28]{index=28}
- Spin a Yarn Crochet — Spring Duck: 27 cm super-bulky duck with separate wings, bill and legs. :contentReference[oaicite:29]{index=29}
- Etsy — current Duck Amigurumi marketplace showing strong rubber-duck and low-sew competition. :contentReference[oaicite:30]{index=30}









