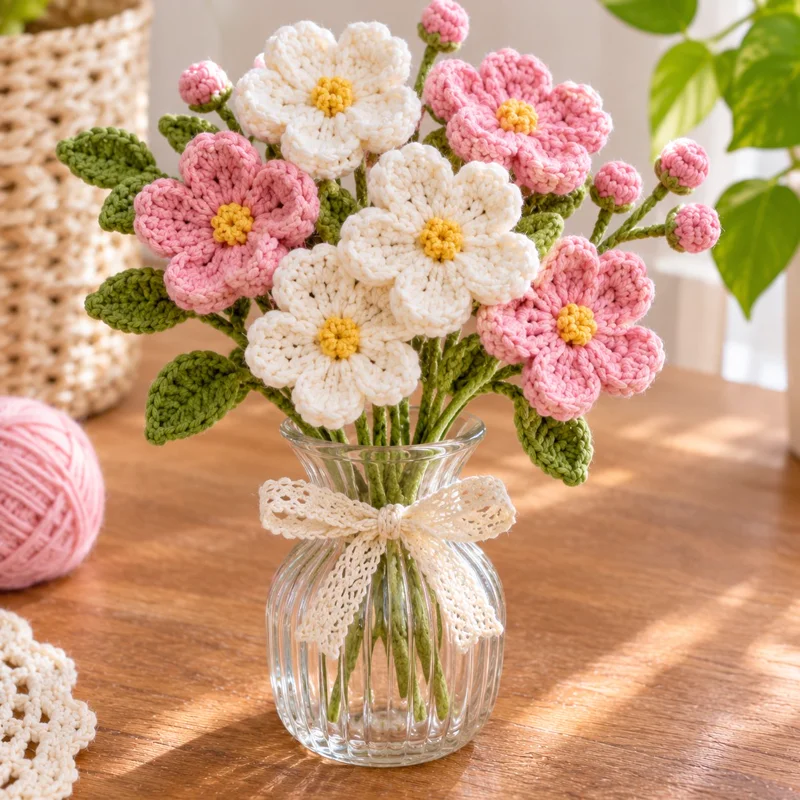
Five rounded petals, raised yellow centers, and small pink buds define this crochet flower bouquet pattern. The arrangement combines pink and ivory flowers with green leaves, wrapped stems, and a decorative lace ribbon. Using DK cotton yarn and a 3.5 mm crochet hook, you can make a lasting floral display without watering or maintenance. This intermediate-beginner project also provides a practical way to use leftover yarn in several coordinated colors.
The Design: What Makes This Crochet Flower Bouquet Different?
This design uses five-petal blossoms rather than the narrow petals commonly found in traditional crochet daisies. Each flower has a compact central ring, a textured layer of rounded petals, and a separate yellow center that adds depth.
The combination of ivory and pastel pink flowers creates contrast without requiring different stitch patterns. You can use the same flower instructions for both colors, which keeps the finished blossoms consistent in diameter.
Small spherical buds sit above the main flowers, creating additional height. Green crocheted leaves fill the spaces between stems and support the appearance of a natural floral arrangement.
One common problem with a handmade crochet flower bouquet is that the flower heads lean forward when attached to weak stems. This version uses covered floral wire and reinforced attachment points to support the blossoms.
The finished arrangement is intended for display in a vase. Its approximate dimensions depend on the yarn, hook, stem length, and arrangement.
Project Information at a Glance
| Detail | Information |
|---|---|
| Skill level | Confident beginner |
| Estimated time | 6–9 hours |
| Flower diameter | Approximately 7–9 cm, depending on tension |
| Bouquet height | Approximately 25–30 cm with stems |
| Crochet hook | 3.5 mm |
| Yarn weight | DK / Light Weight #3 |
| Terminology | US crochet terms |
| Construction | Joined flower rounds, spiral buds, and wired stems |
Measurements and working time are project estimates, not measurements taken from the photograph or a physically tested sample.
Materials and Tools
Yarn
Choose DK-weight cotton or cotton-blend yarn with a firm twist. Cotton holds petal edges and leaf shapes more clearly than very soft, loosely spun fibers.
- Pastel pink DK cotton yarn – approximately 35 g: for three open flowers and seven buds.
- Ivory or cream DK cotton yarn – approximately 30 g: for three open flowers.
- Golden yellow DK cotton yarn – approximately 8 g: for the raised flower centers.
- Olive green DK cotton yarn – approximately 30 g: for leaves, bud bases, and stem coverings.
These quantities are planning allowances for the bouquet described below. Actual yarn consumption will vary with gauge and the size of each component. Suitable yarn ranges include cotton DK collections from DROPS, Paintbox Yarns, or comparable manufacturers.
Additional Tools
- 3.5 mm crochet hook
- Yarn needle with a blunt tip
- Stitch markers for spiral rounds
- Polyester fiberfill for the small buds
- 18–20 gauge floral wire for the stems
- Green floral tape for covering and joining stems
- Wire cutters and round-nose pliers
- Small amount of fabric-safe craft glue if desired
- Decorative cream lace ribbon
- Glass vase with a narrow neck
- Scissors and measuring tape
Safety note: This wired floral arrangement is decorative, not a children’s toy. Cut wire ends must be folded inward and covered. Keep sharp wire, detachable decorations, and small components away from young children.
Crochet Abbreviations
| Abbreviation | Meaning |
|---|---|
| MR | Magic ring |
| ch | Chain |
| sc | Single crochet |
| hdc | Half double crochet |
| dc | Double crochet |
| tr | Treble crochet |
| inc | Two single crochet stitches in one stitch |
| dec | Single crochet decrease over two stitches |
| sl st | Slip stitch |
| BLO | Back loop only |
| st(s) | Stitch(es) |
| FO | Fasten off |
An invisible decrease is made by inserting the hook through the front loops of two consecutive stitches before completing one single crochet.
Free Crochet Flower Bouquet Pattern – Step by Step
This is an original, photo-inspired construction pattern, not a reproduction of an identified designer’s instructions. It has been checked for stitch-count consistency but has not been physically sample-tested. Joined rounds are specified for the flowers, while buds are worked in continuous spirals.
1. Large Five-Petal Flowers (Make 6)
Yarn: Pastel pink for three flowers and ivory for three flowers.
These blossoms form the main structure of the bouquet. The center is made first, followed by five identical petals worked into the base stitches.
Flower Base
R1: Make a MR and work 6 sc into the ring. Join with a sl st. (6)
R2: Ch 1, inc in each stitch around. Join with a sl st. (12)
R3: Ch 1, (1 sc, inc) × 6. Join with a sl st. (18)
R4: Ch 1, (2 sc, inc) × 6. Join with a sl st. (24)
R5: Ch 1, (3 sc, inc) × 6. Join with a sl st. (30)
Fasten off, leaving a 20 cm yarn tail. This circular base is the foundation for the petals. The five petals will each use six consecutive stitches from the final round.
Rounded Petals
Join the petal yarn into any stitch of R5. Each petal is worked across six stitches of the base circle.
Petal 1: Ch 1, sc in the first stitch, hdc in the next stitch, 2 dc in each of the next two stitches, hdc in the next stitch, and sc in the final stitch. (8 worked stitches)
Petal 2: Repeat the same sequence across the next six base stitches. (8 worked stitches)
Petal 3: Repeat across the next six base stitches. (8 worked stitches)
Petal 4: Repeat across the next six base stitches. (8 worked stitches)
Petal 5: Repeat across the final six base stitches. (8 worked stitches)
Join with a sl st to the first sc. There are now five shallow petals, with 40 worked stitches along their outer edges.
Petal Shaping Round
Work the following sequence over the eight stitches of each petal:
R6: (Sc in next stitch, hdc in next stitch, dc in next stitch, 2 dc in each of the next two stitches, dc in next stitch, hdc in next stitch, sc in next stitch) × 5. Join with a sl st. (50)
Fasten off and weave in the finishing end. Leave the original center tail available for attaching the flower to its stem.
Shape each petal with your fingers, pulling the central high stitches outward to create a rounded outline. The resulting flower is flatter than the deeply cupped flowers in the reference image; gentle shaping and a raised center add dimension.
2. Raised Yellow Flower Centers (Make 6)
Yarn: Golden yellow.
The yellow center should sit above the petal base instead of disappearing into the surrounding stitches.
R1: Make a MR and work 6 sc. (6)
R2: Inc × 6. (12)
R3: Sc in each stitch around. (12)
R4: Dec × 6. (6)
Place a very small amount of fiberfill inside the center before closing. Fasten off, leaving a 20 cm tail.
Thread the yarn tail through the front loops of the six remaining stitches, pull closed, and secure. Sew the center onto the middle of the flower, keeping the rounded side facing forward.
For a more textured center, add several short yellow embroidery stitches across the surface after attachment.
3. Small Pink Flower Buds (Make 7)
Yarn: Pastel pink.
The buds provide height and fill the spaces between the open blossoms. Each one is a small stuffed sphere with a green base.
R1: 6 sc in MR. (6)
R2: Inc × 6. (12)
R3: (1 sc, inc) × 6. (18)
R4: Sc around. (18)
R5: Sc around. (18)
R6: (1 sc, dec) × 6. (12)
R7: Dec × 6. (6)
Add a small quantity of stuffing before completing R7. Close the opening and leave a 15 cm tail for securing the bud.
Do not overstuff. A firmly packed bud may become elongated instead of maintaining a rounded silhouette.
4. Green Bud Bases (Make 7)
Yarn: Olive green.
R1: 6 sc in MR. (6)
R2: Inc × 6. (12)
R3: Sc around. (12)
Fasten off, leaving a 15 cm tail. Position each green base beneath a pink bud and sew it around the lower edge.
The base should cover approximately the bottom quarter of the bud. Keep the center accessible for inserting the floral stem.
5. Crochet Leaves (Make 10–12)
Yarn: Olive green.
Each leaf is crocheted around a foundation chain. This creates a pointed oval with a narrow base that can be attached to a wire stem.
Foundation: Ch 13. (13 ch)
R1: Starting in the second chain from the hook, work 1 sc, 1 hdc, 2 dc, 4 tr, 2 dc, 1 hdc, and 1 sc across the next 11 chains. Work 3 sc in the last chain. Continue along the opposite side of the foundation chain, working 1 sc, 1 hdc, 2 dc, 4 tr, 2 dc, 1 hdc, and 1 sc across the corresponding 11 chain positions. Join with a sl st. (25 stitches)
R2: Ch 1, sc in the first 11 stitches, work (sc, ch 2, sc) in the next stitch to sharpen the leaf tip, then sc in each of the remaining 13 stitches. Join with a sl st. (27 sc and 2 ch)
Fasten off, leaving a 20 cm tail. The tip is formed at the three-sc turning group from R1; adjust the placement of the ch-2 point to align with the center of that group.
Pin the leaves flat and shape them while lightly damp. Allow them to dry completely before mounting.
6. Optional Small Filler Leaves (Make 4–6)
Yarn: Olive green.
Smaller leaves can be used around the buds and at the back of the arrangement.
Foundation: Ch 9. (9 ch)
R1: Beginning in the second chain from the hook, work 1 sc, 1 hdc, 4 dc, and 1 sc across seven chains. Work 3 sc in the last chain. Continue along the opposite side with 1 sc, 4 dc, 1 hdc, and 1 sc. Join with a sl st. (17)
Fasten off and leave a 15 cm tail. These smaller leaves should be placed near the upper branches, where large foliage would hide the pink buds.
7. Floral Stems (Make 13)
Materials: Floral wire, olive green yarn, and green floral tape.
Cut six lengths of floral wire approximately 30 cm long for the open flowers and seven lengths approximately 25–28 cm long for the buds.
Use pliers to form a small closed loop at the top of each wire. The loop provides a secure attachment point and prevents the cut end from pushing through the crochet fabric.
Cover the upper portion of the wire with green floral tape. Wrap the remaining length with olive green yarn, keeping the wraps close together.
Secure the yarn ends with a small amount of fabric-safe glue or additional floral tape.
For heavier flower heads, use a thicker wire or combine two thinner wires before wrapping. The stem should hold the flower upright when placed in the vase.
8. Decorative Lace Ribbon
The reference arrangement uses an ivory lace bow around the neck of a clear glass vase.
For a close visual match, use approximately 50–60 cm of ready-made cotton lace ribbon, depending on the vase circumference and desired bow size.
Alternatively, crochet a simple ribbon strip:
Foundation: Ch 81. (81 ch)
Row 1: Sc in the second chain from the hook and each remaining chain. (80)
Row 2: Ch 3, turn. Skip the first stitch, dc in the next stitch, then repeat (ch 1, skip 1 stitch, dc in next stitch) across. Finish with a dc in the final stitch if needed to complete the edge.
Fasten off and weave in the ends. The openwork strip can be tied around a narrow vase, although ready-made lace will produce a closer match to the photograph.
How to Assemble the Crochet Flower Bouquet
- Prepare the flower heads. Lay out all six open flowers and check that each has five evenly spaced petals. Sew the yellow centers securely into position.
- Attach the main stems. Position a covered wire loop against the back of each flower. Sew through the center base and around the loop several times, keeping the wire behind the fabric.
- Reinforce the attachment. Add a small green crochet circle or floral tape over the back of the flower if the wire connection remains visible.
- Complete the buds. Sew each green base beneath its pink bud, attach a covered wire loop, and secure the connection with green yarn.
- Prepare the foliage. Attach the large and small leaves to short sections of covered wire or directly to the flower stems using the yarn tails.
- Arrange the central flowers. Position two ivory blossoms near the center, slightly higher than the remaining flowers. Their pale color creates a visual focal point.
- Add the pink flowers. Place one toward the left, one toward the upper right, and one toward the lower right. Position the remaining ivory flower to balance the arrangement.
- Insert the buds. Distribute the seven pink buds around the upper and outer edges. Keep several buds higher than the open flowers to create an irregular silhouette.
- Adjust the leaves. Place large leaves around the lower half and smaller leaves near the buds. Bend the wires gently so the foliage does not cover the yellow flower centers.
- Finish the display. Gather the stems, trim them to suit the vase, and insert them into the opening. Tie the cream lace ribbon around the neck of the vase and adjust the flower positions.
The completed arrangement contains six open flowers, seven buds, and approximately ten to eighteen leaves.
7 Technical Tips for Better Crochet Flowers
- Maintain accurate stitch counts. Place a marker at the beginning of every spiral round when making buds. Missing one increase in R3 produces an uneven sphere instead of the intended 18-stitch circumference.
- Control stuffing firmness. Use only enough fiberfill to support each bud without stretching the stitches. Visible white stuffing between the pink stitches indicates excessive filling or loose tension.
- Use invisible decreases. Work through the front loops of two stitches when decreasing the buds from 18 to 12 stitches. Standard decreases may leave raised ridges around the lower half.
- Check flower-center placement. Pin each yellow center directly over the original magic ring before sewing. A center displaced by more than a few millimeters makes the five petals appear uneven.
- Avoid loose petal tension. Keep the 3.5 mm hook consistent throughout the flowers and leaves. Switching to a much larger hook may produce soft edges that fold forward under their own weight.
- Pin leaves before attaching them. Use two or three pins per leaf while shaping the point and outer edges. Uneven blocking can cause the leaves to curl toward the back of the bouquet.
- Secure yarn tails and wire ends. Weave each finishing tail through at least 3 cm of crochet fabric before trimming. Cover every cut wire end with a closed loop or protective wrap to prevent snagging and punctures.
How to Customize the Flower Bouquet
Change the Flower Colors
The same flower pattern can be worked in several color combinations. Pale lavender and white produce a cooler palette, while peach and cream create a warmer arrangement.
Keep the yellow centers consistent if you want the flowers to look like a coordinated collection. For a more botanical appearance, choose slightly different shades of pink for individual blossoms.
Make a Smaller Bouquet
For a compact arrangement, crochet three open flowers, four buds, and six leaves. Shorten the stems to approximately 18–22 cm and choose a narrow vase.
Reducing the number of flowers also makes the project more suitable for using small quantities of leftover cotton yarn.
Make a Fuller Arrangement
Increase the bouquet to nine open flowers and ten buds. Place the tallest stems near the back, with shorter blossoms toward the front.
Additional leaves should be concentrated around the outer edges rather than directly behind every flower. This helps prevent the arrangement from becoming visually crowded.
Use the Flowers Without Stems
The individual crochet flowers can also be attached to fabric projects. Remove the wire components and sew the flowers onto tote bags, cushion covers, wall hangings, or decorative wreaths.
For flat applications, reduce the amount of stuffing in the yellow centers or replace the raised centers with embroidered stitches.
Common Crochet Flower Bouquet Problems
Why Are My Flower Petals Curling?
Petal curling can result from tight tension, an undersized hook, or uneven stitch placement. Check that each petal uses exactly six base stitches and that the shaping round contains the same sequence for every petal.
Light blocking can improve the shape of cotton flowers. Avoid aggressive stretching, which may distort the central circle.
Why Do the Flower Heads Fall Forward?
The most common cause is insufficient stem support. A large crocheted flower needs a wire that resists bending at the attachment point.
Use 18-gauge wire for heavier blossoms or reinforce a thinner stem with an additional wire. A wider attachment loop behind the flower also distributes the weight more effectively.
Why Are the Flowers Different Sizes?
Differences in yarn thickness, hook size, and working tension affect the finished diameter. Use yarn from the same weight category for every blossom.
Measure the first completed flower before making the remaining five. If the diameter is outside your preferred range, adjust the hook size or yarn choice before continuing.
Can I Wash a Crochet Flower Bouquet?
Individual cotton flowers without wire can usually be washed according to their yarn label. However, assembled bouquets containing floral wire, glue, and tape should not be immersed in water.
Remove dust with a soft brush or use a cool, gentle stream of air. Keep the arrangement away from prolonged direct sunlight to reduce color fading.
Frequently Asked Questions
What Is the Best Yarn for a Crochet Flower Bouquet?
DK-weight cotton is a practical choice because it provides defined stitches and relatively firm petals. Cotton blends can also work, but very soft acrylic yarn may need additional blocking to maintain the desired shape.
What Crochet Hook Size Should I Use?
A 3.5 mm hook is a useful starting point for DK cotton. If your stitches are unusually loose, try a 3.0 mm hook. If the fabric becomes stiff and difficult to work, consider a 4.0 mm hook.
How Many Flowers Are Needed for a Small Bouquet?
Three to five open flowers can make a small arrangement. For a fuller display similar to the reference image, use six open flowers, several buds, and a selection of green leaves.
Do Crochet Flowers Need Stuffing?
The flat flower petals do not require stuffing. Only the raised yellow centers and small pink buds use small amounts of fiberfill in this design.
How Do I Keep Crochet Flowers Standing Upright?
Attach each flower to a wire stem with a closed loop at the top. Secure the loop to the flower base with several stitches, then cover the connection with green yarn or floral tape.
Can Beginners Make This Bouquet?
Confident beginners who know single crochet, double crochet, increases, decreases, and working around a foundation chain can attempt this pattern. Making one flower and one leaf before preparing the full bouquet is a useful way to check tension and construction.
The instructions above are an independently drafted interpretation of the supplied photograph. They are not claimed to be the original pattern used to create the photographed bouquet.
Conclusion
This arrangement combines six five-petal flowers, seven pink buds, green foliage, and individually wrapped wire stems. The flower components are worked separately, allowing you to adjust their spacing and height before placing them in the vase. For consistent results, complete one sample flower and leaf first, then check their measurements against your preferred bouquet size.
Once assembled, position the finished piece away from moisture and prolonged direct sunlight. Photograph the bouquet from the front and side to document the flower placement, then share your version on Pinterest or Instagram using #CrochetFlowerBouquet.
Would you arrange the ivory blossoms in the center, as shown here, or alternate pink and ivory flowers throughout the bouquet?









