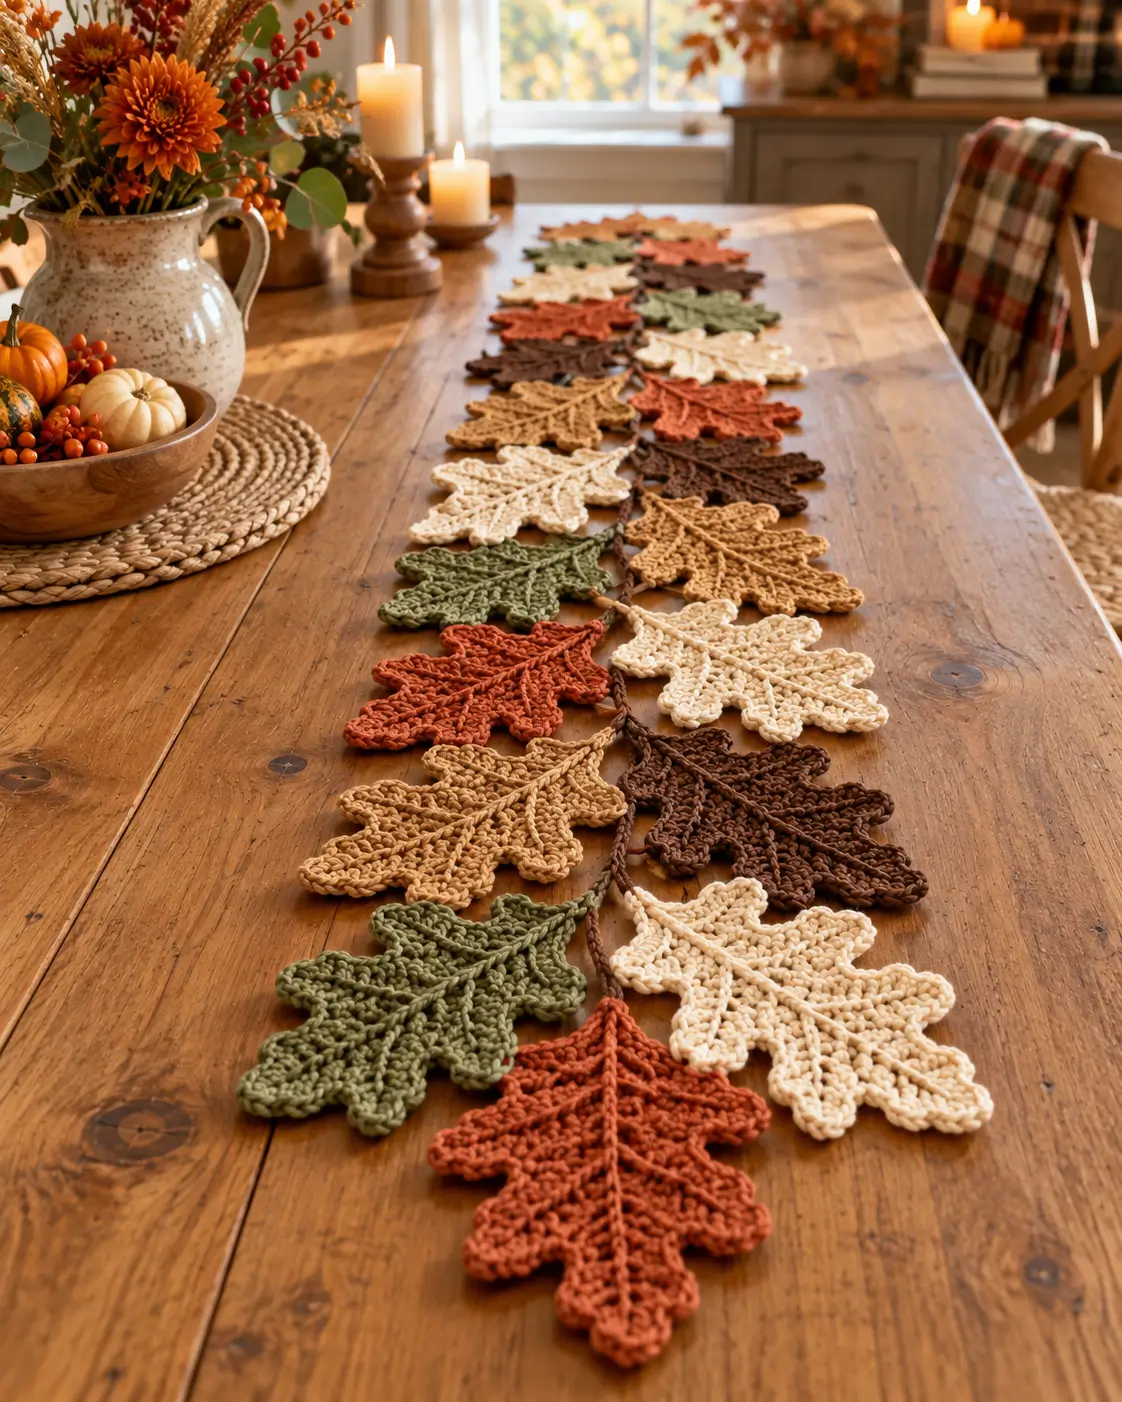
Five pointed lobes and a raised center vein are what stop these crochet leaves from reading as ordinary oval foliage. This crochet fall maple leaf pattern creates individual leaves in rust, cream, olive, tan and dark brown, then connects them into a long autumn table decoration. Medium-weight yarn and a 4–5 mm hook suit this style well. Make the runner longer or shorter simply by changing the number of leaves.
The Design: What Makes These Crochet Maple Leaves Different
The photographed runner depends on three structural details. First, each leaf has a broad central lobe surrounded by smaller pointed lobes. That uneven outline creates the recognizable maple-inspired silhouette rather than a generic crochet leaf.
Second, a defined center line runs from the stem toward the upper point. This feature matters because a completely flat field of stitches can make a large leaf look shapeless. Surface crochet, slip stitches or a narrow raised line can be used to reproduce that vein.
Third, the leaves overlap along a narrow brown connecting cord instead of forming a rigid rectangular runner. The result is a crochet fall leaf garland that can run down a dining table, across a mantel or along a console.
The most common construction problem is curling at the pointed lobes. Excessively tight chains and inconsistent stitch heights pull the tips inward, so each finished leaf should be blocked before assembly.
Project Info at a Glance
| Skill Level | Leaf Size | Hook | Yarn | Construction |
|---|---|---|---|---|
| Intermediate | Approx. 7–10 cm across | 4.0–5.0 mm | DK to worsted | Individual leaves joined to a cord |
Published maple and autumn-leaf patterns vary considerably in scale. One documented maple leaf measures approximately 4.5 × 2 inches, while another fall-leaf design measures about 9 cm across. Fall garland patterns also commonly use worsted yarn with hooks around 4–5 mm. Your gauge and yarn determine the final dimensions.
Materials and Tools
Yarn
- Burnt orange — DK or worsted weight — for rust-colored leaves.
- Olive green — DK or worsted weight — for green autumn leaves.
- Cream — DK or worsted weight — for light contrast leaves.
- Warm tan — DK or worsted weight — for golden-brown leaves.
- Dark brown — DK or worsted weight — for dark leaves and the connecting cord.
Plan on roughly 5–10 yards of yarn per leaf, depending on the yarn thickness and finished size. Published fall-leaf patterns range from approximately 3.5 yards for smaller worsted leaves to about 10 yards for larger versions.
Tools
- 4.0 mm crochet hook for a firmer leaf
- 5.0 mm crochet hook for larger or more relaxed leaves
- Tapestry needle
- Scissors
- Locking stitch markers
- Blocking mat
- Rust-resistant blocking pins
- Tape measure
Abbreviations
- ch — chain
- sl st — slip stitch
- sc — single crochet
- hdc — half double crochet
- dc — double crochet
- tr — treble crochet
- st/sts — stitch/stitches
- sp — space
- rep — repeat
- FO — fasten off
Different stitch heights are intentional in a maple leaf. Moving from slip stitch through single, half-double, double and treble crochet creates the changing heights needed for pointed lobes.
Crochet Fall Maple Leaf Pattern
This pattern is designed to reproduce the visual structure of the photographed project rather than duplicate a published designer pattern. Make individual five-lobed leaves first, block them, add the raised veins, and connect the finished pieces along a brown crochet cord.
Color Plan
For a runner close to the photograph, make approximately 16–20 leaves. Do not distribute the colors in a strict repeating sequence. An irregular arrangement looks more like scattered autumn foliage.
- 4 burnt-orange leaves
- 4 cream leaves
- 3–4 olive-green leaves
- 3–4 tan leaves
- 3–4 dark-brown leaves
Increase these quantities proportionally for a longer dining table.
Maple Leaf Center
Make one center for each leaf in the selected autumn color.
Round 1: Make a magic ring. Ch 1 and work 10 sc into the ring. Join with sl st. (10 sts)
Round 2: Ch 1. Work 2 sc in each stitch around. Join with sl st. (20 sts)
Round 3: Ch 1. Work sc in next st, 2 sc in next st around. Join with sl st. (30 sts)
The 30-stitch center creates five equal six-stitch sections. Place a marker every six stitches. Each section will become one leaf lobe.
Large Center Lobe
The middle lobe should extend farther than the surrounding four lobes.
At the first marked section, work:
Ch 8.
Beginning in the second chain from the hook, work:
sl st, sc, hdc, dc, tr, dc, hdc.
Slip stitch back into the designated base stitch.
This creates a narrow point with gradually increasing stitch height toward the center.
For a wider central lobe, work sc stitches around one side of the lobe, place 3 sc at the point, then work down the opposite side before returning to the center circle.
Upper Side Lobes
Make two, one on either side of the center point.
Ch 6.
Starting in the second chain from the hook, work:
sl st, sc, hdc, dc, hdc.
Slip stitch into the next marked section.
Repeat symmetrically on the opposite side of the center lobe.
These two points should finish approximately 10–20% shorter than the center lobe. That difference in height is important for the maple silhouette.
Lower Side Lobes
Make two.
Ch 5.
Beginning in the second chain from the hook, work:
sl st, sc, hdc, dc.
Return to the leaf center with a slip stitch.
Repeat for the opposite lower side.
There should now be five visible points: one long center lobe, two medium upper-side lobes and two shorter lower lobes.
Shaping the Leaf Edge
Work around the outside edge of the leaf with single crochet.
Use 1 sc in short edge spaces and 2 sc where additional fabric is needed around a curve.
At the tip of each lobe, work:
sc, ch 2, sl st into second ch from hook, sc
This small chain point sharpens the tip without adding another long extension.
Between lobes, use one or two slip stitches. Keeping the valleys low is as important as making the points tall. If too many tall stitches are placed between lobes, the finished piece becomes a flower-like star rather than a maple leaf.
Continue around all five lobes and join with a slip stitch at the lower center.
Leaf Stem
Do not fasten off after completing the border.
Ch 7.
Starting in the second chain from the hook, sl st in each chain back toward the leaf. (6 sl sts)
Slip stitch into the base of the leaf.
For the longer stems visible in the photographed runner, increase the foundation to ch 9–12.
Fasten off and leave a 15 cm tail if the leaf will be sewn to the runner cord.
Raised Center Vein
The photographed leaves have a pronounced line running through their centers. Add this after the main leaf has been completed.
Attach matching yarn at the base of the stem.
Surface slip stitch in a straight or slightly curved line from the base toward the central lobe.
Stop approximately 5–10 mm before the tip. Fasten off.
Add two shorter diagonal veins toward the upper side lobes if stronger definition is wanted.
Keep the surface stitches loose. Tight surface crochet will shorten the center of the leaf and cause the edges to curl upward.
Burnt Orange Leaves
Make approximately four leaves using burnt-orange yarn.
Keep the stitches relatively firm so the pointed outline remains visible after blocking. Use matching orange yarn for the center vein or a slightly darker rust shade for greater definition.
Olive Green Leaves
Make three or four leaves using muted olive-green yarn.
The green pieces provide contrast between the cream, rust and brown leaves. Scatter them along the runner rather than grouping them together.
Cream Leaves
Make approximately four leaves.
Cream leaves expose stitch irregularities more clearly than dark yarn. Count the stitches at each lobe and keep the surface vein centered.
Tan Leaves
Make three or four warm tan leaves.
If the tan yarn is slightly thinner than the other colors, use a larger hook rather than adding extra rounds. All leaves should remain within approximately 7–10 cm across if a consistent runner is wanted.
Dark Brown Leaves
Make three or four dark-brown leaves.
Dark yarn makes individual stitches harder to see, so place markers at the five lobe positions before shaping begins. Check the silhouette against a light background before fastening off.
Blocking the Crochet Leaves
Block every leaf individually before joining the runner.
Place the damp leaf on a blocking mat. Pin the center lobe first, followed by the two upper side lobes and then the two lower lobes.
Pull only enough to define the shape. Aggressive stretching makes the spaces between lobes too wide.
Pin the stem straight and check the center vein. If surface crochet has pulled the fabric inward, gently redistribute the stitches while the leaf is damp.
Allow each leaf to dry fully before removing the pins.
Connecting Cord
Yarn: dark brown.
The photographed project uses a narrow brown line through the center of the arrangement. A crochet chain cord provides a practical equivalent.
Step 1: Ch 25 for the first free end.
Step 2: Position the first blocked leaf by its stem.
Step 3: Insert the hook through the stem end, yarn over and pull through both the stem and the working loop.
Step 4: Ch 8–12 before attaching the next leaf.
Continue in this sequence until every leaf has been attached.
Finish with another 25 chains after the last leaf, then fasten off.
Spacing is adjustable. Published fall garland instructions commonly use chain spacing between individual leaves, and approximately 10 chains gives enough separation to keep adjacent pieces from stacking directly on top of one another.
Arranging the Leaves Like the Photo
Do not point every leaf in the same direction. The photographed table runner works because neighboring leaves alternate from left to right along the central line.
Place the first leaf toward the left. Turn the second toward the right, then rotate the third slightly rather than positioning it at exactly the same angle.
Allow some leaves to overlap by approximately 1–3 cm. Keep the central vein visible whenever possible.
Alternate light and dark colors. For example, avoid placing three cream leaves consecutively or clustering every brown leaf in one section.
A useful sequence is:
Rust → Cream → Olive → Tan → Brown → Cream → Rust → Olive → Brown → Tan.
Repeat with small changes rather than reproducing the sequence exactly.
Assembly
- Crochet all required maple leaves before beginning the connecting cord.
- Weave in the starting yarn tail on each leaf while retaining any tail needed for attachment.
- Add the raised center vein from the stem toward the largest lobe.
- Block each leaf with all five points individually pinned.
- Arrange the dry leaves on the table before joining them.
- Alternate rust, cream, olive, tan and brown across the complete arrangement.
- Rotate consecutive leaves left and right to reproduce the scattered appearance.
- Attach each stem to the dark-brown crochet cord with approximately 8–12 chains between attachment points.
- Lay the completed runner flat and adjust any leaves that overlap by more than approximately 3 cm.
- Weave in the remaining cord ends and lightly block the assembled runner if required.
The finished runner should form a narrow irregular line of five-point leaves rather than a solid rectangular strip.
7 Technical Tips for Better Crochet Maple Leaves
- Check all five points before fastening off. If the central lobe is the same length as the four side lobes, the silhouette can look more like a star than a maple leaf. Keep the center point approximately 10–20% longer.
- Do not tighten the point chains. Tight chains are a common cause of curled leaf tips. Work the chains at normal tension even if the body stitches are firm.
- Mark the five lobe sections. A misplaced starting stitch changes the symmetry of the entire leaf. On a 30-stitch center, markers every six stitches provide five clear working sections.
- Keep surface crochet loose. A center vein that is even 5–10 mm shorter than the relaxed fabric can make the leaf cup inward. Lay the piece flat after every few surface stitches.
- Block before assembly. Trying to pin 18 connected leaves individually is harder than blocking them separately. Shape all five points before attaching a leaf to the cord.
- Leave space between neighboring leaves. Approximately 8–12 chain stitches between stems gives each leaf room to rotate. Shorter spacing creates a denser arrangement but increases overlapping.
- Match yarn thickness across colors. A thinner cream yarn can produce a noticeably smaller leaf even with identical instructions. Change hook size by approximately 0.5 mm when necessary to keep the leaves within the same size range.
Adjusting the Table Runner Length
The modular construction means there is no fixed finished length. Measure the usable center section of the table first, then arrange blocked leaves along that measurement before crocheting the connecting cord.
A short centerpiece can use 8–10 leaves. For a longer runner similar to the photographed arrangement, begin with approximately 16–20 leaves. A mantel garland may require more, depending on leaf size and spacing.
Published examples confirm that fall leaf garlands are commonly constructed from individually crocheted leaves attached to a chain or cord, making the final length easy to modify.
Choosing Yarn for Autumn Leaves
Worsted-weight yarn creates substantial leaves that remain visible across a large dining table. DK yarn produces a lighter result with finer points.
Cotton provides particularly clear stitch definition and holds blocked points well. Acrylic also works and gives access to a broad range of autumn colors.
Avoid combining yarns with drastically different thicknesses unless hook size is adjusted for each color. The goal is not absolute uniformity, but the leaves should remain close enough in scale that one color does not dominate simply because its yarn is thicker.
Finishing the Crochet Fall Maple Leaf Table Runner
Make one test leaf before cutting yarn for the full color set. Block it, measure across the widest two lobes and check that the center point stays flat. A finished width around 7–10 cm works well for a narrow garland, while larger leaves can create a more substantial table runner.
Once the dimensions are established, crochet the remaining leaves in rust, cream, olive, tan and dark brown. Block every piece before connecting them and vary the direction of successive stems.
The completed crochet fall maple leaf pattern can be used as a dining-table runner, mantel garland or seasonal wall decoration. Photograph the finished arrangement from above so the alternating five-point silhouettes remain visible, then share it on Pinterest or Instagram with #CrochetMapleLeafRunner.
For this exact autumn palette, which leaf color would you use most: burnt orange, olive green, cream, tan or dark brown?









