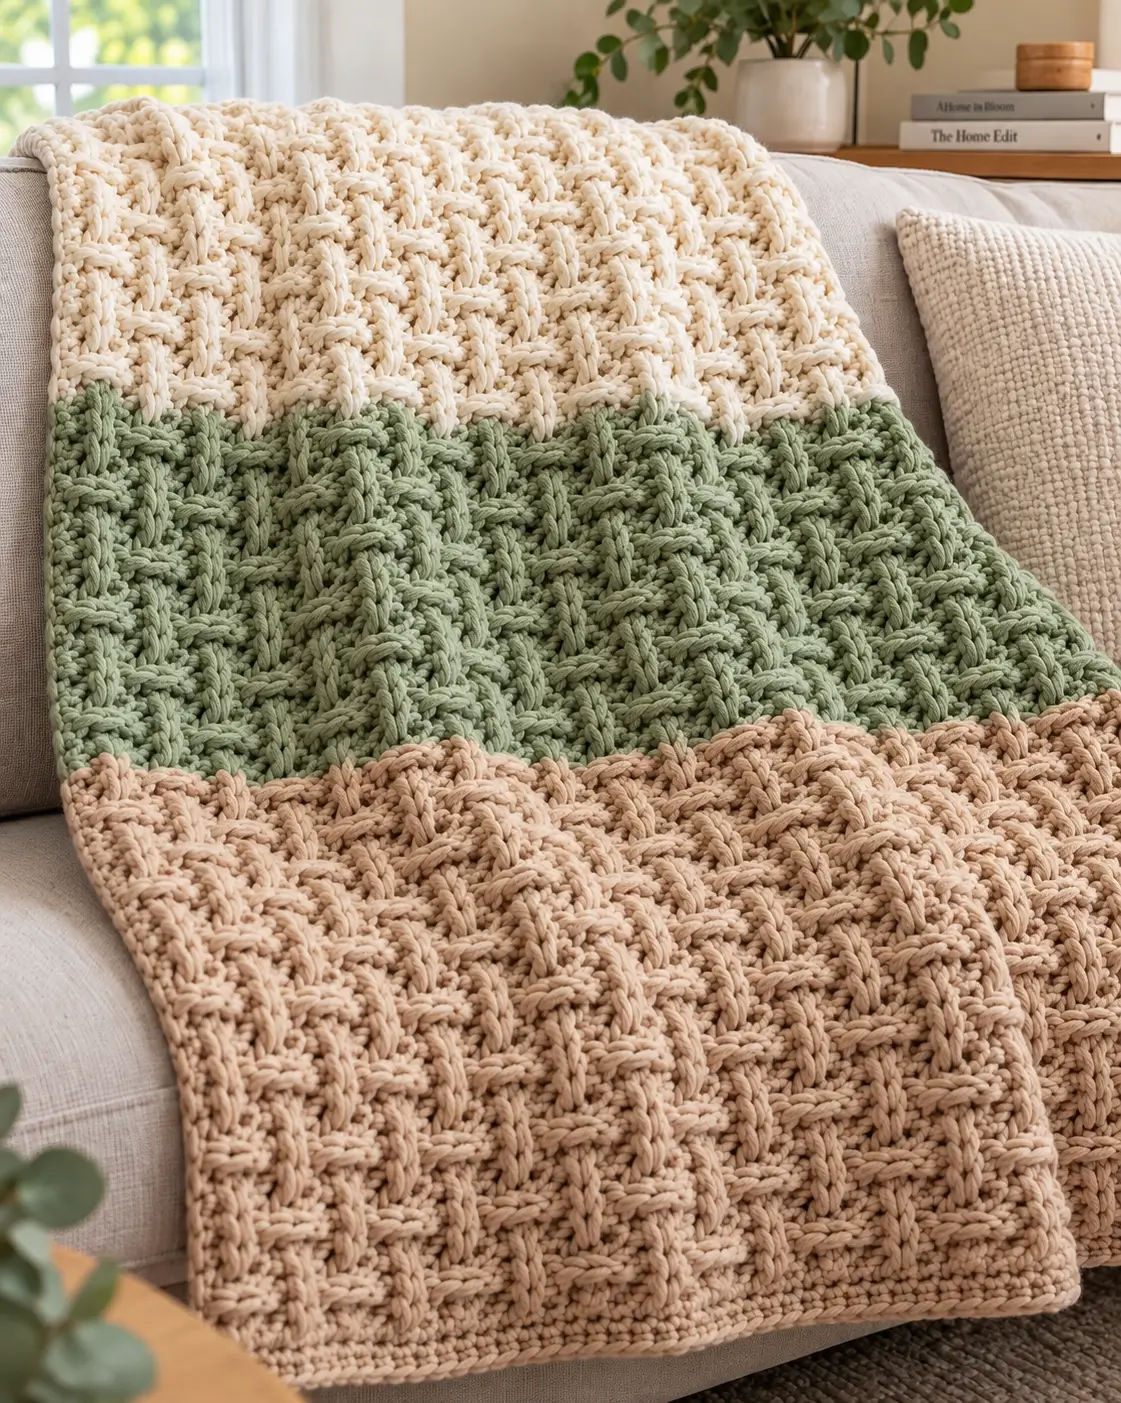
Three oversized color bands make the raised basket structure of this blanket visible before you can identify a single stitch. This chunky basket weave crochet blanket combines cream, sage green and warm tan with alternating front-post and back-post stitches. Super-bulky yarn and an 8 mm hook are a practical starting point for this dense texture. The finished throw works well at approximately 114 × 140 cm, with size adjusted through the foundation and row count.
The Design: What Makes This Basket Weave Blanket Different
The photographed blanket uses a deeply raised woven texture across three broad horizontal color sections. Cream occupies the upper section, muted sage forms the center, and warm tan covers the lower section. Keeping each color in a large uninterrupted block allows the basket texture to remain the main structural feature.
The woven effect comes from alternating groups of front post double crochet and back post double crochet. Front-post stitches project toward the viewer while back-post stitches recede. Reversing those groups after several rows produces the over-and-under appearance associated with basket weave crochet.
A narrow border stabilizes the outside edge without competing with the raised pattern. The main technical risk is uneven tension: post stitches consume more yarn and can contract the fabric compared with ordinary double crochet.
Project Info at a Glance
| Skill Level | Finished Size | Hook | Yarn | Construction |
|---|---|---|---|---|
| Intermediate | Approx. 114 × 140 cm | 8 mm | Super bulky #6 | Worked flat in three color sections |
Published chunky basketweave blankets confirm that super-bulky yarn works well for this structure. One documented version uses an 8 mm hook, super-bulky yarn and approximately 75 oz of yarn for a 45 × 55 inch throw. Another jumbo basketweave example uses a 10 mm hook for a much larger blanket. Hook size should therefore be selected according to the specific yarn and desired fabric density.
Materials and Tools
Yarn
- Cream — super bulky #6 — approximately 600–700 g.
- Sage green — super bulky #6 — approximately 600–700 g.
- Warm tan — super bulky #6 — approximately 600–700 g.
- Tan or chosen border color — reserve approximately 100–150 g from the total yarn supply for edging.
Plan on approximately 1,900–2,250 g total for a substantial throw, then purchase extra yarn if you intend to increase the dimensions. Basketweave fabric consumes considerably more yarn than a plain double-crochet fabric because each post stitch travels around the body of the stitch below.
Tools
- 8 mm crochet hook
- Large-eye tapestry needle
- Scissors
- Locking stitch markers
- Tape measure
- Blocking mats
- Rust-resistant blocking pins
Abbreviations
- ch — chain
- sc — single crochet
- hdc — half double crochet
- dc — double crochet
- FPdc — front post double crochet
- BPdc — back post double crochet
- sl st — slip stitch
- st/sts — stitch/stitches
- rep — repeat
- RS — right side
- WS — wrong side
FPdc is worked around the post from the front of the fabric, while BPdc is worked around the post from the back. Alternating these two stitches creates the raised and recessed sections required for the woven effect.
Chunky Basket Weave Crochet Blanket Pattern
The following construction is independently written to reproduce the broad visual characteristics of the photographed blanket. The basket pattern uses groups of four post stitches, creating substantial woven blocks that remain visible in super-bulky yarn.
Gauge Swatch
Make a basketweave swatch before beginning the blanket.
Ch 26.
Row 1: Dc in fourth ch from hook and in each chain across. Turn.
Row 2: Ch 2. Work FPdc around each of the next 4 posts, BPdc around each of the next 4 posts. Repeat this sequence across as far as the swatch permits. Finish with dc in the final stitch. Turn.
Repeat the post arrangement for three more rows.
On the following tier, reverse the groups: work BPdc over the previous raised blocks and FPdc over the recessed blocks.
Continue until the swatch contains at least two complete basket sections.
Measure only after the fabric has relaxed. If the swatch feels rigid enough to stand by itself, move to a larger hook. If the posts lack definition and the fabric stretches excessively, test a smaller hook.
Foundation
Begin with cream yarn.
The stitch pattern is based on groups of 8 stitches: four front-post stitches followed by four back-post stitches.
Choose a foundation count divisible by 8, then add the required edge stitches for your chosen turning method.
For a throw approximately 110–115 cm wide, make a foundation chain based on your blocked swatch rather than relying on an untested fixed chain count.
The basketweave structure can contract horizontally, so measure a completed pattern swatch rather than measuring the loose foundation chain.
Setup Row
Row 1: Dc across the foundation, beginning in the appropriate chain for your preferred turning-chain method.
Keep the stitches relaxed and consistent. This row supplies the posts around which the first basketweave row will be worked.
Count the row before continuing. An incorrect setup count will shift every basket block above it.
Basket Weave Tier A
Row 2: Ch 2 and turn. Work FPdc around the next 4 posts, then BPdc around the next 4 posts. Repeat across. Work the final edge stitch normally.
Row 3: Ch 2 and turn. Maintain the established raised and recessed blocks by working the stitches as required from the current side of the fabric.
Row 4: Repeat the established basket arrangement.
Row 5: Repeat once more.
Four rows form the first horizontal basket tier.
The raised sections should resemble broad vertical straps while the recessed sections sit behind them.
Basket Weave Tier B
The next four-row section reverses the visual position of the blocks.
Row 6: Ch 2 and turn. Work the opposite post treatment over each four-stitch group so the previously raised block recedes and the previously recessed block projects forward.
Rows 7–9: Maintain this new arrangement.
At the end of Row 9, the first complete over-and-under basket sequence should be visible.
Continue alternating four-row Tier A and four-row Tier B sections throughout the blanket.
Cream Section
Continue the basketweave pattern in cream until the section measures approximately 42–46 cm from the foundation edge.
Finish the final cream row at the end of a complete four-row tier. Changing color halfway through a tier interrupts the rectangular basket structure.
Do not cut the yarn until the last stitch of the row is nearly complete.
Changing From Cream to Sage Green
On the final yarn-over of the last cream stitch, drop the cream yarn.
Pull sage green through the remaining loops to complete the stitch.
Leave yarn tails of approximately 15–20 cm for weaving.
Do not knot the two colors together. A hard knot can create a visible bump at the side edge, particularly with thick yarn.
Continue directly into the sage section while maintaining the same basket tier sequence.
Sage Green Section
Work the established basketweave pattern in sage green.
Aim for approximately 42–46 cm of sage fabric if you want three similarly proportioned color sections.
Count the rows rather than relying only on visual measurement. Super-bulky post stitches can settle after handling, making a section appear temporarily shorter.
Lay the blanket flat every eight rows. Confirm that the left and right edges remain parallel.
If the fabric gradually narrows, check that no edge stitch has been omitted. If it widens, inspect the turning chain and final stitch for accidental increases.
Changing From Sage Green to Tan
Complete the last sage section at the end of a four-row basket tier.
Begin the final yarn-over of the last stitch with sage, then finish the stitch with tan.
Leave approximately 15–20 cm tails from both colors.
Continue with tan without changing the basket sequence.
Warm Tan Section
Work the tan section to approximately the same depth as the cream and sage sections.
For the photographed proportions, the tan area can be slightly longer than the other two sections if additional finished length is required.
Continue until the complete blanket body measures approximately 135–138 cm before the final edging.
Finish on the final row of a complete basket tier.
Fasten off and leave a tail long enough to weave securely through several dense stitches.
How Front Post Double Crochet Works
Yarn over.
Insert the hook from front to back and then back to front around the post of the designated stitch below. The vertical post should sit in front of the hook.
Yarn over and pull up a loop.
Yarn over and pull through two loops. Yarn over again and pull through the remaining two loops.
The completed stitch pushes the post toward the front of the blanket. Groups of FPdc form the raised portions of the basket pattern.
How Back Post Double Crochet Works
Yarn over.
Insert the hook from the back of the work toward the front and then back again around the designated post.
The post should sit behind the hook.
Yarn over and pull up a loop.
Complete the double crochet by pulling through two loops twice.
BPdc pushes the corresponding post away from the viewer, producing the recessed section beside each raised block.
Why the Basket Pattern Changes Direction
A row containing only alternating FPdc and BPdc groups produces vertical ribs. The woven illusion appears only when those groups exchange positions after a fixed number of rows.
In this blanket, each block is four stitches wide and approximately four rows tall. After four rows, the post treatment reverses.
The raised four-stitch group then appears to pass behind the neighboring block, while the previously recessed group moves forward.
Repeating that exchange across the entire blanket creates the interlocking texture visible in the photograph.
Simple Crochet Border
Use tan for a continuous lower-color finish, or cream for a contrasting frame.
A compact border is preferable because the blanket body already has substantial texture.
Border Round 1: Attach yarn at a corner. Ch 1 and sc evenly around the complete blanket. Work 3 sc in each corner. Join with sl st.
Along the row ends, space the single crochet stitches evenly. Do not place one stitch mechanically into every visible gap because post-stitch rows can distort the edge spacing.
Border Round 2: Ch 1. Sc in each stitch around, working 3 sc in the center corner stitch at each corner. Join.
Border Round 3: Repeat Round 2 if a wider frame is wanted.
Fasten off.
The border should lie flat without waves. Rippling indicates too many stitches around the edge; inward curling indicates too few.
Weaving in the Color-Change Ends
Super-bulky yarn requires more deliberate finishing than thin yarn because short tails can work free from large stitches.
Thread each 15–20 cm tail onto a large-eye tapestry needle.
Run the tail through the dense backs of several post stitches in the same color section.
Change direction and weave through another set of stitches.
Avoid carrying a cream tail into the sage section or a sage tail into the tan section. Contrasting yarn can become visible between the raised posts.
Trim the remaining yarn only after the blanket has been handled and stretched gently.
Assembly and Finishing
- Complete the cream basketweave section and finish on a complete four-row tier.
- Change to sage green on the final yarn-over of the last cream stitch.
- Work the full sage section without altering the established stitch count.
- Change from sage to warm tan at another complete tier boundary.
- Finish the tan section when the blanket body reaches the planned length.
- Weave all color-change tails into matching sections of dense post stitches.
- Work one to three rounds of single crochet around the outside edge.
- Measure the width at the top, center and bottom to identify any substantial tension variation.
- Lay the blanket flat and shape the corners and color transitions before blocking.
- Block according to the yarn manufacturer’s care instructions and allow the blanket to dry completely before folding.
The completed blanket should display three broad horizontal color fields with continuous raised basket blocks and a compact, flat outside border.
7 Technical Tips for a Better Basket Weave Blanket
- Mark every eight-stitch repeat. One misplaced post stitch can shift every basket block that follows it. Place a marker between repeats until the structure becomes easy to read.
- Check the edge count every four rows. Accidental increases commonly occur when the turning chain is mistaken for an additional stitch. Compare the stitch count at every tier change.
- Do not pull post stitches tightly. A short FPdc or BPdc contracts the fabric vertically and can make a four-row block noticeably shorter than its neighbors. Pull each working loop to the normal double-crochet height.
- Change colors only at tier boundaries. Switching yarn halfway through a four-row basket section creates a broken rectangle at the transition. Complete the full tier first.
- Buy additional yarn from the same dye lot. Basketweave consumes more yarn than flat double crochet, and running short near the end can leave a visible color difference if the replacement skein comes from another lot.
- Check width in three places. Measure the top, middle and bottom after approximately every 20 cm of work. A difference greater than roughly 2 cm signals changing tension or a stitch-count problem.
- Space border stitches by measurement rather than visible gaps. Too many stitches along the row ends create a ruffled border. Lay each completed side flat before turning the next corner.
Adjusting the Blanket Width
Basketweave patterns are easiest to resize by adding or removing complete post-stitch groups.
For this version, the visual repeat contains 8 pattern stitches: four stitches for one block and four for the neighboring block.
Make a full swatch and measure one eight-stitch repeat. Multiply that measurement by the number of repeats needed for the desired width, then account for the edge stitches.
This method is more reliable than copying a foundation count from a blanket made with another brand of super-bulky yarn. Two yarns carrying the same weight classification can produce noticeably different gauges.
Adjusting the Blanket Length
Length is controlled by the number of four-row basket tiers.
For three equal color sections, divide the desired body length by three and work each color to approximately that measurement.
A target body length of 135 cm, for example, gives approximately 45 cm for cream, 45 cm for sage and 45 cm for tan before the final border.
Always finish a color at the end of a complete basket tier. If the measurement is a few centimeters short, add another full tier rather than stopping halfway through the structure.
Choosing Yarn for a Chunky Basket Weave Blanket
Super-bulky yarn produces the pronounced relief shown in the photograph and reduces the number of stitches required across a throw. Published basketweave projects use a wide range of yarns, from worsted through jumbo, but thicker yarn makes each woven block larger and more prominent.
An 8 mm hook is documented for super-bulky Bernat Blanket in a 45 × 55 inch basketweave throw. Other super-bulky patterns use larger hooks, so the yarn label and a physical swatch should determine the final hook choice.
For the photographed appearance, select three yarn colors with similar fiber composition and thickness. Mixing a dense cotton-style yarn with soft chenille can change both gauge and post definition at the color transitions.
Color Placement
Begin with cream if the blanket will usually be displayed over the back of a sofa. The light upper section emphasizes the shadows between raised basket blocks.
Sage green forms the center band and supplies the strongest color contrast without breaking the neutral palette.
Warm tan at the lower edge gives the blanket a darker visual base. It also works well as the border color because the edging then continues directly from the final section.
For equal color blocking, keep all three sections within approximately one basket tier of the same depth.
Finishing the Chunky Basket Weave Crochet Blanket
Make a complete two-tier swatch before purchasing the full yarn quantity. Eight or more rows are needed to judge the pattern properly because a few isolated post stitches do not show the complete woven structure.
Once the swatch is measured, calculate the foundation from complete eight-stitch repeats and work the cream, sage and tan sections to the required dimensions. Keep every color transition at a four-row tier boundary and finish with a compact single-crochet border.
The completed chunky basket weave crochet blanket should have deep alternating blocks, straight side edges and three clearly separated color fields. Photograph the finished throw with side lighting to show the raised post texture, then share it on Pinterest or Instagram with #ChunkyBasketWeaveBlanket.
Would you keep the cream, sage and tan combination shown here, or replace the tan section with a second neutral shade? “`0









