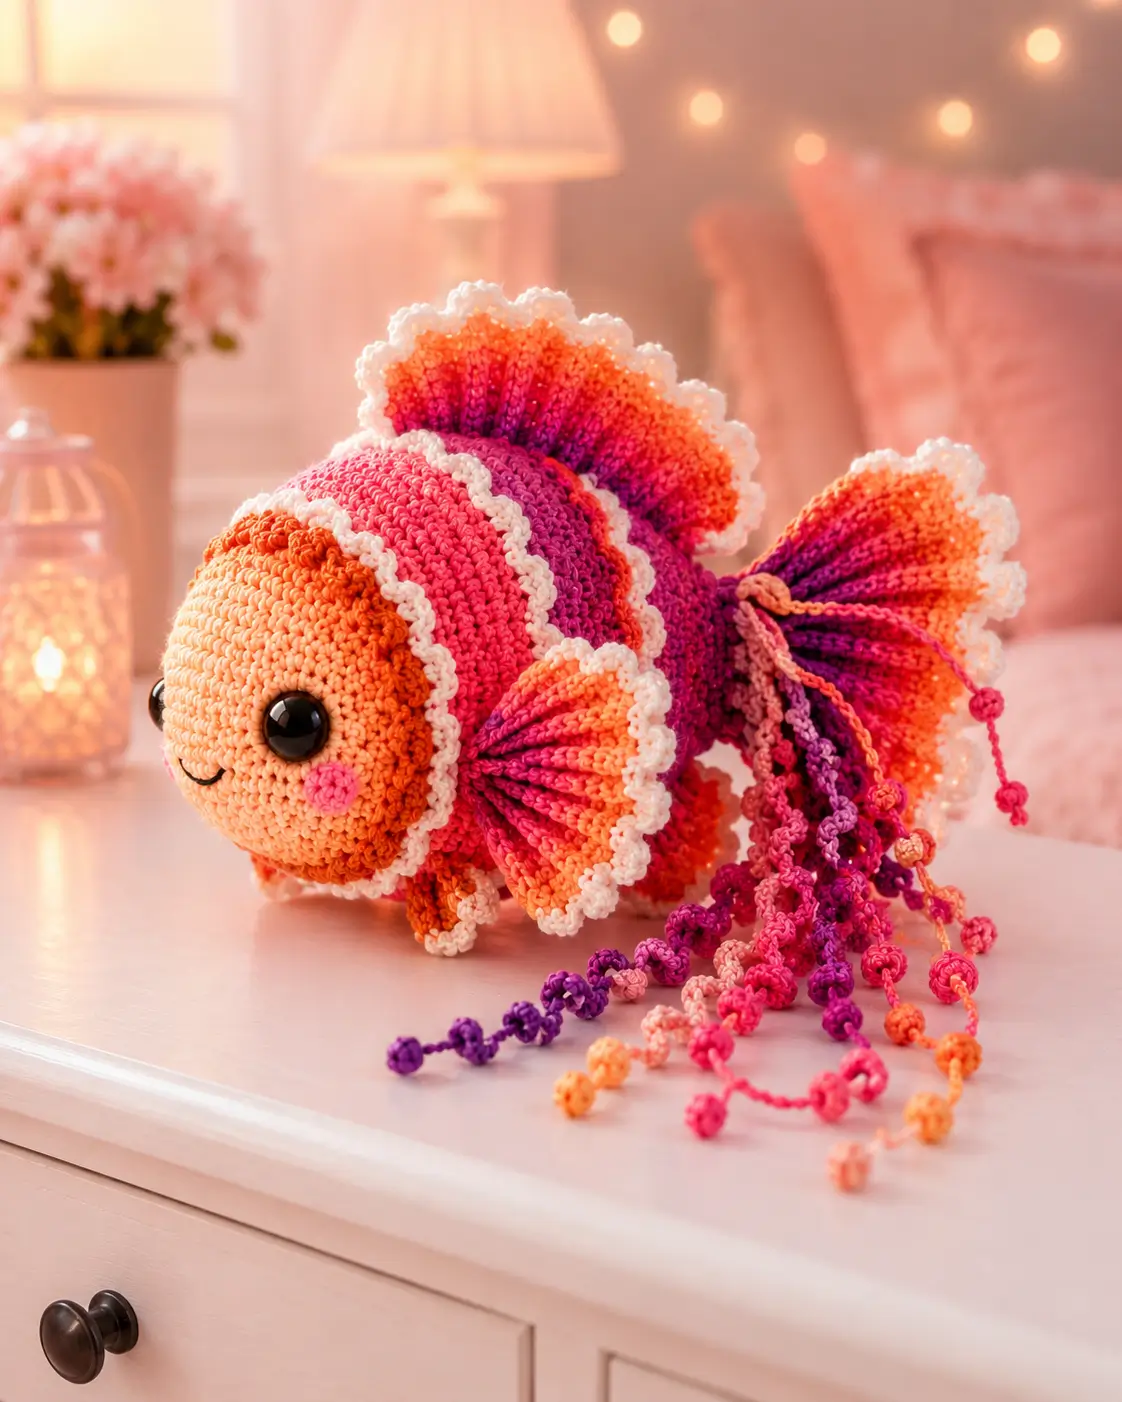
A betta’s fins are larger than its torpedo body, so the toy fails when the tail pulls it backward. This betta fish amigurumi crochet pattern uses worsted cotton, 12 mm eyes, ruffled panels, and a 20 cm display size for an intermediate make. Build it when you need a fish pattern that explains balance, fin order, and tail texture instead of only giving a round body.
The Design: What Makes This Betta Different
The body stays smaller than the head because a betta silhouette reads from its face first, then from its fins. You will make a 36-stitch head, a 30-stitch tapered body, and flat fin panels that are stitched on after stuffing. That order keeps the body firm while the fins stay thin. The maker then adds white ruffle edging as a separate pass, which gives the halfmoon betta crochet shape a clean outline in photos. Another structural choice is the ventral streamer set. It is not stuffed. It hangs from the tail base and copies the decorative movement seen in the reference fish. A common mistake with any crochet betta fish is overstuffing the rear body. Too much stuffing pushes the tail fan down, and the fish no longer sits level.
Project Info at a Glance
| Skill Level | Time | Finished Size | Hook | Best For |
|---|---|---|---|---|
| Intermediate | 2–4 hours | 20 cm long × 10 cm wide | 3.5 mm | Desk display, crochet aquarium decor, photo prop |
The time estimate matches a Ravelry betta listing that gives 2–4 hours, while the 20 cm × 10 cm size follows Hobbii’s Avery pattern measurements.
Materials and Tools
Yarn
- Peach-orange — worsted/aran cotton — 30 g — Lion Brand 24/7 Cotton or similar
- Coral orange — worsted/aran cotton — 10 g — fin shading
- Hot pink — worsted/aran cotton — 12 g — body bands and cheek patches
- Magenta — worsted/aran cotton — 12 g — tail fan and streamers
- Purple — worsted/aran cotton — 8 g — streamer contrast
- White — worsted/aran cotton — 12 g — ruffle borders
- Black embroidery floss — small length — mouth
Tools
- Hook 3.5 mm
- 12 mm black safety eyes
- Polyester stuffing
- Yarn needle
- Stitch markers
- Pins
- Scissors
Abbreviations
MR = magic ring; sc = single crochet; inc = 2 sc in one stitch; dec = invisible decrease; sl st = slip stitch; ch = chain; BLO = back loop only; hdc = half double crochet; bo = bobble.
Invisible decrease means working through the front loops of the next two stitches before finishing one single crochet, which removes bulk from closing rounds.
Pattern — Step by Step
Continuous spiral unless noted. The stitch math below is based on standard amigurumi shaping: 6-stitch start, +6 increase rounds, and −6 decrease rounds.
Head
Yarn: peach-orange
R1: 6 sc in MR (6)
R2: inc ×6 (12)
R3: (sc, inc) ×6 (18)
R4: (2 sc, inc) ×6 (24)
R5: (3 sc, inc) ×6 (30)
R6: (4 sc, inc) ×6 (36)
R7–R12: sc around (36)
R13: (4 sc, dec) ×6 (30)
R14: (3 sc, dec) ×6 (24)
R15: (2 sc, dec) ×6 (18)
Insert safety eyes between R9 and R10, about 10 stitches apart across the front curve. Start firm stuffing before the opening gets small.
R16: (sc, dec) ×6 (12)
R17: dec ×6 (6)
Fasten off. Close the hole and leave a 25 cm tail.
Body
Yarn: hot pink with coral and magenta bands
R1: 6 sc in MR (6)
R2: inc ×6 (12)
R3: (sc, inc) ×6 (18)
R4: (2 sc, inc) ×6 (24)
R5: (3 sc, inc) ×6 (30)
R6–R8: sc around in hot pink (30)
R9–R10: sc around in coral (30)
R11–R13: sc around in magenta (30)
R14: sc around in hot pink (30)
R15: (3 sc, dec) ×6 (24)
R16: sc around (24)
R17: (2 sc, dec) ×6 (18)
R18: sc around (18)
R19: (sc, dec) ×6 (12)
Stuff the body less firmly than the head. The rear needs shape, not weight.
R20: dec ×6 (6)
Fasten off. Close and leave a 30 cm tail for sewing.
Pectoral Side Fins
Yarn: magenta with white edge
Make 2.
R1: 6 sc in MR (6)
R2: inc ×6 (12)
R3: BLO (sc, inc) ×6 (18)
R4: (2 sc, inc) ×6 (24)
R5: sl st around in white (24)
R6: (sl st, ch 2, sl st in same stitch) around in white (24 picots)
Do not stuff. Fold each circle slightly at the base and leave a 20 cm tail.
Dorsal Fin
Yarn: orange to magenta stripes, white edge
Ch 25.
Row 1: sc in second ch from hook and across (24)
Row 2: ch 1, turn, BLO sc across (24)
Row 3: ch 1, turn, (3 sc, inc) ×6 (30)
Row 4: ch 1, turn, sc across (30)
Row 5: ch 1, turn, (4 sc, inc) ×6 (36)
Row 6: ch 1, turn, sc across (36)
Change to white. Work along the outer curved edge only: (sl st, ch 2, sl st in same edge space) across. Leave the foundation edge plain for sewing.
Fasten off. Leave a 35 cm tail.
Lower Anal Fin
Yarn: magenta and coral, white edge
Ch 25.
Row 1: sc in second ch from hook and across (24)
Row 2: ch 1, turn, BLO sc across (24)
Row 3: ch 1, turn, (3 sc, inc) ×6 (30)
Row 4: ch 1, turn, sc across (30)
Row 5: ch 1, turn, (4 sc, inc) ×6 (36)
Row 6: ch 1, turn, sc across (36)
Change to white. Work picot edging across the outside: (sl st, ch 2, sl st in same edge space) across.
Fasten off. Leave a 35 cm tail.
Tail Fan
Yarn: magenta, purple, coral, white
Ch 31.
Row 1: sc in second ch from hook and across in magenta (30)
Row 2: ch 1, turn, BLO sc across in magenta (30)
Row 3: ch 1, turn, (4 sc, inc) ×6 in purple (36)
Row 4: ch 1, turn, sc across in purple (36)
Row 5: ch 1, turn, (5 sc, inc) ×6 in coral (42)
Row 6: ch 1, turn, sc across in coral (42)
Row 7: ch 1, turn, BLO sc across in hot pink (42)
Change to white. Work along both side edges and the outer rim: (sl st, ch 2, sl st in same edge space) around. Leave the foundation edge unruffled.
Fasten off. Leave a 45 cm tail. Gather the foundation edge to about 10 stitches wide before sewing.
Ventral Beaded Streamers
Yarn: magenta, purple, coral, hot pink
Make 6 in mixed colors.
Ch 36.
Work back down the chain: sl st in 5 ch, bo in next ch, sl st in 6 ch, bo in next ch, sl st in 6 ch, bo in next ch, sl st to end.
For bo: yarn over, insert hook, pull up loop, yarn over and pull through 2 loops; repeat 4 times in the same chain, then yarn over and pull through all loops.
Fasten off. Leave a 20 cm tail at the top of each streamer.
Cheek Patches
Yarn: bright pink
Make 2.
R1: 6 sc in MR (6)
R2: inc ×6 (12)
R3: sl st around (12)
Fasten off. Leave a 15 cm tail. Do not stuff.
White Ruffle Borders
Yarn: white
Work this section only where the fin edge needs extra thickness.
Attach white to any plain outer fin edge.
R1: sl st evenly across edge spaces.
R2: (sl st, ch 2, sl st in same stitch) across.
At corners, place two picots in one edge space so the fin does not curl inward.
Fasten off after each section. Weave tails toward the fin base.
Mouth Embroidery
Yarn: black embroidery floss
Thread a needle with black floss. Make one shallow curved stitch under the eyes, centered on the lower face. Anchor the floss inside the head and bury the end through the stuffing.
Assembly
- Sew the head to the wide end of the body, matching the center line of the eyes to the top body stripe.
- Pin the dorsal fin along the top of the body from behind the head to the tail base.
- Sew the dorsal fin through the plain foundation edge only.
- Pin the lower anal fin to the underside, starting one round behind the head.
- Sew the lower fin with small stitches that do not show through the white ruffle.
- Attach the pectoral side fins behind the cheeks, one on each side, angled backward.
- Sew the gathered tail fan to the closed rear of the body.
- Tie or sew the six ventral streamers at the tail base, mixing short and long hang lengths.
- Sew the cheek patches below and slightly behind the eyes.
- Embroider the mouth, weave all tails, and trim only after checking balance on a flat surface.
The finished fish should rest on the lower fin and streamers without the tail twisting the body.
7 Technical Tips
- Mark R1 of the head with a locking marker because a missed 6-stitch start shifts every later eye placement. The eyes should sit between R9 and R10, about 10 stitches apart, before the head closes.
- Understuff the final 2 cm of the body if the tail fan drags backward. A firm tail base needs structure, but extra stuffing adds weight in the worst place.
- Use invisible decreases on R15–R20 of the body to stop stair-step ridges from showing under the side fins. A visible decrease line will pull the white ruffle off center.
- Pin the dorsal fin at three points before sewing: front, middle, and tail base. A 5 mm lean at the front becomes a crooked top silhouette once the white edging is added.
- Keep streamer chains different lengths by 2–4 chains each. Equal streamers form a blunt curtain, while staggered cords look closer to the reference fish.
- Work the picot border loosely on the tail fan. Tight white edging cups the panel and reduces the halfmoon spread by 1–2 cm.
- Bury yarn tails through stuffed sections, not through flat fins. Tails hidden inside panels make bumps that interrupt the ribbed fin texture.
Conclusion
This pattern turns the photo’s main problem into a build sequence: round face first, tapered body second, flat fins last. That order keeps the fish balanced while leaving enough surface area for the ruffled white borders and long streamer cords. For the next make, choose one body color and three fin colors before cutting yarn; the gradient looks cleaner when the palette is planned before Row 1 of the tail. Save this betta fish amigurumi crochet pattern to Pinterest, then post the finished side profile on Instagram with #BettaFishAmigurumi. Which feature should carry the most contrast on your version: the dorsal fin, the tail fan, or the cheek patches?









