Introduction
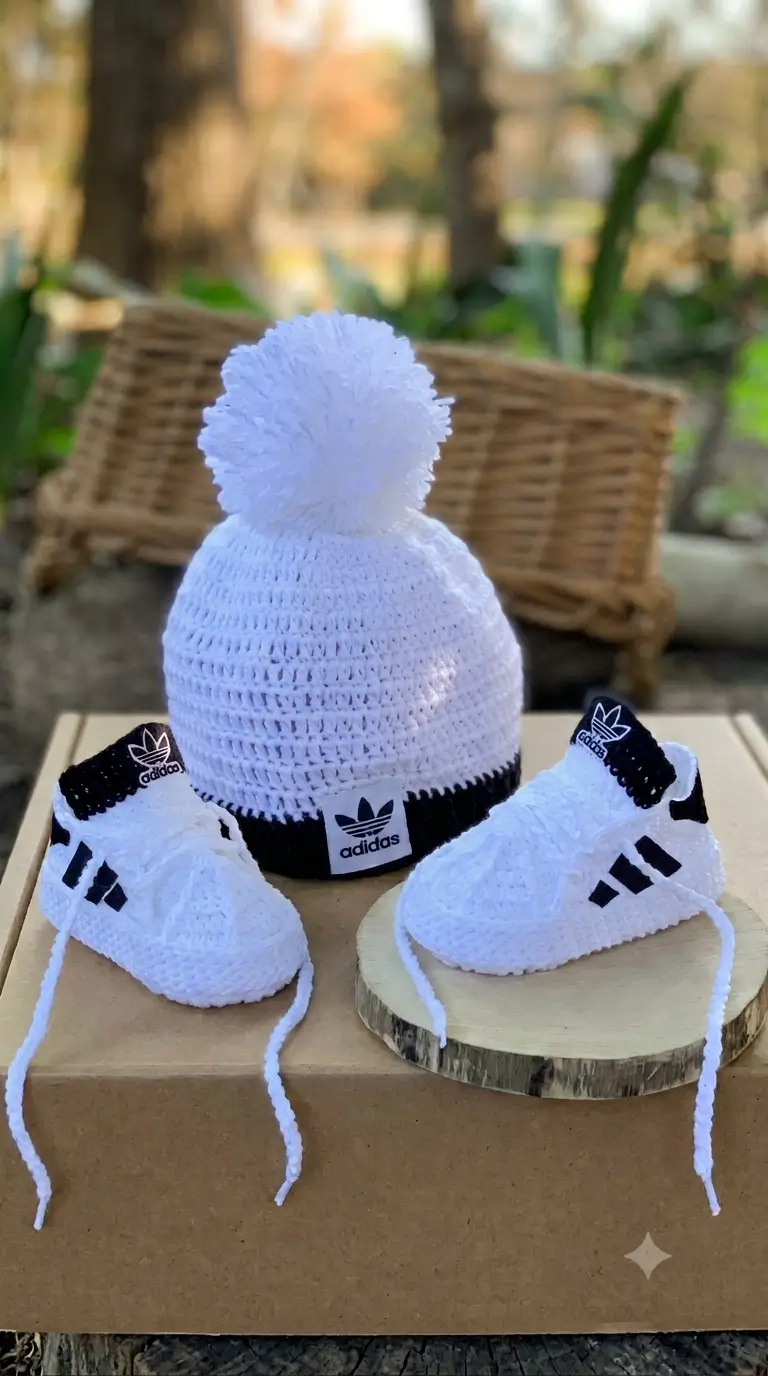
A crocheted sneaker stops looking like footwear the moment the sole loses its oval toe and the tongue sits too low. This crochet baby sneaker pattern pairs approximately 9.5 cm low-top booties with a 35 cm pom-pom beanie, using DK yarn, compact hooks, and intermediate shaping. The monochrome set works especially well for supervised newborn photography because its contrasting sole, tongue, band, and side details remain readable at small scale.
The Design: What Makes the MonoSport Set Different
Three structural decisions control this set. First, the shoe sole is expanded as a long oval rather than a circle, giving the toe enough width without turning the heel into a second rounded toe. Second, the upper loses stitches rapidly across the front while keeping the heel comparatively flat; that shaping separates this crochet baby booties pattern from a simple slipper.
You need the tongue centered on the toe line, not merely centered between side seams. The maker then sees a recognizable sneaker profile even before the laces are added.
The beanie uses a shallow crown and a contrasting lower band so its proportions stay close to the reference photograph. A common mistake in sport-style crochet baby shoes is making the three side bars too large; oversized appliqués cover the upper and distort its scale.
The visible branded logos in the reference are intentionally replaced here with plain sport detailing.
Project Info at a Glance
| Skill Level | Time | Finished Size | Hook | Best For |
|---|---|---|---|---|
| Intermediate shaping | About 4–6 hours | Shoes: about 9–9.5 cm; hat: about 35 cm circumference | 3.5 mm shoes; 4 mm hat | Supervised photos, display, handmade gift sets |
Materials and Tools
Yarn
- White — DK cotton or smooth DK cotton/acrylic — about 55–60 g for the complete set
- Black — DK cotton or matching smooth DK — about 10 g
A smooth, tightly plied yarn makes the shoe shape easier to control and keeps the black decorative sections sharply defined.
Tools
- 3.5 mm crochet hook for the sneakers
- 4 mm crochet hook for the beanie
- Yarn needle
- Locking stitch markers
- Scissors
- Tape measure
- 6 cm pom-pom maker or cardboard circles
- Pins for temporary stripe placement
Baby-use note: Keep the set for supervised wear. Decorative laces and pom-poms should be attached firmly, and the beanie should not be used for unsupervised sleep.
Abbreviations
MR — magic ring
ch — chain
sc — single crochet
hdc — half double crochet
inc — work 2 stitches in one stitch
dec — single crochet 2 together
hdc2tog — half double crochet 2 together
sl st — slip stitch
BLO — back loop only
st/sts — stitch/stitches
FO — fasten off
An invisible decrease may replace sc2tog where the fabric is dense enough to hide the front-loop pickup, but both loops should be used when the shoe fabric becomes too tight.
Pattern — Step by Step
The sneaker construction uses joined rounds because footwear needs a controlled center-back position. The hat is also worked in joined rounds.
Measure the sneaker sole after Round 3. The target is approximately 9–9.5 cm with DK yarn and a 3.5 mm hook.
Sneaker Sole — Make 2
Yarn: white.
Ch 11.
R1: Sc in 2nd ch from hook and next 8 ch, 5 sc in last ch. Working along opposite side of foundation chain, sc in next 8 ch, 4 sc in final ch. Join with sl st. (26)
R2: Inc in next 2 sts, sc 8, inc in next 5 sts, sc 8, inc in next 3 sts. Join. (36)
R3: (Sc 1, inc) ×2, sc 8, (sc 1, inc) ×5, sc 8, (sc 1, inc) ×3. Join. (46)
Check the sole length now. A sole materially longer than 9.5 cm will produce a larger shoe even if every later stitch count is correct.
Do not fasten off. Continue into the upper.
Sneaker Upper — Make 2
Yarn: white.
R4: Ch 1, sc BLO around. Join. (46)
R5: Ch 1, sc around. Join. (46)
Place one marker at the center front and another at the center back.
R6: Sc 15, dec ×8, sc 15. Join. (38)
R7: Sc 13, dec ×6, sc 13. Join. (32)
R8: Sc 12, dec ×4, sc 12. Join. (28)
R9: Sc around without decreasing. (28)
The front decreases should stack directly over the toe instead of drifting toward one side. Check the center-front marker after every shaping round.
Fasten off. Leave a 15 cm tail for finishing.
Tongue — Make 2
Yarn: white, changing to black at the top.
Ch 7.
Row 1: Sc in 2nd ch from hook and across. (6)
Row 2: Ch 1, turn, sc 6. (6)
Row 3: Ch 1, turn, sc 6. (6)
Row 4: Ch 1, turn, sc 6. (6)
Row 5: Ch 1, turn, sc 6. (6)
Row 6: Ch 1, turn, sc 6. (6)
Row 7: Change to black, ch 1, turn, sc 6. (6)
Row 8: Ch 1, turn, sc 6. (6)
Fasten off.
Leave a 20 cm white starting tail for sewing the tongue to the toe.
Position the bottom edge about two rounds behind the front-most point of the shoe. The black top section should rise slightly above the opening.
Heel Tabs — Make 2
Yarn: black.
Ch 6.
Row 1: Sc in 2nd ch from hook and across. (5)
Row 2: Ch 1, turn, sc 5. (5)
Row 3: Ch 1, turn, sc 5. (5)
Fasten off. Leave a 15 cm tail.
Position one tab at the center back of each sneaker. Stitch the lower portion firmly to the heel while leaving the upper edge slightly raised.
Side Stripe Appliqués — Make 6
Yarn: black.
Ch 5.
Row 1: Sc in 2nd ch from hook and across. (4)
Row 2: Ch 1, turn, sc 4. (4)
Fasten off. Leave a 15 cm sewing tail.
Make three bars for the outer side of each sneaker.
Place approximately 3–4 mm between the pieces. Angle each bar slightly toward the toe before sewing.
Keep the stripes small enough that they occupy no more than about one-third of the shoe’s side panel.
A plain geometric design can be used instead of reproducing a commercial logo.
Shoelaces — Make 2
Yarn: white.
Ch 36 or continue until the chain measures approximately 20 cm.
Fasten off.
Weave the yarn ends back through several chain loops before trimming.
Thread the lace through the upper fabric on both sides of the tongue. Keep the tension loose enough that the tongue remains visible.
For infant use, these laces are decorative and require supervision.
Beanie Crown and Body — Make 1
Yarn: white.
Target finished circumference: approximately 35 cm.
Target finished height: approximately 14–15 cm.
Using a 4 mm crochet hook:
R1: 10 hdc in MR. Join with sl st. (10)
R2: Hdc inc ×10. Join. (20)
R3: (Hdc 1, hdc inc) ×10. Join. (30)
R4: (Hdc 2, hdc inc) ×10. Join. (40)
R5: (Hdc 3, hdc inc) ×10. Join. (50)
Measure the crown. It should sit close to 10.5–11 cm across before the straight body begins.
R6: Hdc around. Join. (50)
R7: Hdc around. Join. (50)
R8: Hdc around. Join. (50)
R9: Hdc around. Join. (50)
R10: Hdc around. Join. (50)
R11: Hdc around. Join. (50)
R12: Hdc around. Join. (50)
Do not add another increase round unless your gauge makes the crown clearly undersized. Extra increases can make the hat disproportionately wide.
Black Beanie Band
Yarn: black.
R13: Change to black. Sc around. (50)
R14: Sc BLO around. (50)
R15: Sc BLO around. (50)
R16: Sc around through both loops. (50)
Fasten off.
Weave the tail through at least 4 cm of black stitches.
The finished black band should measure approximately 2–2.5 cm deep.
If the total hat height exceeds 15 cm, remove one white body round rather than reducing the black band.
Pom-Pom — Make 1
Yarn: white.
Use a 6 cm pom-pom maker.
Wrap the yarn evenly until the center opening is nearly full. Cut around the outer edge while holding the strands in position.
Tie the middle firmly with a doubled 30 cm strand of yarn.
Pass the two tying ends through separate stitches at the crown of the hat. Knot them securely inside the beanie.
Pass the ends through neighboring stitches and tie again before weaving the remaining yarn through the fabric.
Check the pom-pom attachment before each use. Remove or repair it immediately if the center tie loosens.
Assembly
- Place the two sneaker soles edge to edge and check that their lengths differ by no more than about 2 mm.
- Shape each upper so the center-front decrease section sits directly over the widest point of the toe.
- Position each tongue on the center line and sew the lower edge firmly to the upper.
- Tack only the lower 1–1.5 cm of the tongue sides so the top remains free.
- Sew one black heel tab to the center back of each sneaker.
- Pin three black side bars to the outer side of each shoe with approximately 3–4 mm spacing, then stitch them securely.
- Thread one 20 cm lace across each tongue and check that both shoes have matching lace placement.
- Weave every shoe tail through at least 3 cm of same-color stitches before trimming.
- Attach the pom-pom through multiple crown stitches and inspect the knot from inside the hat.
- Measure both shoe soles and the finished hat circumference before trimming the remaining yarn ends.
The completed set contains one approximately 35 cm circumference beanie and two matching 9–9.5 cm crochet sneakers.
7 Technical Tips
- Center-front drift: If the toe marker moves even two stitches sideways, the decrease line will lean. Check the visual center after every joined shaping round and reposition the marker before continuing.
- Collapsing upper: Loose tension can make the sneaker walls fold inward. If the sole measures 9–9.5 cm correctly but the sides sag, use a crochet hook 0.25–0.5 mm smaller for the upper.
- Visible decrease ridges: Standard decreases can create diagonal bumps across the toe. Test an invisible decrease using the front loops when the yarn is smooth enough to keep the stitch secure.
- Loose decorative pieces: Heel tabs, stripes, and pom-poms can pull away if sewn through too few stitches. Pass attachment yarn through several separate crochet stitches instead of relying on one anchor point.
- Color-change gauge: White and black yarn can behave differently even when both labels state DK weight. Compare ten stitches in each color; a difference greater than about 5 mm can distort the beanie band or tongue.
- Uneven stripe placement: Sewing one stripe before positioning the others commonly creates inconsistent angles. Pin all three bars first and maintain approximately 3–4 mm spacing before stitching.
- Short woven tails: A yarn tail buried for only 1 cm can work loose when the shoe stretches. Weave structural tails through at least 3–4 cm, reverse direction once, and then trim.
Conclusion
Check the sole measurement before making the second sneaker because correcting a 5 mm sizing error is much easier after Round 3 than after the tongue, heel tab, and side stripes are attached. Next, place both finished shoes side by side and compare the toe shaping, stripe angle, and lace position before weaving the last tails.
For infant use, keep the pom-pom firmly attached, supervise the decorative laces, and remove the beanie for sleep.
Save this crochet baby sneaker pattern to Pinterest and share the finished set on Instagram with #MonoSportBabySet.
Would you keep the three black side stripes parallel, or angle each one slightly farther toward the toe?









