Introduction
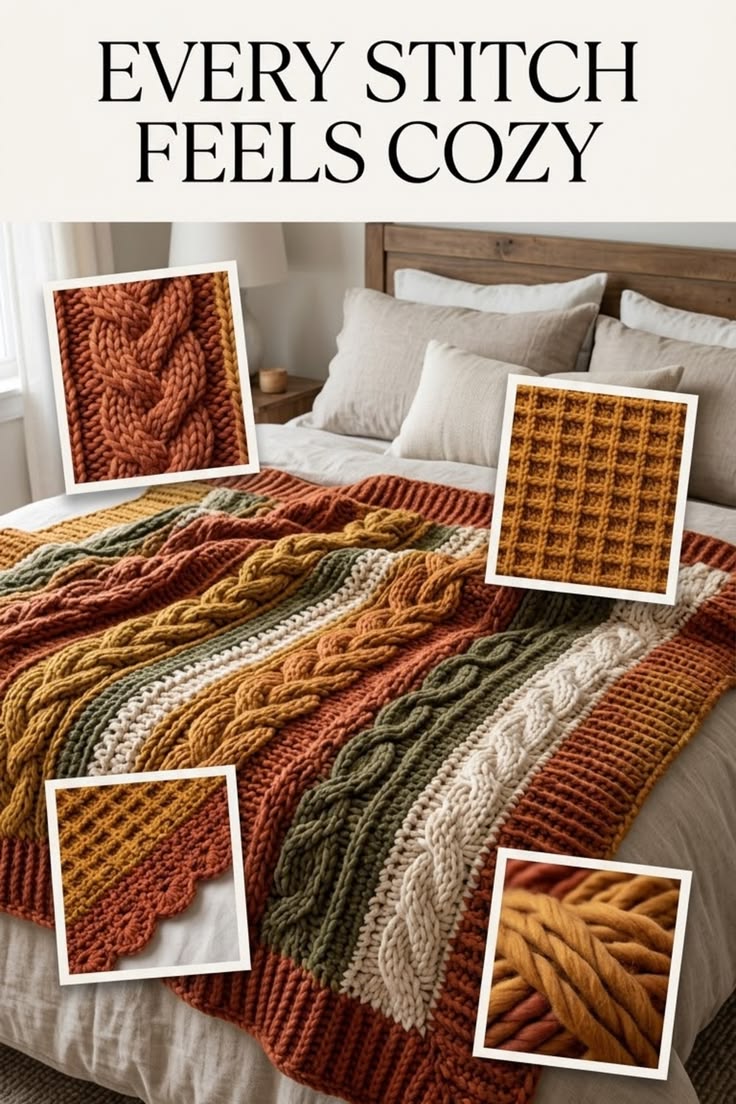
A rust cable crossing beside an olive braid has to keep the same height or the entire striped bedspread starts drifting sideways. This autumn cable crochet blanket pattern uses Aran yarn and a 5.5 mm hook to produce a queen-size blanket approximately 60 × 80 inches. Seven vertical panels combine braided cables, raised grid texture, cream dividers and a wide rust border for an intermediate bed-scale project.
The Design: What Makes This Cable Blanket Different
The blanket is constructed as seven long strips rather than one 60-inch row. That choice matters because the photograph combines several cable styles and color blocks, and individual strips keep those motifs aligned from the foot of the bed to the top edge. Cable panels use crossed front-post treble stitches over a stable single-crochet background, while the secondary panels use raised post stitches to create the smaller grid texture visible between the larger braids. Rust, mustard, olive and cream repeat asymmetrically instead of forming identical stripes. The final rust border ties the colors together and corrects minor differences in panel length. One frequent failure in a braided crochet blanket is allowing cable panels to contract more than plain panels. Block every strip to the same length before joining; otherwise the finished bedspread develops waves between the seams.
Project Info at a Glance
| Skill Level | Time | Finished Size | Hook | Best For |
|---|---|---|---|---|
| Intermediate | 35–45 hours | Approx. 60 × 80 in / 152 × 203 cm | 5.5 mm | Queen beds, large throws and autumn bedroom decor |
Materials and Tools
Yarn
- Rust / terracotta — Aran / worsted #4 — approximately 1,050–1,150 yd — used for two major panels, joining accents and border.
- Mustard gold — Aran / worsted #4 — approximately 700–800 yd — used for cable and textured panels.
- Olive green — Aran / worsted #4 — approximately 700–800 yd — used for braided cable panels.
- Natural cream — Aran / worsted #4 — approximately 600–700 yd — used for a light cable panel and narrow contrast sections.
The total target is approximately 3,200–3,500 yards. Crochet cables consume more yarn than flat single crochet because front-post stitches travel around the stitch posts and cross over one another, so purchase all yarn for each color from the same dye lot where possible.
Tools
- 5.5 mm crochet hook
- 6.0 mm hook optional for tight cable crossings
- Yarn needle
- Locking stitch markers
- Measuring tape
- Blocking mats and rust-resistant pins
- Scissors
Abbreviations
- ch — chain
- sc — single crochet
- dc — double crochet
- hdc — half double crochet
- FPdc — front post double crochet
- BPdc — back post double crochet
- FPtr — front post treble crochet
- sl st — slip stitch
- RS — right side
- WS — wrong side
A crossed cable is formed by skipping a group of post stitches, working the following group first, then returning to the skipped posts so the second set crosses over the first.
Gauge
Make a minimum 6-inch swatch before beginning the panels. The working target is approximately 11 stitches and 12 rows over 4 inches in the plain single-crochet sections after light blocking. Cable areas will pull inward, so measure the complete 24-stitch panel rather than checking only the central braid.
Each finished strip should block to approximately 8–8.5 inches wide. Seven strips plus joining seams and the border produce a blanket close to 60 inches across.
Color Layout
| Panel | Color | Texture |
|---|---|---|
| 1 | Rust | Cable Panel A |
| 2 | Mustard | Grid Panel B |
| 3 | Olive | Cable Panel A |
| 4 | Cream | Cable Panel A |
| 5 | Rust | Grid Panel B |
| 6 | Mustard | Cable Panel A |
| 7 | Olive | Cable Panel A |
The order can be changed, but preserve at least one light panel near the center. The cream section prevents the darker rust and olive cables from merging visually into one continuous block.
Pattern — Step by Step
Cable Panel A — Make 5
Finished width target: approximately 8–8.5 inches. Work until the panel measures approximately 78 inches before border assembly.
Ch 25.
Row 1: Sc in second ch from hook and in each ch across. Turn. (24)
Row 2: Ch 1, sc across. Turn. (24)
Row 3 — Cable setup, RS: Ch 1, sc in first 4 sts, FPdc around each of next 6 corresponding posts, sc in next 4 sts, FPdc around each of next 6 corresponding posts, sc in final 4 sts. Turn. (24)
Row 4: Ch 1, sc across. Turn. (24)
First Cable Crossing
Row 5 — RS: Ch 1, sc in first 4 sts. Skip the first 3 cable posts. Work one FPtr around each of the next 3 cable posts. Working in front of those stitches, return to the 3 skipped posts and work one FPtr around each. Sc in next 4 sts. Repeat the same six-post crossing over the second cable section. Sc in final 4 sts. Turn. (24)
Row 6: Ch 1, sc across. Turn. (24)
Row 7: Ch 1, sc 4, FPdc around each of next 6 cable posts, sc 4, FPdc around each of next 6 cable posts, sc 4. Turn. (24)
Row 8: Ch 1, sc across. Turn. (24)
Repeat Rows 5–8 until the strip measures approximately 78 inches. End after Row 8 so every cable panel finishes on the same wrong-side return row.
Do not stretch the cable when measuring. Lay the panel flat, smooth it by hand and measure from foundation edge to working edge.
Grid Panel B — Make 2
This panel supplies the smaller squared texture visible between the larger braids.
Ch 25.
Row 1: Hdc in second ch from hook and across. Turn. (24)
Row 2: Ch 2, dc across. Turn. (24)
Row 3 — RS: Ch 2, *FPdc around next 2 posts, BPdc around next 2 posts; repeat from * across. Turn. (24)
Row 4: Ch 2, work each stitch as it presents: BPdc around raised front posts and FPdc around recessed posts. Turn. (24)
Row 5: Ch 2, *BPdc around next 2 posts, FPdc around next 2 posts; repeat from * across. Turn. (24)
Row 6: Ch 2, work the opposite post stitch around each stitch to maintain the grid. Turn. (24)
Repeat Rows 3–6 until the panel reaches approximately 78 inches. The alternating groups of two create compact blocks rather than long continuous ribs.
Optional Narrow Divider Strips
If the finished seven panels measure less than approximately 56 inches before the border, add narrow divider strips between selected panels.
Ch 7.
Row 1: Sc in second ch from hook and across. Turn. (6)
Row 2: Ch 1, sc in BLO across. Turn. (6)
Repeat Row 2 until the strip equals the length of the blocked panels.
Use cream between rust and olive, or mustard between cream and olive. These narrow ribs also imitate the slim textured channels visible in the photograph.
Blocking the Panels
Block every panel before joining. Pin the strips to the same target length, approximately 78 inches, without forcing the width beyond 8.5 inches. Cable panels often appear shorter because the crossed stitches consume vertical yarn. If one panel is more than approximately 1 inch shorter than the others after resting, add another complete four-row cable repeat rather than stretching it during seaming.
Allow all panels to dry completely before removing the pins. Stack them after blocking and compare both foundation and final edges.
Joining the Blanket
Arrange the seven panels in the color order shown above. Keep every cable facing the same direction from foot to head.
With the wrong sides together, join neighboring panels using a loose slip-stitch seam through the outer loops only. Work approximately one joining stitch for each row edge, skipping an occasional row when necessary to prevent the seam from becoming longer than the panels.
If a flatter join is preferred, mattress stitch the panels with a yarn needle. Do not pull the seam tight enough to draw the cable columns toward one another.
Rust Border
Setup Round
Join rust yarn in any corner.
Ch 1 and work sc evenly around the complete blanket. Place 3 sc in each corner. Along the long sides, aim for approximately three stitches over every four row ends and adjust locally where the fabric begins to flare or contract.
Join with sl st to the first sc.
Border Round 2
Ch 1, sc in every stitch around, working 3 sc in the center stitch of each corner group. Join with sl st.
Applied Ribbed Border
Ch 9.
Row 1: Sc in second ch from hook and next 7 chains, sl st in next 2 border stitches. Turn. (8 sc)
Row 2: Skip both sl sts, sc BLO across 8 sts. Turn.
Row 3: Ch 1, sc BLO across, sl st in next 2 border stitches. Turn.
Repeat Rows 2–3 around the blanket. At each corner, work several rib rows into the same corner region so the border turns without pulling. Join the final rib row to the first with mattress stitch or slip stitches.
The finished border should measure approximately 2–2.5 inches wide.
Assembly and Finishing
- Complete all five cable panels and both grid panels before joining any pieces.
- Measure each strip without stretching and add complete pattern repeats until all seven reach approximately 78 inches.
- Block every panel to matching dimensions and let the pieces rest after drying before checking length again.
- Arrange the colors in the final order and confirm that every cable braid faces the same direction.
- Join the panels with loose slip stitches or mattress stitch, working from the same end on every seam.
- Measure the joined blanket across the center; add narrow divider strips only if more width is required.
- Work one even single-crochet setup round around all four edges and correct any visible rippling before continuing.
- Add the second border round, maintaining three stitches at every corner.
- Work the applied rust ribbing around the complete perimeter and join its final row invisibly to the beginning.
- Weave every yarn tail through at least 5–7 cm of matching fabric and block the complete blanket to approximately 60 × 80 inches.
The finished blanket should lie flat with continuous vertical panels, equal cable heights and a border that meets all four corners without cupping.
7 Technical Tips
- Cable panels shrinking: A crossed-post strip can finish several inches shorter than a plain strip worked for the same row count. Measure every 24–32 rows and compare actual length rather than relying on row numbers alone.
- Cable crossings disappearing: Tight FPtr stitches pull the braid into the background. Move up to a 6 mm hook for cable rows only if the crossing cannot be lifted approximately 5–8 mm above the base fabric.
- Panel width drift: Missing one edge stitch repeatedly can narrow a 24-stitch strip by more than an inch over bed length. Count all 24 stitches at least once per four-row repeat and keep markers in both edge stitches.
- Wavy seams: Joining every row edge indiscriminately can make the seam longer than the panels. Skip approximately one edge loop whenever the joined edge begins to ripple instead of tightening the joining yarn.
- Uneven cable direction: Rotating one strip before assembly makes its braid cross opposite to the others. Lay all panels right-side up with foundation chains at the same end before making the first seam.
- Border flare: Too many side-edge stitches cause the ribbed frame to spread outward. Reduce the setup-round stitch count until the edge lies flat before beginning the applied ribbing.
- Color imbalance: Equal widths of four dark autumn colors can make the center visually heavy. Keep at least one cream panel near the middle and distribute rust so it appears in the border as well as the blanket body.
Conclusion
Check panel length before starting the border because a wide ribbed frame cannot correct a cable strip that is several inches shorter than its neighbors. The next step is to block all seven strips together, arrange the rust, mustard, olive and cream sequence, and inspect the cable direction from the foot of the blanket. Join only after those alignments match. Share the completed autumn cable crochet blanket pattern project on Pinterest with a full-bed vertical photograph, then post close views of the braided cables and grid texture on Instagram using #AutumnCableCrochetBlanket. For this blanket specifically, would you keep the cream stripe near the center or replace it with a second mustard cable panel?









