Introduction
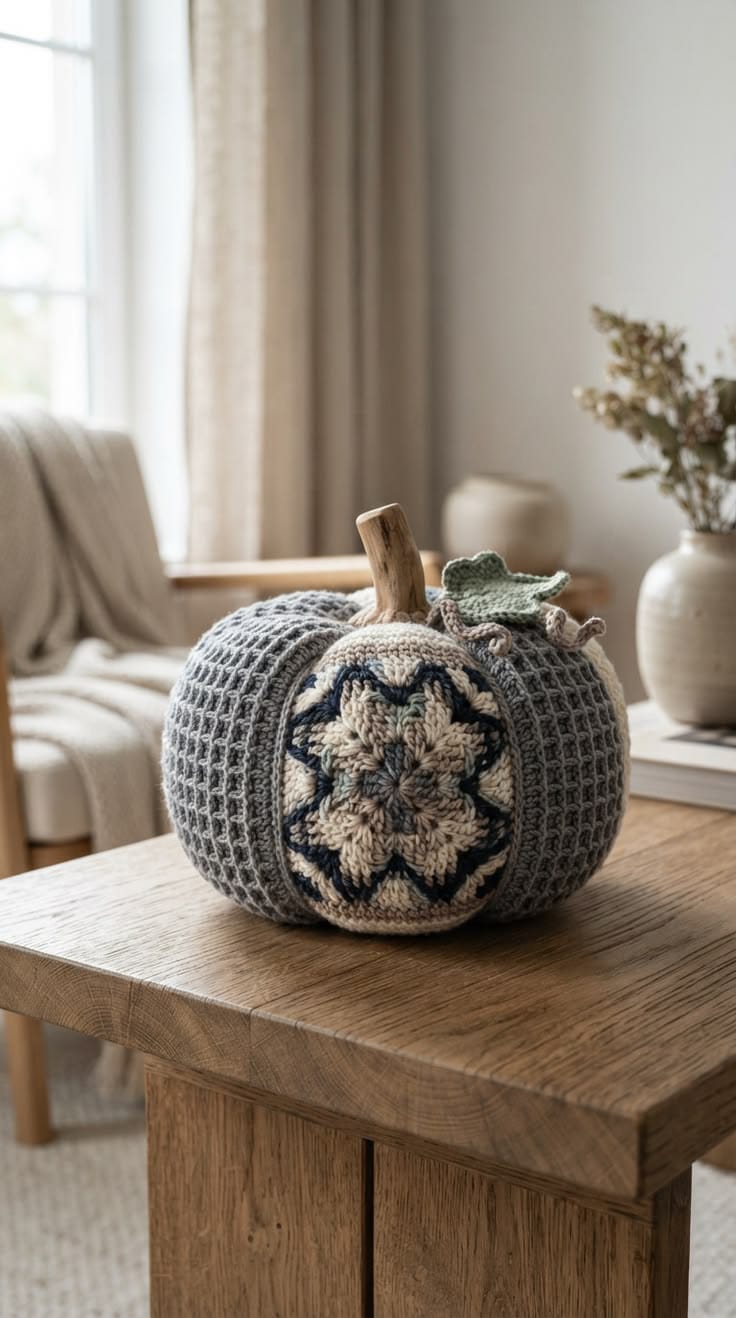
A pumpkin with a circular mandala on its front needs the surrounding ribs to frame that motif instead of bending it around the side. This textured crochet pumpkin pattern uses worsted or Aran yarn, a 5 mm hook and joined vertical panels to produce an approximately 24 cm pumpkin. Raised gray texture, a cream-and-charcoal floral medallion, sage leaf and natural twig stem create the photographed neutral fall design.
The Design: What Makes This Crochet Pumpkin Different
The body is built from six long textured panels rather than one spherical amigurumi shell. That construction gives each gray section a controlled width and produces the strong vertical channels visible around the pumpkin. One front section is partially covered by a separate circular medallion, so its texture remains flatter beneath the applique. The medallion itself uses cream, gray and dark charcoal rounds arranged as a floral star, then receives a plain gray outer frame to connect it visually with the body. A natural twig replaces a crocheted stem, while the sage leaf and short curled vine soften the crown without adding another competing color. A common mistake with this gray crochet pumpkin is making the front motif too large. Keep the finished medallion near 11–13 cm so at least two raised gray ribs remain visible on each side.
Project Info at a Glance
| Skill Level | Time | Finished Size | Hook | Best For |
|---|---|---|---|---|
| Intermediate | 8–10 hours | Approx. 24 cm wide × 23 cm high including stem | 5.0 mm | Neutral fall decor, table displays and farmhouse interiors |
Materials and Tools
Yarn
- Heather gray — worsted / Aran #4 — approximately 180–220 g — used for six body panels and the medallion frame.
- Natural cream — worsted / Aran #4 — approximately 35–45 g — used for the floral medallion.
- Charcoal or very dark navy — worsted / Aran #4 — approximately 15–20 g — used for contrast lines inside the medallion.
- Muted sage green — worsted / Aran #4 — approximately 20–25 g — used for the leaf and curled vine.
Other Materials
- Natural twig — approximately 7–9 cm long and 15–22 mm wide — used for the stem.
- Polyester stuffing — approximately 180–230 g.
Tools
- 5.0 mm crochet hook
- 4.5 mm hook optional for a firmer medallion and leaf
- Yarn needle
- Long tapestry needle
- Locking stitch markers
- Dressmaking pins
- Scissors
- Measuring tape
Select a clean, dry twig with no loose bark, sharp splinters or insect damage. Sand the cut edges before inserting it into the pumpkin crown.
Abbreviations
- ch — chain
- sc — single crochet
- hdc — half double crochet
- dc — double crochet
- tr — treble crochet
- FPdc — front post double crochet
- BPdc — back post double crochet
- sl st — slip stitch
- MR — magic ring
- BLO — back loop only
Front-post stitches are worked around the post of the stitch below rather than through its top loops, producing the raised vertical framework used on the gray panels.
Pattern — Step by Step
Gray Textured Body Panels (Make 6)
Yarn: heather gray — original raised-grid reconstruction.
Ch 19.
Row 1: Sc in second ch from hook and across. Turn. (18)
Row 2: Ch 1, sc across. Turn. (18)
Row 3: Ch 2, *FPdc around next 2 corresponding stitches, dc in next stitch; repeat from * across. Turn. (18)
Row 4: Ch 1, sc across. Turn. (18)
Row 5: Ch 2, dc in first 3 sts, *FPdc around next 2 corresponding posts, dc in next 4 sts; repeat across, adjusting final group to maintain 18 stitches. Turn. (18)
Row 6: Ch 1, sc across. Turn. (18)
Repeat Rows 3–6 until the strip measures approximately 22–24 cm long. Aim for about 34–38 rows depending on gauge.
The panel should remain rectangular before assembly. Do not deliberately taper its ends; the pumpkin shape will be created by gathering the completed body.
Fasten off. Leave a 35 cm sewing tail.
Join the Six Body Panels
Lay two panels right sides together. Whipstitch or mattress stitch along one long edge using gray yarn.
Continue until all six panels form one wide sheet.
Join the first and sixth long edges to create a tube.
Keep every panel facing the same direction so the raised post texture runs consistently from bottom to top.
Gather the Bottom
Thread approximately 90 cm of gray yarn onto a long needle.
Run the yarn in and out around the complete lower edge, catching approximately one stitch every 8–10 mm.
Pull the gathering strand until the opening reduces to approximately 2 cm.
Pass across the opening several times and knot securely.
Do not close the lower opening completely until the first layer of stuffing has been inserted; a small gap makes the base easier to level.
Stuff the Pumpkin Body
Add polyester filling in small portions, starting around the outer perimeter rather than packing one dense ball into the center.
Push filling into every raised panel until the seams begin to act as natural pumpkin grooves.
Keep the central 5–6 cm slightly softer than the outer sections.
The front surface beneath the future medallion should remain flatter than the side panels.
Gather the Top
Once the pumpkin is approximately 90 percent stuffed, thread a new gray strand through the complete upper edge.
Pull until the opening measures roughly 3–4 cm across.
Add the final stuffing through the remaining gap.
Close until the opening is just wide enough to accept the natural twig.
Secure the gathering strand but do not bury it yet.
Deepen the Six Panel Grooves
Yarn: matching heather gray.
Cut a strand approximately 140 cm long.
Enter through the bottom center, carry the strand along one panel seam to the crown, then pass through the pumpkin center and return to the bottom.
Pull until that seam recesses approximately 8–10 mm.
Repeat at each of the six joins.
The panel texture should remain visible. Excessive tension can fold the body and hide the raised grid.
Tie the shaping yarn at the lower center and bury the tails.
Mandala Center
Yarn: heather gray.
R1: 6 sc in MR. Join. (6)
R2: Ch 1, inc ×6. Join. (12)
Fasten off gray.
Cream Inner Petals
Change to natural cream.
R3: Repeat six times: sl st in next stitch, ch 3, 2 dc in next stitch, ch 3, sl st in same stitch.
Six pointed cream petals should radiate around the gray center.
Fasten off.
Charcoal Star Outline
Yarn: charcoal or dark navy.
Join behind one cream petal.
Work one sl st into the space between petals, ch 4, sl st into the next valley. Repeat around.
On the next pass, work 5 sc around each ch-4 loop.
This dark line should frame the cream petals rather than form a solid ring.
Fasten off.
Outer Cream Petals
Yarn: natural cream.
Join in one dark-loop center.
Repeat six times:
Ch 3, 2 dc, tr, 2 dc, ch 3, sl st into the next dark-loop valley.
Spread each petal outward before adding the frame round.
Gray Medallion Frame
Yarn: heather gray.
Join at any outer valley.
R1: Sc evenly around, placing approximately 48 stitches around the complete circumference. Join. (48)
R2: Ch 1, sc around. Join. (48)
R3: Ch 1, BLO sc around. Join. (48)
The medallion should finish approximately 11–13 cm across. Add or omit the final gray round if your yarn changes the diameter substantially.
Fasten off. Leave a 50 cm sewing tail.
Attach the Front Medallion
Position the motif on the front pumpkin panel with its center approximately halfway between the crown and base.
Pin at the top, bottom, left and right before adding more pins.
Sew around the gray frame with small matching stitches approximately every 6–8 mm.
Do not pull the applique tightly into the body. The circular frame should remain flat rather than cupping around the pumpkin.
Large Sage Leaf
Yarn: muted sage green.
Row 1: Ch 13.
Row 2: Starting in second ch from hook: sl st, sc, hdc, dc, dc, 2 tr, dc, hdc, sc, sl st; work 3 sc in final chain.
Continue along the opposite side:
Sl st, sc, hdc, dc, dc, 2 tr, dc, hdc, sc, sl st.
The finished leaf should measure approximately 7–9 cm.
Fasten off. Leave a 25 cm sewing tail.
Raised Leaf Vein
Thread the sage tail through a yarn needle.
Make one long surface stitch from leaf base to point.
Add three short diagonal stitches on each side.
Keep the vein tension light so the leaf remains mostly flat.
Curled Vine
Yarn: muted sage or oatmeal.
Ch 24.
Starting in second chain from the hook, work 2 sc in every chain across.
The increasing stitch count should force the vine into a loose spiral.
Fasten off. Leave a 20 cm attachment tail.
Natural Twig Stem
Select a twig approximately 7–9 cm long. Sand both ends and remove any loose bark.
Insert the lower 2–3 cm into the top opening.
Wrap the remaining gray gathering yarn tightly around the crochet edge beneath the twig.
Pass several stitches through the fabric immediately around the stem base.
The wood should remain removable until the final stability check. If the stem tilts more than approximately 10 degrees under its own weight, add more stuffing beneath its base.
Assembly
- Complete all six gray textured panels and measure them before joining so no strip differs by more than approximately 5 mm in length.
- Join the panels into a tube, keeping all raised post texture facing the same vertical direction.
- Gather the bottom edge, add stuffing evenly around the outer perimeter and keep the center slightly softer.
- Gather the crown and deepen the six panel seams with hidden shaping strands until the body reads as a broad pumpkin.
- Block or flatten the finished floral medallion, pin it to the front panel and check its position from directly in front before sewing.
- Attach the medallion around its complete gray frame without pulling the circular edge into the body texture.
- Insert the prepared twig through the crown opening and secure the gathered crochet edge tightly around its lower 2–3 cm.
- Position the sage leaf beside the stem and add one hidden fixing stitch approximately 10 mm along its center vein.
- Attach the curled vine behind the leaf, fixing only its first 10–15 mm so the remaining spiral stays free.
- Weave all structural yarn tails through at least 5 cm of matching fabric and place the pumpkin on a flat surface to check its final balance.
The completed pumpkin should sit on a broad base with six distinct textured sections, a flat centered medallion, stable twig stem and foliage that remains clear of the front motif.
7 Technical Tips
- Panels finishing at different lengths: A difference of more than 5–8 mm becomes visible after gathering. Measure every panel after each 12-row section and add or remove complete texture repeats before fastening off.
- Texture collapsing under stuffing: An overpacked body stretches the raised post grid until it appears almost flat. Stop adding filling when firm thumb pressure produces approximately 10–15 mm of temporary indentation.
- Mandala curling: Too many outer-frame stitches make the motif ripple while too few make it cup. Target approximately 48 stitches around an 11–13 cm medallion and lay it flat before attachment.
- Medallion shifting sideways: Sewing from one point around the entire circle can move the opposite edge by more than 10 mm. Pin the motif at four compass points first, then add pins halfway between them.
- Grooves disappearing: Gray-on-gray seams need physical depth rather than color contrast. Pull each shaping channel approximately 8–10 mm below the fullest part of the neighboring panels.
- Stem wobble: A 7–9 cm twig inserted only through the crochet opening can lean under its own weight. Bury at least 2–3 cm inside the stuffing and pack additional fiber around the internal base before closing the crown.
- Leaf blending into the gray body: A flat sage leaf can disappear against the textured background. Add one raised center vein and fix only the first 10 mm beyond the base so the outer half lifts away from the pumpkin.
Conclusion
Check the circular medallion before fixing the stem because the crown foliage will change how the front composition appears. Next, place the pumpkin at eye level and compare the motif center with the two nearest body seams; correct any sideways shift before burying its sewing tail. Add the twig, leaf and vine only after the front panel lies flat. Share the finished textured crochet pumpkin pattern project on Pinterest with a vertical neutral-fall photograph, then post a close view of the floral medallion and gray grid texture on Instagram using #MandalaCrochetPumpkin. For this pumpkin specifically, would you keep the charcoal star outline or replace it with muted rust for a warmer autumn accent?









