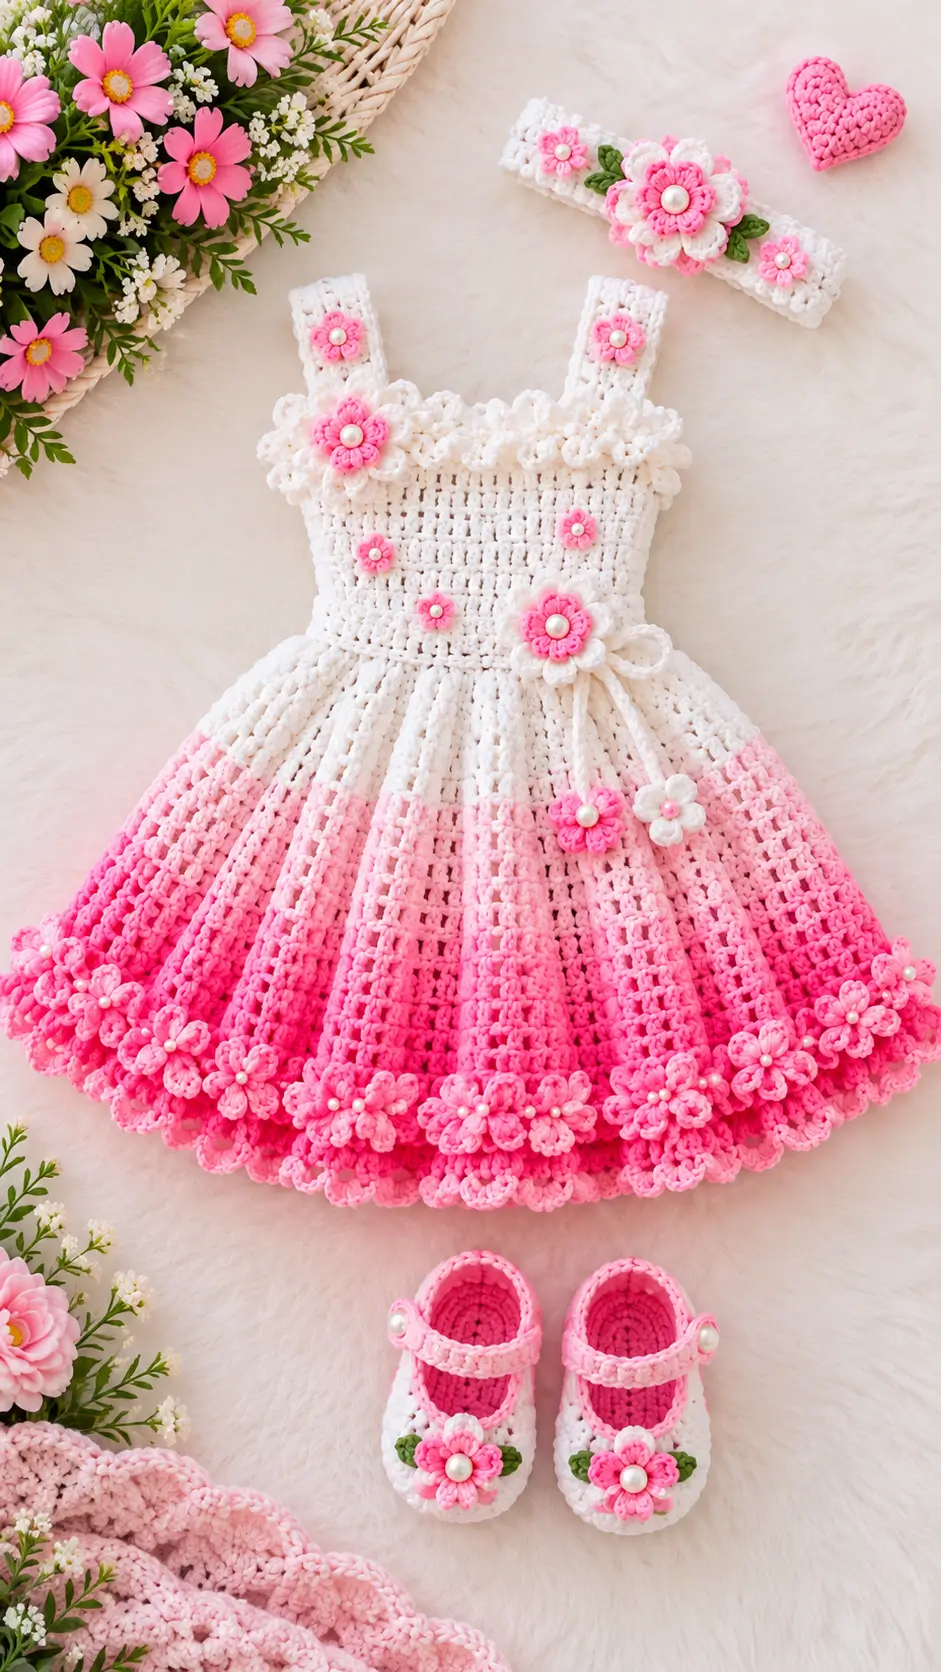
The photographed dress carries its darkest pink at the hem, where dozens of small flowers turn the skirt edge into a structural border. This crochet baby dress pattern guide explains the white bodice, expanding pink skirt, floral appliqués, straps, and matching accessories. Plan on DK yarn, a 3.5 mm hook, and intermediate garment skills. The construction is particularly useful when you want a dress whose length and chest can be adjusted independently.
The Design: What Makes This Floral Dress Different
Three construction choices define this pink crochet baby dress. First, the upper section remains relatively firm so the square bodice does not collapse under the flower appliqués. Second, the skirt gains substantially more circumference below the waist, creating the pronounced flare visible in the photograph without making the chest oversized. Third, color is distributed vertically: white at the upper skirt, pale pink through the middle, then stronger pink near the hem.
The crochet flower baby dress also depends on appliqué placement. Large flowers mark the waist and neckline while smaller motifs repeat around the lower edge. That hierarchy prevents the embellishment from becoming visually uniform. A common construction error is adding skirt width to compensate for an undersized bodice. It fixes neither problem. Chest circumference must be established before skirt expansion begins.
Project Info at a Glance
| Skill Level | Time | Finished Size | Hook | Best For |
|---|---|---|---|---|
| Intermediate | Variable | 6–12 months; 55.9 cm reference chest | 3.5 mm | Floral dress construction and coordinated sets |
The 55.9 cm chest measurement is a published 6–12-month sizing reference rather than a measurement extracted directly from the photograph. Always check the intended wearer’s measurements before beginning.
Materials and Tools
Yarn
For a reconstruction, match the photographed color distribution rather than treating all colors as equal quantities.
- White DK/light category 3 yarn — for the main bodice, shoulder straps and upper skirt.
- Pale pink DK/light category 3 yarn — for the transition section and flower petals.
- Hot pink DK/light category 3 yarn — for the lower skirt, decorative hem and floral accents.
- Green DK/light category 3 yarn — a small quantity for crochet leaves.
Choose a washable baby-grade cotton or cotton-blend yarn with enough stitch definition to hold the floral details. Yarn consumption changes according to size, skirt length, gauge and the number of flowers added around the hem, so purchase additional accent yarn when making a densely decorated border.
Tools
- 3.5 mm crochet hook
- Locking stitch markers
- Tapestry needle
- Scissors
- Measuring tape
- Removable pins
- Sewing thread if required
The photographed flowers appear to have pearl-style centers. For a garment intended for a baby, avoid decorative components that could detach. Embroidered or securely crocheted flower centers provide a practical alternative.
Abbreviations
- ch — chain
- sl st — slip stitch
- sc — single crochet
- hdc — half double crochet
- dc — double crochet
- inc — increase
- dec — decrease
- st/sts — stitch/stitches
- sp — space
- rep — repeat
- BLO — back loop only
- MR — magic ring
An invisible decrease is primarily an amigurumi technique. When it is required for a small accessory, work through the front loops of the next two stitches before completing the decrease.
Crochet Baby Dress Pattern — Step by Step
Gauge and Sizing First
Baby garments cannot use the fixed stitch progression normally associated with amigurumi. The number of stitches must be calculated from yarn weight, hook size, gauge and the required finished chest circumference.
Make a gauge swatch before calculating the bodice. As a working reference for DK yarn, approximately 20 double crochet stitches per 10 cm can be used as a starting point, but your own swatch takes priority.
For a wearable version, measure the intended wearer around the chest and compare that figure with the finished dimensions of the garment. Do not determine fit from age alone.
Record three measurements before beginning:
- Chest circumference
- Waist-to-underarm depth
- Desired waist-to-hem length
These measurements allow the bodice and skirt to be adjusted independently.
Bodice
Yarn: white.
The photographed dress uses a square sleeveless bodice with relatively wide shoulder straps. The bodice should remain firm enough to support the flower appliqués without becoming stiff.
Foundation: Chain the number required by your gauge for the target chest circumference, adding the necessary turning chains.
Row 1: Dc across.
Row 2: Ch 2, turn, dc across.
Following rows: Repeat Row 2 until the bodice reaches the required waist-to-underarm depth.
Check the width against the intended finished chest measurement before starting the skirt. An undersized bodice should be corrected at this stage rather than compensated for with additional skirt stitches.
Join or seam the back according to the selected closure style. If constructing a pullover dress, check that the upper opening provides sufficient room before permanently closing the seam.
Shoulder Straps — Make 2
Yarn: white.
The shoulder straps in the reference image are broad and rectangular.
Row 1: Chain enough stitches to produce a strip approximately 3–4 cm wide. Dc across.
Row 2: Ch 2, turn, dc across.
Following rows: Repeat Row 2 until the strap reaches from the front bodice to its corresponding back attachment point.
Fasten off and leave a long sewing tail.
Make the second strap to exactly the same length. Pin both straps in position before sewing and measure their distance from the center of the bodice. Uneven strap placement will distort the square neckline.
Scalloped Neckline Trim
Yarn: white.
Join the yarn at one upper edge of the bodice.
Round 1: Sc evenly around the neckline and upper edge.
Round 2: *Skip 1 st, 5 dc in next st, skip 1 st, sl st in next st.* Repeat around, adjusting the final repeat when necessary.
The scallops should remain shallow. A very deep shell border can reduce the visual opening of the neckline and compete with the flower appliqués.
Flared Skirt
Yarn: begin with white.
Attach the white yarn evenly around the lower edge of the completed bodice.
Round 1: Work dc evenly around the waist. Join only if your chosen construction is worked in joined rounds.
Round 2: Increase at regular intervals around.
Round 3: Dc around without increasing.
Round 4: Work another controlled increase round, spacing the increases evenly.
Round 5: Dc around.
Continue alternating plain rounds and controlled increase rounds until the required skirt circumference has been reached.
The photograph shows substantial flare beginning immediately below the waist. Expansion should therefore happen progressively across the upper and middle skirt rather than being concentrated entirely near the hem.
Offset the location of increases between expansion rounds. Stacking every increase directly above the previous one can create visible vertical points instead of an even circular flare.
Pink Gradient Section
Yarn: white, pale pink and hot pink.
Continue the upper section of the skirt in white.
Introduce pale pink through the middle section. The color transition can be softened by alternating white and pale-pink rounds before changing fully to pale pink.
Begin adding hot pink farther down the skirt. Alternate pale pink and hot pink briefly if a gradual transition is preferred, then finish the lower section entirely in the stronger pink.
The reference photograph does not show a simple two-color division. Its strongest pink is concentrated toward the hem, with lighter shades connecting the white upper section to the saturated lower edge.
Cut the unused yarn after each completed transition rather than carrying it over long distances inside the garment. Weave every end into matching-color stitches.
Lower Skirt Texture
The skirt has pronounced vertical texture that emphasizes its length and flare. A reconstruction can reproduce that effect with regular raised stitch columns.
Texture Round: Work dc across each standard section and place a raised or post-style stitch at predetermined intervals.
Following Round: Maintain each textured column directly above its previous position.
Repeat the texture sequence through the lower portion of the skirt.
Keep texture and expansion calculations separate. Increase rounds determine circumference, while raised stitch columns create the vertical surface pattern.
Scalloped Hem
Yarn: hot pink.
Round 1: Sc evenly around the entire lower edge.
Round 2: *Skip 1 st, 5 dc in next st, skip 1 st, sl st in next st.* Repeat around.
For a deeper decorative border, add another round into the shell spaces. Test several repeats before completing the entire circumference.
Too many stitches in the final border will cause the hem to ripple. Too few can pull the skirt inward. Lay the dress flat after working approximately one quarter of the edging and inspect the result before continuing.
Large Layered Crochet Flowers
Yarn: hot pink and white.
The largest flowers are positioned at important visual points: the neckline, waist, headband and lower decorative areas.
Center R1: With hot pink, make an MR. Ch 1 and work 6 sc into the ring. Join with sl st. (6)
Petal R2: Work one petal group into each stitch around. (6 petals)
For each petal, use a combination such as sl st, ch, dc stitches and a closing sl st to create a rounded shape.
Make a second white petal layer slightly larger than the pink center flower. Position the pink layer over the white layer and stitch through the central area.
Fasten off and leave approximately 15 cm of yarn for attachment.
Small Five-Petal Flowers
Yarn: pink, white or a combination.
R1: MR, 5 sc in MR, join. (5)
R2: Work one petal into each stitch around. (5 petals)
Fasten off and leave approximately 15 cm for sewing.
Use these smaller flowers on the bodice, shoulder straps and between the larger flowers around the hem. Varying the scale keeps the decoration from becoming a single heavy band.
Crochet Leaves
Yarn: green.
Foundation: Ch 5.
Work around both sides of the foundation chain. Use short stitches at the ends and progressively taller stitches toward the middle to form a pointed oval.
Finish with a sl st at the base.
Fasten off and leave a sewing tail.
Place one or two leaves behind selected flowers rather than adding foliage to every motif. The green should remain a small accent against the dominant white and pink palette.
Waist Tie
Yarn: white.
Make a chain long enough to pass around the waist and form the side bow shown in the reference image.
Row 1: Sl st or sc back along the entire chain.
Fasten off and weave both ends securely.
If the waist stitch pattern creates suitable openings, thread the tie through them at regular intervals. Keep the bow placement to one side to reproduce the asymmetrical floral arrangement visible in the photograph.
Matching Floral Headband
Yarn: white, pink and green.
Measure the required finished head circumference. The band should be calculated from that measurement and the stretch of the selected stitch rather than from age alone.
Row 1: Make a foundation chain for a band approximately 3–4 cm wide. Dc across.
Row 2: Ch 2, turn, dc across.
Following rows: Repeat until the strip reaches the calculated circumference.
Join the short ends securely.
Make one large layered flower for the central decoration. Add smaller pink flowers and green leaves toward either side, keeping the underside of the headband flat.
Matching Crochet Baby Shoes
The reference photograph includes Mary Jane-style crochet shoes with white outer sections, pink interiors and trim, pink straps, and floral decorations across the toes.
A fitted crochet shoe requires its own sole gauge and exact foot-length calculation. Do not determine the sole stitch count from the photograph alone.
Use a tested baby-bootie sole construction matching the intended foot length. Build the upper in white, introduce pink around the opening, then crochet a narrow Mary Jane strap.
Attach one layered flower and a small green leaf to the front of each shoe. Position both motifs at matching points so the pair remains symmetrical.
Small Crochet Heart
Yarn: hot pink.
The small heart visible beside the headband is a separate decorative accessory.
R1: Make an MR.
Work a symmetrical sequence of tall stitches into the ring to create the first rounded lobe. Use shorter stitches toward the lower section and create a defined chain point at the bottom.
Mirror the same stitch sequence for the opposite lobe.
Pull the magic ring firmly closed. Fasten off and weave in the yarn tail.
Assembly
- Lay the bodice and skirt flat and check the finished measurements before attaching dimensional decorations.
- Complete the bodice seam or selected closure and secure all structural yarn tails.
- Pin both shoulder straps in place and compare their finished length and position before sewing.
- Complete the neckline scallops and check that the upper edge remains flat.
- Weave in all white-to-pink and pink-to-hot-pink color-change tails on the inside of the skirt.
- Pin the large flowers at the neckline and waist before permanently sewing any motif.
- Add the smaller flowers between the major motifs while keeping them clear of structural seams.
- Arrange all hem flowers around the skirt before sewing. Check the border after every few motifs so the appliqués do not contract the circumference.
- Attach the waist tie, then complete the matching headband and shoe decorations as separate pieces.
- Inspect every seam, yarn tail and decorative attachment before use. Replace any embellishment that can detach from the garment.
The completed project consists of a white and pink floral crochet dress with a coordinated headband, decorated Mary Jane-style shoes and an optional crochet heart.
7 Technical Tips for a Better Crochet Baby Dress
- Check bodice width before expanding the skirt. Adding skirt stitches cannot correct an undersized chest. Measure the upper garment before starting the first expansion round.
- Measure both shoulder straps from the same center point. A difference of even 1 cm at the attachment position can make the square neckline appear uneven. Pin before sewing.
- Distribute skirt increases instead of stacking them. Repeated increases in identical positions can create visible points. Offset the increase locations between expansion rounds.
- Use an intermediate pink for the gradient. Changing immediately from white to hot pink creates a hard stripe rather than the graduated effect visible in the reference dress. Introduce pale pink through the middle section.
- Attach flowers through their centers and inner bases. Sewing heavily through the outer petals can flatten and distort them. Keep the dimensional petal edges free.
- Pin the entire hem arrangement before sewing. Dense appliqués can reduce the effective circumference if they are attached too tightly. The skirt should still lie flat after several flowers have been secured.
- Weave structural yarn tails in more than one direction. Short or loosely woven ends can work out during laundering, especially around straps and waist joins. Inspect every structural connection before the garment is used.
Finishing the Floral Crochet Baby Dress
Finish this project by making a gauge swatch and calculating the bodice from the intended wearer’s measurements before cutting yarn for the skirt. That checkpoint controls the fit more reliably than copying stitch counts from a different yarn weight.
Once the white upper section fits, build the flared gradient skirt, complete the scalloped border, and pin every flower before sewing. Keep the largest flowers around the neckline, waist and selected hem positions, using smaller motifs to fill the remaining spaces.
Save this crochet baby dress pattern to Pinterest as a construction reference, and share your finished color arrangement on Instagram with #PinkFloralCrochetDress. For this specific dress, will you make the lower skirt fade gradually through three pink shades or use clearly defined white, pale-pink and hot-pink sections?









