Introduction
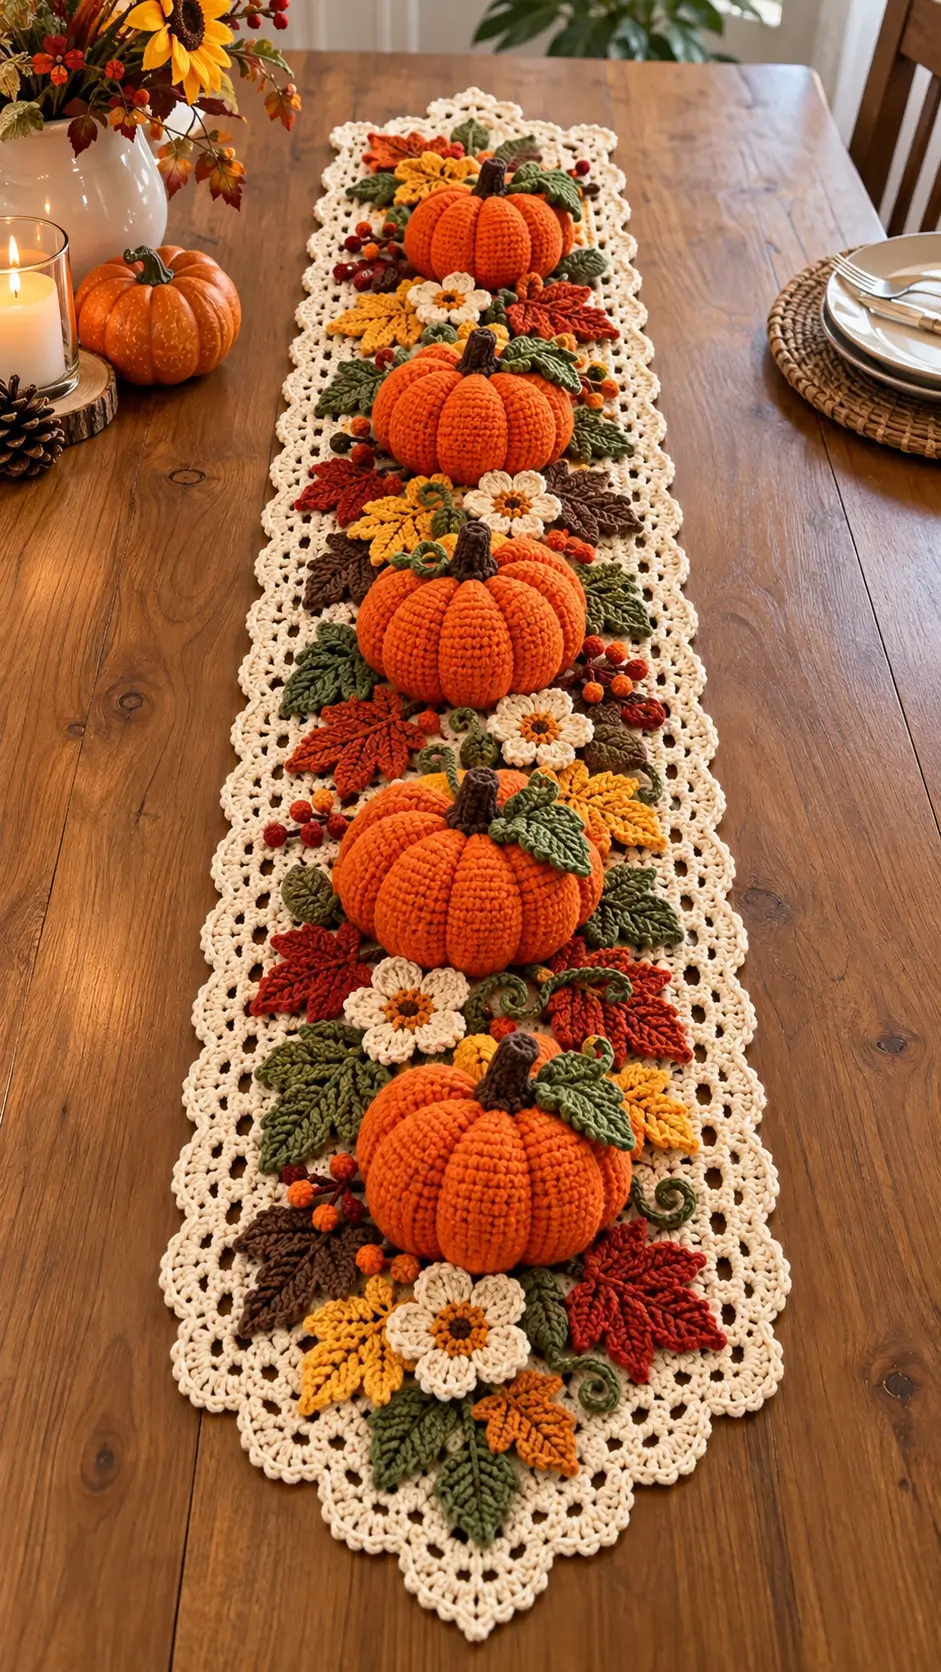
Five stuffed orange pumpkins rising from one cream lace runner require the base to carry far more weight than a conventional flat centerpiece. This 3D pumpkin crochet table runner pattern uses worsted cotton, a 4 mm hook, sculpted pumpkins, autumn leaves, flowers, berries, vines, and openwork lace. The intermediate reconstruction targets approximately 35 × 180 cm and creates a removable dimensional centerpiece for a long dining table.
The instructions below are an original photo-inspired reconstruction based on visible structure; published patterns cited later are used only for sizing, gauge, and material benchmarks.
The Design: What Makes This Pumpkin Runner Different
The photographed runner combines two structures that normally behave differently: flexible lace and firmly stuffed crochet sculpture. A dense central strip is therefore built inside the cream openwork base so the five pumpkins have stable attachment zones while the side borders remain airy. Each orange pumpkin uses six sculpted lobes, keeping its footprint broad without requiring a very high body. Separate rust, mustard, olive, and brown leaves fill the spaces between pumpkins, while cream flowers and small berry clusters hide attachment points. The crochet pumpkin table runner also uses curling green vines to connect otherwise isolated motifs. A common construction error is sewing the pumpkins only to lace chains. Their weight can distort those openings, so every pumpkin is anchored through the denser center stitches instead.
Project Info at a Glance
| Skill Level | Time | Finished Size | Hook | Best For |
|---|---|---|---|---|
| Intermediate | Approx. 28–36 hours | Reconstruction target: approx. 35 × 180 cm | 4 mm | Long dining tables, Thanksgiving centerpieces, autumn displays |
The dimensions above are reconstruction targets inferred from the photographed proportions, not verified measurements of an identified pattern. For comparison, SASS Crochet publishes a worsted-weight Farmhouse Pumpkin Table Runner measuring 13 × 72 inches / approximately 33 × 183 cm, using a 4 mm hook and approximately 956–1006 m of yarn. That published size is particularly close to the proportions selected for this reconstruction.
Materials and Tools
Yarn
- Warm cream / ivory — worsted #4 cotton or cotton blend — approximately 500–600 g
- Pumpkin orange — worsted #4 — approximately 450–550 g
- Olive / moss green — worsted #4 — approximately 120–150 g
- Rust / brick red — worsted #4 — approximately 80–100 g
- Mustard / golden yellow — worsted #4 — approximately 70–90 g
- Chocolate brown — worsted #4 — approximately 70–90 g
- Berry orange and dark red scraps — approximately 30–40 g total
Plan approximately 1.3–1.6 kg total yarn for the complete dimensional reconstruction. This estimate intentionally includes a margin because five stuffed pumpkins, layered leaves, flowers, and a 180 cm base consume substantially more material than a conventional flat filet runner.
Tools
- 4 mm crochet hook
- 3.5 mm hook — optional for compact berries
- Polyester fiberfill — approximately 250–350 g
- Long tapestry needle
- Locking stitch markers
- Blocking mats and rust-resistant pins
- Scissors
- Measuring tape
Abbreviations
- MR — magic ring
- sc — single crochet
- inc — 2 sc in one stitch
- dec — invisible single-crochet decrease
- sl st — slip stitch
- ch — chain
- hdc — half double crochet
- dc — double crochet
- tr — treble crochet
- BLO — back loop only
- st/sts — stitch/stitches
For an invisible decrease, insert the hook through the front loops of the next two stitches, yarn over and pull through both front loops, then complete one single crochet.
Pattern — Step by Step
Work the dimensional pumpkin pieces in continuous spirals unless stated otherwise. Mark the first stitch of every round.
Cream Lace Runner Base
Yarn: warm cream — original photo-inspired reconstruction.
Foundation: Ch 65.
Row 1: Dc in fourth ch from hook and in each chain across. (63 dc including turning chain)
Row 2: Ch 3, turn. Dc in next 9 sts, *ch 2, skip 2 sts, dc in next 3 sts*. Repeat across until 10 sts remain. Dc in final 10 sts.
Row 3: Ch 3, turn. Dc in each dc and work 2 dc in every ch-2 space across.
Row 4: Ch 3, turn. Dc in next 7 sts, *ch 3, skip 3 sts, sc in next st, ch 3, skip 3 sts, dc in next 3 sts*. Repeat across while maintaining a solid band approximately 8–10 stitches wide at both edges.
Row 5: Ch 3, turn. Work dc across, placing 3 dc into each ch-3 space.
Rows 6 onward: Alternate Rows 2–5 until the runner measures approximately 170 cm, ending with a solid dc row.
The exact row count depends on yarn and tension. Length is the controlling measurement because the final border adds approximately 5 cm at each end.
Reinforcing the Center
The photographed runner carries five stuffed pumpkins. Before adding the decorative border, reinforce the longitudinal center.
With cream yarn, surface crochet two parallel rows of slip stitches down the center of the runner, approximately 4 cm apart.
Work through solid stitches rather than chain spaces.
These reinforcement lines create attachment tracks for the pumpkins and distribute their weight across several rows.
Cream Openwork Side Border
Join cream at one corner.
Border R1: Sc evenly around the complete runner, placing 3 sc in each corner.
Border R2: Ch 5, skip 2 sts, sc in next st; repeat around. At each corner work sc, ch 5, sc in the corner stitch.
Border R3: Sl st into first ch-5 loop. Work 5 dc, ch 2, 5 dc in each corner loop. In every remaining ch-5 loop work 5 dc.
Border R4: Ch 1. Sc in first dc, *ch 4, skip 2 dc, sc in next dc*. Repeat around, placing an additional ch-4 loop at each corner.
Scalloped Final Edge
Border R5: In each ch-4 loop work sc, hdc, 3 dc, hdc, sc.
At each corner loop work sc, hdc, 5 dc, hdc, sc.
Fasten off.
Block the complete runner base to approximately 35 × 180 cm before attaching any dimensional pieces.
Large Orange Pumpkin — Make 5
Yarn: pumpkin orange — original reconstruction using standard six-stitch amigurumi expansion.
R1: 6 sc in MR. (6)
R2: Inc ×6. (12)
R3: (1 sc, inc) ×6. (18)
R4: (2 sc, inc) ×6. (24)
R5: (3 sc, inc) ×6. (30)
R6: (4 sc, inc) ×6. (36)
The medium 36-stitch plateau is appropriate for the approximately 13–15 cm pumpkins visible along the runner.
R7: Sc around. (36)
R8: Sc around. (36)
R9: Sc around. (36)
R10: Sc around. (36)
R11: Sc around. (36)
R12: Sc around. (36)
R13: Sc around. (36)
R14: Sc around. (36)
R15: Sc around. (36)
R16: (4 sc, dec) ×6. (30)
R17: (3 sc, dec) ×6. (24)
Begin stuffing. Keep the center slightly softer than the outside circumference.
R18: (2 sc, dec) ×6. (18)
R19: (1 sc, dec) ×6. (12)
Add remaining stuffing without making the body rigid.
R20: Dec ×6. (6)
Fasten off with a 120 cm tail. Close the six remaining front loops.
Sculpting Six Pumpkin Lobes
Thread the long orange tail through the center from bottom to top.
Bring it down the outside of the pumpkin and return through the bottom center.
Pull until a rounded groove forms.
Repeat at approximately 60-degree intervals until six equal lobes surround the body.
Run a second pass through each groove if additional depth is required.
Target each finished pumpkin at approximately 13–15 cm wide × 8–10 cm high.
Brown Pumpkin Stem — Make 5
Yarn: chocolate brown.
R1: 6 sc in MR. (6)
R2: Inc ×6. (12)
R3: BLO sc around. (12)
R4: Sc around. (12)
R5: Sc around. (12)
R6: Sc around. (12)
R7: Sc around. (12)
Lightly stuff the lower half.
Fasten off with a 30 cm sewing tail.
Sew one stem over the center depression of each pumpkin.
Large Pointed Autumn Leaf — Make 18
Use olive, rust, mustard, and brown in mixed quantities.
Ch 17.
Starting in second ch from hook: sl st in next ch, sc in next ch, hdc in next 2 ch, dc in next 3 ch, tr in next 5 ch, dc in next 2 ch, hdc in next ch, sc in final ch.
Work 3 sc into the final chain to turn.
Working along the opposite side of the foundation chain: sc, hdc, dc in next 2 ch, tr in next 5 ch, dc in next 3 ch, hdc in next 2 ch, sc, sl st.
Ch 5 for the stem. Sl st back through all 5 chains and join to the leaf base.
Fasten off with a 25 cm tail.
Leaf Vein
Join matching yarn at the base of each leaf.
Surface sl st along the center foundation chain to the tip.
Fasten off.
The raised center line keeps the leaf from disappearing visually beneath the pumpkins.
Lobed Maple-Style Leaf — Make 12
Use rust, mustard, and olive.
Ch 14.
Starting in second ch: sc in next 2 ch, hdc in next 2 ch.
First lobe: Ch 4, sl st in second ch, sc in next ch, hdc in next ch, sl st into the next foundation ch.
Dc in next 2 foundation chains.
Center lobe: Ch 6, sl st in second ch, sc, hdc, dc, tr down the chain, then sl st into next foundation ch.
Dc in next 2 foundation chains.
Third lobe: Ch 4, sl st in second ch, sc, hdc, then sl st into next foundation ch.
Finish the side with hdc, sc, sl st.
Work 3 sc into the end chain and mirror the same three lobes along the opposite side.
Ch 5 for the stem and sl st back to the base.
Fasten off.
Cream Daisy Flower — Make 10
Yarn: brown or mustard center with cream petals.
R1: With center color, 6 sc in MR. (6)
R2: Inc ×6. (12)
Fasten off center color.
R3: Join cream in any stitch. *Ch 4, work 2 tr in same stitch, ch 4, sl st in same stitch, sl st in next stitch.* Repeat around. (6 petals)
Fasten off with a sewing tail.
Flatten each flower lightly but leave the petals raised.
Small Orange Berry — Make 18
Yarn: orange or rust.
R1: 6 sc in MR. (6)
R2: Sc around. (6)
Add a pea-sized amount of stuffing.
Fasten off, thread through the six stitches, pull closed, and leave a 15 cm tail.
Dark Red Berry — Make 14
Repeat the small berry instructions using dark rust or burgundy yarn.
Green Curly Vine — Make 10
Yarn: olive green.
Ch 28.
Starting in second chain from hook, work 2 hdc in each chain.
The increased stitch density causes the strand to spiral.
Fasten off with a 20 cm tail.
Motif Placement
Position the five pumpkins down the longitudinal center before sewing anything permanently.
Place the first and fifth pumpkins approximately 20–25 cm from the pointed ends.
Distribute the remaining three evenly between them.
The pumpkins should not touch. Leave approximately 12–16 cm of decorated runner between neighboring pumpkin bodies.
Building the Botanical Clusters
Place three to five leaves around each pumpkin.
Alternate color direction rather than creating identical repeated bouquets.
Position cream flowers primarily between pumpkins where they remain visible.
Add berry groups in clusters of two or three.
Finally, thread green curls through open spaces between the leaves.
The decoration should overlap enough to hide the central attachment track while leaving sections of cream lace visible.
Attaching the Pumpkins
Use orange yarn and a long needle.
Pass through the lower quarter of a pumpkin and through the reinforced cream center below it.
Make four attachment points positioned approximately like the corners of a square.
Do not stitch around the complete circumference.
Four concealed anchor points allow the pumpkin to remain three-dimensional while preventing it from rolling sideways.
Attaching Leaves and Flowers
Sew each leaf primarily at its base and along the first 2–3 cm of its center vein.
Leave the outer sections free.
Attach flowers through their center rings.
Stitch berries directly beside leaf stems rather than into isolated chain spaces.
Tack vines only at their starting ends and one intermediate curl if necessary.
Assembly
- Crochet the cream runner base to approximately 170 cm before the final border, then add two longitudinal reinforcement tracks through its solid central stitches.
- Work all five border rounds and block the empty runner to the reconstruction target of approximately 35 × 180 cm before adding dimensional weight.
- Crochet five 36-stitch orange pumpkin bodies, stuff them evenly, close their six-stitch openings, and sculpt each body into six lobes spaced about 60 degrees apart.
- Crochet five brown stems and sew one over the recessed crown of each pumpkin, passing the needle deeply through the stuffed body rather than catching only surface stitches.
- Make the full leaf collection in olive, rust, mustard, and brown, then shape each pointed tip and raised center vein before placement.
- Make ten cream flowers, thirty-two mixed berries, and ten olive spiral vines, leaving sewing tails on every component that will be attached directly.
- Pin the five pumpkins along the runner center with approximately 12–16 cm of decorated space between neighboring bodies, then attach each pumpkin at four reinforced points.
- Arrange the largest leaves around the pumpkin bases first, alternating colors and angles so the foliage does not form five identical repeated clusters.
- Add cream flowers, smaller leaves, berries, and green curls between pumpkins, sewing through dense base stitches rather than unsupported lace chains.
- Weave every tail through at least 6 cm of matching fabric, reshape the scalloped edge, and confirm that all five pumpkins remain upright when the runner lies flat.
The completed centerpiece should contain five raised orange pumpkins surrounded by layered autumn foliage, cream flowers, berries, green curls, and an ivory openwork border.
7 Technical Tips
- The lace base stretches beneath a pumpkin: place every pumpkin over the two reinforced center tracks and use four attachment points. Sewing a 13–15 cm stuffed body directly to chain spaces can permanently enlarge those openings.
- The pumpkins look spherical instead of ribbed: mark six sculpting positions approximately 60 degrees apart before tightening any strand. Uneven spacing produces one oversized lobe and several narrow channels.
- The pumpkin bottoms rock against the runner: pull the bottom closure approximately 1 cm inward before attachment. A projecting center knot creates a pivot point even when four sewing anchors are used.
- The autumn leaves curl into tubes: block the largest leaves before assembly and keep both sides of the foundation chain at comparable tension. A difference of several millimeters between the two sides is enough to twist a long leaf.
- The scalloped runner edge ripples: correct Border R1 before adding decorative rounds. Excess single crochets along a 180 cm side multiply into much larger waves once shells are added.
- The berry clusters disappear under foliage: place groups of two or three berries approximately 2–3 cm beyond a neighboring leaf edge. Berries sewn entirely beneath the leaves add thickness without contributing visible color.
- The five pumpkins lean in different directions: pin each body at four points and view the runner from the short end before sewing. Correct any tilt greater than approximately 5 degrees while the attachment yarn is still accessible.
Published Table Runner Size Benchmark
SASS Crochet’s Farmhouse Pumpkin Table Runner provides a useful contemporary benchmark because it uses worsted-weight cotton yarn and a 4 mm hook. The published runner measures 13 inches wide × 72 inches long, approximately 33 × 183 cm, and lists a gauge of 7.5 stitches and four rows per 2 inches.
The pattern lists approximately 1,045–1,100 yards / 956–1006 m. Its pumpkins are created as textured elements within a flat runner rather than as five stuffed sculptures, so this reconstruction requires substantially more orange yarn and stuffing.
Published Filet Pumpkin Runner Benchmark
HandmadebyRaine’s Pumpkin Table Runner takes a much finer approach. The published design uses size 10 crochet thread and a 1.75 mm hook, with approximately 350 yards / 320 m listed on Ravelry.
A two-pumpkin version measures approximately 10 × 20 inches / 25 × 51 cm. The accompanying tutorial also documents blocking as an important finishing stage for keeping the openwork runner rectangular.
Published Worsted Pumpkin Table Setting Benchmark
Donna Harelik’s Pumpkin Table Scapes uses Aran-weight yarn with 4 and 5 mm hooks and lists approximately 300–600 yards / 274–549 m.
The pattern is rated intermediate and includes motif-based pumpkin table decor. This provides another useful technical comparison for choosing medium-weight yarn when the runner needs more structure than thread crochet can provide.
Why Five Pumpkins Fit the Reference
The image shows five dominant pumpkin forms placed in a single line.
At roughly 14 cm diameter each, the pumpkin bodies themselves occupy about 70 cm of the runner’s length.
The remaining length provides spacing for flowers, leaves, berries, and visible cream lace.
Adding a sixth pumpkin to a 180 cm runner would significantly reduce the negative space unless the individual bodies were made smaller.
Making a Three-Pumpkin Version
Shorten the cream base to approximately 115–125 cm.
Make three orange pumpkins instead of five.
Reduce the leaves to approximately 18–20, flowers to six, berries to approximately 20, and vines to six.
Keep the full width and border construction unchanged.
This creates a centerpiece suited to a shorter dining table without shrinking the dimensional motifs.
Making a Seven-Pumpkin Version
Extend the base to approximately 225–240 cm.
Add two pumpkins and approximately 40% more foliage.
Continue the same lace repeat until the required pre-border length is reached.
Add a third central reinforcement track if the finished runner will regularly be moved with all seven pumpkins attached.
Making Smaller Pumpkins
Stop increasing at 30 stitches.
Work seven or eight even rounds, then decrease:
30 → 24 → 18 → 12 → 6.
Use five or six sculpting passes depending on the desired lobe width.
Smaller pumpkins can be substituted at the two ends while keeping larger 36-stitch pumpkins in the central three positions.
Making Larger Pumpkins
For a centerpiece with fewer but larger pumpkins, increase one additional round:
R7: (5 sc, inc) ×6. (42)
Work the plateau at 42 stitches, then reverse the increases:
42 → 36 → 30 → 24 → 18 → 12 → 6.
Keep at least 15 cm between neighboring finished bodies so the foliage remains visible.
Creating Deeper Pumpkin Ribs
Do not overstuff the center.
Run the first six shaping strands at moderate tension.
Inspect the body from above, correct the spacing, then make a second pass through each existing groove.
Two controlled passes create broader depressions than one extremely tight strand.
Using Flat Pumpkin Appliqués Instead
A lighter runner can replace the stuffed pumpkins with flat motifs.
Maria’s Blue Crayon publishes a worsted-weight pumpkin appliqué using a 4 mm hook. Its basic pumpkin begins with 10 half double crochets, increases to 20 stitches, and adds shaping through taller stitches.
Dani Joan’s 2025 pumpkin appliqué provides another benchmark: Aran-weight yarn, a 5 mm hook, and a finished diameter around 5.5 cm.
Flat motifs greatly reduce the reinforcement needed in the runner base.
Color Placement
Keep orange limited primarily to the five pumpkins and small berries.
Use olive as the dominant foliage color.
Distribute rust and mustard leaves throughout the full length rather than grouping one color around each pumpkin.
Brown works best in stems and a smaller number of leaves.
Cream flowers repeat the runner color and create visual breaks between saturated autumn shades.
Making the Cream Flowers Larger
Increase the center to 18 stitches before beginning petals.
Work nine petals rather than six, distributing one petal over every two center stitches.
Use the larger flowers sparingly between the central pumpkins.
Too many large cream flowers can hide the openwork base and make the runner appear fully covered.
Making Smaller Accent Flowers
Start with 6 sc in an MR.
Work one petal into each stitch using sl st, ch 3, 2 dc, ch 3, sl st.
Six compact petals produce a flower approximately half the visual scale of the main cream daisies.
Use these near the pointed runner ends where space is limited.
Creating Berry Sprigs
Instead of sewing berries independently, make a brown stem first.
Ch 15 and sl st back through the chain.
Sew three small berries along the final 6–8 cm of the stem.
Place one berry at the tip and two on opposite sides below it.
This makes the small orange and rust accents easier to position as one unit.
Adding Oak Leaves
Oak leaves provide another recognizable autumn silhouette.
SeeLoveShare’s published oak-leaf tutorial constructs its motif in only three rows plus a stem and specifically recommends pumpkin, gold, burgundy, and brown for autumn arrangements.
Substitute several oak leaves for the pointed motifs rather than replacing every leaf. Mixed silhouettes produce a more layered botanical arrangement.
Keeping the Runner Washable
Use crocheted stems rather than cinnamon sticks, wire, wood, or glued decorations.
Sew every component with matching yarn.
Choose washable stuffing and yarn with compatible care instructions.
The completed runner is bulky, so hand washing or a large protective laundry bag may be more practical than unrestricted machine agitation.
Making the Pumpkins Removable
For easier storage, sew small yarn loops to the underside of each pumpkin.
Add matching flat buttons beneath the foliage on the reinforced center strip.
Button the pumpkins onto the runner after blocking.
Flowers, leaves, and vines can remain permanently attached while the five largest dimensional pieces are stored separately.
Correcting a Runner That Narrows in the Middle
Measure width at both ends and at three intermediate points before adding motifs.
If the center is more than approximately 1 cm narrower, reblock before assembly.
Do not expect attached pumpkins to conceal structural narrowing. Their weight can exaggerate it.
Correcting Uneven Pumpkin Spacing
Mark the longitudinal center of the runner.
Place the middle pumpkin there first.
Position the second and fourth pumpkins equal distances from the center, followed by the first and fifth.
This center-out method is more accurate than beginning at one end and estimating each gap sequentially.
Correcting Overcrowded Foliage
Remove the smallest elements first.
Every decorative cluster should contain some visible cream base between neighboring leaves.
If no lace remains visible, reduce berry groups and secondary leaves before moving the main pumpkin or flower positions.
The runner needs negative space to preserve the openwork character seen in the reference.
Correcting a Twisted Leaf
Check the stitches on both sides of the foundation chain.
The two sides should have comparable stitch heights and tension.
Dampen and block the leaf with the center vein straight.
Pin the tip and base first, then shape the sides.
Attach only after completely dry.
Correcting a Loose Pumpkin
Do not add one very tight stitch through the center.
Instead, add four independent anchor points around the lower quarter of the body.
Each stitch should pass through the reinforced runner center.
Four distributed anchors resist rotation without visibly flattening the pumpkin.
Correcting a Stem That Leans
Insert the sewing needle through the stem base and several centimeters into the pumpkin stuffing.
Make attachment passes at four evenly spaced positions.
If the stem still leans, add a small amount of stuffing to its lower half.
Do not pack the entire tube firmly because the reference stems retain a slightly organic shape.
Blocking the Finished Runner
Do not wet-block the fully assembled runner by submerging all five stuffed pumpkins unless the yarn and stuffing are designed for that treatment.
Block the lace base before assembly.
After attachment, use localized damp shaping on leaves and border scallops as required.
Support the runner with both hands when moving it so the dimensional pieces do not pull against the lace.
Storage
Remove detachable pumpkins if that construction option was used.
Roll the lace base loosely around a fabric-covered tube rather than making sharp folds through the leaves.
If the pumpkins are permanently attached, store the runner flat in a shallow container.
Avoid stacking heavy seasonal decorations directly over the stems or sculpted lobes.
Sources
SASS Crochet — Farmhouse Pumpkin Table Runner — worsted-weight cotton, 4 mm hook, published 13 × 72 inch finished size, 7.5-stitch gauge information, and construction notes for a long pumpkin runner.
Ravelry — Farmhouse Pumpkin Table Runner by Angie Dooley — published November 2025; worsted yarn, 4 mm hook, approximately 956–1006 m, and textured pumpkin construction.
HandmadebyRaine — Pumpkin Table Runner — size 10 crochet thread, 1.75 mm hook, approximately 300 yards for the demonstrated two-pumpkin runner, 10 × 20 inch finished measurement, and blocking guidance.
Ravelry — Pumpkin Table Runner by Raine Eimre — published November 2024; size 10 thread, 1.75 mm hook, approximately 320 m, and a 10 × 20 inch published size.
Ravelry — Pumpkin Table Scapes by Donna Harelik — Aran-weight yarn, 4 and 5 mm hooks, approximately 274–549 m, motif construction, and intermediate skill classification.
Maria’s Blue Crayon — Crochet Pumpkin Appliqué — worsted-weight yarn and 4 mm hook reference for a compact flat pumpkin alternative.
Ravelry — A Pumpkin Appliqué by Dani Joan — Aran yarn, 5 mm hook, approximately 4–7 m, and a published 5.5 cm finished diameter.
SeeLoveShare — Crochet Oak Leaf Pattern — three-row fall leaf construction with a stem and autumn color recommendations suitable for runner embellishments.
Conclusion
The structural priority is the reinforced cream center: five stuffed pumpkins should transfer their weight into solid stitches rather than unsupported lace loops. Block the empty 180 cm base first, mark the center, then position the pumpkins outward symmetrically before adding leaves, flowers, berries, and vines. Your concrete next step is to make one 36-stitch pumpkin and place it on a blocked swatch to confirm its 13–15 cm target diameter. Save this 3D pumpkin crochet table runner pattern to Pinterest or share the completed centerpiece on Instagram with #PumpkinHarvestRunner. Would you keep all five pumpkins the same orange, or make the center pumpkin cream for contrast? “`0









