Introduction
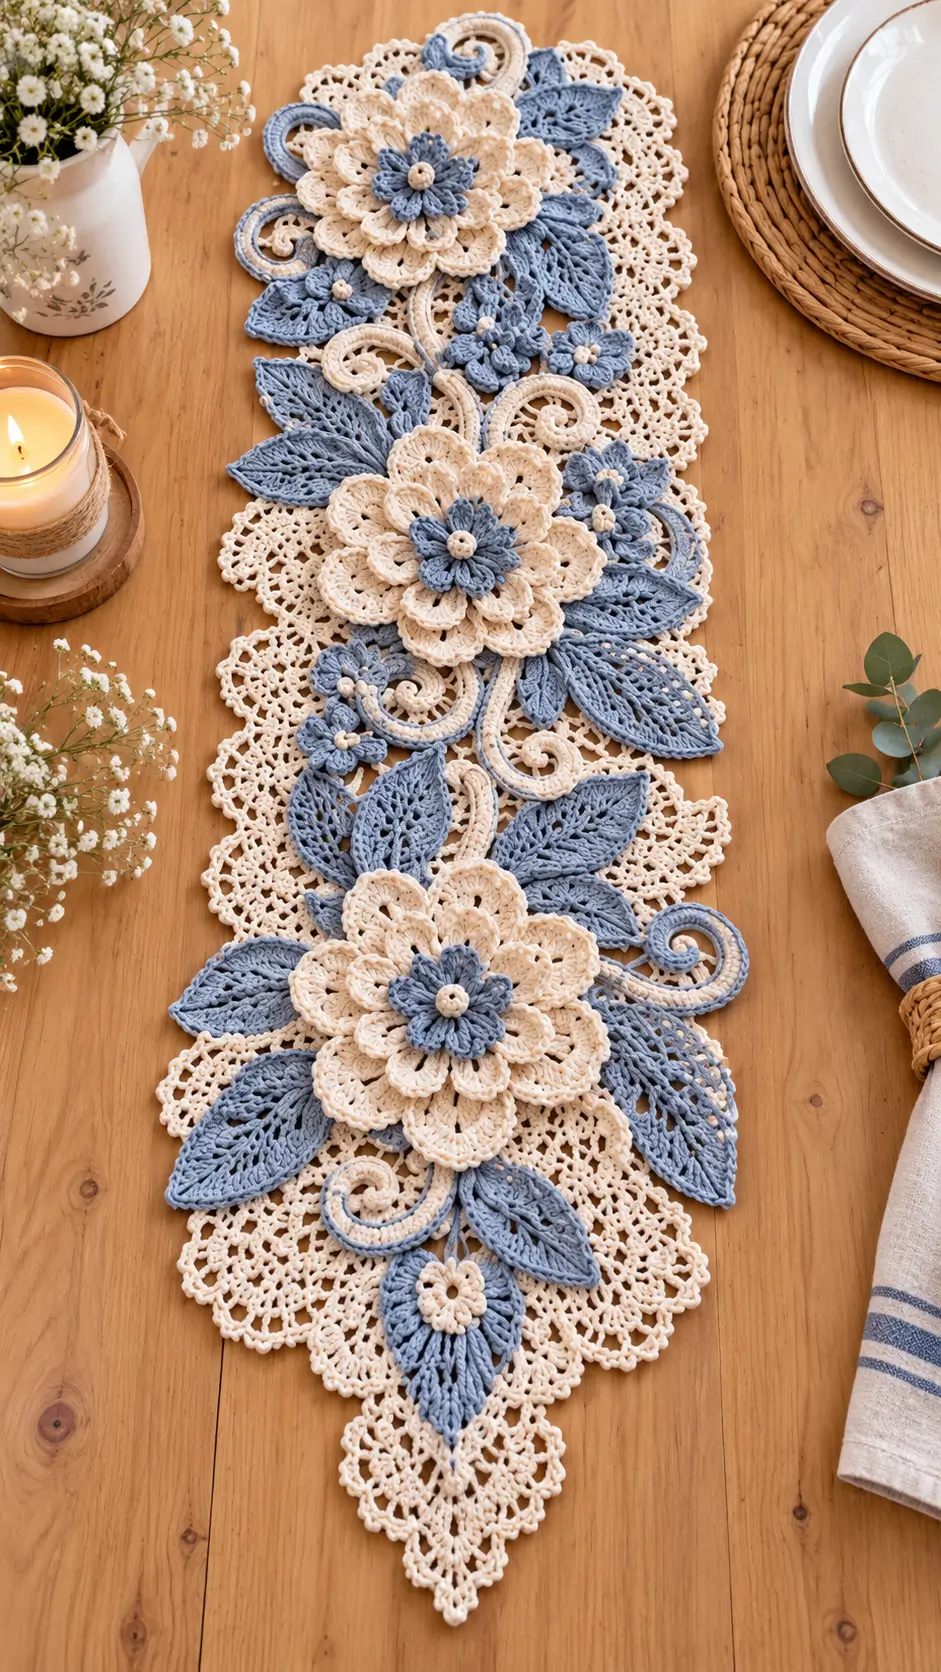
Three oversized cream blossoms have to sit above this runner without pulling its narrow lace foundation out of line. This crochet floral table runner pattern uses dimensional flowers, dusty-blue leaves, spiral vines, and cream openwork to reproduce that structure. A 4 mm hook and cotton yarn provide a practical benchmark, with a comparable motif runner measuring about 28 × 94 cm. The project suits intermediate crochet and modular table décor.
The Design: What Makes This Floral Runner Different
The photographed runner uses three structural layers rather than a single repeating stitch pattern. A cream openwork ground forms the lowest layer and gives the piece its elongated outline. Dimensional flowers occupy the centerline, while pointed leaves extend sideways to increase visual width without making the whole foundation solid.
Padded spiral vines provide the third layer. Their curved lines connect otherwise separate botanical motifs and break up the repeated circles created by the flowers.
That construction places this 3D flower crochet table runner closer to Irish-crochet-inspired appliqué than a conventional striped runner. Separate flowers, leaves, and decorative elements can be prepared individually before the final arrangement is sewn to the lace foundation.
A frequent mistake is attaching every leaf before blocking. That can lock twists into the crochet lace table runner and make its edges curl.
Project Info at a Glance
| Skill Level | Time | Finished Size | Hook | Best For |
|---|---|---|---|---|
| Intermediate | Multi-session | Approx. 28 × 94 cm benchmark | 4.0 mm | Dining tables, consoles, sideboards |
The finished measurement is a benchmark from a comparable floral motif runner rather than a direct measurement of the photographed piece. Final dimensions depend on yarn, tension, blocking, and motif placement.
Materials and Tools
Yarn
A practical starting point is approximately 250 g of cotton yarn. Because the photograph does not reveal the original yarn labels or quantities, the color amounts below should be treated as planning estimates.
- Cream/ivory — worsted cotton — approximately 150–175 g
- Dusty slate blue — worsted cotton — approximately 90–110 g
Use the same yarn family for both colors so the flowers, leaves, and lace respond similarly during blocking. Purchase additional yarn when increasing the length of the runner or adding more flower clusters.
Tools
- 4.0 mm crochet hook
- Tapestry needle
- Locking stitch markers
- Sharp scissors
- Rust-resistant blocking pins
- Blocking mat
- Tape measure
Stuffing and safety eyes are not required. This design is a flat and dimensional botanical crochet project rather than amigurumi.
Abbreviations
- MR — magic ring
- sc — single crochet
- hdc — half double crochet
- dc — double crochet
- tr — treble crochet
- inc — increase
- sl st — slip stitch
- ch — chain
- BLO — back loop only
- sp — space
- st/sts — stitch/stitches
- rep — repeat
Invisible decrease is an amigurumi technique and is not required for the flat botanical components used in this runner.
Pattern — Step by Step
This is an original photo-inspired construction rather than a transcription of a commercial pattern. Finished measurements will change according to yarn, hook size, tension, blocking, and motif placement.
Large Layered Flower — Make 3
Yarn: cream and dusty blue.
With cream:
R1: MR, ch 1, 12 sc into ring, sl st to first sc. (12)
R2: Ch 1, 2 sc in each st around, sl st. (24)
R3: Ch 4, skip 1 st, sl st in next st around. (12 loops)
R4: Into each ch-4 loop work (sc, hdc, 3 dc, hdc, sc). (12 petals)
Fasten off cream.
Join cream behind R4.
R5: Ch 6, anchor with sc between the next two petals around. (12 loops)
R6: Into each ch-6 loop work (sc, hdc, 5 dc, hdc, sc). (12 large petals)
Join behind the second petal layer.
R7: Ch 8, sc around the anchoring point between petals around. (12 loops)
R8: Into each loop work (sc, hdc, 2 dc, 3 tr, 2 dc, hdc, sc). (12 outer petals)
Fasten off. Leave approximately 30 cm of yarn if the flower will be sewn directly onto the foundation.
Blue flower center:
R1: With dusty blue, MR, 10 sc in ring, sl st. (10)
R2: Ch 4, 2 dc in next st, ch 4, sl st in same st around. (10 raised petals)
Fasten off and sew the blue section centrally over the cream flower.
The reference flowers have visible vertical layering. Do not press every petal completely flat during blocking.
Small Blue Flower — Make 7–9
Yarn: dusty blue.
R1: MR, 10 sc in ring, sl st. (10)
R2: Sl st in next st, ch 3, 2 dc in same st, ch 3, sl st in same st around. (10 petals)
Fasten off, leaving approximately 20 cm for sewing.
For a cream center, embroider several short cream stitches across the magic ring or crochet a small center separately and attach it after blocking.
Pointed Leaf — Make 14–18
Yarn: dusty blue.
Ch 16.
Row 1: Sc in second ch from hook, hdc, dc in next 3, tr in next 7, dc, hdc, 3 sc in final ch. Continue along the opposite side of the foundation chain: hdc, dc, tr in next 7, dc in next 3, hdc, sc. Join with sl st.
Row 2: Ch 1. Work sc around the leaf, placing 3 sc at the tip and keeping the base narrow.
Row 3: Ch 3, skip 1 st, dc in next st, ch 1, skip 1 st around the outer portion. Add stitches around the point when necessary to keep the leaf flat.
Row 4: Sc around, placing a picot (ch 3, sl st into first ch) approximately every 4–5 sts.
Fasten off. Leave approximately 25 cm for sewing.
Surface-slip-stitch from the base toward the point to create a defined central vein.
Small Leaf — Make 8–12
Yarn: dusty blue.
Ch 10.
Row 1: Sc in second ch, hdc, dc in next 2, tr in next 3, dc, hdc, 3 sc in final ch. Continue down the second side using the reverse stitch sequence.
Row 2: Sc around, working 3 sc at the point.
Fasten off. Leave approximately 20 cm for sewing.
Cream Spiral Scroll — Make 6
Yarn: cream.
Ch 35.
Row 1: Work 2 sc in second ch from hook and 2 sc in every remaining chain.
The repeated increases force the strip to curl naturally.
Row 2: Work one sl st in each stitch along the inside edge to add firmness.
Fasten off, leaving approximately 30 cm. Coil the strip into a controlled spiral and tack only the main contact points during assembly.
Two-Color Scroll — Make 4
Yarn: cream and dusty blue.
With cream, ch 32.
Row 1: Work 2 sc in each chain across.
Change to dusty blue.
Row 2: Sl st loosely in each stitch across.
Fasten off. Shape the piece into an open spiral instead of a completely closed circle.
The reference runner contains scrolls with contrasting edges. Position the blue row so that it remains visible after the spiral has been pinned and sewn.
Lace Ground Motif — Make 10–14
Yarn: cream.
R1: MR, ch 3, 15 dc in ring, sl st to top of beginning ch. (16 dc)
R2: Ch 5, skip 1 dc, sc in next dc; repeat around. Finish with a joining sl st. (8 loops)
R3: Into each loop work (sc, ch 3, dc, ch 3, sc).
R4: Sl st to first ch-3 space. Ch 5, sc into next ch-3 space around.
R5: Into each ch-5 loop work (2 sc, ch 3, 2 sc).
Fasten off.
Block every motif before joining. Arrange the pieces as overlapping diamonds and rounded sections behind the dimensional flowers rather than forming a rigid rectangular grid.
Lace Connector
Yarn: cream.
Join yarn to one blocked ground motif.
Row 1: Ch 5, sc into an adjacent motif.
Row 2: Ch 3, sc around the previous ch-5 bridge, ch 3, sc into the next attachment point.
Repeat only at points requiring structural support.
The connecting mesh should remain open. Excessive connections make the runner look like a solid panel and reduce the negative space surrounding the dimensional flowers and leaves.
Small Cream Center — Make 8–10
Yarn: cream.
R1: MR, 6 sc. (6)
R2: Inc ×6. (12)
R3: Ch 2, sl st in next st ×12.
Fasten off. Leave approximately 15 cm for attaching the center to a small blue flower.
End Lace Point — Make 2
Yarn: cream.
Ch 7.
Row 1: Dc in fourth ch from hook and each remaining ch. (5 dc including turning chain)
Row 2: Ch 3, dc in first st, dc across, 2 dc in final st. (7)
Row 3: Ch 3, dc in first st, ch 1, skip 1, dc in next st across, 2 dc in final st.
Continue increasing at both edges until the triangular section reaches approximately the width of the lace foundation.
Finish the outer edge with a picot border: sc, ch 3, sl st into first ch, sc in next space across.
Fasten off and block the section to a defined point.
Assembly
- Block every lace-ground motif first and arrange the cream pieces into a long central foundation.
- Join the ground motifs at several points on each side while retaining visible open spaces between the motifs.
- Position the three large cream flowers along the centerline. Place one toward each end section and the third around the middle.
- Pin the dusty-blue flower centers onto the large flowers and sew through the lower layers without compressing the upper petals.
- Arrange the largest blue leaves diagonally around each major flower. Alternate their direction to avoid rigid bilateral symmetry.
- Place smaller leaves in the remaining spaces between the principal motifs. Keep their outer points within the planned width of the runner.
- Add the cream and two-color spiral scrolls between the flowers. Tack each scroll at its base, midpoint, and outer curve.
- Position the small blue flowers in groups around the scrolls, large flowers, and leaf bases.
- Attach the pointed lace sections at both ends. Inspect the entire runner from directly above before weaving in the remaining yarn tails.
- Wet-block the completed runner to its intended dimensions. Pin the cream foundation first, then arrange the leaves, scrolls, and flowers without flattening the raised petals.
The completed runner should have a stable cream lace foundation with raised botanical elements positioned above the surface.
7 Technical Tips for a Dimensional Floral Runner
- Prevent marker drift: place a removable marker at the beginning of every flower round. Missing the starting point by one stitch shifts each subsequent petal and rotates the upper flower layers.
- Control flower distortion: keep each large blossom within approximately 1 cm of the planned blocked diameter. Significant variation between the three focal flowers changes the balance of the entire centerline.
- Stop scroll rotation: secure each spiral at a minimum of three attachment points. A scroll sewn only at its base can rotate when the table runner is moved or washed.
- Prevent leaf curling: block the leaves individually before attaching them. Sewing an unblocked leaf firmly around its entire perimeter can trap unwanted curvature in the foundation.
- Preserve flower depth: place blocking pins around the outer petals rather than pressing through every layer. Flattening all the tiers removes the dimensional separation required for the photographed style.
- Check motif placement: position all three large flowers before sewing the first one permanently. A center displacement of 2–3 cm becomes noticeable because the remaining flowers, leaves, and scrolls follow the same visual axis.
- Secure yarn tails: weave attachment tails through at least 4–5 cm of nearby stitches before trimming. Very short tails can loosen at appliqué attachment points when the runner is handled.
Conclusion
A crochet floral table runner pattern based on this design works best as a modular construction. Make the cream lace foundation first, block it, then position all three major flowers before attaching leaves or spiral scrolls. A 4 mm hook, cotton yarn, approximately 250 g total yarn, and a finished size around 28 × 94 cm provide practical starting benchmarks rather than exact measurements of the photographed runner. Crochet and block one large flower and one pointed leaf before producing the remaining motifs; their actual dimensions can then determine the final foundation width. Save your completed arrangement to Pinterest or share it on Instagram with #BlueFloralTableRunner. Which element will dominate your version: the dusty-blue leaves or the cream spiral vines?









