Introduction
An envelope book sleeve has to hold a rectangle by folding a square into three overlapping corners. This granny square crochet book sleeve uses cream and black worsted yarn, a 5 mm hook and a single oversized granny square sized to the book. The intermediate-beginner construction protects hardcover corners while allowing the sleeve width and flap depth to be adjusted before any permanent seam is made.
The Design: What Makes This Book Sleeve Different
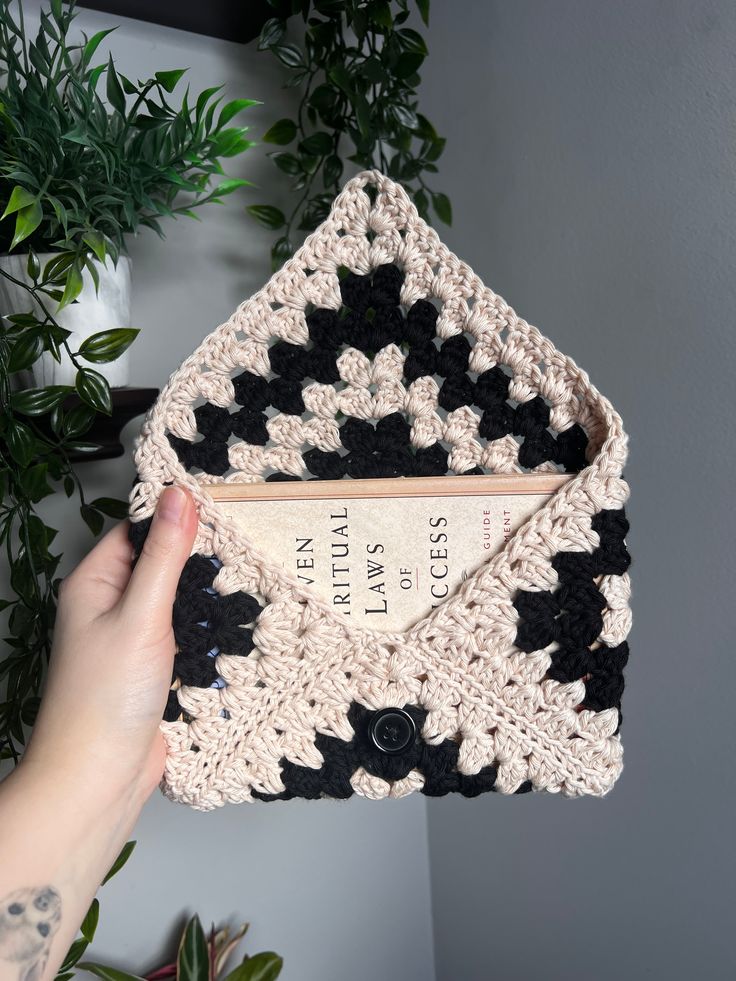
The photographed sleeve is built around one geometric decision: a large square becomes a rectangular pocket after three corners are folded inward. That removes the need to crochet separate front, back and flap pieces.
Color placement does most of the visual work. Cream dominates the outer rounds while concentrated black clusters produce stepped diagonal bands across the granny structure. The uncovered fourth corner becomes the pointed envelope flap.
A central button keeps that flap close to the front panel without adding a zipper or long strap. This makes the design distinct from a flat granny square book cover assembled from several motifs.
The common mistake is sizing the square only by book width. Thickness matters too. A hardcover spine adds several centimeters to the distance the folded sides must travel, so the sleeve should be tested around the actual book before seaming.
Project Info at a Glance
| Skill Level | Time | Finished Size | Hook | Best For |
|---|---|---|---|---|
| Intermediate beginner | 3–5 hours | About 26 × 15 cm, adjustable | 5 mm | Paperbacks, hardcovers, journals |
A comparable granny-square sleeve measures approximately 26 × 15 cm. Envelope-style book sleeves are commonly worked in worsted yarn with a 5 mm hook and can be resized by adding or removing rounds.
Materials and Tools
Yarn
- Natural cream — worsted/Aran #4 — approximately 70–90 g for an average hardcover-sized sleeve
- Black — worsted/Aran #4 — approximately 20–35 g
- Matching cream yarn — approximately 2 m reserved for seaming
Because sleeve dimensions vary by book size, yarn amounts should be treated as working estimates rather than fixed totals.
Tools
- 5 mm crochet hook
- 20–25 mm black button
- Tapestry needle
- Scissors
- 4 locking stitch markers
- Flexible measuring tape
- The actual book being fitted
Use the book itself as the final sizing template. Gauge is secondary because the square can be stopped at the required dimensions.
Abbreviations
- MR — magic ring
- ch — chain
- sl st — slip stitch
- sc — single crochet
- dc — double crochet
- sp — space
- ch-sp — chain space
- st/sts — stitch/stitches
- rnd — round
- RS — right side
An invisible decrease is not needed because the sleeve is constructed from flat granny clusters rather than shaped amigurumi fabric.
Understanding the Granny-Square Math
Traditional granny-square fabric grows at four corners. Each corner contains two 3-dc clusters separated by a corner chain space, while the spaces along each side receive one 3-dc cluster.
For this design, a square around 34–38 cm across will suit many medium hardcovers once folded. Do not treat that as a fixed measurement. A thick 24 cm hardcover needs more fabric than a thin book with the same height.
Place the book diagonally on the square after Round 8. The bottom corner should fold above the lower edge of the book, both side corners should overlap the cover edges, and the top point should reach far enough downward to meet the future button.
Pattern — Step by Step
Main Granny Square
Yarn: cream and black — standard granny-square construction.
Start with cream.
Round 1 — Cream
Make a MR.
Ch 3. Work 2 dc into ring, ch 3.
Work:
[3 dc, ch 3] ×3 into the ring.
Join with sl st to top of beginning ch 3.
You now have four 3-dc clusters and four corner spaces.
Fasten off cream if making a clean color change.
Round 2 — Cream
Join cream in any corner space.
Ch 3, 2 dc in same corner, ch 3, 3 dc in same corner.
In each remaining corner work:
3 dc, ch 3, 3 dc.
Join with sl st.
Fasten off.
Round 3 — Black
Join black in any corner.
Work:
Corner: 3 dc, ch 3, 3 dc.
Ch 1.
In the next side space work 3 dc, ch 1.
Repeat that structure around, placing 3 dc, ch 3, 3 dc in every corner.
Join with sl st.
Fasten off black.
Round 4 — Black and Cream Placement
The photo uses irregular black blocks rather than uniform concentric rings. To reproduce that visual effect, place black clusters through selected side spaces and cream through the remaining spaces.
Begin with cream at a corner.
Work the standard corner:
3 dc, ch 3, 3 dc.
Continue in cream across the first side until reaching the planned black section.
Change to black at the final yarn-over of the preceding dc.
Work 3 dc into the selected space.
Change back to cream at the final dc of the black cluster.
Continue around.
The precise location of the black block can vary, but repeat the color section on the opposite diagonal so the finished envelope has balanced dark accents.
Round 5
Continue the granny structure.
At each corner:
3 dc, ch 3, 3 dc.
In every non-corner ch-1 space:
3 dc, ch 1.
Place two neighboring black clusters on two diagonally opposed sections.
Work all remaining clusters in cream.
Join and fasten off.
Round 6
Repeat the same granny-square expansion.
Increase the black section to approximately three consecutive clusters where the reference image shows its broadest dark diagonal.
Keep all four corner groups predominantly cream.
That matters after folding because the top flap should have a cream outer edge rather than a solid black tip.
Round 7
Work one granny cluster into every side space and standard corner groups into each corner.
Reduce each black section back toward one or two clusters.
Check that the design now forms broken black diamonds or stepped diagonal shapes rather than horizontal stripes.
Round 8 — Cream Border
Work the entire round in cream.
Each side space receives:
3 dc, ch 1.
Each corner receives:
3 dc, ch 3, 3 dc.
Join with sl st.
Do not fasten off yet if the square is large enough.
Lay the square flat and measure diagonally.
Round 9 — Optional Size Round
If the folded square does not cover the book, work another complete granny round.
For a stronger match to the photograph, use cream along most of the perimeter and place limited black clusters where they will fall on the lower front sides after folding.
Join.
Round 10 — Optional Final Round
Work one further cream-dominant round only if required for book thickness or height.
The outermost edge in the photograph is mainly cream. Keeping the last round light also produces a clearer envelope outline.
Fasten off, leaving a 30 cm tail if the yarn position is suitable for seaming.
Test the Size Before Assembly
Place the finished square with one corner pointing upward.
Center the closed book vertically on top.
Fold the bottom corner upward first. It should cover approximately the lower 35–45% of the book.
Next, fold the left and right corners inward.
The side edges should overlap the book cover by at least 1.5–2 cm once the spine thickness is included.
Fold the top point downward last.
The flap should extend several centimeters below the top edge of the book. If its point barely reaches the book, add another granny round before sewing.
This testing stage prevents the most common envelope-sleeve failure: a square that looks large enough when flat but becomes too narrow once wrapped around a thick hardcover.
Optional Firm Edging
The photographed sleeve has a defined cream border around the exposed flap and folded front edges.
Join cream yarn at one corner.
Work 1 sc in each dc and 1 sc into each ch-1 space around the entire square.
At each corner ch-space, work:
2 sc, ch 1, 2 sc.
Join with sl st.
Fasten off.
A single-crochet border reduces excessive stretching at the flap point. It also gives the sewing stitches a denser edge to catch.
Folding the Envelope
Place the square RS down with one corner pointing upward.
The four points are now:
- top flap
- left side
- right side
- bottom pocket
Fold the bottom corner toward the center.
Fold the left and right corners over it.
The side points should stop near the center-front rather than crossing completely over one another.
Pin the three layers at both lower diagonal seams.
Insert the book before sewing. Check the spine, front cover and fore-edge independently; a sleeve can fit the book face while still pulling too tightly around the spine.
Button Loop
The reference appears to use the granny openings near the flap point as part of the closure, but a dedicated loop gives more control.
Join cream yarn near the flap tip.
Row 1: Ch 8–12 depending on button diameter.
Sl st back into the joining point.
Test the loop over the button.
For a 20–25 mm button, the chain loop should pass over the widest point without leaving more than approximately 5 mm excess space.
If the chain stretches heavily, work one sl st into each chain before fastening off.
Black Button
Use a round 20–25 mm black button for a scale close to the reference photograph.
With the empty sleeve folded correctly, bring the flap downward and mark the point where the loop naturally reaches the front panel.
Remove the book.
Sew the button at that mark, passing the sewing yarn through several crochet stitches rather than one granny-space strand.
Make at least six secure passes through the button holes.
Knot on the inside of the sleeve and weave the tail horizontally through nearby cream stitches.
Assembly
- Lay the finished granny square RS down with one cream-dominant corner at the top.
- Fold the bottom corner upward until it covers approximately 35–45% of the book height.
- Fold the left corner inward and pin it where it overlaps the bottom section.
- Fold the right corner inward at the same height and compare both side angles.
- Insert the intended book and confirm at least 1.5–2 cm of functional side overlap without excessive stretching.
- Remove the book and seam the left diagonal edge through both overlapping layers using cream yarn.
- Seam the right diagonal edge to the same height, keeping the upper flap completely free.
- Attach the black button on the lower center-front panel where the flap loop naturally reaches.
- Form or adjust the cream button loop at the flap point and test it over the button at least five times.
- Weave every tail through several stitch directions, insert the book again, close the flap and check that no seam pulls the granny clusters out of square.
The completed piece forms a rectangular book pocket from three folded granny-square corners with the fourth corner acting as the closure flap.
7 Technical Tips
- Wrong square size: A square fitted only to book width can become too tight around the spine. Test the actual book after every additional round once the square reaches roughly 32 cm across.
- Side-seam distortion: Sewing through random granny loops can pull one folded side higher than the other. Pin both diagonal seams at matching cluster positions before making the first permanent stitch.
- Loose corner holes: Oversized corner chains produce large openings directly on the envelope edges. Keep each corner space at ch 2 or ch 3 consistently throughout the project.
- Color-step mismatch: Black blocks placed without considering the final fold can disappear underneath the front panel. Fold the square temporarily after every two color rounds and mark the visible zones with stitch markers.
- Button tearing: Sewing the button through one chain-space strand concentrates force at a weak point. Catch at least three neighboring crochet stitches beneath the button during attachment.
- Flap stretching: A long chain loop can grow after repeated opening. Size the loop with no more than about 5 mm clearance around the button and reinforce it with slip stitches if the yarn has low recovery.
- Book abrasion: Knots left inside the lower pocket can press against the book cover. Weave tails horizontally through at least 4–5 cm of crochet fabric and keep knots away from the main front and back contact areas.
Sizing the Sleeve for Different Books
The strongest advantage of the one-square construction is dimensional flexibility.
Measure three dimensions before adjusting the square:
Book height determines the minimum vertical pocket depth.
Book width controls how far the side corners must fold inward.
Spine thickness adds the fabric needed to travel around the book rather than merely lying flat beneath it.
For a paperback around 21 × 14 cm with a 2–3 cm spine, start testing the square once it measures approximately 32–34 cm.
A hardcover around 24 × 16 cm may require approximately 36–40 cm, depending on yarn stretch and spine depth.
Those are fitting ranges, not fixed pattern sizes. The physical folding test remains the deciding measurement.
Why One Large Granny Square Works
A granny square grows symmetrically in four directions. That geometry makes it particularly suitable for an envelope because all four corners are already identical before assembly.
The photograph uses that geometry effectively. The top triangle stays open as the flap while the lower and side triangles overlap to form the pocket.
Compared with constructing a rectangle and adding a separate flap, the square method also reduces the number of structural joins. Only two principal side seams are required.
There is one trade-off. Granny fabric contains intentional openings. The sleeve protects a book mainly against abrasion, bent corners and direct contact inside a bag; it is not a water-resistant case.
Controlling the Black-and-Cream Pattern
The black yarn should not be treated as a second full concentric ring if the aim is to reproduce the reference.
Instead, insert black yarn into selected granny spaces for individual clusters. The next round can widen the black area, and the following round can narrow it again.
That creates the stepped diamond effect visible across the front and flap.
Carry neither color across long sections. Cut the black after each isolated area and weave the ends into the back of matching dark clusters.
On the final one or two rounds, return mainly to cream. A light perimeter separates the envelope silhouette from the interior black shapes and gives the side seams a consistent yarn color.
Before finishing the last round, fold the square into its envelope position. A black cluster that looks balanced on a flat square can move almost completely behind another layer after folding.
Button Placement and Closure Tension
The button in the reference sits close to the lower center of the visible front panel.
Its location should be determined after folding rather than measured from the bottom edge. Different book thicknesses change where the flap point lands.
Insert the intended book first.
Close the flap with light tension.
Mark the natural resting point of the loop using a removable stitch marker.
Take the book out and sew the button at the marker.
The closure should prevent the flap from opening when the sleeve is lifted vertically. It should not pull the upper granny clusters into a narrow V.
If the fabric deforms around the button when closed, move the button upward by approximately 1 cm or lengthen the loop by one chain.
Conclusion
Size the square against the actual hardcover before committing to either side seam. The bottom corner should support the book while both side points overlap far enough to account for spine thickness, and the upper point must reach the button without being stretched. Keep the final border mostly cream if the aim is to reproduce the photographed contrast, then attach the black button only after the folded geometry has been tested. Save the finished granny square crochet book sleeve to Pinterest and share the front, back and open-flap views on Instagram with #BlackCreamBookSleeve. Would you keep the stepped black clusters shown here or replace them with one continuous black granny round?









