Introduction
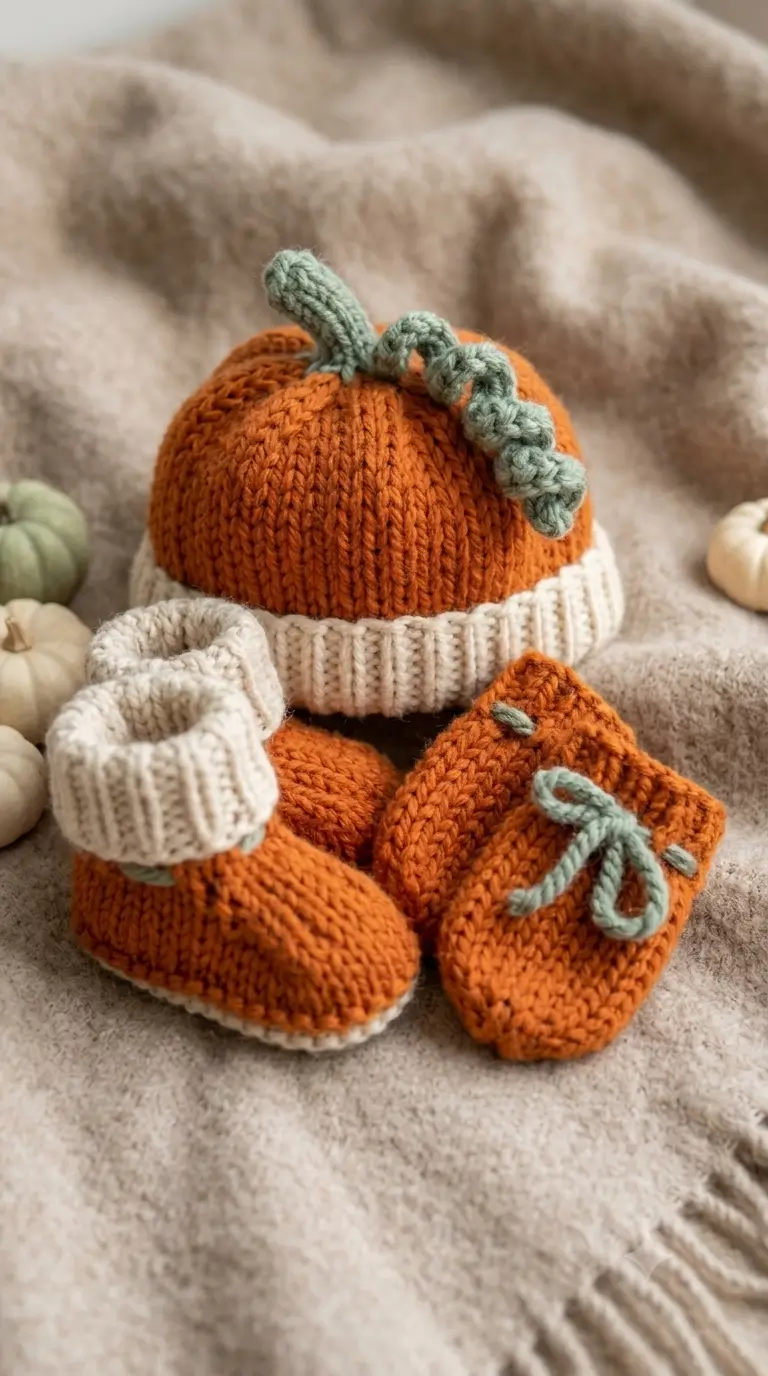
Pumpkin ribs pull inward between the lobes, so a plain orange ball will not reproduce the structure shown in this reference. This pumpkin amigurumi crochet pattern uses DK yarn, a 3.5 mm hook, external rib shaping, and a long sage stem to make a piece about 12 cm wide and 15 cm high. The project suits an advanced beginner and gives repeatable dimensions for table displays or photographed product sets.
The Design: What Makes This Pumpkin Different
Three decisions control the finished profile. First, the body reaches a 36-stitch medium plateau rather than expanding indefinitely; that keeps enough width for distinct lobes without turning the form into a large sphere. Second, six external shaping passes run from top to base after stuffing. They compress the shell at fixed intervals and create the segmented silhouette visible in the reference. Third, the sage stem is deliberately longer than a typical stub and is curved during attachment because the photographed stem bends away from the crown.
A common mistake in a ribbed crochet pumpkin is pulling the sculpting threads with different tension. One channel then cuts much deeper than its neighbors. Equal thread length, marked anchor points, and gradual tightening give the crochet pumpkin amigurumi a more regular six-lobe body.
Project Info at a Glance
| Skill Level | Time | Finished Size | Hook | Best For |
|---|---|---|---|---|
| Advanced beginner | 3–4 hours | Approx. 12 cm wide × 15 cm high | 3.5 mm | Fall display, shelf décor, market sets |
The finished-size target is based on a published pumpkin measuring approximately 12 cm in diameter and 15 cm with its stem. A 3.5 mm hook is also documented for a DK pumpkin design.
Materials and Tools
Yarn
- Pumpkin orange — DK — approximately 50–60 g — Paintbox Yarns Cotton DK, Stylecraft Special DK, or another smooth DK with firm stitch definition.
- Sage green — DK — approximately 10–15 g — use the same fiber family as the body when possible.
- Orange sewing yarn — DK or a stronger smooth matching thread — approximately 2 m for external rib shaping.
Published pumpkin patterns use yarns from sport through super bulky, so yarn substitution changes the finished measurements substantially.
Tools
- Hook 3.5 mm
- Polyester stuffing, approximately 25–35 g
- Long tapestry needle
- Six removable stitch markers
- Regular yarn needle
- Scissors
- Pins, 6–8
- Safety eyes: not required
The reference image contains no facial hardware. Adding eyes would change the design from a botanical pumpkin into a character pumpkin, so this adaptation keeps the surface unbroken.
Abbreviations
- MR — magic ring
- sc — single crochet
- inc — 2 sc in one stitch
- dec — invisible decrease
- sl st — slip stitch
- ch — chain
- BLO — back loop only
- st / sts — stitch / stitches
For an invisible decrease, insert the hook through the front loop of each of the next two stitches, yarn over, pull through both front loops, then complete the single crochet.
Pattern — Step by Step
Work the pumpkin body in a continuous spiral unless a section says otherwise. Place the marker in the first stitch of each round.
Pumpkin Body
Yarn: pumpkin orange — original construction using standard six-stitch amigurumi expansion.
R1: 6 sc in MR (6)
R2: inc ×6 (12)
R3: (sc, inc) ×6 (18)
R4: (2 sc, inc) ×6 (24)
R5: (3 sc, inc) ×6 (30)
R6: (4 sc, inc) ×6 (36)
R7: sc around (36)
R8: sc around (36)
R9: sc around (36)
R10: sc around (36)
R11: sc around (36)
R12: sc around (36)
R13: sc around (36)
R14: sc around (36)
R15: sc around (36)
R16: sc around (36)
R17: sc around (36)
R18: sc around (36)
R19: (4 sc, dec) ×6 (30)
R20: (3 sc, dec) ×6 (24)
Stuff firmly through the center and around the outside wall. Keep the crown and base slightly flatter than the middle circumference.
R21: (2 sc, dec) ×6 (18)
Add the last stuffing in small pieces. Do not create a hard mound at the base.
R22: (sc, dec) ×6 (12)
R23: dec ×6 (6)
Fasten off. Leave a 20 cm tail, thread through the remaining front loops, and close the opening.
The increase sequence adds six stitches per expansion round, reaches the required medium 36-stitch plateau, then removes six stitches on each principal decrease round. Counts remain divisible into six equal shaping zones.
External Pumpkin Ribs
Yarn: matching orange — original sculpting stage.
Cut a strong 90–100 cm length. Thread the long needle and pass from the center bottom to the center top. Bring the yarn down the outside surface and return through the base.
Pull only until one clear channel forms.
Repeat the same path at approximately 60-degree intervals until six channels divide the body into six lobes. Move around the pumpkin sequentially rather than tightening one rib to full depth before the others exist.
After all six channels are visible, compare their depth. Tighten each pass in small increments. Knot securely at the base and bury the tail inside the body.
This shaping stage is what separates the piece from a generic stuffed ball. Several published pumpkin tutorials also rely on post-crochet shaping or rib texture to produce recognizable gourd segmentation.
Curved Stem
Yarn: sage green — original construction.
R1: 6 sc in MR (6)
R2: sc around (6)
R3: sc around (6)
R4: sc around (6)
R5: sc around (6)
R6: sc around (6)
R7: sc around (6)
R8: sc around (6)
R9: sc around (6)
R10: sc around (6)
R11: sc around (6)
R12: sc around (6)
Do not pack the stem firmly. Insert only a thin strand of stuffing through the lower two-thirds if more body is required.
Fasten off. Leave a 25 cm tail.
Bend the upper third slightly before sewing. The photo shows a long, irregular stem rather than a short vertical cylinder, so a soft curve is part of the silhouette rather than an accidental deformation.
Leaf
Yarn: sage green — original flat construction.
Ch 7.
Row 1: Starting in second ch from hook, sl st, sc, hdc, hdc, sc, sl st (6)
Row 2: Ch 1, working down opposite side of foundation chain: sl st, sc, hdc, hdc, sc, sl st (6)
Do not join around the edge. Pinch the base and work:
Row 3: ch 2, sl st into leaf base (2 ch)
Row 4: ch 2, sl st into same base (2 ch)
Row 5: ch 1 (1)
Fasten off. Leave a 15 cm sewing tail.
Keep this leaf restrained in size. A leaf longer than roughly one-third of the pumpkin diameter starts to dominate the top profile and obscures the stem attachment.
Curly Vine
Yarn: sage green — original spiral accessory.
Ch 26.
Starting in the second chain from the hook, work 2 sc into every chain across (50).
The doubled stitches force the chain into a corkscrew. If the spiral is too compact, gently rotate it open rather than stretching its length.
Fasten off. Leave a 15 cm tail.
Published pumpkin references frequently add a curly vine or optional leaf because those details distinguish the top of the gourd without changing the stuffed body construction.
Optional Second Vine
Yarn: sage green.
Ch 18.
Starting in second ch from hook, work 2 sc into each chain (34).
Fasten off. Leave a 15 cm tail.
Use the shorter second vine only when the crown still has open visual space beside the stem. The uploaded reference shows several green curves concentrated on one side, so asymmetry is appropriate here.
Cream Garment Detail — Reference Only
The cream ribbed band visible in the uploaded image belongs to the photographed knitted baby garment, not to the pumpkin itself. It is therefore not attached to this amigurumi body.
Replicating the cream section as a crochet collar would change the object into a hat-inspired character and would no longer represent a standalone botanical pumpkin. For a coordinated display, use a cream cloth, basket liner, or separate crocheted mat beneath the finished piece rather than sewing cream fabric around the body.
Assembly
- Place the closed pumpkin body on a flat surface and rotate it until the six rib channels appear evenly distributed.
- Position the stem over the center of Round 1. Pin its base across roughly a 2 cm circle.
- Sew around the bottom edge of the stem with small mattress-style stitches, catching body stitches without pulling the crown inward.
- Bend the stem approximately 20–30 degrees from vertical. Add one hidden anchoring stitch halfway up only if the yarn continually springs upright.
- Place the leaf beside the stem base, with its tip directed away from the stem bend. Sew only the lowest 1 cm so the remaining leaf stays free.
- Position the long vine on the opposite side of the leaf. Stitch the first two coils to the crown and leave the remaining spiral unattached.
- Add the optional short vine beside the longer spiral if its coils do not cover an existing rib channel.
- Compare all six channels from the top. Rework any shaping pass that lands noticeably closer than 60 degrees to its neighbor.
- Bury each sewing tail through at least 3 cm of stuffed body before trimming. Pull the fabric outward after cutting so the end retreats beneath the stitches.
- Roll the pumpkin gently between both hands to redistribute any stuffing displaced during sculpting, then set the base flat and check the 12 cm approximate diameter.
The completed piece consists of one sculpted orange pumpkin body, one curved sage stem, one leaf, and one or two spiral vines.
7 Technical Tips
- Stitch-marker drift: move the round marker immediately after completing the first stitch, not at the end of the round. A marker displaced by even one stitch per round can visibly twist the decrease lines by the time Round 23 is reached.
- Stuffing firmness: stop adding fiberfill when firm finger pressure creates a depression of roughly 5–8 mm that rebounds after release. Overstuffing resists the sculpting thread and produces shallow ribs.
- Invisible-decrease gaps: work decreases through the two front loops rather than inserting under both loops of both stitches. A standard bulky decrease can leave a hole large enough for white filling to show at the base.
- Feature placement timing: complete all six orange rib channels before attaching the green stem or leaf. Sculpting after crown assembly can pull the accessories off center by several millimeters.
- Tension variation: keep the 3.5 mm hook and the same yarn lot through the orange body. A sudden tension change of even one stitch per centimeter can make one half noticeably narrower than the other.
- Pinning error: use six markers around the crown at roughly 60-degree intervals before tightening sculpting yarn. Freehand placement often creates four broad lobes and two narrow ones rather than six comparable sections.
- Tail weaving: bury assembly tails at least 3 cm into the filled body and exit through an unrelated stitch before cutting. Trimming directly beside a sewing knot leaves the knot exposed to repeated surface friction.
Conclusion
Check the finished pumpkin from directly above before cutting the final sculpting thread. Six comparable rib sections, a centered stem base, and an off-center vine arrangement produce the closest crochet interpretation of the photographed pumpkin motif. Measure the body next: the target is approximately 12 cm across, with the stem bringing the total height toward 15 cm. Your next step is to record the final yarn weight and finished measurements so later copies can match the first one. Save the pumpkin amigurumi crochet pattern to Pinterest and share the finished version on Instagram with #RibbedPumpkinAmigurumi. Which stem profile matches your reference better: a single long bend or the tighter curled form shown beside it?









