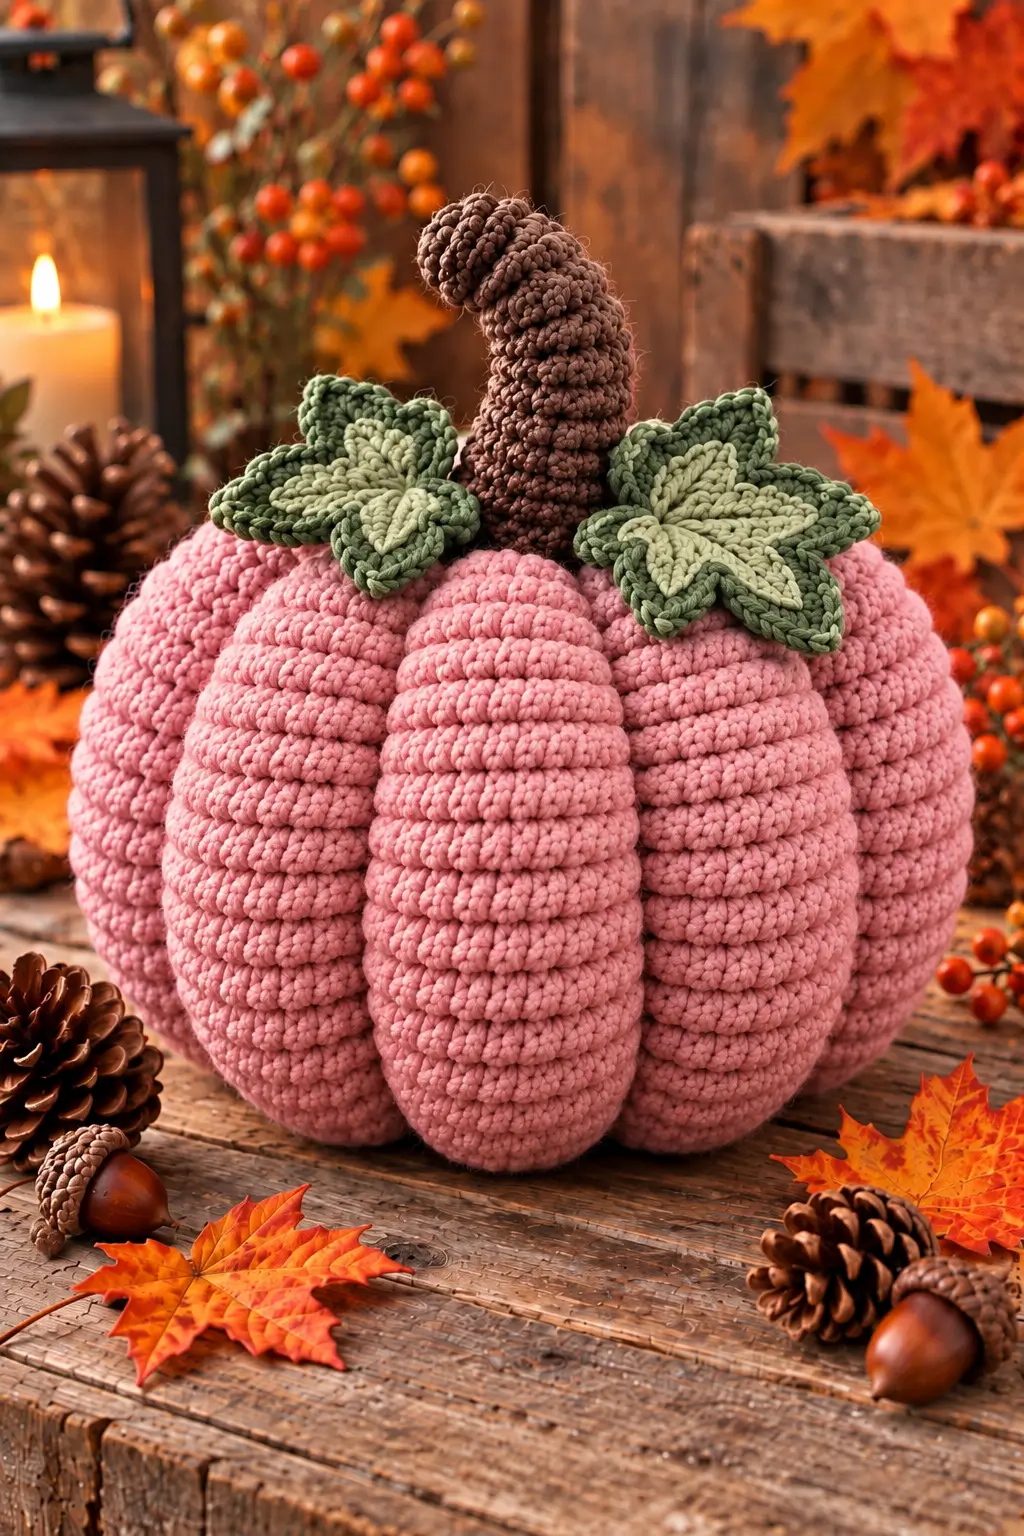
A pumpkin gets its recognizable shape from deep ribs running from stem to base, and those ribs control this entire crochet construction. This chunky crochet pumpkin pattern recreates the photographed pink pumpkin with plush yarn, pronounced segments, a curved brown stem, and two layered green leaves. Plan for a finished pumpkin approximately 28–34 cm wide, depending on yarn and stuffing. Intermediate crochet skills are useful for the shaping and decorative assembly.
The Design: What Makes This Crochet Pumpkin Different
The strongest feature is the exaggerated segmentation. Instead of relying only on surface stitches to suggest pumpkin ribs, this design combines a stuffed body with external shaping strands. Those strands compress the body at regular intervals and produce the deep channels visible in the reference.
The tall brown stem is deliberately curved rather than worked as a short straight cylinder. A narrow tube with controlled increases gives the crochet pumpkin stem enough structure to rise above the leaves while retaining an irregular botanical shape.
Two broad, pointed leaves cover the upper join. Their two-tone construction also separates them visually from the dusty pink body. A common failure with a ribbed crochet pumpkin is excessive stuffing. Too much fiberfill makes the shaping strands fight against a rigid body, leaving shallow grooves instead of defined segments.
Project Info at a Glance
| Skill Level | Time | Finished Size | Hook | Best For |
|---|---|---|---|---|
| Intermediate | 5–8 hours | Approx. 28–34 cm wide | 6.0–6.5 mm | Autumn decor and table displays |
Finished dimensions are an estimate for this photo-inspired version. Yarn thickness, tension, stuffing density, and segment compression will affect the final measurement.
Materials and Tools
Yarn
Use a bulky or plush yarn that can hold pronounced shaping without making the pumpkin excessively rigid. Bulky #5 velvet yarn is particularly suitable for the photographed texture.
- Dusty pink: #5 bulky velvet or chenille yarn — approximately 250–350 g
- Chocolate brown: #5 bulky yarn — approximately 50–70 g
- Sage green: #5 bulky yarn — approximately 40 g
- Light olive green: #5 bulky yarn — approximately 30 g
The quantities above are estimates for the larger photo-inspired pumpkin. Buy extra main-color yarn when using dense chenille because yardage per 100 g varies considerably between brands.
Tools
- 6.0 mm crochet hook for the pumpkin body
- 5.0–5.5 mm crochet hook for the stem and leaves
- Polyester fiberfill
- Long tapestry needle
- Stitch markers
- Scissors
- Strong matching yarn for segment shaping
- Measuring tape
Abbreviations
- MR — magic ring
- sc — single crochet
- hdc — half double crochet
- dc — double crochet
- tr — treble crochet
- inc — increase
- dec — decrease
- sl st — slip stitch
- ch — chain
- BLO — back loop only
- FLO — front loop only
- sts — stitches
For an invisible decrease, insert the hook through the front loops of the next two stitches, yarn over, pull through both front loops, then complete the single crochet.
Chunky Crochet Pumpkin Pattern
The instructions below are an original pattern based on the visible structure of the supplied image rather than a transcription of another designer’s pattern. Work the pumpkin body in continuous spirals unless instructed otherwise.
Pumpkin Body
Yarn: dusty pink bulky velvet or chenille.
R1: 6 sc in MR. (6)
R2: Inc ×6. (12)
R3: (1 sc, inc) ×6. (18)
R4: (2 sc, inc) ×6. (24)
R5: (3 sc, inc) ×6. (30)
R6: (4 sc, inc) ×6. (36)
R7: (5 sc, inc) ×6. (42)
The 42-stitch plateau produces a large body. Keep a stitch marker in the first stitch because velvet yarn can hide the transition between rounds.
R8: BLO sc around. (42)
R9: Sc around. (42)
R10: BLO sc around. (42)
R11: Sc around. (42)
R12: BLO sc around. (42)
R13: Sc around. (42)
R14: BLO sc around. (42)
R15: Sc around. (42)
R16: BLO sc around. (42)
R17: Sc around. (42)
R18: BLO sc around. (42)
R19: Sc around. (42)
R20: BLO sc around. (42)
R21: Sc around. (42)
Begin stuffing. Fill the lower half evenly, but do not compress the fiberfill into a rigid ball.
R22: (5 sc, dec) ×6. (36)
R23: (4 sc, dec) ×6. (30)
R24: (3 sc, dec) ×6. (24)
Add more stuffing and distribute it toward the outside edge. Keep the center slightly softer because a long needle must pass through it during segmentation.
R25: (2 sc, dec) ×6. (18)
R26: (1 sc, dec) ×6. (12)
Add final stuffing before closing.
R27: Dec ×6. (6)
Fasten off with a 25 cm tail. Thread through the remaining six front loops and pull the opening closed.
Creating the Deep Pumpkin Segments
The photographed pumpkin has strongly compressed vertical channels. Surface texture alone will not reproduce that shape.
Cut a length of strong pink yarn approximately 180–220 cm long. Thread it onto a long tapestry needle.
Insert the needle through the center of the pumpkin from bottom to top. Pull the yarn through while leaving a 15 cm tail at the base.
Bring the working yarn down the outside of the pumpkin and return the needle through the bottom center. Pull gradually until a visible groove forms.
Repeat at equal intervals around the body.
Create eight segments for a shape close to the reference image. Check the spacing after the fourth segment before continuing.
Each shaping strand should be tight enough to create a channel but not tight enough to bury itself completely inside the velvet fibers.
Once all eight segments are balanced, knot the two yarn ends securely at the base and draw the knot inside the pumpkin.
Curved Brown Stem
Yarn: chocolate brown. Use the smaller hook for a denser fabric.
R1: 6 sc in MR. (6)
R2: Inc ×6. (12)
R3: Sc around. (12)
R4: Sc around. (12)
R5: Sc around. (12)
R6: Sc around. (12)
R7: Sc around. (12)
R8: Sc around. (12)
Stuff the lower section lightly.
R9: 3 sc, 3 sl st, 6 sc. (12)
R10: 3 sc, 3 sl st, 6 sc. (12)
The shorter slip stitches begin pulling one side inward, introducing the curve.
R11: Sc around. (12)
R12: 4 sc, 2 sl st, 6 sc. (12)
R13: 4 sc, 2 sl st, 6 sc. (12)
R14: Sc around. (12)
R15: (1 sc, dec) ×4. (8)
R16: Sc around. (8)
R17: Dec ×4. (4)
Fasten off and close the tip. Shape the stem gently with your fingers. Leave the lower end open for attachment to the pumpkin.
Large Two-Tone Pumpkin Leaves — Make 2
Begin with light olive green.
Foundation: Ch 13.
Side 1: Starting in the second ch from hook, work sl st, sc, hdc, dc, dc, tr, tr, dc, dc, hdc, sc, sl st.
Ch 2 at the end and rotate the work to crochet along the opposite side of the foundation chain.
Side 2: Sl st, sc, hdc, dc, dc, tr, tr, dc, dc, hdc, sc, sl st.
Join with sl st.
This produces the central leaf section.
Leaf Point Shaping
Continue in light olive.
Round 2: Ch 5, starting in second ch from hook work sl st, sc, hdc, dc. Sl st into the next available edge stitch.
Repeat the pointed extension four more times at evenly spaced positions around the leaf to create five distinct points.
Fasten off the light green yarn.
Dark Green Leaf Border
Yarn: sage or dark olive green.
Join dark green yarn at the base of the leaf.
Border Round: Sc evenly around the complete leaf. At each pointed tip work (sc, ch 2, sc) to preserve the point.
Where two leaf points meet, work one sl st into the valley before continuing with sc.
Join with sl st.
Final Round: Sl st loosely around the complete edge. At each ch-2 tip work (sl st, ch 1, sl st).
Fasten off, leaving a 25 cm tail for sewing.
Repeat for the second leaf.
Optional Raised Leaf Veins
The reference leaves have a visibly divided center. Surface crochet can reproduce this structure without adding another full layer.
With dark green yarn, insert the hook near the leaf base and work surface slip stitches along the central foundation chain toward the tip.
For side veins, add three short lines branching from the center toward selected points. Do not pull the surface stitches tightly or the leaf will curl upward.
Assembly
- Finish and stuff the pink pumpkin body, keeping the center slightly softer than the outer circumference.
- Create eight evenly spaced vertical segments with strong matching yarn.
- Position the brown stem over the top center where the shaping strands intersect.
- Sew around the lower stem through approximately 8–12 body stitches, keeping the stem upright while leaving its natural curve intact.
- Position the first green leaf so its base disappears partly beneath the stem.
- Place the second leaf on the opposite side with approximately 2–3 cm of overlap near the center.
- Pin both leaves before sewing and check that their points extend beyond different pumpkin segments.
- Sew only the inner third of each leaf to the pumpkin so the outer points remain dimensional.
- Weave all brown and green yarn tails into dense sections beneath the stem and leaves.
- Set the pumpkin on a flat surface and redistribute the stuffing by hand until all eight segments have comparable width.
The completed piece has a segmented dusty-pink body, a tall curved brown stem, and two dimensional green leaves covering the upper shaping point.
How to Make the Pumpkin More Ribbed
The depth of the grooves depends on three variables: stuffing density, shaping-yarn tension, and the number of segments.
Start with stuffing. The body should feel filled but still compress when squeezed between both hands. A rigid pumpkin cannot develop the deep channels visible in the reference.
Next, tighten each shaping strand in stages. Do not fully tighten the first groove before adding the others. Form all eight channels lightly, compare their spacing, then make a second pass around the pumpkin to increase compression.
The number of segments changes the proportions as well. Six divisions create broad traditional pumpkin lobes. Eight produce the fuller segmented appearance used here. Increasing the count further creates narrower ribs and requires more accurate spacing.
How to Adjust the Pumpkin Size
For a smaller pumpkin, stop the increase sequence at 30 stitches. Work fewer plateau rounds before beginning the decreases.
A medium version can stop at 36 stitches.
For the large version shown here, increase to 42 stitches before working the body rounds.
The basic increase sequence remains consistent:
- 6 stitches
- 12 stitches
- 18 stitches
- 24 stitches
- 30 stitches
- 36 stitches
- 42 stitches
Changing yarn thickness also changes the finished dimensions. A #6 super-bulky yarn will produce a substantially larger pumpkin from the same stitch counts, particularly when paired with an 8 or 9 mm hook.
Working With Velvet and Chenille Yarn
Velvet creates the plush surface visible in the image, but it makes individual stitches harder to read. Put a locking marker into the first stitch of every round rather than relying on visual identification.
Do not repeatedly pull velvet stitches apart to check them. Some chenille yarns shed or strip when subjected to repeated friction.
Tension is another consideration. Pulling every stitch tightly around a small hook can produce a stiff shell that resists segment shaping. The body needs enough flexibility for the external yarn strands to compress it.
If the magic ring refuses to close because of yarn friction, make the ring with a smooth matching yarn and crochet the velvet stitches around it. The reinforcement will be hidden inside the finished pumpkin.
7 Technical Tips for This Chunky Crochet Pumpkin
- Mark every round. Velvet can hide the first stitch, causing accidental increases that distort the body. Move a locking marker after completing each round.
- Stop stuffing before the body becomes rigid. Overstuffing is the main failure mode when forming deep pumpkin channels. You should be able to compress the finished body by approximately 2–3 cm with moderate hand pressure.
- Use eight temporary markers before segmenting. Unequal shaping positions produce one oversized lobe and several narrow ones. Place markers around the circumference before passing the first shaping strand.
- Tighten segment strands progressively. Pulling the first strand to maximum tension makes it difficult to match the remaining seven grooves. Establish all eight channels first, then tighten them in a second pass.
- Stuff the stem lightly. Dense stuffing can eliminate the intentional bend created by the slip-stitch sections. Concentrate most stem stuffing within the lower 4–5 cm.
- Pin the leaves before sewing. A leaf attached too close to the center disappears behind the stem. Keep approximately two-thirds of each leaf visible beyond the stem attachment area.
- Hide shaping knots inside the base. An exposed knot can make the pumpkin rock on a flat surface. Pull the finished knot approximately 1 cm into the body with the tapestry needle.
Choosing Colors for the Pumpkin
The dusty pink body changes the project from a conventional orange pumpkin while keeping the botanical structure recognizable. Brown provides enough contrast for the tall stem, and the two green values prevent the leaves from becoming a single flat shape.
For a close match to the reference, select a muted pink rather than a saturated hot pink. The darker leaf border should also differ clearly from the light center.
Alternative palettes can use cream with olive leaves, burnt orange with dark sage, mustard with brown-green foliage, or rust with beige leaf centers. Keep the stem darker than the pumpkin body when the goal is to preserve the strong silhouette shown in the photograph.
Finishing and Shape Correction
Place the completed pumpkin on a level surface and inspect it from all sides. The bottom should contact the table across several segments rather than balancing on one central point.
If one lobe projects farther than its neighbors, massage some fiberfill away from that section. For a shallow groove, tighten only the corresponding shaping strand rather than compressing the entire pumpkin.
Check the stem last. Its lower section should remain firmly anchored while the upper portion bends naturally to one side. The two leaves should partially cover the stem attachment stitches without completely covering the pink segments underneath.
A finished pumpkin made with velvet yarn should not be aggressively steam-blocked. Shape the body mechanically with your hands and follow the care instructions provided for the specific yarn.
Conclusion
The finished design combines a 42-stitch body, eight compressed pumpkin segments, a curved tubular stem, and two five-point leaves. Make the body first and test the segment depth before attaching any upper details; that allows stuffing and shaping adjustments while the center remains accessible. Save this chunky crochet pumpkin pattern to Pinterest or share the finished version on Instagram with #ChunkyPinkCrochetPumpkin. For the closest match to this specific pumpkin, keep the leaf centers lighter than their borders and position both leaves directly beneath the curved stem. Which feature would you change first: the dusty-pink body, the eight deep segments, or the oversized green leaves? “`1









