Introduction
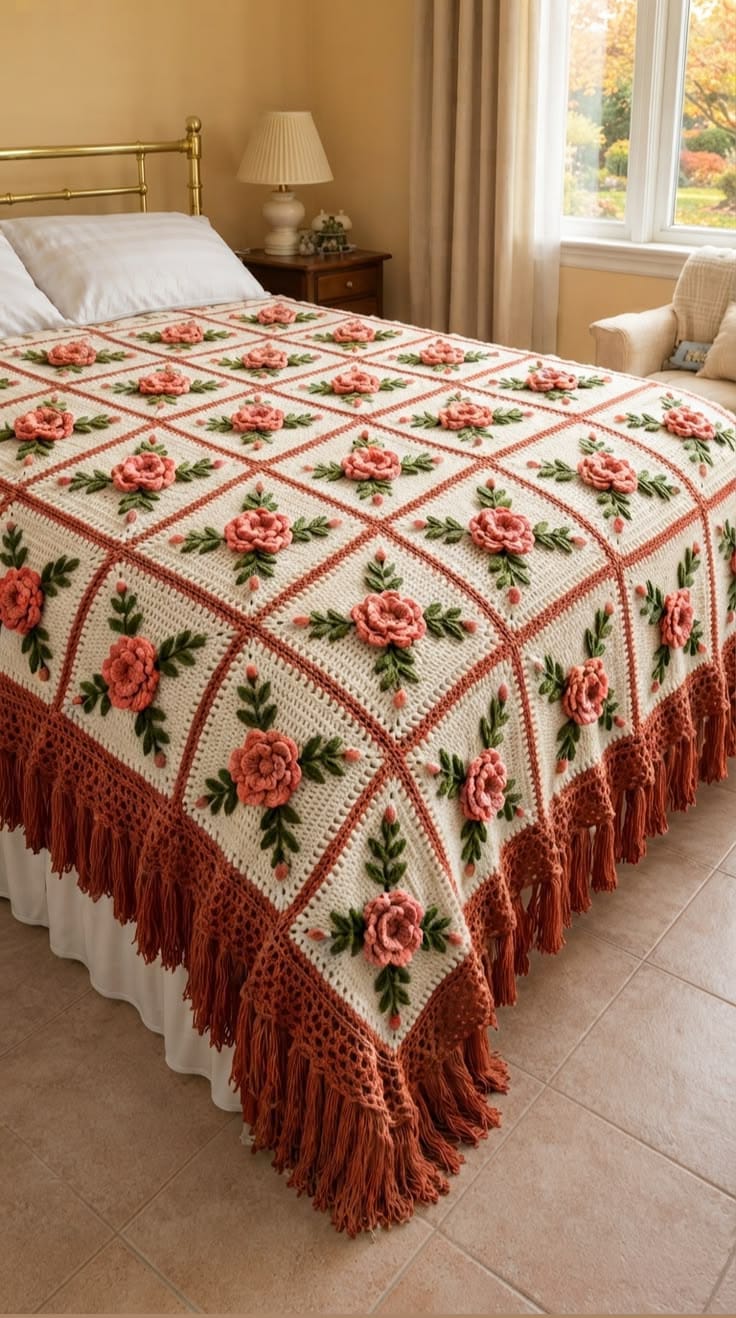
Thirty raised coral roses sit inside individual ivory garden plots, with olive leaves radiating toward rust-colored seams. This 3D rose granny square crochet bedspread pattern uses worsted yarn, a 5 mm hook, dimensional flowers, solid cream squares, foliage appliqués, a deep lace border, and long fringe. The intermediate reconstruction targets approximately 165 × 205 cm including edging and fringe, suitable for a full or queen-size display bed.
The instructions below are an original photo-inspired reconstruction based on visible structure; published patterns cited later are used only for sizing, gauge, and material benchmarks.
The Design: What Makes This Rose Bedspread Different
The photograph treats every square as a miniature rose panel rather than crocheting the flower directly into an open granny motif. A dense ivory background supports a substantial layered rose, paired olive leaves, and small coral buds without allowing the square to collapse around the appliqués. Rust joining lines deliberately remain visible, creating the strong geometric grid that separates the floral sections. Around the perimeter, the construction changes again: an open rust lace band adds depth before long matching fringe finishes the bedspread. This 3D rose granny square crochet bedspread pattern therefore separates background, flowers, foliage, joining, and border into distinct stages. One common mistake is sewing roses onto unblocked squares. The extra flower weight can distort a soft square permanently, so every background motif should reach its final dimensions before decoration begins.
Project Info at a Glance
| Skill Level | Time | Finished Size | Hook | Best For |
|---|---|---|---|---|
| Intermediate | Reconstruction estimate: 45–60 hours | Reconstruction target: approximately 165 × 205 cm including fringe | 5 mm main fabric; 4.5 mm appliqués | Full/queen display bed, heirloom-style floral cover |
Published rose-square projects vary considerably in scale. Kimberly Arenas’ 2026 3D Rose Granny Square uses Aran-weight Red Heart Super Saver and a 5 mm hook. TutorialRajut documents a finer 9 × 9 cm rose square using fingering cotton and a 2.5 mm hook, while commercially made rose squares are currently offered at approximately 13 cm using a 3 mm hook. This reconstruction deliberately targets larger 24 cm blocked background squares because the photographed bedspread uses broad panels rather than small patchwork motifs.
Materials and Tools
Yarn
- Warm ivory — worsted/Aran #4 — reconstruction estimate: 1,800–2,100 g
- Dusty coral / antique rose — worsted #4 — reconstruction estimate: 650–800 g
- Rust / terracotta — worsted #4 — reconstruction estimate: 850–1,050 g
- Dark olive green — worsted #4 — reconstruction estimate: 400–500 g
- Light moss green — worsted #4 — reconstruction estimate: 100–150 g
These are reconstruction allowances, not quantities attributed to the photographed item. A contemporary 3D rose granny-square pattern specifies Aran-weight Red Heart Super Saver with a 5 mm hook, while another published flower square uses 50 g cotton and a 4 mm hook for a 10 cm motif. Make and weigh one complete decorated square before buying supplemental yarn if exact consumption matters.
Tools
- 5 mm crochet hook for background squares
- 4.5 mm crochet hook for roses and leaves
- Tapestry needle
- Blocking mats
- Rust-resistant pins
- Stitch markers
- Sharp scissors
- Measuring tape
- 20 × 25 cm piece of cardboard for cutting fringe
Abbreviations
- MR — magic ring
- ch — chain
- sl st — slip stitch
- sc — single crochet
- hdc — half double crochet
- dc — double crochet
- tr — treble crochet
- sp — space
- BLO — back loop only
- FLO — front loop only
- st/sts — stitch/stitches
- RS — right side
- WS — wrong side
An invisible decrease works through the front loops of two adjacent stitches before completing one single crochet; no decreases are required in the flat background squares used here.
Blanket Layout and Exact Motif Count
Make 30 complete floral squares and arrange them 5 squares across × 6 squares long.
Each blocked square measures 24 × 24 cm. The joined floral field therefore measures approximately 120 × 144 cm before the outer border. The deep rust border adds approximately 8–10 cm per side, and the fringe adds another 10–12 cm around the visible edges. The finished reconstruction target is approximately 160–165 cm wide × 200–205 cm long.
The photograph suggests a larger field of repeating flowers, but perspective obscures the exact count. The 5 × 6 arrangement is an original reconstruction chosen to reproduce the proportions without claiming an unverifiable count from the image.
Solid Ivory Background Square — Make 30
Yarn: warm ivory. Hook: 5 mm. Join each round with a slip stitch.
The background uses deterministic solid-square growth. Each new round adds four stitches to every side.
R1: In MR work *3 dc, ch 2* ×4. Join. (12 dc; four ch-2 corners)
R2: Sl st to corner. Work (2 dc, ch 2, 2 dc) in corner, dc in each of the next 3 sts; repeat the corner treatment and side stitches around. Each side now contains 7 dc between corner spaces.
R3: Work (2 dc, ch 2, 2 dc) in every corner and dc in every side stitch. Each side contains 11 dc.
R4: Repeat established expansion. Each side contains 15 dc.
R5: Repeat. Each side contains 19 dc.
R6: Repeat. Each side contains 23 dc.
R7: Repeat. Each side contains 27 dc.
R8: Repeat. Each side contains 31 dc.
R9: Repeat. Each side contains 35 dc.
Fasten off.
Published solid-granny-square mathematics confirm this four-stitch-per-side progression: side counts move through 3, 7, 11, 15, 19 and continue in the same sequence. Block every finished background square to exactly 24 × 24 cm.
Rust Outline Round — Work on All 30 Squares
Join rust yarn in any corner.
Outline Round: Work (2 sc, ch 2, 2 sc) in the corner, sc in every stitch across the side, and repeat around all four corners.
Join and fasten off.
This narrow outline produces the terracotta grid visible between the ivory floral panels after joining.
Large Dimensional Coral Rose — Make 30
Yarn: dusty coral. Hook: 4.5 mm.
Rose Foundation
R1: 6 sc in MR. Join. (6)
R2: FLO: *sc in next st, 4 dc in next st* ×3. Join. This creates three compact inner petal sections.
Do not cut the yarn.
Second Petal Layer
Working behind the first petals into available back loops, make five ch-3 loops distributed around the center.
Into each ch-3 loop work:
Sc, hdc, 3 dc, hdc, sc.
Five medium petals are complete.
Third Petal Layer
Working behind the second layer, create seven ch-4 loops distributed around the rose base.
Into each loop work:
Sc, hdc, dc, 3 tr, dc, hdc, sc.
Seven outer petals are complete.
Fourth Petal Layer
Create nine ch-5 loops behind the previous layer.
Into each loop work:
Sc, hdc, 2 dc, 3 tr, 2 dc, hdc, sc.
Fasten off with a 45 cm sewing tail.
Target approximately 9–10 cm diameter without flattening the petals. The multi-level construction is consistent with current 3D rose techniques: a 2024 tutorial demonstrates successive petal layers of 2, 4, 6, and 8, while a current rose-square pattern uses several distinct petal levels before squaring the motif.
Shaping the Rose
Do not block the rose flat.
Roll the three innermost petal sections slightly toward the center.
Curve the five second-layer petals around them.
Leave the seven- and nine-petal outer layers progressively more open.
Use the long tail to tack two or three outer petals at their bases if the flower spreads beyond 10 cm.
Large Olive Leaf — Make 120
Each floral square receives four large leaves.
With dark olive, ch 11.
Beginning in second chain from hook, work into the next 9 chains, leaving the final chain for the tip:
Sl st, sc in next 2 ch, hdc in next 2 ch, dc in next 2 ch, hdc in next ch, sc in next ch. (9)
Work 3 sc in the final chain.
Working down the opposite side of the foundation, mirror the nine-stitch sequence:
Sc, hdc, dc in next 2 positions, hdc in next 2, sc in next 2, sl st. (9)
Fasten off with a 20 cm tail.
The exact body contains 9 side stitches + 3 tip stitches + 9 opposite-side stitches = 21 stitches.
Small Olive Leaf — Make 120
Each square also receives four smaller leaves.
Ch 8.
Starting in second chain, work into the next six chains while leaving the final chain for the tip:
Sl st, sc, hdc, dc, hdc, sc. (6)
Work 3 sc in the final chain.
Mirror the six stitches down the opposite side:
Sc, hdc, dc, hdc, sc, sl st. (6)
Fasten off with a sewing tail.
Coral Bud — Make 60
Each square receives two small buds.
With coral, ch 5.
Starting in second chain work:
Sc, hdc, 3 dc in next chain, hdc.
Roll the strip tightly from the sc end toward the hdc end.
Pass the tail through the base twice and secure.
The finished bud should measure approximately 1.5–2 cm.
Light Moss Accent Leaf — Make 60
Ch 6.
Starting in second chain work:
Sl st, sc, hdc, sc into the next four chains, leaving the final chain for the tip.
Work 3 sc in the final chain.
Mirror with sc, hdc, sc, sl st along the opposite side.
Fasten off.
These smaller accents sit near the buds and introduce the lighter green visible among the darker foliage.
Decorating Each Ivory Square
Place one large coral rose in the exact center.
Arrange four large olive leaves diagonally at approximately 45, 135, 225, and 315 degrees around the rose.
Place four smaller dark leaves between those positions.
Add one coral bud above the rose and one below it, each with a small moss leaf beside its base.
The floral arrangement should remain within approximately 17 × 17 cm of the 24 cm square, leaving enough undecorated ivory fabric near the rust border for clean joining.
Sewing the Rose to the Square
Pin the rose at the square center.
Sew through the flower foundation at six evenly distributed points.
Do not sew through the outer 2–3 cm of the petals.
After the sixth anchor, lift the square by two corners. If the flower tilts more than approximately 1 cm from the background, add two additional hidden base stitches.
Sewing the Leaves
Attach each large leaf through the base and center foundation chain.
Leave the outer 2–3 cm free.
Attach small leaves through their lower half only.
The free tips create the raised botanical texture visible in the photograph while the center seams remain stable.
Sewing the Buds
Place the first bud approximately 6 cm above the rose center and the second approximately 6 cm below.
Sew each bud firmly through its rolled base.
Position one light moss leaf immediately beside each bud.
Repeat the same measurements on all 30 squares so the floral field remains regular after joining.
Joining the 30 Squares
Arrange the decorated squares 5 across × 6 long.
Check that every rose faces the same orientation before sewing.
With rust yarn, place two neighboring squares wrong sides together.
Join through corresponding stitches using loose slip stitches.
Match every corner exactly.
Complete five-square horizontal strips first, then join the six strips vertically.
The rust seams remain visible on the right side as narrow grid lines.
Checking the Joined Field
Lay the joined bedspread flat.
The five-square width should be approximately 120 cm before the border, and the six-square length approximately 144 cm.
Measure both diagonals.
If they differ by more than approximately 2 cm, inspect the square joins before adding the border. A border cannot correct a significantly skewed central field.
Ivory Foundation Border
Join ivory in one corner of the completed 5 × 6 field.
Because every square side contains the same stitch structure, work one sc in every edge stitch and one additional sc at each internal square junction.
At each outer corner work (sc, ch 2, sc).
Complete one round and join.
Work a second round of hdc, placing (2 hdc, ch 2, 2 hdc) in each corner.
Fasten off ivory.
Deep Rust Lace Border
Join rust in any corner.
Border R1: Ch 3, dc in each stitch around. In every corner ch-2 space work (2 dc, ch 2, 2 dc).
Border R2: Ch 4, skip 1 st, sc in next st; *ch 3, skip 2 sts, sc in next st* around. At each corner work sc, ch 5, sc in the corner space.
Border R3: In every ch-3 side space work (sc, ch 3, sc). In every ch-5 corner space work (sc, ch 3, sc, ch 3, sc).
Border R4: Sl st to first ch-3 space, ch 3, work 4 dc in same space; *sc in next ch-3 space, 5 dc in next ch-3 space* around each side. In each corner use the central corner space for 7 dc.
Border R5: Sc in every stitch around, placing 3 sc in the center stitch of each seven-dc corner fan.
Fasten off.
The lace band should measure approximately 8–10 cm deep after blocking.
Fringe
The photograph shows dense rust fringe along the outer border.
Cut strands approximately 24–26 cm long. Folding them during attachment produces finished fringe around 11–12 cm before trimming.
Use three strands per fringe bundle.
Attach one bundle approximately every three border stitches along the two long sides and foot edge. For a bed positioned against a headboard, fringe across the head edge is optional.
After all bundles are attached, lay the bedspread flat and trim the fringe uniformly to 10–11 cm.
General crochet-fringe guidance recommends cutting strands roughly twice the desired finished length plus trimming allowance; published examples commonly use finished fringe around 6–8 inches, although the reconstruction uses shorter fringe to match the photograph more closely.
Assembly
- Crochet 30 ivory background squares through nine rounds, add the narrow rust outline, and block every square to exactly 24 × 24 cm.
- Make 30 layered coral roses, keeping the inner petals compact and leaving the nine outer petals progressively more open.
- Crochet 120 large olive leaves, 120 small olive leaves, 60 coral buds, and 60 light-moss accent leaves using the exact foundation-chain counts.
- Center one rose on each square, place four large leaves diagonally and four small leaves between them, then position one bud approximately 6 cm above and below the flower.
- Sew each rose through at least six concealed foundation points, attach leaves through their centers and bases, and leave the outer petal and leaf tips free.
- Arrange the decorated squares five across by six long, checking flower orientation and color placement before joining any permanent seams.
- Join squares with visible rust slip-stitch seams, first forming six horizontal strips of five squares and then connecting those strips vertically.
- Work two ivory stabilizing border rounds around the complete floral field, keeping all four corner treatments identical.
- Add the five-round rust lace border, block the complete bedspread, and verify that corresponding opposite sides remain equal in length.
- Attach three-strand rust fringe bundles at consistent intervals, trim them to 10–11 cm, and weave all remaining tails through at least 5 cm of matching fabric.
The finished reconstruction contains 30 raised rose panels, 240 dark olive leaves, 60 coral buds, 60 moss accents, visible rust grid seams, a deep lace perimeter, and dense matching fringe.
7 Technical Tips
- The finished grid develops crooked seam lines: block every ivory background to exactly 24 cm before decorating it. A 5 mm error repeated through six squares can shift the lower edge by 3 cm.
- The rose pulls the square into a bowl: attach the flower through six separated points in its foundation rather than pulling one continuous sewing strand tightly around the center. Concentrated tension beneath a 9–10 cm rose distorts the surrounding ivory fabric.
- The leaves disappear under the flower: position each large leaf so at least 3–4 cm extends beyond the outer rose petals. A leaf with only its final centimeter visible will be lost once the flower settles after washing.
- The appliqués sag when the bedspread hangs over the mattress: sew every large leaf along its foundation chain while leaving only the outer 2–3 cm free. Attaching only the leaf base creates a hinge that allows the entire motif to fold downward.
- The rust joins pucker: make each joining slip stitch as long as the corresponding edge stitch. A seam shortened by even 1 cm across a 24 cm square produces visible gathering along the grid.
- The lace border ruffles: inspect the central field for excess edge stitches before continuing beyond Border R1. Adding extra stitches indiscriminately along a 120–144 cm edge compounds into substantial excess circumference.
- The fringe finishes unevenly: cut all strands around one fixed 12–13 cm cardboard template before attachment. Freehand cutting hundreds of 24–26 cm strands can produce several centimeters of variation after they are folded.
Why a Solid Background Works Better Here
The supplied image has broad ivory areas between the flowers and rust seams. A traditional open granny square would introduce many small holes that are not prominent in the photographed floral field.
A solid square also supports the weight of the rose and eight leaves more effectively. Published solid-square mathematics are predictable: one established construction moves from 12 to 28, 44, 60, and 76 double crochets across successive rounds, while side counts increase by four per round. That regular growth makes a large modular bedspread easier to square accurately.
Why the Rose Is Sewn On Separately
Separating the flower from the square gives direct control over both components. The ivory background can be blocked perfectly flat before any dimensional weight is introduced.
Separate appliqués also make replacement possible. If a rose becomes damaged, its concealed foundation stitches can be removed without dismantling the surrounding square.
Current rose-granny-square patterns use several approaches. Kimberly Arenas publishes an Aran-weight 3D rose square with a 5 mm hook, while Loopara builds multiple rose petal rounds before completing the surrounding square. This reconstruction keeps the square independent because that method better matches the broad ivory panels visible in the photograph.
Published 3D Rose Square Benchmark
Kimberly Arenas’ 3D Rose Granny Square, published in April 2026, specifies Red Heart Super Saver Aran yarn and a 5 mm hook. The materials include separate red, green, and Aran shades and the design is intended for blankets, pillows, and garments.
Those specifications support the #4 yarn and 5 mm background hook used here. The exact flower and square instructions above remain an independent photo-inspired reconstruction.
Published Fine Cotton Rose Square Benchmark
TutorialRajut’s 3D rose square uses fingering-weight Scheepjes Catona and a 2.5 mm hook. Its published finished size is approximately 9 × 9 cm, with 59 m of yarn listed across pink, green, and champagne colors.
That benchmark demonstrates how strongly yarn weight affects motif dimensions. A 9 cm fingering square would require far more motifs to cover a bed than the oversized panels shown in the reference.
Published 10 cm Flower Square Benchmark
A current ManzanaDesign rose-flower granny-square listing specifies Drops Paris cotton, a 4 mm hook, and a finished size of approximately 10 × 10 cm.
Another current premade rose-square listing reports 13 cm squares made with YarnArt Jeans and a 3 mm hook. These commercial dimensions are useful checks, but neither is large enough to reproduce the broad square geometry used in this bedspread without substantially increasing the motif count.
Published Rose Blanket Size Benchmarks
A current handmade cotton rose blanket is listed at approximately 50 × 70 inches / 127 × 178 cm. Another rose granny-square blanket is listed at approximately 48 × 85 inches / 122 × 216 cm.
Those finished blankets demonstrate the wide range of proportions used for floral crochet covers. The reconstruction target of approximately 165 × 205 cm is intentionally broader because the supplied image shows a bedspread extending well over both mattress sides.
Making a Smaller Throw
Use 4 squares across × 5 squares long.
At 24 cm per motif, the central field measures approximately 96 × 120 cm.
Add the same 8–10 cm border and 10–11 cm fringe. The resulting throw will be approximately 132–138 × 156–162 cm, depending on blocking and fringe placement.
The flower, leaf, and bud patterns require no alteration.
Making a Larger Queen Bedspread
Use 6 squares across × 7 squares long, requiring 42 complete floral motifs.
The central field will measure approximately 144 × 168 cm.
With the full border and fringe, the finished dimensions approach approximately 184–190 × 208–214 cm.
Make 42 roses, 168 large leaves, 168 small leaves, 84 buds, and 84 moss accents.
Making a King-Size Version
A 7 × 8 layout requires 56 floral squares.
At the same 24 cm square gauge, the central field measures approximately 168 × 192 cm before edging.
Measure the intended mattress and desired drop before beginning 56 motifs. Large dimensional flowers add significant weight, so consider using a lighter worsted acrylic or cotton-acrylic blend rather than dense pure cotton.
Changing the Rose Color
Dusty coral closely matches the reference, but the geometry does not depend on that color.
For a softer version, use blush roses with sage leaves and muted terracotta joins. Burgundy flowers create stronger contrast against the ivory background.
Keep the grid and fringe in the same color family. Using unrelated colors for seams and fringe can visually divide the border from the floral field.
Using Fewer Leaves
For a less dense square, omit the four small dark leaves and retain only four large leaves around each rose.
This reduces the total dark-leaf count from 240 to 120.
Keep the two buds and their moss accents because they create the vertical floral extension visible in the image.
Test one simplified square beside a fully decorated square before committing to the complete blanket.
Making the Rose Flatter
Omit the nine-petal fourth layer.
The remaining center, five-petal layer, and seven-petal layer produce a shallower flower that is easier to wash and store.
Do not flatten the remaining petals with an iron. Shape them by hand during drying.
A flatter rose is particularly practical if the bedspread will be used as bedding rather than displayed over the top of other covers.
Making the Rose Fuller
Retain all four layers and curl the innermost petals more tightly before sewing the flower down.
Add one hidden stitch between every second outer petal and the layer beneath it.
Do not add another complete petal round unless the background square is enlarged. A rose much wider than 10 cm will begin covering the leaf bases and reduce the visible ivory space.
Correcting a Square That Is Too Small
If R9 blocks below 23.5 cm, first increase the hook from 5 to 5.5 mm.
If the difference is minor, add one additional solid-square round. The next side count increases from 35 to 39 stitches per side.
Do not aggressively stretch a 21–22 cm square to 24 cm. It will tend to contract after washing and pull against neighboring motifs.
Correcting a Square That Is Too Large
If R9 exceeds 24.5 cm, try a 4.5 mm hook.
Alternatively, stop after R8 and measure before adding the rust outline.
All 30 backgrounds must use the same number of rounds. Mixing eight-round and nine-round squares creates incompatible edge counts even if blocking temporarily makes their measurements similar.
Correcting a Rose That Tilts
Check the sewing foundation rather than the petals.
The six principal attachment points should surround the flower base evenly.
Add two stitches on the low side if the rose leans when the square hangs vertically.
Never pull an outer petal downward to correct the tilt; that changes the flower silhouette without stabilizing its center.
Correcting Leaves That Curl
Confirm the two sides contain equal stitch counts.
The large leaf requires 9 stitches on each side plus three at the tip. The small leaf requires six per side plus three at the tip.
If those counts are correct, wet the leaf and pin the tip and side edges. Persistent twisting usually indicates tension imbalance between the two sides of the foundation chain.
Correcting a Skewed Blanket
Measure both diagonals before adding the outer border.
If one diagonal exceeds the other by more than 2 cm, identify the row or column where the grid begins drifting.
Open that joining seam and realign corresponding square corners.
Do not attempt to force a skewed 30-square field into shape with border tension. The distortion will return after washing.
Fringe Planning
Make a small test section before cutting every strand.
Three strands per bundle create six visible tails after folding. If that density looks too heavy in the selected yarn, use two strands rather than increasing the spacing dramatically.
Cut all fringe before attachment so every bundle begins with the same strand length. Trim only after the bedspread has received its final block.
Yarn Planning by Sample Weight
The most reliable material calculation is to finish one complete decorated square.
Weigh the ivory square, rose, eight dark leaves, two buds, and two moss accents separately. Multiply each result by 30.
Next add the yarn used in one horizontal and one vertical test join, extrapolate those measurements across the grid, and add approximately 15% for border, fringe variation, swatches, tails, and repairs.
This approach is more dependable than applying the yardage from a smaller published rose square to a substantially larger bedspread.
Care and Storage
Follow the yarn manufacturer’s washing instructions. A large dimensional bedspread becomes heavy when wet, so support the entire textile rather than lifting it from one corner.
Dry flat when possible. Reshape the roses and leaf tips while damp, keeping the petals raised rather than pressing them into the ivory backgrounds.
For storage, fold along the rust seam lines instead of directly through the roses. Place clean tissue or lightweight fabric between layers so one flower does not crush the petals beneath it.
Sources
Ravelry — 3D Rose Granny Square by Kimberly Arenas — 2026 Aran-weight floral square using a 5 mm hook and separate red, green, and neutral yarns.
Totally Fierce Crochet — 3D Rose Granny Square Tutorial — 4 mm hook, cotton yarn, and a documented multi-layer rose progression before squaring.
TutorialRajut — 3D Rose Flower Granny Square — fingering cotton, 2.5 mm hook, approximately 9 × 9 cm finished size, and published color-specific meterage.
ManzanaDesign — Rose Flower Granny Square — cotton yarn, 4 mm hook, and approximately 10 × 10 cm finished motif benchmark.
PastelMotifShop — Raised Rose Granny Squares — contemporary 13 cm rose-square benchmark using a 3 mm hook and cotton-acrylic yarn.
Crochet Project Lab — Solid Granny Square Pattern — documented solid-square stitch progression in which each new round adds 16 total double crochets and four stitches per side.
MKnitCrochet — Cotton 3D Rose Bedspread — current handmade rose blanket measuring approximately 50 × 70 inches.
MonaBuyMona — Handmade Crochet Rose Blanket — contemporary floral blanket benchmark measuring approximately 48 × 85 inches.
Conclusion
The 24 cm ivory square controls every later measurement, so complete, wash, and block one background before producing the remaining 29. Keep the coral roses dimensional, attach the olive leaves through their centers rather than their tips, and verify both diagonals before adding the deep rust border. Your next step is to make one fully decorated sample square and record its finished weight for accurate yarn planning. Save this 3D rose granny square crochet bedspread pattern to Pinterest or share the finished bedspread on Instagram with #CoralRoseGardenBedspread. For this specific floral grid, would you keep every rose dusty coral or alternate a few squares with softer blush flowers?









