Introduction
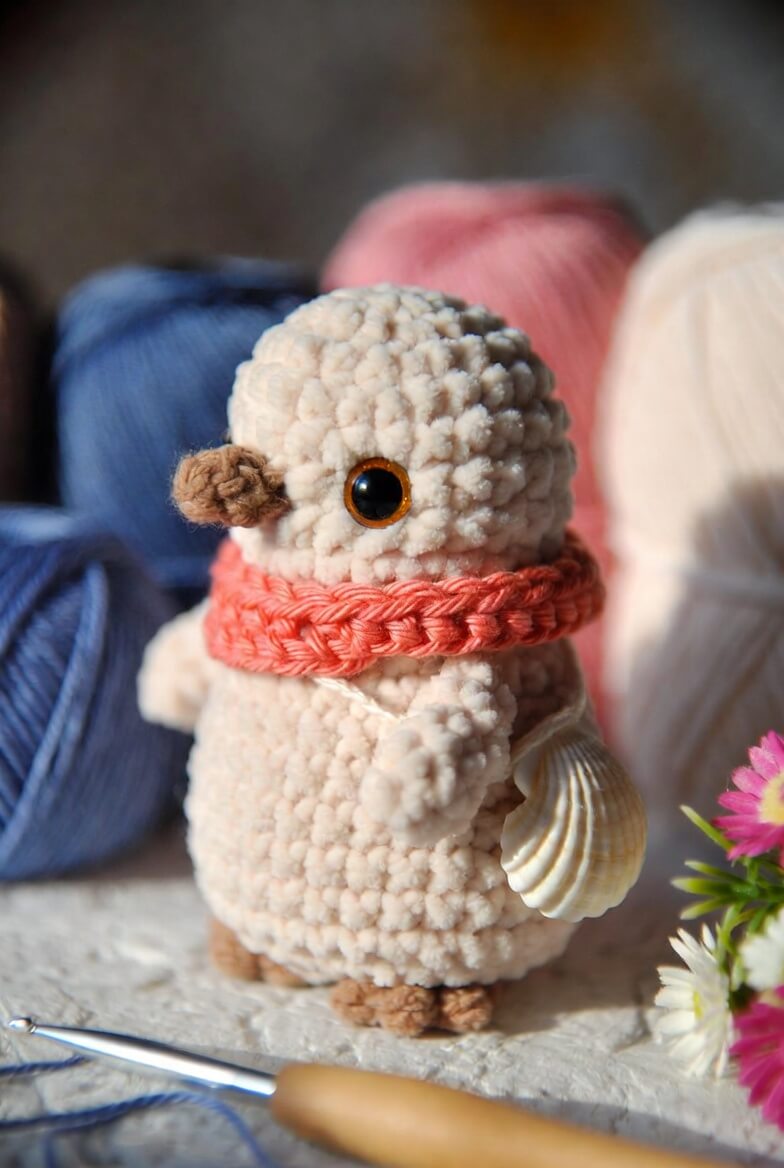
A penguin’s wings must sit behind its belly line, not beside its shoulders like mammal arms. This penguin amigurumi crochet pattern uses chunky chenille, a 4.5 mm hook and 12 mm safety eyes to produce an approximately 18 cm standing figure. The intermediate construction includes separate wings, broad feet, a fitted coral scarf and a shell-shaped bag. Its weighted lower body makes the finished penguin suitable for stable shelf photography.
The Design: What Makes Marina the Penguin Different
Marina has a separate head and body rather than the common one-piece oval. That seam creates a defined neck where the scarf can rest without sliding toward the eyes. Her body reaches a 36-stitch plateau and holds that width for seven rounds, forming the long egg-shaped torso visible in the reference. Short wings are attached below the neck because a penguin’s flippers emerge from the sides of the upper body rather than from a narrow shoulder joint. Broad feet shift the support points toward the front. This prevents the shell bag from pulling the figure backward. A common error in a chunky penguin crochet pattern is overstuffing the head until the stitches separate. Chenille hides the openings at first, but they become visible around the safety-eye washers. The velvet penguin amigurumi therefore needs layered stuffing rather than one compressed central mass.
Project Info at a Glance
| Skill Level | Time | Finished Size | Hook | Best For |
|---|---|---|---|---|
| Intermediate | 7–10 hours | Approximately 18 cm | 4.5 mm | Display, winter collections and product photography |
A published chenille Pocket Penguin uses a 5 mm hook, 10–12 mm eyes and reaches approximately 11.4 cm. Another worsted penguin reaches about 17 cm with a 3.5 mm hook. Marina’s 18 cm estimate accounts for the larger stitch plan and category 5 yarn.
Materials and Tools
Yarn
- Warm ivory — chunky/category 5 chenille — approximately 70 g — Himalaya Dolphin Baby, Premier Parfait Chunky or an equivalent washable plush yarn.
- Coral pink — DK cotton or smooth light-worsted yarn — approximately 15 g — use a non-chenille yarn to preserve the scarf’s stitch definition.
- Tan brown — chunky or doubled DK yarn — approximately 8 g — required for the beak and feet.
- Shell cream — DK cotton — approximately 12 g — required for the shell bag.
- Ivory sewing yarn — DK cotton — approximately 2 g — useful when chenille tails are too fragile for assembly.
Tools
- 4.5 mm crochet hook for the penguin
- 3.5 mm crochet hook for the scarf and shell bag
- Two 12 mm safety eyes with amber rims
- Polyester stuffing, approximately 40–50 g
- Blunt yarn needle
- Locking stitch markers
- Straight pins
- Scissors
- Optional plastic pellets and fabric pouch, 15–20 g, for a weighted base
Safety eyes can detach under force and are not intended for children under three. Substitute tightly embroidered eyes when the penguin will be used as a young child’s toy.
Abbreviations
- MR — magic ring
- sc — single crochet
- inc — two single crochet in one stitch
- dec — single crochet two stitches together
- sl st — slip stitch
- ch — chain
- hdc — half double crochet
- dc — double crochet
- BLO — back loop only
- FLO — front loop only
For an invisible decrease, insert the hook beneath the front loops of the next two stitches and complete one single crochet through both loops.
Pattern — Step by Step
Work the head, body, wings, feet and beak in continuous spirals unless stated otherwise. Place a marker in the first stitch of every round. The starting point will drift naturally because the rounds are not joined.
Head
Yarn: warm ivory — original shaping based on standard six-stitch amigurumi expansion.
R1: 6 sc in MR (6)
R2: inc ×6 (12)
R3: (sc, inc) ×6 (18)
R4: (2 sc, inc) ×6 (24)
R5: (3 sc, inc) ×6 (30)
R6: (4 sc, inc) ×6 (36)
R7–R12: sc around (36)
R13: (4 sc, dec) ×6 (30)
R14: (3 sc, dec) ×6 (24)
Insert the 12 mm eyes between R9 and R10. Leave seven visible stitches between their inner edges. Fit both washers before adding more stuffing.
R15: (2 sc, dec) ×6 (18)
R16: (sc, dec) ×6 (12)
R17: dec ×6 (6)
R18: dec ×3 (3)
Add stuffing in pieces approximately 2 cm wide. Keep the lower head moderately firm because the neck seam must support the scarf.
Fasten off. Leave a 25 cm tail and close the opening.
Body
Yarn: warm ivory — 36-stitch medium plateau.
R1: 6 sc in MR (6)
R2: inc ×6 (12)
R3: (sc, inc) ×6 (18)
R4: (2 sc, inc) ×6 (24)
R5: (3 sc, inc) ×6 (30)
R6: (4 sc, inc) ×6 (36)
R7–R13: sc around (36)
R14: (4 sc, dec) ×6 (30)
R15–R17: sc around (30)
R18: (3 sc, dec) ×6 (24)
R19: sc around (24)
R20: (2 sc, dec) ×6 (18)
R21: (sc, dec) ×6 (12)
R22: dec ×6 (6)
Place an optional sealed 15–20 g pellet pouch at the base after R14. Surround it with stuffing so the pouch cannot touch the crochet fabric directly. Pack the lower body firmly and keep the final three rounds slightly softer.
Fasten off. Leave a 30 cm tail for attaching the head.
Wings (Make 2)
Yarn: warm ivory — narrow flipper construction.
R1: 6 sc in MR (6)
R2: inc ×6 (12)
R3: (sc, inc) ×6 (18)
R4–R6: sc around (18)
R7: (sc, dec) ×6 (12)
R8–R10: sc around (12)
R11: dec ×6 (6)
Add a small amount of stuffing to R1–R4 only. Flatten the upper section so each wing hangs close to the body.
Fasten off. Leave a 25 cm sewing tail on each wing.
Feet (Make 2)
Yarn: tan brown — broad oval support pieces.
R1: 6 sc in MR (6)
R2: inc ×6 (12)
R3: (sc, inc) ×6 (18)
R4: BLO sc around (18)
R5–R6: sc around (18)
R7: (sc, dec) ×6 (12)
R8: dec ×6 (6)
Stuff lightly. Flatten the back third of each foot while keeping the front edge rounded.
Fasten off. Leave a 25 cm sewing tail.
Beak
Yarn: tan brown — compact cylindrical beak matching the photograph.
R1: 6 sc in MR (6)
R2: inc ×6 (12)
R3–R4: sc around (12)
R5: (sc, dec) ×4 (8)
R6: sc around (8)
R7: dec ×4 (4)
Insert only a small pinch of stuffing. Flatten the base vertically before sewing so the beak projects horizontally from the face.
Fasten off. Leave a 20 cm tail.
Cheek Patches (Make 2)
Yarn: warm ivory or pale cream — optional low-relief facial circles.
R1: 6 sc in MR (6)
R2: inc ×6 (12)
Join with a sl st. Fasten off and leave a 15 cm tail. Keep both circles flat and unstuffed.
Scarf
Yarn: coral pink DK or light-worsted yarn — worked in joined rows.
Row 1: ch 56, hdc in the third ch from the hook and across (54)
Row 2: ch 2, turn, hdc across (54)
Row 3: ch 1, turn, sl st loosely across (54)
Test the scarf around the assembled neck before cutting the yarn. It should overlap by approximately 3 cm without pressing into the lower edge of the head.
Fasten off. Leave two 20 cm tails for hidden tacking stitches.
Shell Bag — Front Panel
Yarn: shell cream DK cotton — worked in turning rows to create a fan shape.
Row 1: ch 3, work 6 dc in the third ch from the hook (6)
Row 2: ch 2, turn, dc inc ×6 (12)
Row 3: ch 2, turn, (dc, dc inc) ×6 (18)
Row 4: ch 2, turn, (2 dc, dc inc) ×6 (24)
Row 5: ch 1, turn, sc across the curved edge (24)
Fasten off. Leave a 25 cm tail.
Shell Bag — Back Panel
Yarn: shell cream DK cotton.
Row 1: ch 3, work 6 dc in the third ch from the hook (6)
Row 2: ch 2, turn, dc inc ×6 (12)
Row 3: ch 2, turn, (dc, dc inc) ×6 (18)
Row 4: ch 2, turn, (2 dc, dc inc) ×6 (24)
Row 5: ch 1, turn, sc across the curved edge (24)
Do not fasten off. Place both panels together and sc through both layers around the curved edge. Leave the straight upper edge open until the strap is attached. Add a thin layer of stuffing, then close the top with slip stitches.
Shell Ridges
Yarn: shell cream or pale beige embroidery yarn.
Embroider five raised lines from the lower center of the shell toward the curved outer edge. Space the endpoints approximately four stitches apart. Work each ridge twice along the same path to create the ribbed shell structure visible in the photograph.
Fasten off and bury each tail inside the bag.
Bag Strap
Yarn: shell cream DK cotton.
Row 1: ch 48, sc in the second ch from the hook and across (47)
Row 2: ch 1, turn, sl st loosely across (47)
The strap should cross from the penguin’s left shoulder to the right side of the body. Add or remove chains before Row 1 when a different gauge changes the fit.
Fasten off. Leave a 20 cm tail at each end.
Assembly
- Pin the head centrally over the body opening. Sew around the neck twice, passing through complete stitches rather than the loose surface fibers of the chenille.
- Place the beak between R10 and R13 of the head. Its upper edge should sit one round below the lower edges of the eyes.
- Position the cheek patches beside the beak if they are being used. Keep their upper edges level and leave approximately two stitches between each patch and the beak.
- Pin the feet beneath the lower front of the body with four to five visible stitches between them. Test the figure on a flat surface before completing either seam.
- Attach the left wing across R15–R19 of the body. Angle its tip slightly forward so it remains visible beside the belly.
- Sew the right wing at the matching height. Keep it close to the body because the shell bag will cover part of its lower edge.
- Wrap the coral scarf around the neck with a 3 cm overlap at the front-left side. Tack the overlap and the back center to the body with matching sewing yarn.
- Attach one strap end to the upper-left corner of the shell bag and the other to the upper-right corner. Reinforce each connection with three passes.
- Place the strap across the penguin’s chest from the left shoulder to the right hip. Tack it beneath the scarf so the upper attachment remains hidden.
- Secure the shell bag against the right side of the body with two concealed stitches. The curved shell edge should finish above the base of the foot.
The completed penguin should stand on both feet without using the wings or shell bag as support.
7 Technical Tips
- Stitch-marker loss: Chenille fibers can conceal the first stitch within one round. Use a locking marker at least 20 mm long and count every 36-stitch plateau round before continuing.
- Overfilled head: Excess stuffing can expose the eye posts and create gaps wider than 2 mm. Stop adding fiber when the head holds its shape without feeling rigid under thumb pressure.
- Visible decrease ridges: Standard decreases form bars across the ivory surface. Work every decrease through the front loops and keep the working loop close to the hook shaft.
- Incorrect eye timing: Waiting beyond R14 reduces the opening to 24 stitches and restricts washer placement. Install both eyes immediately after completing R14.
- Chenille tension breaks: Pulling a magic ring tail sharply can strip the plush fibers from its core. Close the ring in three gradual pulls and stop when the center opening reaches approximately 2 mm.
- Uneven foot placement: A difference of one body round can make the penguin lean sideways. Pin both feet first and compare their front edges against the body’s round marker.
- Loose accessory tails: A bag strap attached with one pass can pull through DK stitches. Sew through each connection three times, reverse direction and weave the remaining tail through at least 3 cm of fabric.
Conclusion
Inspect the penguin from all four sides before cutting the assembly tails. Both feet should contact the surface fully, the beak should project level with the floor, and the shell bag must stop above the right foot. Record your final hook size, eye spacing and scarf-chain count before making another figure because chenille thickness varies between dye lots. The next practical step is to photograph the penguin against a plain background and compare the wing angles with the reference image. Save this penguin amigurumi crochet pattern to Pinterest and share the completed project on Instagram with #MarinaShellPenguin. Did your shell bag sit more securely with one body tack or two?









