Introduction
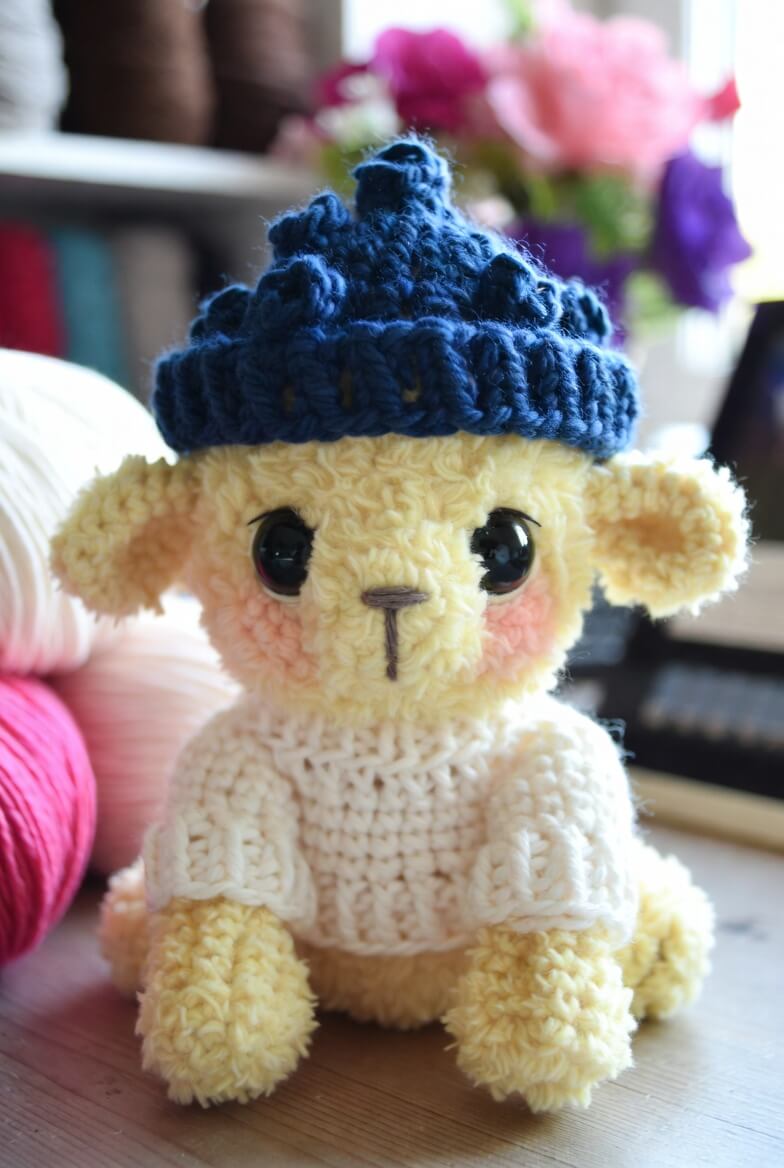
A lamb’s ears extend beyond its skull, so a fitted hat must grip the crown without folding either ear forward. This lamb amigurumi crochet pattern makes a 25 cm seated figure with a cream sweater, navy bobble hat and fuzzy yellow fleece. Use worsted yarn, DK clothing yarn, 3 and 3.5 mm hooks, and 14 mm eyes. Intermediate skills are required. The finished figure sits securely on a shelf.
The Design: What Makes Mallow the Lamb Different
Mallow has a 36-stitch head plateau that provides enough width for large eyes, a projecting muzzle and broad side-facing ears. The body uses the same maximum count, but its plateau is shorter so the sweater does not turn the torso into a cylinder. Both back legs have wide 18-stitch feet. That choice shifts the center of gravity forward and supports the seated pose. The sweater is worked as a separate tube with a shaped neckline, while short sleeves are added independently over the arms. This method keeps the cream fabric from distorting the fuzzy lamb crochet surface. One common mistake in a sheep amigurumi pattern is sewing the ears too low. Low ears collide with the sweater shoulders and make the head look wider than intended. Attach their upper edges near head Round 8, then test the hat before completing the seams.
Project Info at a Glance
| Skill Level | Time | Finished Size | Hooks | Best For |
|---|---|---|---|---|
| Intermediate | 8–10 hours | Approximately 25 cm including hat | 3.5 mm and 3 mm | Seated displays, winter collections and nursery shelves |
Materials and Tools
Yarn
- Pale butter yellow — worsted fuzzy or brushed yarn — approximately 80–100 g — use for the head, body, ears, legs and tail.
- Cream — smooth DK yarn — approximately 45 g — use for the sweater.
- Navy blue — DK or light-worsted yarn — approximately 25 g — use for the ribbed bobble hat.
- Blush pink — smooth DK yarn — under 4 g — use for the cheek patches.
- Brown — embroidery thread — use for the nose and mouth.
- Black — embroidery thread — use for the upper eyelashes.
Tools
- 3.5 mm crochet hook for the lamb
- 3 mm crochet hook for the clothing
- 14 mm safety eyes
- Polyester stuffing
- Blunt tapestry needle
- Locking stitch markers
- Long sewing pins
- Small pet slicker brush, optional for raising the yarn halo
- Scissors
The selected 25 cm scale follows a published DK lamb comparison. Similar lamb patterns use 3–3.5 mm hooks, while documented eye sizes near this project range from 12 to 13 mm. The slightly larger 14 mm eyes reproduce the proportions visible in the photograph.
Abbreviations
- MR — magic ring
- sc — single crochet
- inc — two single crochet stitches in one stitch
- dec — single crochet two stitches together
- sl st — slip stitch
- ch — chain
- hdc — half double crochet
- dc — double crochet
- BLO — back loop only
- FLO — front loop only
- bo — five-double-crochet bobble
For an invisible decrease, insert the hook through the front loops of the next two stitches and complete both loops as one single crochet.
Pattern — Step by Step
Work all amigurumi sections in a continuous spiral unless a section states otherwise. Mark the first stitch after every completed round. The head and body use a medium 36-stitch plateau.
Head
Yarn: pale butter yellow — Source: standard amigurumi mathematics.
R1: 6 sc in MR (6)
R2: inc ×6 (12)
R3: (sc, inc) ×6 (18)
R4: (2 sc, inc) ×6 (24)
R5: (3 sc, inc) ×6 (30)
R6: (4 sc, inc) ×6 (36)
R7–R13: sc around (36)
R14: (4 sc, dec) ×6 (30)
Insert the 14 mm eyes between R10 and R11 with seven visible stitches between the posts. Fit both washers now. Embroider one short upper lash at the outside of each eye.
R15: (3 sc, dec) ×6 (24)
R16: (2 sc, dec) ×6 (18)
Stuff the crown firmly, directing small pieces behind the eyes to prevent recessed sockets.
R17: (sc, dec) ×6 (12)
R18: dec ×6 (6)
Fasten off. Leave a 25 cm tail and close the opening through the front loops.
Body
Yarn: pale butter yellow — Source: standard amigurumi mathematics.
R1: 6 sc in MR (6)
R2: inc ×6 (12)
R3: (sc, inc) ×6 (18)
R4: (2 sc, inc) ×6 (24)
R5: (3 sc, inc) ×6 (30)
R6: (4 sc, inc) ×6 (36)
R7–R11: sc around (36)
R12: (4 sc, dec) ×6 (30)
R13–R15: sc around (30)
R16: (3 sc, dec) ×6 (24)
R17: sc around (24)
R18: (2 sc, dec) ×6 (18)
Fill the lower body firmly enough to resist compression from the back legs. Leave the upper 2 cm moderately filled for the neck seam.
R19: (sc, dec) ×6 (12)
R20: dec ×6 (6)
Fasten off. Leave a 30 cm tail for joining the body to the head.
Front Legs (Make 2)
Yarn: pale butter yellow — Source: standard amigurumi mathematics.
R1: 6 sc in MR (6)
R2: inc ×6 (12)
R3: (sc, inc) ×6 (18)
R4–R6: sc around (18)
R7: (sc, dec) ×6 (12)
R8–R12: sc around (12)
R13: dec ×6 (6)
Stuff the rounded foot firmly. Reduce the filling above R8 so the leg can hang below the sweater sleeve.
Fasten off. Leave a 25 cm sewing tail.
Back Legs (Make 2)
Yarn: pale butter yellow — Source: standard amigurumi mathematics.
R1: 6 sc in MR (6)
R2: inc ×6 (12)
R3: (sc, inc) ×6 (18)
R4–R7: sc around (18)
R8: (sc, dec) ×6 (12)
R9–R13: sc around (12)
R14: dec ×6 (6)
Pack the lower seven rounds firmly. Keep the upper leg flexible so it can rotate into a seated position.
Fasten off. Leave a 30 cm sewing tail.
Ears (Make 2)
Yarn: pale butter yellow — Source basis: flattened spiral ear construction used in sheep patterns.
R1: 6 sc in MR (6)
R2: inc ×6 (12)
R3: (sc, inc) ×6 (18)
R4–R6: sc around (18)
R7: (sc, dec) ×6 (12)
R8: sc around (12)
R9: dec ×6 (6)
Do not stuff. Flatten each ear, fold the lower corners toward one another and tack the fold with two stitches.
Fasten off. Leave a 25 cm tail.
Muzzle
Yarn: pale butter yellow — Source: standard amigurumi mathematics.
R1: 6 sc in MR (6)
R2: inc ×6 (12)
R3: (sc, inc) ×6 (18)
R4: sc around (18)
Embroider a horizontal brown nose across three central stitches. Add one vertical mouth line approximately 2 cm long.
Fasten off. Leave a 25 cm tail and add a small amount of stuffing.
Cheek Patches (Make 2)
Yarn: blush pink — Source: standard flat-circle mathematics.
R1: 6 sc in MR (6)
R2: inc ×6 (12)
Join with a sl st. Fasten off and leave a 15 cm tail.
Tail
Yarn: pale butter yellow — Source: standard amigurumi mathematics.
R1: 6 sc in MR (6)
R2: inc ×6 (12)
R3–R4: sc around (12)
R5: dec ×6 (6)
Add a small amount of stuffing without stretching the final round.
Fasten off. Leave a 15 cm sewing tail.
Sweater Body
Yarn: cream — use the 3 mm hook. Work joined rounds.
R1: ch 37, join without twisting, sc around (36)
R2–R4: ch 1, sc around, join with sl st (36)
R5: ch 1, (4 sc, dec) ×6, join (30)
R6–R8: ch 1, sc around, join (30)
R9: ch 1, (3 sc, dec) ×6, join (24)
R10–R12: ch 1, sc around, join (24)
R13: ch 1, (2 sc, dec) ×6, join (18)
R14–R16: ch 1, BLO sc around, join (18)
Check that the neck opening passes over the body before attaching the head. R14–R16 form the folded ribbed collar.
Fasten off. Weave the tail into the inside surface.
Sweater Sleeves (Make 2)
Yarn: cream — use the 3 mm hook. Work joined rounds.
R1: ch 13, join without twisting, sc around (12)
R2–R6: ch 1, sc around, join (12)
R7–R9: ch 1, BLO sc around, join (12)
Slide each sleeve onto a front leg before attaching that leg to the body. Fold the final three rounds outward to form a cuff.
Fasten off. Leave a 20 cm tail for tacking the sleeve to the sweater body.
Hat Ribbed Band
Yarn: navy blue — use the 3 mm hook. Work in turned rows.
Ch 9.
Row 1: sc in second ch from hook and across (8)
Rows 2–36: ch 1, turn, BLO sc across (8)
Wrap the band around the head above the ears. Add or remove two rows when the ends do not meet without stretching.
Join the short ends with sl st. Do not cut the yarn.
Hat Crown
Yarn: navy blue — continue from the band edge.
R1: work 36 sc evenly around the upper band edge (36)
R2–R4: sc around (36)
R5: (4 sc, dec) ×6 (30)
R6: sc around (30)
R7: (3 sc, dec) ×6 (24)
R8: sc around (24)
R9: (2 sc, dec) ×6 (18)
R10: (sc, dec) ×6 (12)
R11: dec ×6 (6)
Do not stuff. Draw the final six loops closed and pull the point upward before securing the tail.
Fasten off. Leave a 20 cm tail.
Hat Bobbles (Make 5)
Yarn: navy blue.
R1: 6 sc in MR (6)
R2: bo in each stitch around (6 bobbles)
R3: dec ×3 (3)
Add only a loose pinch of yarn waste or stuffing. Make one bobble for the crown and four for the upper sides.
Fasten off. Leave a 15 cm tail on each bobble.
Assembly
- Pull the sweater body over the unfinished neck end of the body and align the lower hem above body R6.
- Center the head over the body, then sew twice around the neck seam through matching head and body stitches.
- Pin the muzzle between head R11 and R15 and sew around its edge without compressing the center stuffing.
- Attach the cheek patches beside the lower muzzle, keeping each patch at least one stitch away from the eye posts.
- Pin the ears between head R7 and R10 with their folded bases facing downward, then test the hat before sewing them fully.
- Place one sweater sleeve over each front leg, attach the legs at body R13 and tack the sleeve tops to the sweater shoulders.
- Sew the back legs between body R4 and R9, angling both feet forward until they rest on the same flat surface.
- Attach the tail at the center back between body R7 and R10, below the sweater hem.
- Sew one navy bobble to the hat point and arrange the remaining four around crown R6–R8.
- Position the hat band above the eyes, tack it behind both ears and bury all remaining yarn tails through at least 4 cm of stuffed fabric.
The finished lamb should remain seated while both ears extend horizontally below the hat band.
7 Technical Tips
- Hidden round start: Fuzzy yarn can conceal the marked stitch and shift the face several stitches sideways. Place a locking marker through both loops and count each round before removing it.
- Recessed eyes: A soft head creates deep hollows around 14 mm safety eyes. Pack small pieces of filling behind each post until the eye rims remain level with the surrounding stitches.
- Exposed stuffing: Standard decreases form larger gaps in brushed yarn. Work front-loop invisible decreases and keep the completed loop no taller than the 3.5 mm hook shaft.
- Blocked eye washers: Installing the eyes after R15 leaves a 24-stitch opening that is difficult to access. Fit both washers immediately after completing R14.
- Unequal sweater gauge: DK clothing worked too loosely can slide over the lamb’s hips. Ten sweater stitches should measure within 3 mm of the width used when calculating the 36-stitch lower opening.
- Folded ears: Sewing the hat before checking ear clearance can force one ear downward. Pin the band 5–8 mm above both ear bases and compare the front view before tacking it.
- Unstable seated base: Back legs attached at different heights make the torso lean. Pin both legs simultaneously and test the lamb on a level table before completing either seam.
Conclusion
Test the sweater collar, ear clearance and seated balance before trimming the structural yarn tails. The next concrete step is to crochet the 36-row hat band and wrap it around the completed head; fuzzy yarn thickness can change the required circumference even when the stitch count is correct. Save this lamb amigurumi crochet pattern to Pinterest and share front, side and back photographs on Instagram with #MallowSweaterLamb. Multiple views show whether the sleeves, back legs and hat bobbles remain symmetrical. For this lamb specifically, would you position the four side bobbles in an even ring or cluster them toward the pointed crown?









