Introduction
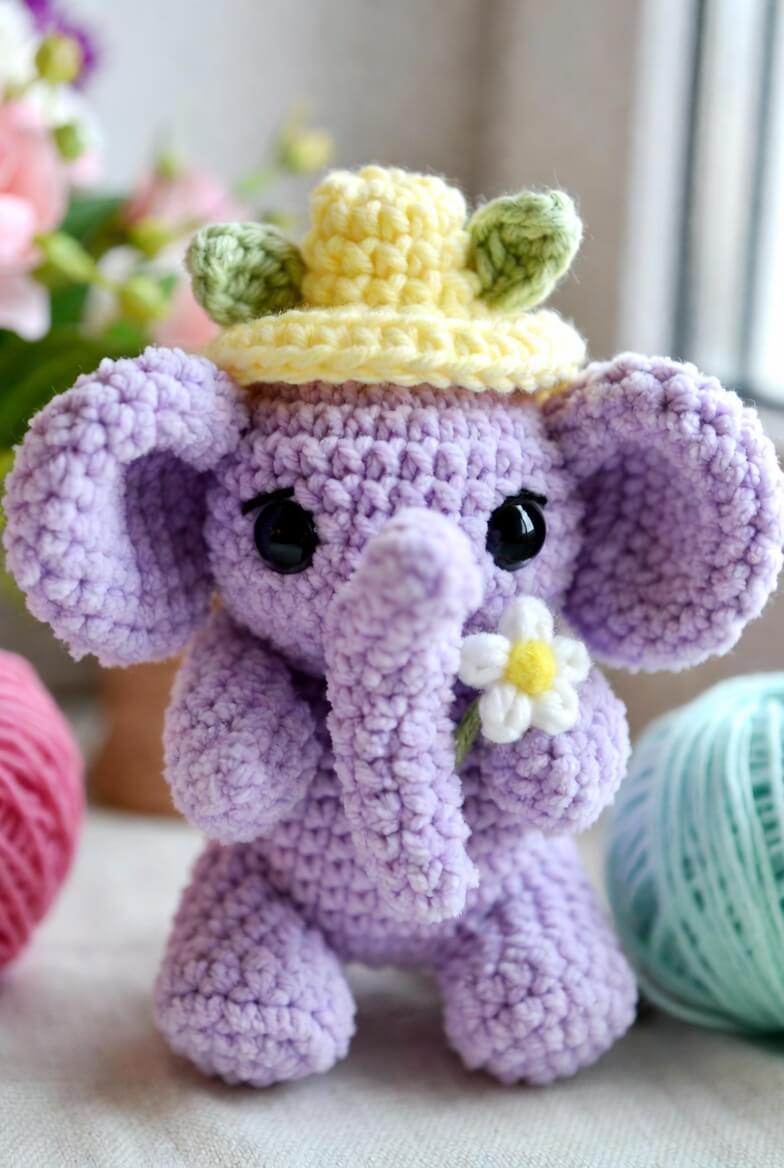
An elephant’s trunk must clear its front legs before it can hold a daisy without twisting the face. This lemon hat elephant amigurumi crochet pattern uses worsted yarn, a 3.5 mm hook and separately shaped features to make a standing figure approximately 20 cm tall. The intermediate project includes layered ears, a tapered trunk and fitted hat. Broad feet support the toy without wire.
The Design: What Makes This Lemon Hat Elephant Different
The head reaches a 36-stitch plateau, which provides enough width for 14 mm eyes and two oversized ears without making the body top-heavy. A separate trunk begins with a narrow tip, expands gradually and uses controlled offset decreases to create its forward curve. The ears consist of outer lavender circles with smaller inner panels, giving the edges enough thickness to hold their rounded shape. This lavender elephant crochet pattern uses a 36-stitch body and broad standing legs rather than a seated base. The proportions leave room for the daisy between the trunk and right arm. A fitted yellow hat sits between the ear roots and adds height without covering them. One common error in an elephant amigurumi with flower is sewing the trunk vertically. That placement pushes the flower away from the paw and hides the lower face.
Project Info at a Glance
| Skill Level | Time | Finished Size | Hook | Best For |
|---|---|---|---|---|
| Intermediate | 10–13 hours | Approximately 20 cm | 3.5 mm | Spring displays, nursery shelves and handmade market stock |
Measure the completed elephant from the lowest foot round to the top of the yellow hat. Yarn thickness, stuffing density and trunk angle will change the final dimensions.
Materials and Tools
Yarn
- Soft lavender — worsted or aran weight — approximately 90 g — used for the head, trunk, ears, body and limbs
- Lemon yellow — worsted weight — approximately 25 g — used for the fruit hat and flower center
- Sage green — worsted weight — approximately 10 g — used for the hat leaves and flower stem
- White — worsted weight — approximately 15 g — used for the daisy petals
- Pale pink — DK or worsted weight — approximately 8 g — used for the inner ears
- Black — embroidery yarn — approximately 1 g — used for optional eyebrows and eye definition
Tools
- 3.5 mm crochet hook
- 14 mm safety eyes
- Polyester stuffing, approximately 60–75 g
- Yarn needle
- Locking stitch markers
- Dressmaking pins
- Scissors
- Ruler
Abbreviations
- MR — magic ring
- sc — single crochet
- inc — two single crochets in one stitch
- dec — invisible decrease over two stitches
- sl st — slip stitch
- ch — chain
- hdc — half double crochet
- dc — double crochet
- BLO — back loop only
- FLO — front loop only
Work an invisible decrease through the front loops of the next two stitches, then complete one single crochet through both loops.
Pattern — Step by Step
Work all stuffed pieces in continuous spirals unless rows or joined rounds are stated. Place a locking marker in the first completed stitch of each round.
Head
Yarn: soft lavender — standard six-stitch amigurumi shaping.
R1: 6 sc in MR (6)
R2: inc ×6 (12)
R3: (sc, inc) ×6 (18)
R4: (2 sc, inc) ×6 (24)
R5: (3 sc, inc) ×6 (30)
R6: (4 sc, inc) ×6 (36)
R7–R14: sc around (36)
R15: (4 sc, dec) ×6 (30)
R16: sc around (30)
R17: (3 sc, dec) ×6 (24)
R18: sc around (24)
R19: (2 sc, dec) ×6 (18)
R20: (sc, dec) ×6 (12)
R21: dec ×6 (6)
R22: draw the yarn through the front loops and close (6)
Insert the eyes between R11 and R12 with seven visible stitches between the posts. Fit both washers before completing R18. Stuff firmly after R17, adding small pieces around the eye backs.
Fasten off. Leave a 30 cm tail.
Body
Yarn: soft lavender — standard six-stitch shaping.
R1: 6 sc in MR (6)
R2: inc ×6 (12)
R3: (sc, inc) ×6 (18)
R4: (2 sc, inc) ×6 (24)
R5: (3 sc, inc) ×6 (30)
R6: (4 sc, inc) ×6 (36)
R7–R14: sc around (36)
R15: (4 sc, dec) ×6 (30)
R16–R18: sc around (30)
R19: (3 sc, dec) ×6 (24)
R20–R21: sc around (24)
R22: (2 sc, dec) ×6 (18)
R23: sc around (18)
Pack the lower third firmly. Keep the upper 2 cm moderately stuffed so the neck opening remains flat.
Fasten off. Leave a 35 cm sewing tail.
Arms (Make 2)
Yarn: soft lavender — standard amigurumi math.
R1: 6 sc in MR (6)
R2: inc ×6 (12)
R3–R5: sc around (12)
R6: (2 sc, dec) ×3 (9)
R7–R11: sc around (9)
R12: (sc, dec) ×3 (6)
Stuff through R6 only. Leave the upper half flexible so the right arm can turn toward the flower stem.
Flatten the opening and work 3 sc through both layers. Fasten off, leaving a 25 cm tail.
Back Legs (Make 2)
Yarn: soft lavender — broad standing-foot construction.
R1: 6 sc in MR (6)
R2: inc ×6 (12)
R3: (sc, inc) ×6 (18)
R4–R7: sc around (18)
R8: (sc, dec) ×6 (12)
R9–R12: sc around (12)
R13: dec ×6 (6)
Stuff the first seven rounds firmly. Use smaller pieces above R8 so each leg sits close to the body.
Fasten off. Leave a 30 cm tail.
Trunk
Yarn: soft lavender — tapered tube with offset shaping.
R1: 6 sc in MR (6)
R2–R4: sc around (6)
R5: (sc, inc) ×3 (9)
R6–R8: sc around (9)
R9: 2 sc, inc ×3, 4 sc (12)
R10–R12: sc around (12)
R13: 3 sc, dec ×3, 3 sc (9)
R14–R16: sc around (9)
R17: (2 sc, inc) ×3 (12)
R18–R20: sc around (12)
R21: (2 sc, dec) ×3 (9)
R22: sc around (9)
Stuff the first 8 cm lightly as the trunk grows. Leave the attachment end moderately filled and bend the narrow tip toward the elephant’s right side.
Fasten off. Leave a 35 cm tail.
Outer Ears (Make 2)
Yarn: soft lavender — large flat-circle construction.
R1: 6 sc in MR (6)
R2: inc ×6 (12)
R3: (sc, inc) ×6 (18)
R4: (2 sc, inc) ×6 (24)
R5: (3 sc, inc) ×6 (30)
R6: (4 sc, inc) ×6 (36)
R7: sc around (36)
Do not stuff. Fold approximately 2 cm of the inner lower edge toward the back to create a shallow ear cup.
Fasten off. Leave a 35 cm tail.
Inner Ears (Make 2)
Yarn: pale pink — smaller flat circles.
R1: 6 sc in MR (6)
R2: inc ×6 (12)
R3: (sc, inc) ×6 (18)
R4: (2 sc, inc) ×6 (24)
R5: (3 sc, inc) ×6 (30)
Sew one pink circle to each lavender ear, leaving a 5 mm lavender border. Match the lower fold before stitching.
Fasten off. Leave a 25 cm tail.
Tail
Yarn: soft lavender — short tapered tube.
R1: 6 sc in MR (6)
R2: inc ×6 (12)
R3–R4: sc around (12)
R5: (2 sc, dec) ×3 (9)
R6–R7: sc around (9)
R8: (sc, dec) ×3 (6)
Stuff the base lightly. Leave the final two rounds empty so the tail can hang downward.
Fasten off. Leave a 20 cm tail.
Lemon Hat
Yarn: lemon yellow — fitted crown with projecting brim.
R1: 6 sc in MR (6)
R2: inc ×6 (12)
R3: (sc, inc) ×6 (18)
R4: (2 sc, inc) ×6 (24)
R5–R10: sc around (24)
R11: (3 sc, inc) ×6 (30)
R12: sc around (30)
R13: (4 sc, inc) ×6 (36)
R14: FLO inc ×36 (72)
R15: sc around (72)
Do not stuff the brim. Add a small amount of filling inside the upper crown only when a firmer lemon shape is required.
Join with a sl st. Fasten off, leaving a 35 cm tail.
Hat Leaves (Make 2)
Yarn: sage green — oval leaves worked around a foundation chain.
Ch 9. Beginning in the second chain from the hook, work sc, hdc, 3 dc, hdc, sc, 3 sc in the final chain. Continue along the opposite side with sc, hdc, 3 dc, hdc, sc (18).
Fold each leaf along the center chain. Angle one leaf upward and the second toward the side.
Join with a sl st. Fasten off, leaving a 20 cm tail.
Daisy Center
Yarn: lemon yellow — flat-circle construction.
R1: 6 sc in MR (6)
R2: inc ×6 (12)
Join with a sl st. Fasten off, leaving a 20 cm tail.
Daisy Petals (Make 6)
Yarn: white — worked directly into the center edge.
Join white yarn in any center stitch. Repeat around: ch 5, beginning in the second chain work sl st, sc, hdc, dc; sl st in the next center stitch. Make six petals, using two center stitches for each petal.
Flatten every petal before securing the final yarn tail.
Fasten off. Weave the tail behind the center.
Flower Stem
Yarn: sage green — narrow cord.
Ch 17. Beginning in the second chain from the hook, sl st in every chain across (16).
The finished stem should measure approximately 8 cm. Attach one end behind the flower center.
Fasten off. Leave a 15 cm tail.
Assembly
- Pin the head centrally over the body’s 18-stitch opening. Sew around the neck twice, adding a final layer of filling before closing the last 2 cm.
- Position the trunk between head R11 and R18. Place its wide base below the eyes and angle the narrow tip toward the right arm.
- Pin the outer ears between head R6 and R13. Keep approximately eight visible head stitches between their upper inner edges.
- Check the ear circles from the front, then sew around their folded inner sections without flattening the outer edges.
- Attach the arms at body R17 and R18. Turn the right arm inward until it reaches the flower stem beside the trunk.
- Sew the back legs across body R3 to R10. Stand the elephant on a hard surface and level both feet before closing the second seam.
- Attach the short tail to the center back between body R8 and R11. Point the final rounds downward.
- Place the yellow hat between the ear roots. Tack the rear half of the brim to the head and sew the two green leaves over the crown center.
- Attach the daisy stem to the back of the flower, then stitch the stem between the right paw and trunk at two points.
- Check the trunk curve, hat level and foot contact. Bury every remaining tail through at least 5 cm of stuffed fabric.
The completed elephant should stand on both feet while the daisy rests between the trunk and right paw.
7 Technical Tips
- Trunk rotation: A base shifted by two head stitches makes the tip cross the wrong eye line. Mark the vertical facial center before pinning the trunk.
- Weak neck stuffing: Compression greater than 6 mm lets the ear weight pull the head backward. Add small pieces of filling around the neck perimeter before closing the seam.
- Visible decrease holes: Conventional decreases can expose filling along the head and body. Work through front loops only and reduce the hook to 3.25 mm when a gap exceeds 2 mm.
- Late eye fitting: Fourteen-millimetre washers become difficult to install after the opening drops below 24 stitches. Fit both eyes before completing head R18.
- Unequal ear diameters: A tension difference of one millimetre per round can produce a visibly smaller second ear. Compare both circles after R4 and R6 before finishing them.
- Unstable foot placement: A vertical difference of 4 mm makes the elephant lean. Pin both legs, place the body on a level table and compare the magic-ring centers before sewing.
- Loose flower grip: One attachment stitch allows the daisy to rotate away from the trunk. Secure the stem at two points spaced approximately 18 mm apart.
Conclusion
Check the trunk angle before fixing the flower. Its narrow end should pass beside the daisy center while leaving both safety eyes fully visible. Crochet the first ear next and record its relaxed diameter after R7; compare that measurement with the second circle before adding the inner panels. Save this lemon hat elephant amigurumi crochet pattern to a Pinterest spring-project board, then share the finished figure on Instagram using #LemonHatElephant. Include the yarn weight, hook size and final standing height in the caption. Did you curve the trunk around the daisy stem, or position its tip directly beneath one white petal?









