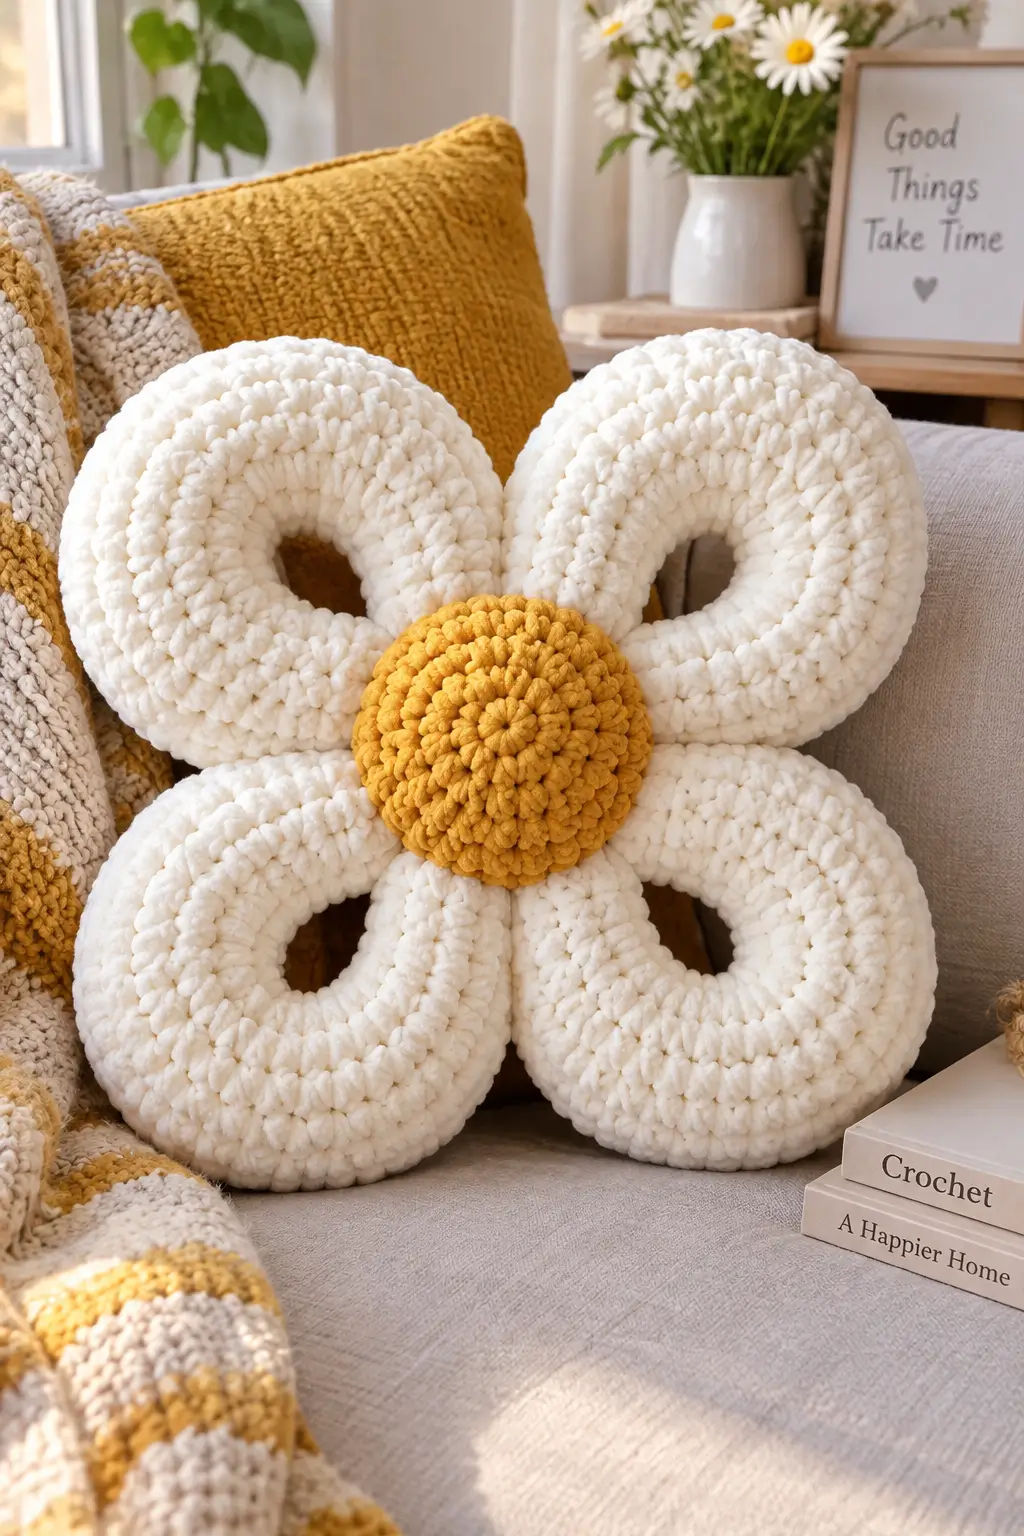
Four hollow petals give this flower a silhouette that a standard daisy cushion cannot produce. This crochet flower pillow pattern recreates that structure with super-bulky chenille, a 4.5 mm hook, four stuffed tubes and a 36-stitch center. The target diameter is approximately 30–35 cm, depending on tension. Intermediate skills are appropriate because the project requires controlled stuffing and ring assembly. Its compact depth makes it practical as sofa back support.
The Design: What Makes This Flower Different
The photographed cushion is built around rings, not conventional leaf-shaped petals. Each petal therefore needs an open center and enough stuffing to retain an oval loop after assembly. A narrow 18-stitch tube provides that geometry without making the chunky crochet flower pillow excessively deep.
The mustard center is intentionally larger than the four inner openings. That overlap hides the petal joins and locks the rings into a readable flower silhouette. Behind it, the petals meet near one central point rather than along a broad circular panel.
Another structural decision concerns symmetry. Four petals require 90-degree spacing, and small placement errors become obvious once the center is attached. The common mistake in a daisy pillow crochet pattern of this type is overstuffing the tubes. The maker then gets four rigid doughnut shapes rather than soft oval petals that can overlap at the center.
Project Info at a Glance
| Skill Level | Time | Finished Size | Hook | Best For |
|---|---|---|---|---|
| Intermediate | 5–8 hours | Approx. 30–35 cm | 4.5 mm | Sofa or bed accent cushion |
A 30 cm finished diameter and 4.5 mm hook are useful benchmarks for a super-bulky flower pillow. The upper end of the size range allows for the thicker loop construction used in this design.
Materials and Tools
Yarn
- Warm white — Super Bulky #6 chenille/blanket yarn — approximately 300 g — Himalaya Dolphin Baby or comparable polyester chenille.
- Mustard gold — Super Bulky #6 chenille/blanket yarn — up to 100 g — matching chenille with similar meterage and diameter.
Tools
- 4.5 mm crochet hook
- Polyester fiberfill
- Yarn needle
- Locking stitch markers
- Scissors
- Four removable pins or clips for assembly
No safety eyes are required for this flower pillow.
Abbreviations
- MR — magic ring
- sc — single crochet
- inc — 2 sc in one stitch
- dec — invisible decrease over 2 stitches
- sl st — slip stitch
- ch — chain
- BLO — back loop only
- FO — fasten off
For an invisible decrease, insert the hook through the front loops of the next two stitches, yarn over and complete them together as one single crochet.
Pattern — Step by Step
Work in a continuous spiral unless a section specifically says otherwise. Mark the first stitch of every round.
Raised Flower Center
Yarn: mustard gold. This section uses standard six-stitch amigurumi progression.
R1: 6 sc in MR (6)
R2: inc ×6 (12)
R3: (sc, inc) ×6 (18)
R4: (2 sc, inc) ×6 (24)
R5: (3 sc, inc) ×6 (30)
R6: (4 sc, inc) ×6 (36)
R7: sc around (36)
R8: sc around (36)
R9: sc around (36)
R10: sc around (36)
R11: (4 sc, dec) ×6 (30)
R12: (3 sc, dec) ×6 (24)
Begin stuffing. Keep the front rounded but do not pack the base hard. A slightly flatter rear surface sits against the four petal joins more cleanly.
R13: (2 sc, dec) ×6 (18)
R14: (sc, dec) ×6 (12)
Add the final stuffing before the opening becomes too small.
R15: dec ×6 (6)
Fasten off. Leave a 30 cm tail and close the remaining opening.
The 36-stitch plateau creates a medium-sized raised center while maintaining the oversized center visible in the reference flower.
Loop Petal — Make 4
Yarn: warm white. The petals are constructed as stuffed tubes that are joined into rings.
Each petal needs an open center. Instead of crocheting a conventional flat petal, make a narrow tube, stuff it gradually, curve it into an oval ring and join the two ends.
R1: 6 sc in MR (6)
R2: inc ×6 (12)
R3: (sc, inc) ×6 (18)
R4: sc around (18)
R5: sc around (18)
R6: sc around (18)
R7: sc around (18)
R8: sc around (18)
R9: sc around (18)
R10: sc around (18)
R11: sc around (18)
R12: sc around (18)
R13: sc around (18)
R14: sc around (18)
R15: sc around (18)
R16: sc around (18)
R17: sc around (18)
R18: sc around (18)
R19: sc around (18)
R20: sc around (18)
R21: sc around (18)
R22: sc around (18)
R23: sc around (18)
R24: sc around (18)
R25: sc around (18)
R26: sc around (18)
R27: sc around (18)
R28: sc around (18)
R29: sc around (18)
R30: sc around (18)
R31: sc around (18)
R32: sc around (18)
R33: sc around (18)
R34: sc around (18)
R35: sc around (18)
R36: sc around (18)
R37: sc around (18)
R38: sc around (18)
Stuff gradually from approximately R10 onward. The tube should bend without producing visible gaps between stitches. Leave the final 2 cm at the open end slightly softer so the seam can be compressed.
Do not decrease the open end. Fasten off and leave a 35 cm sewing tail.
Curve the tube until the open end meets the R1 end. Sew the 18 stitches around the open rim securely to the beginning end. Distribute the seam around the end rather than pulling all 18 stitches toward one point.
Repeat until you have four matching loop petals.
Petal Inner Anchors
No separate crocheted component is required. On each completed petal, mark a section approximately 3 cm wide opposite the outermost curve. This section becomes the inner anchor concealed beneath the mustard center.
The four anchor areas replace the flat bases found on conventional crochet flower petals. Keeping the joining area broad also prevents the petals from twisting after the cushion is assembled.
Finishing the Four Petals
Before joining the petals, place all four rings on a flat surface. Compare their length, width and central openings.
Minor differences can usually be corrected by redistributing the stuffing. Move a small amount toward the outer curves when one petal appears flatter than the others. Keep the inner sections softer because those areas must overlap beneath the flower center.
The petal seams should all point toward the middle of the flower. This positioning hides the joins beneath the mustard center instead of leaving them visible around the outside edge.
Assembly
- Place the top petal vertically with its seam positioned at the bottom, where the mustard center will conceal it.
- Position the bottom petal directly opposite it. Keep the two outer edges on the same vertical axis before pinning.
- Add the left petal at 90 degrees to the first pair. Its inner edge may overlap the vertical petals slightly, but the outer loop should remain open.
- Set the right petal opposite the left one. Measure from the flower’s center to each outer edge and correct any petal that extends noticeably farther than its opposite.
- Sew the four inner anchor sections to one another with warm-white yarn. Catch approximately 2–3 cm of each petal rather than pulling the loops together at a single stitch.
- Turn the assembled petals face up and place the mustard center over the junction. It should cover the white joining stitches while leaving all four hollow petal openings visible.
- Pin the center at four quarter points. Check the top, right, bottom and left overlap before adding more pins between them.
- Sew the mustard center to the white petals using small stitches around the center’s rear perimeter. Catch the petal fabric without passing the needle through the visible front surface whenever possible.
- Redistribute stuffing by hand after sewing. The four petals should have comparable thickness, with slightly softer inner edges and fuller outside curves.
- Weave every tail through at least 5 cm of dense crochet fabric before trimming. Check the four loop seams and center attachment for openings large enough to expose fiberfill.
The completed cushion consists of four stuffed ring petals fixed around one raised circular center.
7 Technical Tips for a Better Flower Pillow
- Control stitch-marker drift. Moving the marker one stitch late produces a diagonal seam and changes the apparent length of a petal tube. Place the marker into the first stitch immediately after completing it on every round.
- Watch stuffing firmness. Packing the 18-stitch tubes completely rigid can reduce the inner opening and prevent the petal from bending into an oval. Keep the inner 2–3 cm near each anchor noticeably softer than the outer curve.
- Prevent invisible-decrease gaps. Pulling chenille too hard during the center decreases can damage the yarn’s plush outer fibers. Work each invisible decrease through the two front loops with the same tension used for the preceding single crochets.
- Measure center placement. A center shifted by even 1–2 cm makes one petal appear shorter than its opposite. Pin at the four 90-degree points before sewing any section longer than 2 cm.
- Correct loose chenille tension. Loose stitches can expose stuffing because plush yarn can disguise the actual gap until the fabric stretches. If an 18-stitch tube shows visible fiberfill, reduce the hook by 0.5 mm instead of pulling every stitch excessively tight.
- Pin a wide petal anchor. Joining all four loops at one tiny central point creates a bulky knot behind the gold center. Pin and sew approximately 2–3 cm of each inner edge into the central junction instead.
- Secure the yarn tails. A short chenille tail can work loose because the smooth polyester core has less grip than many traditional yarns. Leave at least 30 cm for structural joins and weave the remaining tail through roughly 5 cm of dense fabric before cutting it.
Finishing the Crochet Flower Pillow
Check the flower from both the front and back before trimming the final tails. The four petal openings should remain clearly visible and approximately equal in size. If one opening has collapsed, move some stuffing away from its inner curve and reshape the tube by hand.
Also inspect the mustard center. It should conceal the central petal seams without covering so much of each loop that the flower loses its four-petal structure.
The next practical step is to make one 18-stitch test tube for ten rounds, stuff it and confirm that the 4.5 mm hook produces fabric dense enough to hide the filling. If the fabric passes that test, continue the full crochet flower pillow pattern with the same tension.
Save the finished project to Pinterest and share the completed cushion on Instagram with #LoopPetalFlowerPillow. When comparing your cushion with the reference flower, check one detail in particular: did the inner edges remain soft enough to form four distinct oval openings?









