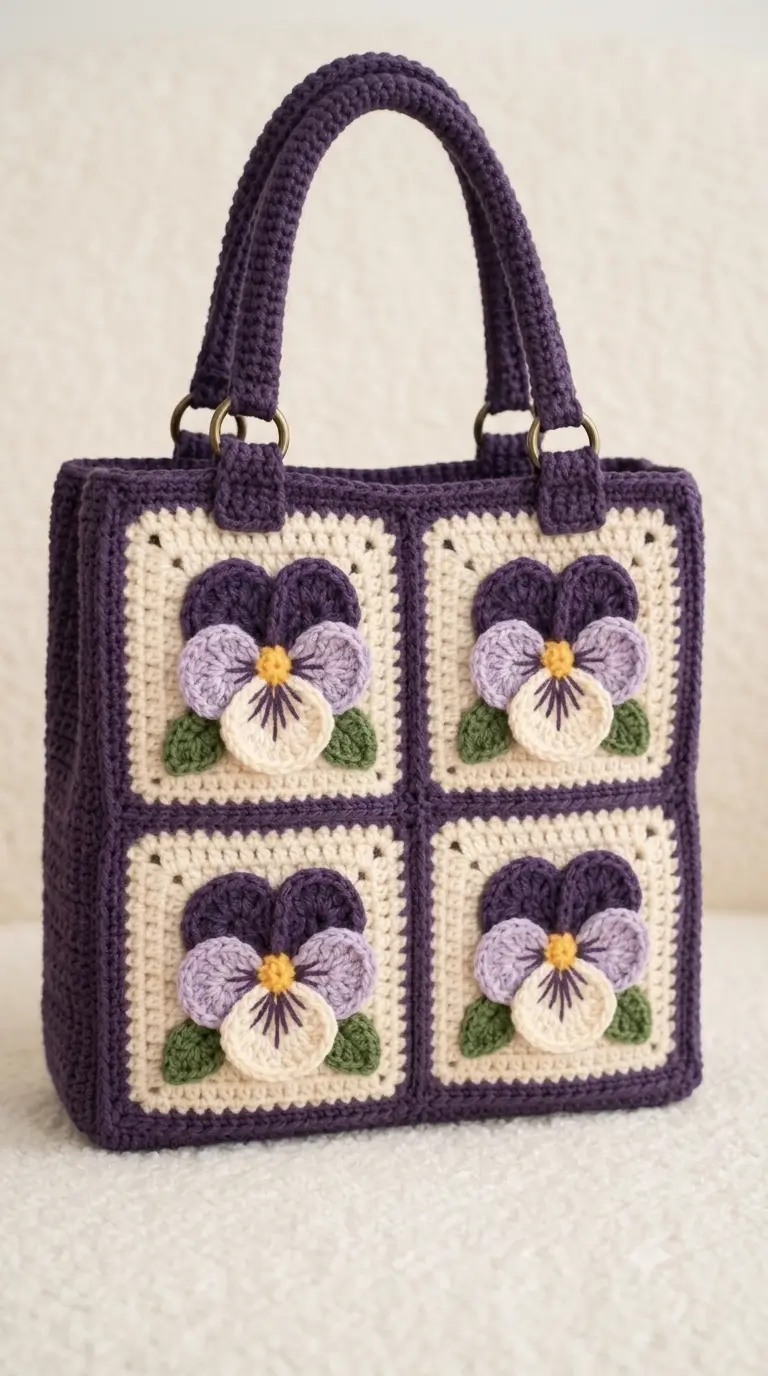
A pansy needs two high petals, two side petals and one lower petal to produce its unmistakable face. This pansy granny square crochet bag converts that asymmetry into four raised floral panels framed in dark violet. Use Category 4 cotton or cotton-blend yarn, a 4 mm hook and four purse rings for an approximately 27 × 25 cm intermediate-level handbag. The structured panel construction also limits the stretching common in crocheted totes.
The Design: What Makes This Pansy Bag Different
Three structural choices define this crochet pansy bag pattern. First, the flower is applied after the square is complete, so its petals can overlap without changing the square’s gauge. Second, the dark-violet outer frame visually connects four separate cream motifs and creates a firmer perimeter for joining. Third, the handles attach through metal rings rather than directly to open granny-square spaces; load is transferred into reinforced tabs instead of one vulnerable stitch cluster.
The flower itself must remain asymmetric. Pansies have five petals arranged in unequal visual groups, and flattening all five into an evenly spaced rosette makes the motif read as a generic flower.
The most common construction error on a floral granny square bag is joining panels before blocking them to equal dimensions. Even a 5 mm difference compounds across a two-square-wide front.
Project Info at a Glance
| Skill Level | Time | Finished Size | Hook | Best For |
|---|---|---|---|---|
| Intermediate | 12–18 hours estimated | 26.7–27.9 × 25.4 × 7.6 cm | 4 mm | Structured handbag / everyday tote |
Materials and Tools
Yarn
For a bag close to the photograph, choose a firm Category 4 cotton or cotton-blend yarn. Bag fabric needs enough structure to support the raised flowers, hardware and contents without excessive stretching.
- Warm ivory — Category 4 cotton or cotton blend — main granny-square color
- Deep violet/plum — Category 4 — square frames, sides, handles and upper petals
- Lavender — Category 4 — side petals
- Leaf green — Category 4 — leaves
- Golden yellow — Category 4 — flower centers
- Dark violet embroidery yarn — small quantity for pansy facial markings
For purchasing guidance, allow generous quantities of ivory and deep violet because these colors form the structural parts of the bag. Lavender, green and yellow can be purchased in smaller quantities or worked from suitable remnants.
Tools
- 4 mm crochet hook
- 4 purse rings, approximately 32 mm
- Tapestry needle
- Locking stitch markers
- Scissors
- Blocking pins
- Tape measure
- Optional cotton cord for handle cores
- Optional fabric lining
- Optional magnetic closure
Abbreviations
- MR — magic ring
- ch — chain
- sc — single crochet
- hdc — half double crochet
- dc — double crochet
- tr — treble crochet
- inc — 2 stitches in one stitch
- dec — decrease
- sl st — slip stitch
- BLO — back loop only
- st/sts — stitch/stitches
- sp — space
- RS — right side
- WS — wrong side
Invisible decreases are mainly used for three-dimensional crochet; if one is needed on a tubular handle section, work through the front loops to reduce visible bulk.
Pattern — Step by Step
Measure after every major component because yarn substitution changes both square dimensions and handle stretch. The target finished square is approximately 12.7–13.3 cm.
Solid Granny Squares — Make 8
Yarn: warm ivory
R1: MR, ch 3, 2 dc, ch 2; *3 dc, ch 2* ×3. Join with sl st.
R2: Sl st to corner. Ch 3, dc in each dc to corner; *(2 dc, ch 2, 2 dc) in corner, dc in each dc to next corner* around. Join.
R3: Repeat the established solid-square increase: one dc in each dc and *(2 dc, ch 2, 2 dc)* in every corner. Join.
R4: Repeat R3.
R5: Repeat R3.
Measure before adding another round. Stop when the cream section leaves enough room for the violet frame while maintaining the target finished-square measurement.
Fasten off.
Violet Square Frame — Make on All 8 Squares
Yarn: deep violet
Join violet at any corner.
R1: Ch 1. Work 1 sc in each dc across each side. At each ch-2 corner work 3 sc. Join with sl st.
R2: Ch 1, sc around, placing 3 sc in the center stitch of each corner group. Join.
Fasten off.
Block all eight motifs to exactly the same measurement. Aim for approximately 12.7–13.3 cm per finished square.
Deep-Violet Upper Petals — Make 8
Yarn: deep violet
R1: MR, ch 2, 6 hdc into ring. Turn. (6)
R2: Ch 2, 2 hdc in each st across. (12)
R3: Ch 2, *2 hdc in next st, 1 hdc in next st* ×6. (18)
Do not join the piece into a complete circle. Keeping the lower edge open produces the fan shape required for a pansy petal.
Fasten off. Leave approximately 20 cm for sewing.
Make two upper petals for each flower.
Lavender Side Petals — Make 8
Yarn: lavender
R1: MR, ch 2, 6 hdc into ring. Turn. (6)
R2: Ch 2, 2 hdc in each stitch. (12)
R3: Ch 1. Work sc and hdc toward the center, use dc increases across the center section, then mirror the sequence with hdc and sc toward the opposite edge.
The completed side petal should form a broad oval fan approximately 4–5 cm wide. Make these petals slightly wider than the dark-violet upper pair.
Fasten off. Leave approximately 20 cm for sewing.
Ivory Lower Petals — Make 4
Yarn: warm ivory
R1: MR, ch 2, 6 hdc. Turn. (6)
R2: Ch 2, 2 hdc in each stitch. (12)
R3: Ch 2, *hdc, 2 hdc in next* ×6. (18)
R4: Work a shallow fan across the outer edge using sc at both ends, hdc beside them and dc through the central section.
Fasten off.
The ivory petal points downward and sits beneath the lavender petals. Do not arrange all five petals at equal angles; the uneven petal groups create the recognizable pansy shape.
Yellow Centers — Make 4
Yarn: golden yellow
R1: 6 sc in MR. (6)
R2: inc ×6. (12)
Sl st to the first sc.
Fasten off. Leave approximately 20 cm for sewing.
Keep each yellow disk compact. An oversized center covers too much of the overlapping petals.
Leaves — Make 8
Yarn: leaf green
Row 1: Ch 8.
Starting in the second chain from the hook: sc, hdc, dc, 2 dc, dc, hdc, sc.
Rotate the work and crochet along the opposite side of the foundation chain.
Row 2: sc, hdc, dc, 2 dc, dc, hdc, sc.
Sl st at the base.
Fasten off. Leave a sewing tail.
Use two leaves for each flower. Angle one down-left and the other down-right.
Pansy Facial Embroidery — Make on 4 Flowers
Yarn: deep violet
Position the ivory lower petal first. Thread approximately 30 cm of violet yarn onto a tapestry needle.
Make five narrow straight stitches radiating from the center toward the lower half of the ivory petal. Add two or three shorter rays to each lavender petal, starting close to the yellow center.
Keep each embroidery stitch independent and avoid long yarn floats across the reverse side.
Front Panel — Make 1
Arrange four finished squares in a 2 × 2 grid.
Check every square before joining. Keep dimensional variation within approximately 3 mm.
Place stitch markers at the central meeting points. With deep-violet yarn, seam the two upper squares together, followed by the two lower squares. Join the completed upper row to the lower row.
Lay the panel flat and measure it. The target width is approximately 26–28 cm.
Back Panel — Make 1
Arrange and join the remaining four squares using the same 2 × 2 layout.
The back can remain plain or receive four additional pansies. A plain back reduces bulk and prevents raised petals from rubbing against clothing during use.
If additional flowers are added, repeat the petal, leaf, center and embroidery instructions before final bag assembly.
Side and Bottom Gusset — Make 1
Yarn: deep violet
Chain until the foundation measures approximately 7–8 cm.
Row 1: Sc in second ch from hook and across. Turn.
Row 2: Ch 1, sc across. Turn.
Repeat Row 2 until the strip is long enough to run down one side of the front panel, across the entire bottom and up the opposite side.
Do not rely on a fixed row count because gauge changes the required gusset length. Pin the strip around the blocked front panel and stop when it reaches both upper corners without stretching.
Fasten off. Leave a long joining tail.
Top Edge
Yarn: deep violet
After the front panel, gusset and back panel have been connected, join the violet yarn at the upper edge.
R1: Sc evenly around the entire bag opening. Join.
R2: Ch 1, sc in each stitch around. Join.
R3: Repeat R2.
If the opening flares outward, work occasional sc2tog decreases near the side seams. If the edge contracts noticeably, remove those decreases.
Handle Tabs — Make 4
Yarn: deep violet
Chain enough stitches to produce a strip approximately 3 cm wide.
Row 1: Sc across.
Rows 2–8: Ch 1, sc across.
Test the strip around a 32 mm purse ring. It needs enough length to fold through the ring and overlap against the inner face of the bag by approximately 2 cm.
Fasten off. Leave a 30 cm sewing tail.
Crocheted Handles — Make 2
Yarn: deep violet
Make a foundation chain corresponding to the required finished handle length. Aim for a total bag height of approximately 45–46 cm including the handles.
Row 1: Sc in second chain from hook and across.
Rows 2–5: Ch 1, sc across.
Fasten off.
For a thicker rounded handle like the one shown, fold the strip lengthwise around cotton cord and seam the long edges with matching yarn. Leave approximately 4–5 cm at each end flat enough to pass through the metal rings.
The cord core helps reduce lengthwise stretching once the bag carries weight.
Flower Placement
Center one pansy on each visible ivory square.
Attach the leaves first. Their inner ends should disappear beneath the flower petals.
Position the two dark-violet upper petals at approximately 10 and 2 o’clock. Set the lavender petals at approximately 8 and 4 o’clock. Place the ivory petal at approximately 6 o’clock.
Pin every component before sewing.
Sew the inner half of each petal firmly to the square while leaving approximately 10–15 mm of the outer edge unattached. This produces the raised 3D appearance without leaving an excessively loose edge.
Sew the yellow center into position last. Stitch through the overlapping petal layers and into the granny square underneath.
Assembly
- Block all eight granny squares to the same measurement, targeting approximately 12.7–13.3 cm each.
- Join four squares into the 2 × 2 front panel. Check the central intersection before completing each seam.
- Join the remaining four squares into the back panel and compare its finished dimensions with the front.
- Attach the pansies to the front panel in this order: leaves, petals, embroidered markings and yellow centers.
- Pin the violet gusset down one side of the front, around the bottom and up the opposite side. Seam without stretching either component.
- Attach the back panel to the free edge of the gusset. Match both upper corners and the bottom-center point before completing the seams.
- Crochet the violet top edging around the bag opening. Keep the stitch distribution symmetrical at the two side seams.
- Fold each handle tab through a metal ring. Stitch through the tab, top edging and approximately 2 cm of inner bag fabric several times.
- Pass the handle ends through their corresponding rings and secure them firmly. Add a fabric lining before final finishing if the bag will regularly carry concentrated loads.
- Weave structural yarn tails through at least 4–5 cm of dense crochet. Trim only after checking the seams and handle attachments under light tension.
The completed piece forms a rectangular purple handbag with four raised pansies across the front and two reinforced ring-mounted handles.
7 Technical Tips for a Better Pansy Crochet Bag
- Prevent square mismatch: keep the finished squares within 3 mm of one another before joining. A larger discrepancy becomes visible where the four motifs meet in the center.
- Prevent handle-tab failure: do not attach a loaded handle to only one row of top edging. Stitch the tab through approximately 2 cm of inner bag fabric to distribute the pulling force.
- Prevent petal collapse: avoid sewing around the entire perimeter of a pansy petal. Leave approximately 10–15 mm of the outer edge free so the flower remains raised.
- Prevent a distorted flower face: place the dark-violet petals at roughly 10 and 2 o’clock. Horizontal placement makes the finished motif resemble a generic radial flower rather than a pansy.
- Prevent gusset puckering: mark the midpoint of both the gusset and bottom panel edge before sewing. If the markers do not meet, redistribute the pinned fabric before making the seam permanent.
- Prevent unequal handles: measure both handles under light tension and keep the finished lengths within 5 mm. Adding cotton cord inside each handle can also reduce progressive stretching.
- Prevent structural tails from escaping: weave ring-tab and gusset tails through at least 4–5 cm of dense crochet and reverse direction once. These locations receive more mechanical load than the decorative flower components.
Why Cotton or Cotton Blend Works Better
A handbag places more mechanical load on yarn than a decorative crochet motif. Stretch therefore becomes part of the construction rather than simply a gauge issue.
Category 4 cotton or cotton-blend yarn provides the density needed for the photographed silhouette. The side walls need to remain vertical, the upper edge should resist sagging between the handles, and the front panel must support four layered flowers.
Acrylic yarn can also be used, but a fabric lining becomes more important when the yarn stretches easily. Firm cotton additionally produces cleaner edges around the applied petals.
Gauge should be checked at the panel level. Crochet one complete square, block it, measure it and calculate the expected two-square panel width before making the remaining seven squares.
Sizing the Pansies
Pansy motifs can vary substantially in finished diameter depending on yarn weight, hook size and petal construction. For this bag, flower size needs to remain proportional to the granny square rather than following an independent flower measurement.
On a square measuring approximately 12.7–13.3 cm, aim for a completed pansy around 8–10 cm across after arranging the petals.
This leaves a visible ivory margin around the flower and prevents the petals from covering the dark-violet square frame.
Pin the complete flower to the blocked square before sewing. Blocking can widen individual petals, so measuring the assembled motif gives a more useful result than measuring each petal separately.
Hardware Placement
Four metal rings create two separate attachment points for each handle. This arrangement distributes the load across a wider section of the upper edge and reproduces the hardware configuration visible in the design.
Position the left and right rings symmetrically around the vertical centerline of each panel.
Do not use the flowers as the only positioning reference. Minor differences in appliqué placement can make correctly attached handles appear crooked.
Measure each tab position from the nearest side seam instead. If the front panel measures approximately 27 cm wide, mark both ring locations, compare the distances from the outer edges and repeat those measurements on the back panel.
Conclusion
The defining measurement in this project is the relationship between a roughly 13 cm square, an 8–10 cm layered flower and a finished front panel near 27 cm wide. Crochet one square first, block it, and adjust the remaining components from that measured sample before making the full set. Test the metal-ring tabs under load before adding the lining or completing the final finishing. Save the finished pansy granny square crochet bag to Pinterest or share the front-panel layout on Instagram with #PansyGrannySquareBag. For another version, decide one design variable before purchasing yarn: should all four pansies retain this coordinated purple palette, or should each square feature a different pansy color?









