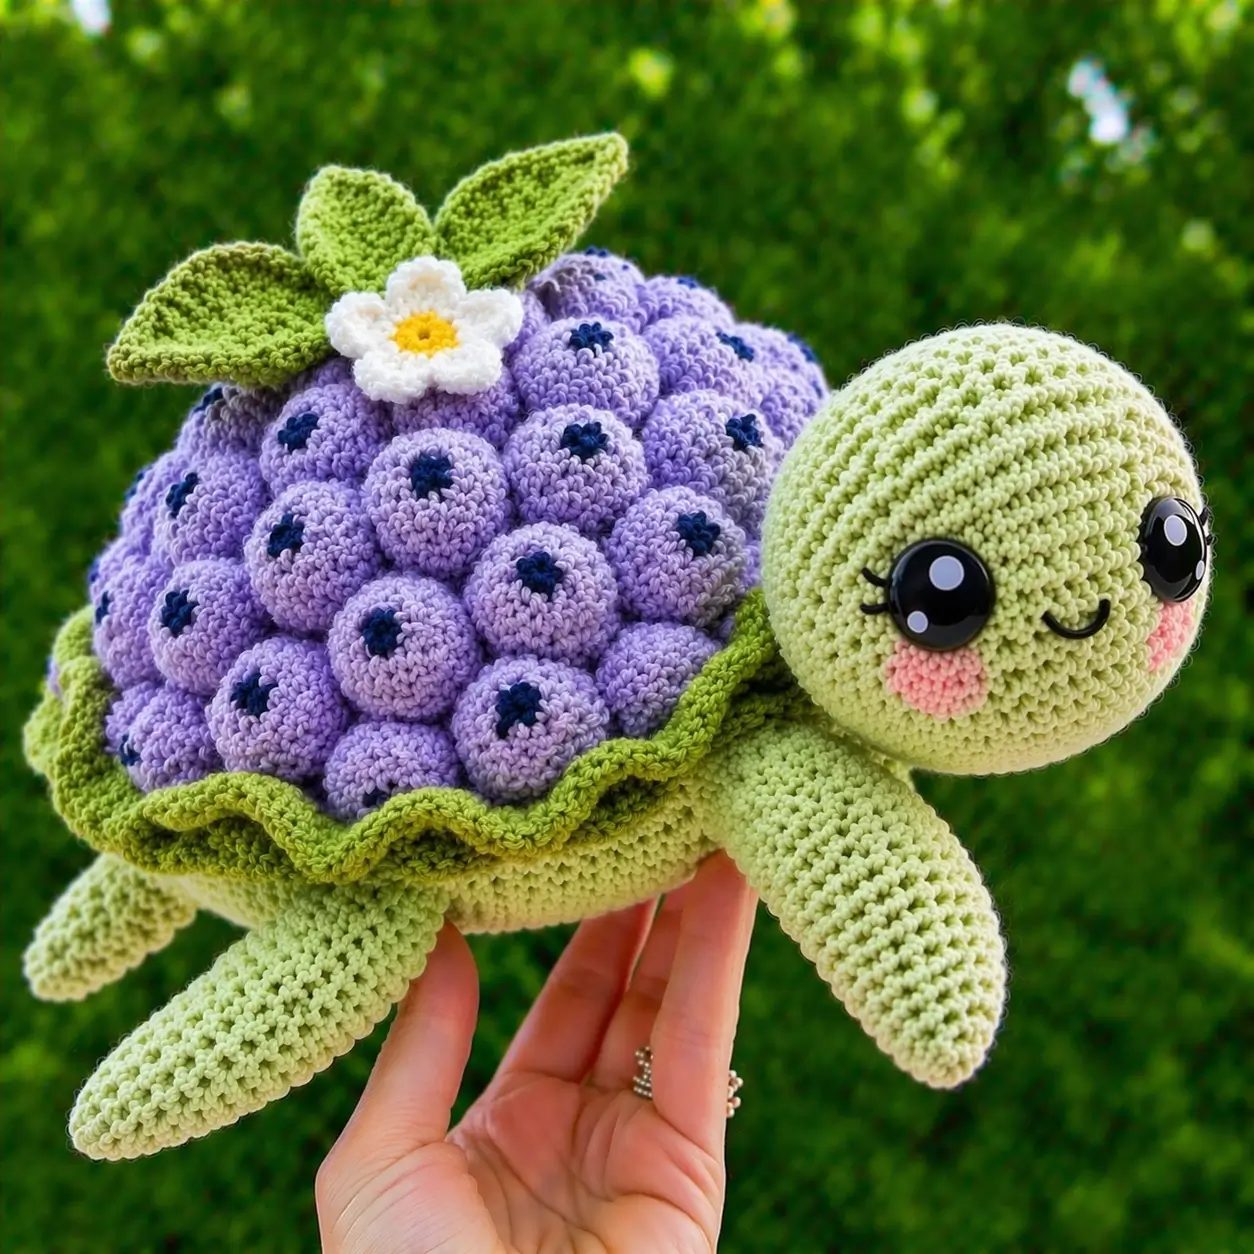
Hydrangea heads grow as tight clusters, not flat petals. That changes the whole shell strategy. This hydrangea turtle amigurumi crochet pattern uses a 4.0 mm hook, floral cluster repeats, a compact 15 cm finish, and intermediate shaping to match the photo while keeping the turtle stable on four flippers. Accessible pattern listings for this design confirm the 4.0 mm hook, 12 mm eyes, and about 15 cm finished size.
The Design: What Makes This Turtle Different
A standard turtle shell reads as one dome. This one does not. The shell has to carry dozens of rounded hydrangea bumps, so the base needs a lower center of gravity and a firmer edge than a plain turtle body. That is why the draft below uses a medium 36-stitch body core with a separate ruffled shell rim. Another structural choice is the leaf-and-flower topper. It breaks up the top silhouette and pushes the piece from generic flower turtle crochet pattern territory into a hydrangea-specific design. One common failure shows up fast: makers build the bumps too large, then the shell slumps outward instead of stacking upward. In strong examples of hydrangea turtle crochet, the florets stay small, repeated, and tightly packed. Marketplace previews confirm the design family, but they do not explain that proportion problem.
Project Info at a Glance
| Skill Level | Time | Finished Size | Hook | Best For |
|---|---|---|---|---|
| Intermediate | 6–8 hours | 15 cm verified target | 4.0 mm | Floral gift plush, display piece, spring market table |
Materials and Tools
Yarn
- Pale pistachio green — DK/light worsted look — about 70 g estimated — cotton blend or mercerized cotton visual match
- Lavender — DK/light worsted look — about 80 g estimated — cotton blend
- Deep violet — DK/light worsted look — about 10 g estimated — cotton blend
- Leaf green — DK/light worsted look — about 20 g estimated — cotton blend
- White — DK/light worsted look — about 5 g estimated — cotton blend
- Yellow — DK/light worsted look — under 5 g estimated — cotton blend
- Pink — DK/light worsted look — under 5 g estimated — cotton blend
Tools
Hook 4.0 mm / 12 mm safety eyes / stuffing / tapestry needle / stitch markers / embroidery needle for smile and cheek detail.
Abbreviations
- MR = magic ring
- sc = single crochet
- inc = increase
- dec = decrease
- sl st = slip stitch
- ch = chain
- BLO = back loop only
- FLO = front loop only
Use invisible decrease on the visible shaping rounds so the head and shell edge keep a cleaner line.
Pattern — Step by Step
Continuous spiral unless noted. Counts use standard amigurumi math reconstructed for a medium-size turtle.
Head (Make 1)
Yarn: pale pistachio green — Source: standard amigurumi math
- R1: 6 sc in MR (6)
- R2: inc x6 (12)
- R3: (sc, inc) x6 (18)
- R4: (2 sc, inc) x6 (24)
- R5: (3 sc, inc) x6 (30)
- R6: (4 sc, inc) x6 (36)
- R7: sc around (36)
- R8: sc around (36)
- R9: sc around (36)
- R10: sc around (36)
- R11: sc around (36)
- Insert 12 mm eyes between R8 and R9, about 10 sts apart if following the verified hardware size. Embroider lashes and smile after stuffing.
- R12: (4 sc, dec) x6 (30)
- R13: (3 sc, dec) x6 (24)
- R14: (2 sc, dec) x6 (18)
- Stuff firmly, but keep the lower back of the head slightly flatter for sewing.
- R15: (sc, dec) x6 (12)
- R16: dec x6 (6)
Fasten off. Leave a 30 cm tail.
Body Core (Make 1)
Yarn: pale pistachio green — Source: standard amigurumi math
- R1: 6 sc in MR (6)
- R2: inc x6 (12)
- R3: (sc, inc) x6 (18)
- R4: (2 sc, inc) x6 (24)
- R5: (3 sc, inc) x6 (30)
- R6: (4 sc, inc) x6 (36)
- R7: sc around (36)
- R8: sc around (36)
- R9: sc around (36)
- R10: (4 sc, dec) x6 (30)
- R11: (3 sc, dec) x6 (24)
- R12: (2 sc, dec) x6 (18)
- Stuff lightly. This part is a low dome, not a sphere.
- R13: (sc, dec) x6 (12)
- R14: dec x6 (6)
Fasten off. Leave a 25 cm tail.
Shell Ruffle Base (Make 1)
Yarn: leaf green — Source: standard amigurumi math adapted from the photo
- R1: 6 sc in MR (6)
- R2: inc x6 (12)
- R3: (sc, inc) x6 (18)
- R4: (2 sc, inc) x6 (24)
- R5: (3 sc, inc) x6 (30)
- R6: (4 sc, inc) x6 (36)
- R7: BLO sc around (36)
- R8: in FLO of R7: (sl st, hdc, dc, hdc, sl st) in next st, skip 1 st; repeat around for 18 small waves
Fasten off. Leave a 20 cm tail.
Front Flippers (Make 2)
Yarn: pale pistachio green — Source: standard amigurumi math
- R1: 6 sc in MR (6)
- R2: inc x6 (12)
- R3: sc around (12)
- R4: (sc, inc) x6 (18)
- R5: sc around (18)
- R6: sc around (18)
- R7: (4 sc, dec) x3 (15)
- R8: sc around (15)
- R9: (3 sc, dec) x3 (12)
- R10: sc around (12)
- R11: (2 sc, dec) x3 (9)
- R12: sc around (9)
- R13: (sc, dec) x3 (6)
- R14: sc around (6)
- Flatten lightly. Do not overstuff.
Fasten off. Leave a 20 cm tail.
Back Flippers (Make 2)
Yarn: pale pistachio green — Source: standard amigurumi math
- R1: 6 sc in MR (6)
- R2: inc x6 (12)
- R3: sc around (12)
- R4: (sc, inc) x6 (18)
- R5: sc around (18)
- R6: (4 sc, dec) x3 (15)
- R7: sc around (15)
- R8: (3 sc, dec) x3 (12)
- R9: sc around (12)
- R10: (2 sc, dec) x3 (9)
- R11: (sc, dec) x3 (6)
Fasten off. Leave a 18 cm tail.
Tail (Make 1)
Yarn: pale pistachio green — Source: standard amigurumi math
- R1: 6 sc in MR (6)
- R2: sc around (6)
- R3: (sc, inc) x3 (9)
- R4: sc around (9)
- R5: (sc, dec) x3 (6)
Fasten off. Leave a 12 cm tail.
Hydrangea Florets (Make 26–30)
Yarn: lavender — Source: photo reconstruction
- R1: 6 sc in MR (6)
- R2: inc x6 (12)
- R3: sc around (12)
- R4: (sc, inc) x6 (18)
- R5: sc around (18)
- R6: (sc, dec) x6 (12)
- Stuff with a pea-sized amount only.
- R7: dec x6 (6)
Fasten off. Leave a 15 cm tail.
Floret Centers (Make 26–30)
Yarn: deep violet — Source: photo reconstruction
- R1: 6 sc in MR (6)
Fasten off. Leave a short tail.
Sew one center into the front of each hydrangea floret.
Leaves (Make 3)
Yarn: leaf green — Source: photo reconstruction
- R1: 6 sc in MR (6)
- R2: inc x6 (12)
- R3: (sc, inc) x6 (18)
- R4: sc around (18)
- R5: (4 sc, dec) x3 (15)
- R6: sc around (15)
- R7: (3 sc, dec) x3 (12)
- R8: sc around (12)
- R9: (2 sc, dec) x3 (9)
- R10: sc around (9)
Flatten. Sc through both layers for 4 sts to taper the tip.
Ch 1, turn, 4 sc back along the edge for a slight spine.
Fasten off. Leave a 20 cm tail.
Top Flower Petals (Make 5)
Yarn: white — Source: photo reconstruction
- R1: 6 sc in MR (6)
- R2: inc x6 (12)
- Petal 1: (sl st, ch 2, 2 dc, sl st) in next 2 sts
- Repeat the petal sequence 5 times around.
Fasten off. Leave a 15 cm tail.
Flower Center (Make 1)
Yarn: yellow — Source: standard flat-circle math
- R1: 6 sc in MR (6)
- R2: inc x6 (12)
Fasten off. Sew to the center of the white flower.
Cheek Patches (Make 2)
Yarn: pink — Source: standard flat-circle math
- R1: 6 sc in MR (6)
- R2: inc x6 (12)
Fasten off. Leave a short tail.
Assembly
- Sew the head to the front third of the body core, tilted slightly upward.
- Attach the shell ruffle base over the body so the wave edge extends beyond the green body line.
- Sew the front flippers slightly below head level, angled forward.
- Sew the back flippers farther apart and flatter than the front pair.
- Attach the tail centered at the rear seam.
- Sew the cheek patches below the eyes.
- Embroider the curved smile between the cheeks.
- Sew the hydrangea florets across the shell from center outward in tight rows.
- Add a dark violet center to each floret, then attach the three leaves and the flower topper near the back-left top of the shell.
- Check the base on a flat surface, rebalance stuffing if the shell leans, then weave in all tails.
The finished turtle should sit with the shell weight centered over all four flippers.
7 Technical Tips
- Mark the first stitch of every round on the head and body. Losing one increase round on a 36-stitch plateau throws the eye line off by a full row.
- Pack the hydrangea florets lightly. Overstuffed bumps push outward and make the shell look like grapes instead of hydrangea clusters.
- Use invisible decreases on the head from R12 onward. Open decreases leave small diagonal gaps that read clearly on smooth cotton yarn.
- Install the safety eyes before the head closes below 24 stitches. At 18 stitches and under, washers become harder to seat cleanly.
- Keep flipper stuffing lighter than head stuffing. Dense flippers angle downward and can lift the shell into a rocking posture.
- Pin the leaf cluster and top flower before sewing. A shift of even 1 cm can pull the visual center too far back and make the head look undersized.
- Weave in hydrangea floret tails in at least three direction changes. Single-pass tail hiding can work loose because the shell surface gets handled more than the body.
Conclusion
The hydrangea turtle amigurumi crochet pattern works because the shell is treated as clustered volume, not surface decoration. That single choice affects floret size, body height, stuffing density, and how the turtle stands once assembled. Use the verified 15 cm scale, 4.0 mm hook, and 12 mm eyes as the hard baseline, then test floret spacing before sewing every bump in place. Post one top view for Pinterest and one side profile for Instagram so the shell structure reads clearly. Hashtag: #HydrangeaTurtle. One question matters for this character more than most: did you place the leaf cluster behind the flower, or offset it to the side like the photo?









