Introduction
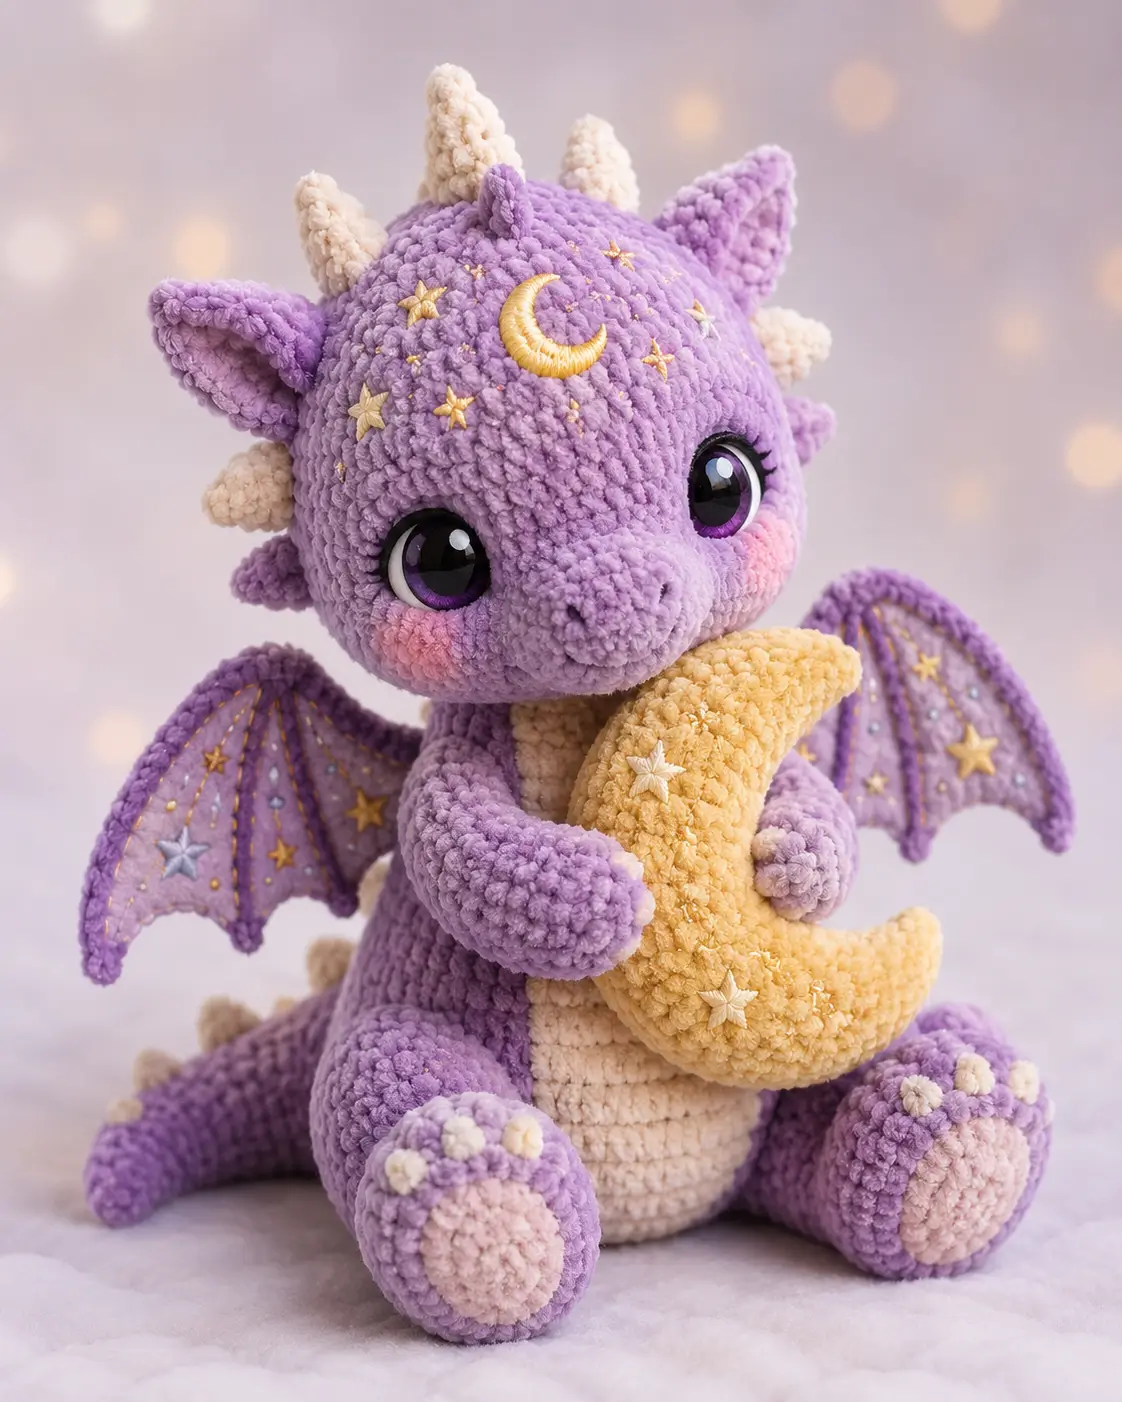
Dragons need weight in the haunches before their wings can look light. This celestial dragon amigurumi crochet pattern builds a purple velvet dragon with cream horns, star details, and a yellow crescent moon pillow. Use super bulky chenille, a 4.5 mm hook, and 24–25 mm safety eyes for a 24–30 cm seated piece. The skill level is intermediate because the wings, snout, and accessory all need accurate placement.
The Design: What Makes This Celestial Dragon Different
A seated dragon fails when the head, wings, and prop all fight for the same visual weight. This pattern solves that by making the head a large 42-stitch sphere, the body a stable 42-stitch pear, and the crescent moon a separate stuffed tube that the arms can hold. You build the head first, then the maker treats the moon as a scale check before adding limbs. The snout is shallow so the large safety eyes stay dominant, while the cream belly and pink cheek patches break up the purple surface. Wing membranes are worked flat because a row-built wing pins cleaner than a stuffed wing on velvet yarn. Common maker mistake: placing the wings too low, which makes a purple dragon amigurumi lean backward. This celestial dragon crochet pattern keeps the wing seam high and the tail low for balance.
Project Info at a Glance
| Skill Level | Time | Finished Size | Hook | Best For |
|---|---|---|---|---|
| Intermediate | 6–12 hours | 24–30 cm seated | 4.5 mm | Shelf display, photo prop, fantasy plush |
Materials and Tools
Yarn
- Lavender purple chenille — super bulky / blanket yarn — 220 g — Premier Basix Chenille, Bernat Blanket, or similar
- Cream chenille — same weight — 80 g — belly, horns, foot pads, spikes
- Butter yellow chenille — same weight — 45 g — crescent moon pillow
- Blush pink chenille — same weight — 10 g — cheek patches
- Gold embroidery floss — small amount — forehead moon, stars, wing lines
Tools
- Hook 4.5 mm
- Safety eyes 24–25 mm
- Polyester stuffing
- Tapestry needle
- Stitch markers
- Straight pins
- Scissors
Abbreviations
MR = magic ring; sc = single crochet; inc = 2 sc in one stitch; dec = single crochet decrease; sl st = slip stitch; ch = chain; BLO = back loop only; st = stitch; FO = fasten off.
Invisible decrease means working through the front loops of the next two stitches before finishing a single crochet so the decrease does not leave a stuffing gap.
Pattern — Step by Step
Continuous spiral unless noted. This is an original moon-dragon construction using standard 6-stitch amigurumi math.
Head
Yarn: lavender purple
R1: 6 sc in MR (6)
R2: inc ×6 (12)
R3: (sc, inc) ×6 (18)
R4: (2 sc, inc) ×6 (24)
R5: (3 sc, inc) ×6 (30)
R6: (4 sc, inc) ×6 (36)
R7: (5 sc, inc) ×6 (42)
R8–R14: sc around (42)
R15: (5 sc, dec) ×6 (36)
R16: sc around (36)
R17: (4 sc, dec) ×6 (30)
R18: sc around (30)
R19: (3 sc, dec) ×6 (24)
R20: (2 sc, dec) ×6 (18)
R21: (sc, dec) ×6 (12)
R22: dec ×6 (6)
Place safety eyes between R11 and R12, 9 stitches apart, before R19. Stuff firmly from R18 onward.
Fasten off. Leave 20 cm tail for closing.
Body
Yarn: lavender purple
R1: 6 sc in MR (6)
R2: inc ×6 (12)
R3: (sc, inc) ×6 (18)
R4: (2 sc, inc) ×6 (24)
R5: (3 sc, inc) ×6 (30)
R6: (4 sc, inc) ×6 (36)
R7: (5 sc, inc) ×6 (42)
R8–R13: sc around (42)
R14: (5 sc, dec) ×6 (36)
R15–R16: sc around (36)
R17: (4 sc, dec) ×6 (30)
R18: sc around (30)
R19: (3 sc, dec) ×6 (24)
R20: sc around (24)
R21: (2 sc, dec) ×6 (18)
R22: (sc, dec) ×6 (12)
R23: dec ×6 (6)
Stuff the lower body more firmly than the upper body so the dragon sits without tipping.
Fasten off. Leave 25 cm tail.
Belly Patch
Yarn: cream
R1: 6 sc in MR (6)
R2: inc ×6 (12)
R3: (sc, inc) ×6 (18)
R4: (2 sc, inc) ×6 (24)
R5: (3 sc, inc) ×6 (30)
Flatten into a vertical oval while sewing.
Fasten off. Leave 35 cm tail.
Snout
Yarn: lavender purple
R1: 6 sc in MR (6)
R2: inc ×6 (12)
R3: (sc, inc) ×6 (18)
R4–R6: sc around (18)
Stuff lightly; overstuffing pushes the eyes outward.
Fasten off. Leave 30 cm tail.
Arms / Front Legs
Yarn: lavender purple — Make 2
R1: 6 sc in MR (6)
R2: inc ×6 (12)
R3–R5: sc around (12)
R6: dec ×6 (6)
R7–R10: sc around (6)
Stuff only R1–R5. Flatten the top before sewing.
Fasten off. Leave 30 cm tail.
Back Legs
Yarn: lavender purple and cream — Make 2
Start in cream.
R1: 6 sc in MR (6)
R2: inc ×6 (12)
R3: (sc, inc) ×6 (18)
Change to lavender purple.
R4–R6: sc around (18)
R7: (sc, dec) ×6 (12)
R8–R9: sc around (12)
Stuff the foot, not the upper edge. Add three cream toe stitches after assembly.
Fasten off. Leave 30 cm tail.
Foot Pads
Yarn: cream — Make 2
R1: 6 sc in MR (6)
R2: inc ×6 (12)
Place one pad on each back foot before sewing the legs to the body.
Fasten off. Leave 20 cm tail.
Wings
Yarn: lavender purple — Make 2
Row 1: ch 10, sc in 2nd ch from hook and across (9)
Row 2: ch 1, turn, inc, 7 sc, inc (11)
Row 3: ch 1, turn, sc across (11)
Row 4: ch 1, turn, inc, 9 sc, inc (13)
Row 5: ch 1, turn, sc across (13)
Row 6: ch 1, turn, inc, 11 sc, inc (15)
Row 7: ch 1, turn, sc across (15)
Row 8: ch 1, turn, 3 sc, sl st, ch 3, sl st in next st, 3 sc, sl st, ch 3, sl st in next st, 4 sc (15)
Work one border round of sc around the wing edge, placing 3 sc at the upper corner.
Fasten off. Leave 45 cm tail.
Ears
Yarn: lavender purple — Make 2
Row 1: ch 3, sc in 2nd ch from hook, sc in next ch (2)
Row 2: ch 1, turn, inc, inc (4)
Row 3: ch 1, turn, sc across (4)
Row 4: ch 1, turn, inc, 2 sc, inc (6)
Row 5: ch 1, turn, sc across (6)
Fold the lower edge slightly before sewing so each ear tilts outward.
Fasten off. Leave 25 cm tail.
Horns
Yarn: cream — Make 2
R1: 6 sc in MR (6)
R2–R4: sc around (6)
R5: inc ×6 (12)
R6: sc around (12)
Stuff the base only. Pinch the tip while weaving the starting tail inside.
Fasten off. Leave 25 cm tail.
Head and Back Spikes
Yarn: cream and lavender purple — Make 7 total
R1: 6 sc in MR (6)
R2–R3: sc around (6)
Use cream for 4 head spikes and lavender for 3 back spikes.
Fasten off. Leave 20 cm tail.
Tail
Yarn: lavender purple
R1: 6 sc in MR (6)
R2–R5: sc around (6)
R6: inc ×6 (12)
R7–R14: sc around (12)
R15: (sc, inc) ×6 (18)
R16–R20: sc around (18)
Stuff lightly so the tail bends against the floor.
Fasten off. Leave 35 cm tail.
Cheek Patches
Yarn: blush pink — Make 2
R1: 6 sc in MR (6)
R2: inc ×6 (12)
Do not stuff. Sew below the eyes and slightly behind the snout edge.
Fasten off. Leave 20 cm tail.
Crescent Moon Pillow
Yarn: butter yellow
R1: 6 sc in MR (6)
R2: inc ×6 (12)
R3: (sc, inc) ×6 (18)
R4–R17: sc around (18)
R18: (sc, dec) ×6 (12)
R19: dec ×6 (6)
Stuff evenly, then bend into a crescent. Stitch through the inner curve every 2 rounds to hold the moon shape.
Fasten off. Leave 40 cm tail.
Moon and Star Embroidery
Yarn: gold embroidery floss
Work one small crescent on the forehead with 5 curved satin stitches. Add 6–9 tiny stars across the forehead and wing membranes. Keep each star under 8 mm wide so the embroidery does not overpower the plush stitches.
Fasten off on the inside or bury the thread through the head.
Assembly
- Sew the body to the lower front of the head, placing the neck join across R18–R20 of the head.
- Sew the snout centered below the eyes, with its top edge between R12 and R13.
- Attach the belly patch to the front of the body, stretching it into an oval before the final stitches.
- Sew the cheek patches below the eyes, one stitch behind the snout edge.
- Place the horns on the top of the head, 4–5 stitches apart.
- Attach ears outside the horns, angled toward the wing line.
- Sew arms to the front of the body so they touch the crescent moon pillow.
- Sew back legs to the lower body, then add foot pads and three cream toe stitches per foot.
- Pin wings to the upper back on a vertical seam, then sew through the center line only.
- Attach the tail, head spikes, back spikes, crescent moon pillow, and gold embroidery.
The finished dragon should sit with the tail and back legs acting as a three-point base.
7 Technical Tips
- Stitch marker drift: The head twists when the stitch marker shifts during R8–R14. Move the marker at the start of every round and check that both eyes sit 9 stitches apart before locking the washers.
- Body collapse: The body collapses under the head when the lower section is too soft. Pack the lower body until it gives no more than 6 mm when pressed, then keep the neck area slightly softer.
- Visible stuffing: White stuffing dots show through decrease rounds when the decreases are loose. Use invisible decrease on R19–R23 of the body and R19–R22 of the head.
- Low eye placement: The eyes sit too low after the snout is attached if placement is delayed. Install 24–25 mm eyes between R11 and R12, then pin the snout before closing the head.
- Velvet yarn movement: Velvet yarn worms out at seams when the stitches are loose. Keep the 4.5 mm hook for all stuffed pieces and sew through full stitches, not surface fuzz.
- Wing imbalance: Wings pull the dragon backward when they are sewn too low or too wide. Pin each wing with a 5 cm center seam starting just below the neck join, then test the seated balance before sewing.
- Loose yarn tails: Loose tails show through lavender stitches if they are trimmed too close. Weave every yarn tail at least 10 cm through stuffed fabric, change direction once, then trim inside the plush.
Conclusion
This version works because the large head, seated body, and crescent pillow are balanced before any decorative stitching is added. Keep the 42-stitch head plateau, test both wings with pins, then add the stars only after the face is locked. The next concrete step is to crochet the head and moon on the same day, because those two parts set the scale for every limb. Save the finished celestial dragon amigurumi crochet pattern to Pinterest, post a straight-on view to Instagram, and use #CelestialDragonMoon. Which detail should carry the most weight on your dragon: the cream horns, the wing stars, or the yellow crescent?









