Introduction
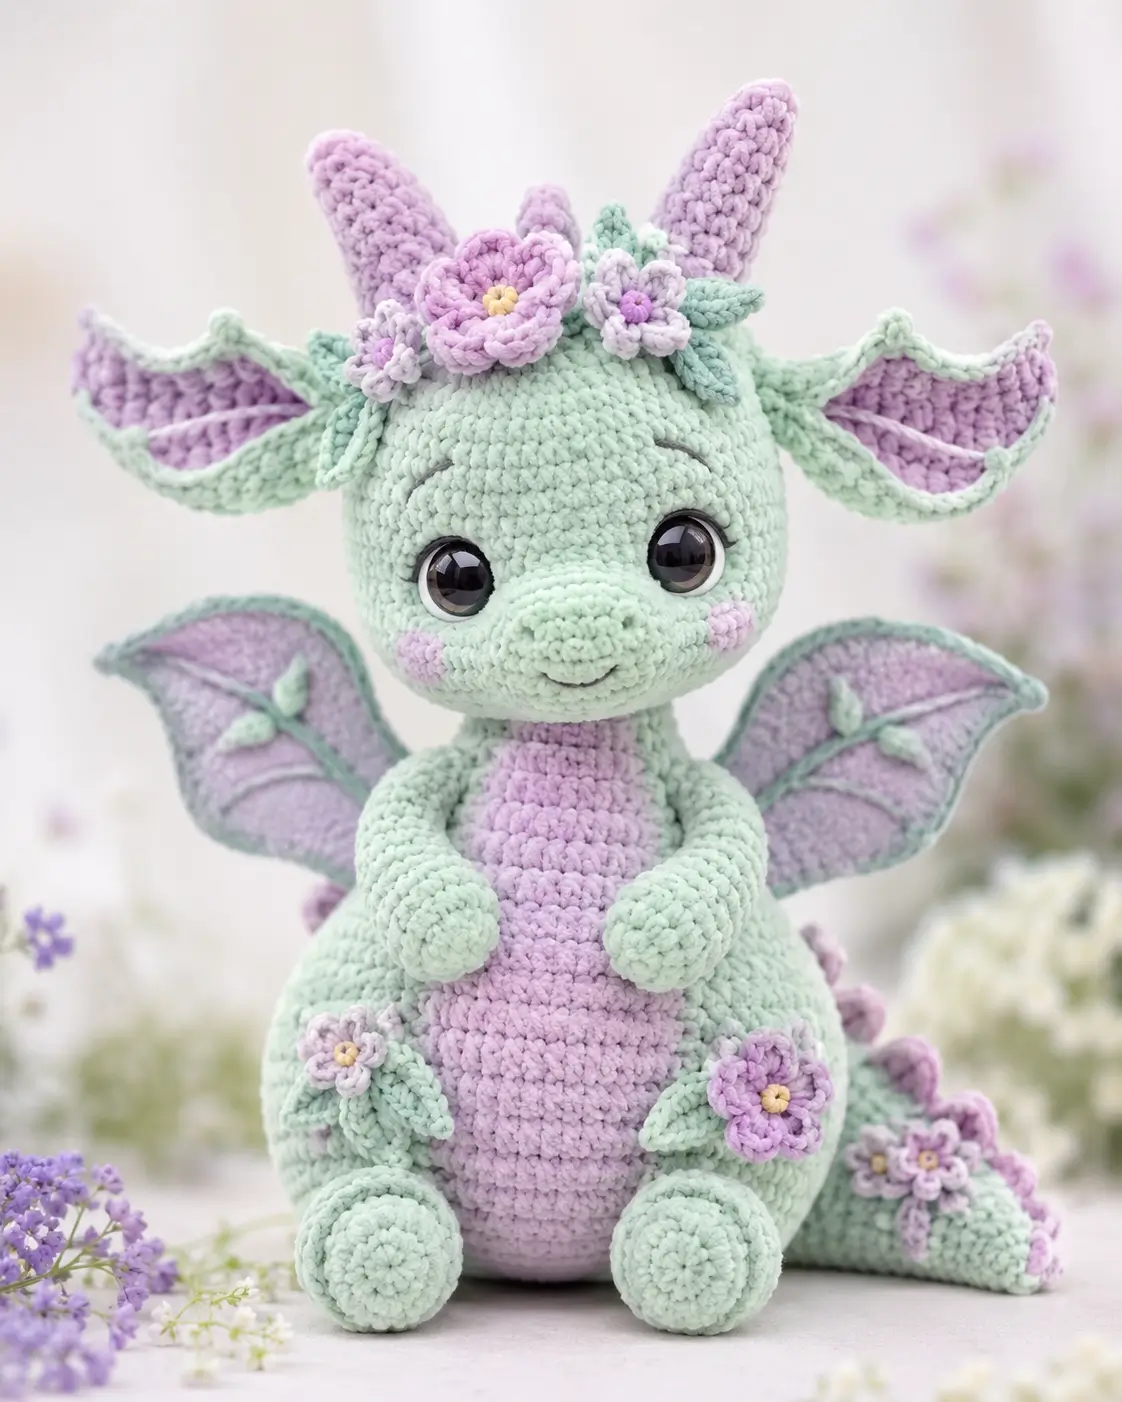
A flower dragon has two jobs: read as reptile from the snout and read as garden creature from the crown. This flower dragon amigurumi crochet pattern uses bulky mint yarn, lavender accents, 12 mm eyes, and a 4.5 mm hook for a 58 cm reference-size plush; the compact version uses the same math with smaller yarn. Skill level: intermediate. Make it when a dragon needs soft wings, stable sitting legs, and visible floral placement.
The Design: What Makes This Dragon Different
The snout is separate because dragons lose their profile when the face is worked as a plain sphere. You build the head as a 36-stitch medium sphere, then sew on a shallow oval snout so the eyes stay forward instead of drifting to the sides. The ears use a folded-circle shell, not a tall cone; that keeps the lavender inner ear wide enough to read against plush yarn. Wings are row-built membranes with a mint border and embroidered ribs, because thick yarn makes full double-layer wings too heavy. The plush dragon amigurumi pattern also separates the belly patch, so the lavender chest stays centered after stuffing. A common maker error is placing horns before the flower crown. The result: flowers sit too high, and the forehead looks crowded in a crochet dragon plushie pattern.
Project Info at a Glance
| Skill Level | Time | Finished Size | Hook | Best For |
|---|---|---|---|---|
| Intermediate | 6–10 hours | 16.5–58 cm reference range | 4.5–5.0 mm | Seated plush display |
Compact flower-dragon references list about 16.5 cm seated, while a bulky Ravelry flower-dragon listing gives 58 cm; hook references cluster around 4.5 mm for bulky yarn and 5.0 mm for super bulky chenille.
Materials and Tools
Yarn
- Mint green — bulky #5 or soft chenille — 180–220 g — Bernat Blanket, Himalaya Dolphin Baby, or similar plush yarn
- Lavender — bulky #5 or soft chenille — 60–80 g — same yarn family for belly, wings, cheeks, and horns
- Light purple — bulky #5 or worsted held double — 20–30 g — small flowers and inner accents
- Pale yellow — worsted cotton or chenille scrap — 3–5 g — flower centers
- Dark gray or black — embroidery yarn — 1–2 m — nostrils and mouth
Comparable dragon sources list main-yarn needs from 140 g in sport cotton to 200 g in heavy cotton, so bulky chenille should be planned with a larger margin.
Tools
- Hook 4.5 mm for bulky #5 yarn, or Hook 5.0 mm for super bulky chenille
- Safety eyes 12–18 mm, scaled to head size
- Polyester stuffing
- Tapestry needle
- Locking stitch markers
- Straight pins
- Small scissors
Abbreviations
MR = magic ring; sc = single crochet; inc = 2 sc in one stitch; dec = invisible single crochet decrease; sl st = slip stitch; ch = chain; BLO = back loop only; hdc = half double crochet; dc = double crochet.
An invisible decrease is worked through the front loops of the next 2 stitches before completing one single crochet, which reduces bulk on plush dragon shaping.
Pattern — Step by Step
Continuous spiral unless noted. Use a stitch marker at the first stitch of every round.
Head
Yarn: mint green — Source: Standard amigurumi math, with material scale checked against bulky flower-dragon references.
R1: 6 sc in MR (6)
R2: inc ×6 (12)
R3: (sc, inc) ×6 (18)
R4: (2 sc, inc) ×6 (24)
R5: (3 sc, inc) ×6 (30)
R6: (4 sc, inc) ×6 (36)
R7–R12: sc around (36)
R13: sc around (36)
R14: (4 sc, dec) ×6 (30)
R15: (3 sc, dec) ×6 (24)
R16: (2 sc, dec) ×6 (18)
R17: (sc, dec) ×6 (12)
R18: dec ×6 (6)
Place eyes between R9 and R10, 8 stitches apart, before closing. Stuff firmly enough that the forehead stays round but not stretched.
Fasten off. Leave a 20 cm tail and close the final 6 stitches.
Snout
Yarn: mint green — Source: Standard amigurumi math.
R1: 6 sc in MR (6)
R2: inc ×6 (12)
R3: (sc, inc) ×6 (18)
R4–R5: sc around (18)
Lightly stuff. Flatten the lower edge slightly before sewing.
Fasten off. Leave a 30 cm tail.
Body
Yarn: mint green — Source: Standard amigurumi math.
R1: 6 sc in MR (6)
R2: inc ×6 (12)
R3: (sc, inc) ×6 (18)
R4: (2 sc, inc) ×6 (24)
R5: (3 sc, inc) ×6 (30)
R6: (4 sc, inc) ×6 (36)
R7–R13: sc around (36)
R14: (4 sc, dec) ×6 (30)
R15–R16: sc around (30)
R17: (3 sc, dec) ×6 (24)
R18: sc around (24)
R19: (2 sc, dec) ×6 (18)
R20: (sc, dec) ×6 (12)
R21: dec ×6 (6)
Stuff the lower body densely so the dragon sits upright. Keep the neck area slightly flatter for head attachment.
Fasten off. Leave a 30 cm tail.
Belly Patch
Yarn: lavender — Source: Standard oval shaping.
Ch 7.
R1: sc in 2nd ch from hook, 4 sc, 3 sc in last ch, rotate, 4 sc, inc in first chain base (14)
R2: inc, 4 sc, inc ×3, 4 sc, inc ×2 (20)
R3: sc, inc, 4 sc, (sc, inc) ×3, 4 sc, (sc, inc) ×2 (26)
R4: sc around (26)
Do not stuff. Pin vertically on the body before sewing.
Fasten off. Leave a 40 cm tail.
Arms / Front Legs
Yarn: mint green — Source: Standard amigurumi math.
Make 2.
R1: 6 sc in MR (6)
R2: inc ×6 (12)
R3–R5: sc around (12)
R6: dec ×6 (6)
R7–R9: sc around (6)
Stuff only the rounded paw. Leave the upper arm flat for cleaner sewing.
Fasten off. Leave a 25 cm tail on each arm.
Back Legs
Yarn: mint green — Source: Standard amigurumi math.
Make 2.
R1: 6 sc in MR (6)
R2: inc ×6 (12)
R3: (sc, inc) ×6 (18)
R4–R5: sc around (18)
R6: (sc, dec) ×6 (12)
R7: sc around (12)
R8: dec ×6 (6)
Stuff the foot front firmly and keep the top soft so the leg sits against the body curve.
Fasten off. Leave a 30 cm tail.
Cheek Patches
Yarn: lavender — Source: Standard flat circle.
Make 2.
R1: 6 sc in MR (6)
R2: inc ×6 (12)
Sl st to first stitch (12)
Do not stuff. Place under the outer lower corner of each eye.
Fasten off. Leave a 20 cm tail.
Outer Ears
Yarn: mint green — Source: Standard folded-circle ear.
Make 2.
R1: 6 sc in MR (6)
R2: inc ×6 (12)
R3: (sc, inc) ×6 (18)
R4: (2 sc, inc) ×6 (24)
Fold the circle in half. Sc through both layers across the open edge (12).
The fold forms the long upper ear edge.
Fasten off. Leave a 30 cm tail.
Inner Ear Panels
Yarn: lavender — Source: Standard folded-circle insert.
Make 2.
R1: 6 sc in MR (6)
R2: inc ×6 (12)
Fold in half and sl st through both layers across the edge (6).
Center each lavender insert inside a mint outer ear.
Fasten off. Leave a 20 cm tail.
Horns
Yarn: lavender — Source: Standard amigurumi math.
Make 2.
R1: 6 sc in MR (6)
R2: sc around (6)
R3: inc ×6 (12)
R4–R5: sc around (12)
R6: (sc, inc) ×6 (18)
R7–R8: sc around (18)
Stuff from the base with small pinches so the horn tip does not bulge.
Fasten off. Leave a 35 cm tail.
Wings
Yarn: lavender membrane, mint border — Source: row-built wing adaptation; public dragon patterns commonly treat wings as separate sewn parts.
Make 2.
Row 1: ch 2, 2 sc in 2nd ch from hook (2)
Row 2: ch 1, turn, inc ×2 (4)
Row 3: ch 1, turn, sc across (4)
Row 4: ch 1, turn, inc, 2 sc, inc (6)
Row 5: ch 1, turn, sc across (6)
Row 6: ch 1, turn, inc, 4 sc, inc (8)
Row 7: ch 1, turn, sc across (8)
Row 8: ch 1, turn, inc, 6 sc, inc (10)
Row 9: ch 1, turn, sc across (10)
Border: switch to mint. Work 1 round of sc evenly around the wing edge, placing 3 sc in each outer corner. Along the lower wing edge, work: sl st, hdc, dc, sl st, hdc, dc, sl st to create two shallow scallops.
Do not stuff. Embroider 2 mint rib lines from the wing base to the lower scallops.
Fasten off. Leave a 35 cm tail.
Tail
Yarn: mint green — Source: Standard amigurumi math.
R1: 6 sc in MR (6)
R2: sc around (6)
R3: inc ×6 (12)
R4–R5: sc around (12)
R6: (sc, inc) ×6 (18)
R7–R8: sc around (18)
R9: (2 sc, inc) ×6 (24)
R10–R11: sc around (24)
Stuff gradually, with less stuffing at the base so it can bend behind the body.
Fasten off. Leave a 40 cm tail.
Tail Spines
Yarn: lavender — Source: Standard cone math.
Make 5.
R1: 6 sc in MR (6)
R2: sc around (6)
R3: inc ×6 (12)
R4: sc around (12)
Flatten each spine; do not stuff.
Fasten off. Leave a 20 cm tail on each.
Large Crown Flower
Yarn: yellow center, lavender petals — Source: standard crochet flower construction.
Center: with yellow, R1: 6 sc in MR (6), sl st to first stitch.
Petals: join lavender. In each stitch around: ch 3, 2 dc in same stitch, ch 3, sl st in same stitch (6 petals).
Keep the center tight so the flower does not cup forward.
Fasten off. Leave a 25 cm tail.
Small Flowers
Yarn: light purple with yellow or lavender centers — Source: standard crochet flower construction.
Make 3.
Center: R1: 6 sc in MR (6), sl st to first stitch.
Petals: in each stitch around: ch 2, hdc in same stitch, ch 2, sl st in same stitch (6 petals).
Use one flower near the crown, one near the hip, and one on the tail base.
Fasten off. Leave a 20 cm tail on each.
Leaves
Yarn: mint green — Source: standard leaf row.
Make 6.
Ch 5. Starting in 2nd ch from hook: sl st, sc, hdc, 3 sc in last ch. Rotate. On the other side: hdc, sc, sl st (10 worked stitches).
Block lightly between fingers before sewing.
Fasten off. Leave a 15 cm tail.
Mouth and Nostrils
Yarn: dark gray or black embroidery yarn — Source: photo-matched surface embroidery.
Make two nostril stitches across R3–R4 of the snout, spaced 3 stitches apart. Work the mouth as one shallow curved stitch below the snout center.
Do not pull tightly; over-pulling sinks the muzzle into the head.
Tie ends inside the head or bury them behind the snout seam.
Assembly
- Sew the head to the body with the head tilted slightly forward; add stuffing at the neck before closing the seam.
- Pin the lavender belly patch to the body center from R6 to R17, then sew around the edge.
- Attach the snout between the eyes and lower face; the top edge should sit just below the eye line.
- Sew cheek patches below the eyes, keeping each patch one stitch away from the snout edge.
- Add the arms to the upper body at R11–R14, angled inward toward the belly.
- Sew the back legs to the lower front body so the feet touch the table and support the sitting pose.
- Attach ears behind the horns’ future position, then sew horns above the forehead with 5–6 stitches between bases.
- Sew wings to the back with their bases level with the upper body and their tips angled outward.
- Attach the tail to the lower back, then sew the lavender spines along the tail ridge.
- Add flowers and leaves last, starting with the large crown flower, then filling side gaps with small flowers and leaves.
The finished plush has a seated body, forward snout, paired wings, lavender cheeks, and a visible flower crown.
7 Technical Tips
- A drifting stitch marker will twist the snout line by 2–3 stitches. Move the marker every round and check that the eye gap still measures 8 stitches before locking washers.
- Soft stuffing causes the body to collapse under the head weight. Stop adding stuffing when the body springs back after a 1 cm thumb press.
- Visible decrease bars appear fastest on mint chenille. Work every decrease through front loops only, then rotate the decrease line toward the back of the head.
- Late eye insertion can split plush stitches. Install eyes after Head R13, while the opening is still wide enough for two fingers and a washer.
- Loose velvet tension creates holes beside the horns. Hold the yarn with a shorter feed path and keep the hook shaft inside the stitch until the final pull-through.
- Unpinned wings often sit at different heights. Pin both wing bases first, then measure 5–6 stitches between them before sewing.
- Short yarn tails come loose inside plush seams. Leave at least 25 cm for small parts and 40 cm for the tail, then weave through three separate stitch paths.
Conclusion
The finished dragon should sit without hand support, with the tail acting as a rear brace and the wings balanced above the hip line. Check the snout before final stitching: the nostrils must point forward, not down. Next, photograph the plush from a low front angle so the horns, ears, flowers, and lavender belly all show in one frame. Share the finished make on Pinterest and Instagram with #MintFlowerDragon and credit the flower dragon amigurumi crochet pattern. For the next version, change only one variable: eye size, crown flower count, or wing color. Which detail should carry more lavender on this mint dragon—the inner ears, the wing membranes, or the cheek patches?









