Introduction
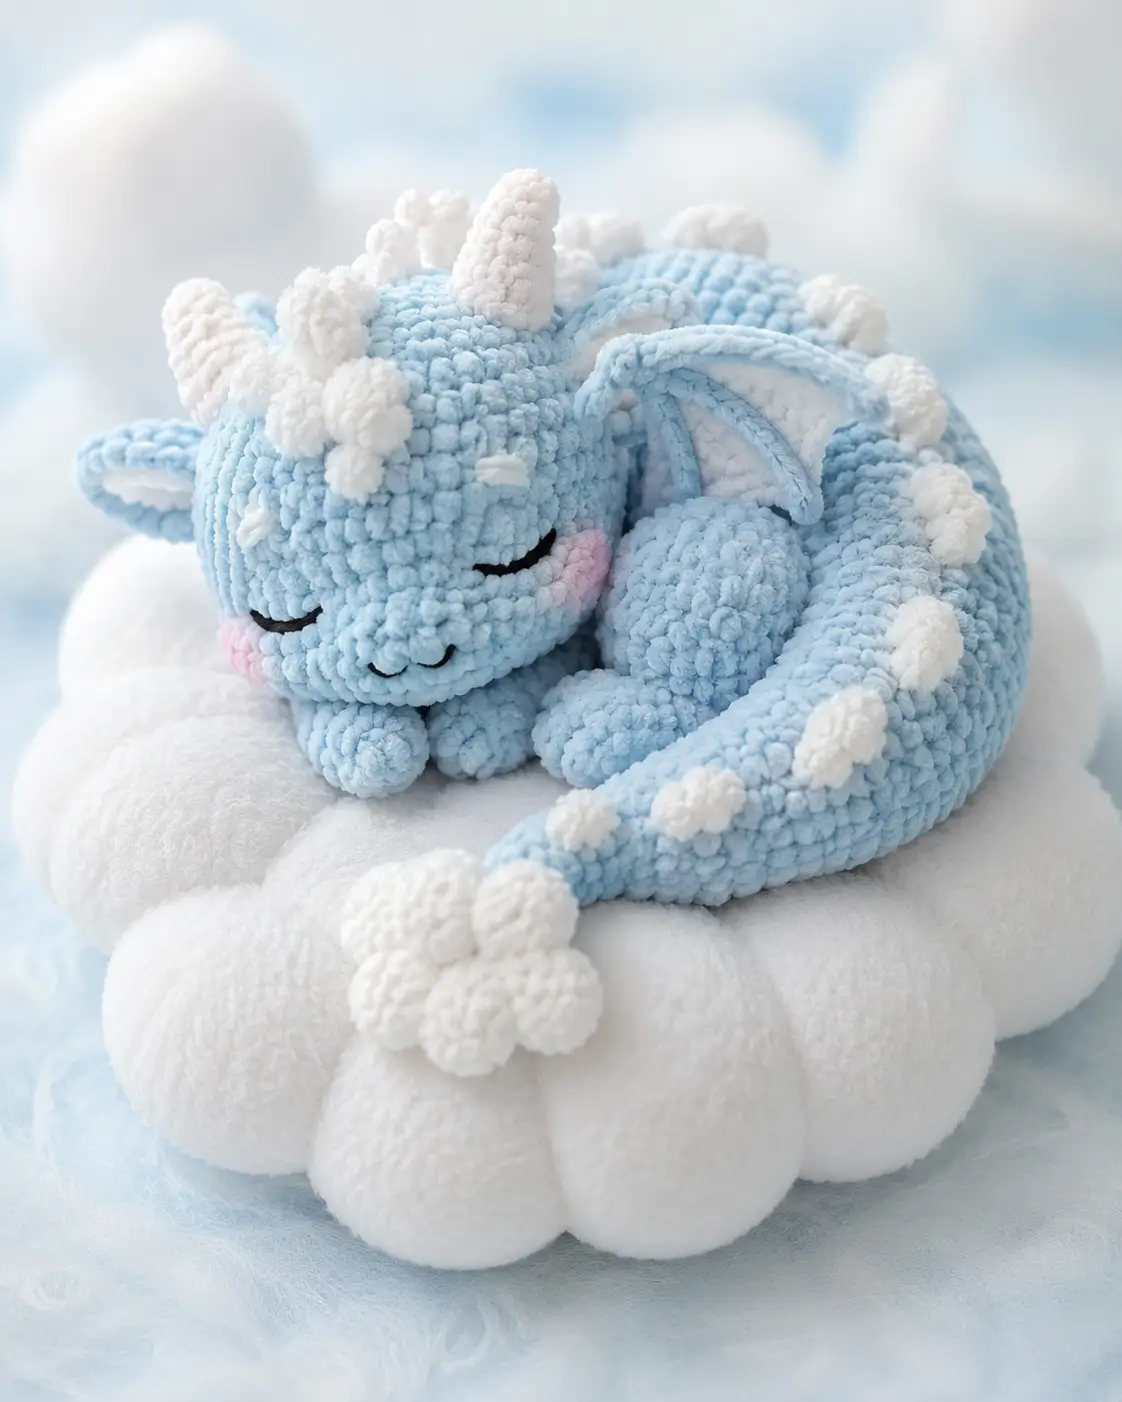
A sleeping dragon has to keep its horns visible while its snout rests low; otherwise the toy reads like a pale blue puppy. This baby dragon amigurumi crochet pattern uses chunky chenille, white accents, embroidered closed eyes, and a cloud bed. The finished dragon is planned at about 22 cm, with large-piece shaping suitable for an intermediate maker who wants a nursery-safe fantasy plush.
The Design: What Makes This Dragon Different
This dragon is built as a curled toy, not a vertical mascot. You shape the body as a long stuffed oval, then set the head low so the closed face sits into the curve of the tail. The horns and back spikes stay white because they need contrast against pale blue chenille. A single-color dragon loses its silhouette fast, especially in velvet yarn. The wings are flat, light, and sewn near the shoulder line; heavy stuffed wings would pull the body backward. For a sleeping dragon crochet pattern, the face must be placed before final assembly, because the eyelid curve decides the head angle. One common mistake is attaching the snout too high. That turns a plush dragon amigurumi into a bear-like face with horns.
Project Info at a Glance
| Skill Level | Time | Finished Size | Hook | Best For |
|---|---|---|---|---|
| Intermediate | 6–8 hours | about 22 cm | 4.0 mm | plush nursery décor, fantasy display, photo prop |
Comparable baby dragon patterns list 18 cm × 12 cm, 20 cm, and 22 cm sizes, with hook sizes ranging from 2.5 mm for sport yarn to 5.0 mm for chenille. Source
Materials and Tools
Yarn
- Pale ice blue — chunky chenille / velvet — 120–140 g — Himalaya Dolphin Baby, Premier Parfait Chunky, or similar
- White — chunky chenille / velvet — 45–60 g — for horns, wings, spikes, cloud bed, and optional claws
- Blush pink — worsted or chenille scrap — 3–5 g — for cheek patches
- Black — embroidery thread or cotton yarn — 1 g — for closed eyes and mouth
One cotton baby dragon listing gives 92 g main yarn and 20 g accent yarn; chenille versions usually need yardage planning because plush yarn has more bulk per stitch. Source
Tools
- Hook 4.0 mm for chenille tension
- Optional 10–12 mm safety eyes only for an open-eye version
- Fiberfill stuffing
- Yarn needle
- Embroidery needle
- Locking stitch markers
- Pins
- Scissors
Abbreviations
MR = magic ring; sc = single crochet; inc = increase; dec = decrease; sl st = slip stitch; ch = chain; BLO = back loop only; FLO = front loop only; hdc = half double crochet; dc = double crochet.
Invisible decrease means working through the front loops of the next two stitches before completing one single crochet decrease, which keeps chenille gaps smaller on the closing rounds.
Pattern — Step by Step
Continuous spiral unless noted. The head and body use a large 42-stitch plateau to match the plush scale in the photo.
Head
Yarn: pale ice blue — Source: Standard amigurumi math; size benchmarked against 22 cm baby dragon references.
R1: 6 sc in MR (6)
R2: inc ×6 (12)
R3: (1 sc, inc) ×6 (18)
R4: (2 sc, inc) ×6 (24)
R5: (3 sc, inc) ×6 (30)
R6: (4 sc, inc) ×6 (36)
R7: (5 sc, inc) ×6 (42)
R8–R14: sc around (42)
R15: (5 sc, dec) ×6 (36)
R16: (4 sc, dec) ×6 (30)
R17: (3 sc, dec) ×6 (24)
R18: (2 sc, dec) ×6 (18)
R19: (1 sc, dec) ×6 (12)
R20: dec ×6 (6)
Stuff firmly before R18 closes too tightly. Mark the front center between R9 and R13 for snout placement.
Fasten off. Leave 18 cm tail.
Body
Yarn: pale ice blue — Source: Standard amigurumi math; curled body styling follows dragon assembly references.
R1: 6 sc in MR (6)
R2: inc ×6 (12)
R3: (1 sc, inc) ×6 (18)
R4: (2 sc, inc) ×6 (24)
R5: (3 sc, inc) ×6 (30)
R6: (4 sc, inc) ×6 (36)
R7: (5 sc, inc) ×6 (42)
R8–R24: sc around (42)
R25: (5 sc, dec) ×6 (36)
R26: sc around (36)
R27: (4 sc, dec) ×6 (30)
R28: sc around (30)
R29: (3 sc, dec) ×6 (24)
R30: sc around (24)
R31: (2 sc, dec) ×6 (18)
R32: (1 sc, dec) ×6 (12)
R33: dec ×6 (6)
Stuff gradually from R12 onward. Bend the body into a crescent before closing so the stuffing settles into the curled shape.
Fasten off. Leave 25 cm tail.
Snout
Yarn: pale ice blue — Source: Standard amigurumi math.
R1: 6 sc in MR (6)
R2: inc ×6 (12)
R3: (1 sc, inc) ×6 (18)
R4–R5: sc around (18)
R6: (1 sc, dec) ×6 (12)
Stuff lightly. Flatten the open edge into an oval before sewing.
Fasten off. Leave 20 cm tail.
Front Legs Make 2
Yarn: pale ice blue — Source: Standard amigurumi math.
R1: 6 sc in MR (6)
R2: inc ×6 (12)
R3–R6: sc around (12)
Stuff only the paw end. Keep the upper edge flat for sewing under the head.
Fasten off. Leave 18 cm tail on each leg.
Back Legs Make 2
Yarn: pale ice blue — Source: Standard amigurumi math.
R1: 6 sc in MR (6)
R2: inc ×6 (12)
R3: (1 sc, inc) ×6 (18)
R4–R6: sc around (18)
R7: (1 sc, dec) ×6 (12)
R8: sc around (12)
Stuff to medium firmness. Shape each leg into a rounded oval before sewing to the outside curve of the body.
Fasten off. Leave 22 cm tail on each leg.
Tail
Yarn: pale ice blue — Source: Standard amigurumi math; tail/body separation follows dragon pattern structures.
R1: 6 sc in MR (6)
R2–R3: sc around (6)
R4: inc ×6 (12)
R5–R7: sc around (12)
R8: (1 sc, inc) ×6 (18)
R9–R13: sc around (18)
R14: (2 sc, inc) ×6 (24)
R15–R19: sc around (24)
R20: (3 sc, inc) ×6 (30)
R21–R24: sc around (30)
R25: (4 sc, inc) ×6 (36)
R26–R30: sc around (36)
Stuff the tip lightly and the base firmly. Curve the tail around the body while pinning.
Fasten off. Leave 30 cm tail.
Wings Make 2
Yarn: white with pale blue edging — Source: Wing construction benchmarked against baby dragon wing references.
Ch 10.
Row 1: sc in second ch from hook, sc across (9)
Row 2: ch 1, turn, sc across (9)
Row 3: ch 1, turn, sc 7, leave 2 sts unworked (7)
Row 4: ch 1, turn, sc across (7)
Row 5: ch 1, turn, sc 5, leave 2 sts unworked (5)
Row 6: ch 1, turn, sc across (5)
Row 7: ch 1, turn, sc 3, leave 2 sts unworked (3)
Work a blue sl st border around the top edge only. Add two blue straight stitches from wing base to lower points for ribs.
Fasten off. Leave 25 cm tail.
Horns Make 4
Yarn: white — Source: Standard amigurumi math.
R1: 6 sc in MR (6)
R2–R3: sc around (6)
R4: inc ×6 (12)
R5: sc around (12)
Do not overstuff. Two horns sit on top of the head; two shorter horns sit slightly forward.
Fasten off. Leave 18 cm tail.
Back and Tail Spikes Make 12
Yarn: white — Source: Standard amigurumi math; spike placement benchmarked against dragon spine references.
R1: 6 sc in MR (6)
R2: sc around (6)
R3: inc ×6 (12)
R4: sc around (12)
Leave unstuffed for small spikes or add one pinch of stuffing for larger tail spikes.
Fasten off. Leave 15 cm tail on each spike.
Cheek Patches Make 2
Yarn: blush pink — Source: Standard amigurumi math.
R1: 6 sc in MR (6)
R2: inc ×6 (12)
Sl st to first stitch (12)
Keep flat. Pull the center tail tight so the patch does not cup.
Fasten off. Leave 12 cm tail.
Closed Eyes and Mouth Embroidery
Yarn: black embroidery thread — Source: photo-based feature.
Place each closed eye across 5–6 visible stitches between R10 and R12 of the head. Work one long curved stitch, then anchor the curve with two tiny couching stitches near each end. Add a shallow mouth under the snout with two short curved stitches.
Cloud Bed Poufs Make 8 Large, 4 Small
Yarn: white — Source: Standard amigurumi math; accessory is photo-based.
Large pouf:
R1: 6 sc in MR (6)
R2: inc ×6 (12)
R3: (1 sc, inc) ×6 (18)
R4: (2 sc, inc) ×6 (24)
R5–R7: sc around (24)
R8: (2 sc, dec) ×6 (18)
R9: (1 sc, dec) ×6 (12)
R10: dec ×6 (6)
Small pouf:
R1: 6 sc in MR (6)
R2: inc ×6 (12)
R3–R4: sc around (12)
R5: dec ×6 (6)
Stuff every pouf firmly. Sew large poufs into an oval, then tuck small poufs into gaps to create the cloud edge.
Fasten off each pouf and hide tails after joining.
Assembly
- Pin the head to the front-left curve of the body, with the head tilted downward into the sleeping pose.
- Sew the body to the head using the head tail, passing through at least 8 body stitches for a stable neck.
- Attach the snout between R10 and R15 of the head, then embroider the closed eyes and mouth.
- Sew the cheek patches beside the snout, placing each patch one round below the eye curve.
- Attach the front legs under the head, spaced 3–4 stitches apart so they look tucked.
- Sew the back legs to the outside body curve between R12 and R18 of the body.
- Join the tail to the rear of the body, then curve it forward around the cloud bed.
- Sew horns to the top of the head and place spikes from the crown line down the back and along the tail.
- Attach wings to the upper body behind the head, with their bases 4–5 stitches apart.
- Sew the cloud poufs into an oval base, place the dragon on top, and tack the body to the bed at three hidden points.
The finished piece is a curled sleeping dragon with a separate plush cloud base.
7 Technical Tips
- Stitch marker drift: Chenille hides the start of round after 6–8 rounds. Move the marker every round, and add a second contrast marker at the front center of the head.
- Stuffing firmness: A soft neck will make the head sag into the cloud. Pack the head firmly, then use medium stuffing in the body so the crescent can still curve.
- Invisible decrease gaps: Standard decreases can leave white stuffing dots between velvet stitches. Work invisible decreases on R15–R20 of the head and R25–R33 of the body.
- Eye placement timing: Closed eyes must be embroidered before the head is sewn tightly to the body. Place the eyelid curve across 5–6 stitches, or the face will look too narrow.
- Velvet tension: Loose chenille tension can add 2–3 cm to the finished length. Keep each single crochet compact and use a 4.0 mm hook rather than the larger hook printed on many plush yarn labels.
- Pinning accuracy: Wings can rotate backward if they are sewn from only one edge. Pin the wing base first, then pin the lower wing point so both wings match before stitching.
- Tail weaving: A tail spike can pull loose if its yarn end is woven once through plush stitches. Weave each spike tail through the spike base, body fabric, and back through the spike base again.
Final Notes
This pattern works because the dragon is treated as a curled shape first and a character second. The head angle, snout height, horn contrast, and tail curve all support the sleeping pose. Your next step is to crochet the head and body before making any small pieces, then pin the full silhouette on the cloud bed before final sewing. Share the finished plush on Pinterest and Instagram with #SleepingBabyDragon. For search use, save this page under baby dragon amigurumi crochet pattern. Which detail should stay most visible from above: the white horns, the wing ribs, or the tail spikes?









