Introduction
A capybara’s muzzle is too large to fake with a few dark stitches. That is the first structural problem this capybara amigurumi crochet pattern solves. The design uses worsted or aran yarn, a 2.75 mm hook, and a seated build that lands close to 15.5 cm tall in published references. It suits an intermediate maker and works well as shelf decor because the body stays upright without extra support.
The Design: What Makes Capybara Different
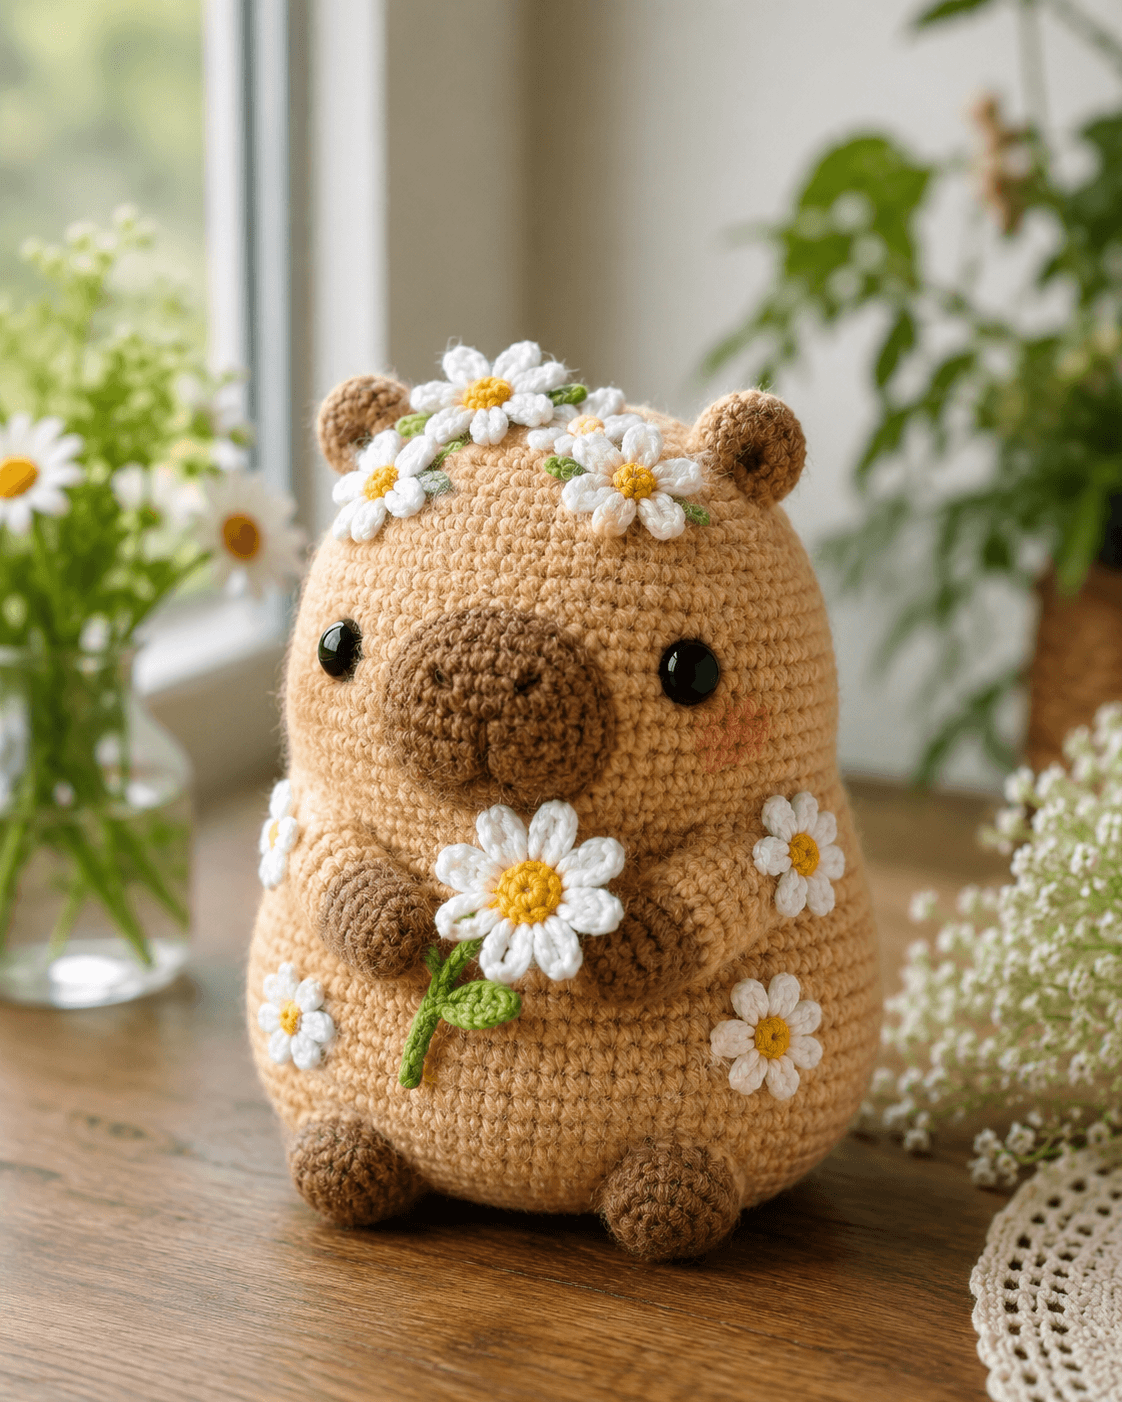
The capybara shape depends on proportion more than detail. First, the muzzle must project forward and sit low on the face; otherwise the toy reads as bear or hamster. Second, the ears stay small and high, because real capybaras have compact ears that do not dominate the head. Third, the body needs a weighted seated silhouette, with lower width greater than shoulder width, so the plush rests flat on a table instead of pitching forward. Published capybara patterns show the same trend: broad head-body shaping, compact ears, and short legs placed to support the mass.
A common mistake is oversizing the eyes or pushing them too high above the muzzle. In several published versions, eye placement falls around the mid-face, not the forehead, which keeps the animal calm rather than cartoonish. That matters even more in a floral capybara amigurumi or daisy capybara crochet variation, because the crown already adds visual height.
Project Info at a Glance
| Skill Level | Time | Finished Size | Hook | Best For |
|---|---|---|---|---|
| Intermediate | 6–8 hours | 15.5 cm tall | 2.75 mm | Shelf decor, spring display, handmade gift |
Finished size, hook, and yarn category are aligned with published capybara references used for verification.
Materials and Tools
Yarn
- Light tan / limestone — aran or worsted — about 22 g+ for body base in one published version; plan extra for this rounded floral variant — suggested base brand: Yarn and Colors Epic style yarn.
- Dark brown / cigar — aran or worsted — about 62 g in one published capybara reference, though this flowered version uses less because brown is limited to muzzle, paws, and ears.
- White — small amount for daisies
- Yellow — small amount for daisy centers
- Green — small amount for leaves and stem
- Soft pink — small amount for blush embroidery
Tools
- Hook 2.75 mm
- 12 mm safety eyes
- Stuffing
- Tapestry needle
- Stitch markers
- Sewing pins
- Small embroidery scissors
Abbreviations
MR / sc / inc / dec / sl st / ch / BLO / FLO / st / FO
Invisible decrease pulls through front loops only, reducing bulk at the muzzle join and lower body closure.
Pattern — Step by Step
Continuous spiral unless noted.
Head (Make 1)
Yarn: light tan — Source: standard amigurumi shaping from photo analysis, using medium 36-st plateau
R1: 6 sc in MR (6)
R2: inc x6 (12)
R3: (1 sc, inc) x6 (18)
R4: (2 sc, inc) x6 (24)
R5: (3 sc, inc) x6 (30)
R6: (4 sc, inc) x6 (36)
R7–11: sc around (36)
R12: (4 sc, dec) x6 (30)
R13: sc around (30)
Insert eyes between R9 and R10 with 10 stitches between them. Do not stuff the lower front face too firmly; the muzzle will add depth.
Fasten off. Leave 20 cm tail.
Body (Make 1)
Yarn: light tan — Source: standard amigurumi shaping from photo analysis
R1: 6 sc in MR (6)
R2: inc x6 (12)
R3: (1 sc, inc) x6 (18)
R4: (2 sc, inc) x6 (24)
R5: (3 sc, inc) x6 (30)
R6: (4 sc, inc) x6 (36)
R7–12: sc around (36)
R13: (10 sc, inc, 10 sc, inc, 14 sc) (38)
R14: (11 sc, inc, 11 sc, inc, 14 sc) (40)
R15–18: sc around (40)
R19: (8 sc, dec) x4 (36)
R20: (4 sc, dec) x6 (30)
R21: (3 sc, dec) x6 (24)
R22: (2 sc, dec) x6 (18)
Stuff very firmly at the base. Flatten the bottom slightly by hand before closing.
R23: (1 sc, dec) x6 (12)
R24: dec x6 (6)
Fasten off. Leave 20 cm tail.
Muzzle (Make 1)
Yarn: dark brown — Source: photo analysis plus published low, broad capybara muzzle references
Ch 7.
R1: starting in 2nd ch from hook, 5 sc, 3 sc in last ch, working along opposite side 4 sc, inc (14)
R2: inc, 4 sc, 3 inc, 4 sc, 2 inc (20)
R3: sc around (20)
R4: (9 sc, inc) x2 (22)
R5–6: sc around (22)
Stuff lightly. Embroider one vertical nostril line at center and one short line to each side, or use a tight French-knot pair.
Fasten off. Leave 25 cm tail.
Front Legs (Make 2)
Yarn: dark brown then light tan — Source: photo analysis with short support paws; published front-leg sizing supports 12-st small limbs
R1: 6 sc in MR (6)
R2: inc x6 (12)
R3–4: sc around (12)
Change to light tan
R5–8: sc around (12)
R9: dec x6 (6)
Stuff the paw section only. Leave upper arm soft so it sits against the body.
Fasten off. Leave 18 cm tail.
Back Legs (Make 2)
Yarn: dark brown — Source: photo analysis and published hind-foot proportions
R1: 6 sc in MR (6)
R2: inc x6 (12)
R3: (2 sc, inc) x4 (16)
R4–5: sc around (16)
R6: (6 sc, dec) x2 (14)
Lightly stuff. Flatten opening and sew closed before attaching. Embroider two toe divisions if desired.
Fasten off. Leave 20 cm tail.
Ears (Make 2)
Yarn: dark brown — Source: published capybara ear tabs from short chain or mini oval shaping
Ch 4.
R1: starting in 2nd ch, 2 sc, 3 sc in last ch, work opposite side 1 sc, inc (8)
R2: sc around (8)
Fold base slightly before sewing so the ear cups inward.
Fasten off. Leave 12 cm tail.
Cheek Patches (Make 2)
Yarn: soft pink or blush thread — Source: photo analysis
R1: 6 sc in MR (6)
Sl st to first st.
For a softer result, embroider blush instead of attaching full crochet circles.
Fasten off. Leave 10 cm tail.
Daisy Appliqués for Body (Make 4)
Yarn: white and yellow — Source: photo analysis
With yellow:
R1: 6 sc in MR (6)
Change to white
R2: (ch 4, sl st in 2nd ch from hook, 1 sc, 1 sl st, sl st in next st) x6
Fasten off. Leave 12 cm tail.
Daisy Crown Flowers (Make 5)
Yarn: white and yellow — Source: photo analysis
With yellow:
R1: 6 sc in MR (6)
Change to white
R2: (ch 5, sl st in 2nd ch from hook, 1 sc, 1 hdc, 1 sl st, sl st in next st) x6
Fasten off. Leave 15 cm tail.
Leaves (Make 6 small)
Yarn: green — Source: photo analysis
Ch 5.
Work into chain: sl st, sc, hdc, sc.
Fasten off.
Stem for Held Flower (Make 1)
Yarn: green — Source: photo analysis
Ch 12.
Starting in 2nd ch from hook, sl st in each ch back (11).
Fasten off. Leave 15 cm tail.
Held Daisy (Make 1)
Yarn: white, yellow, green — Source: photo analysis
Make one crown flower. Sew to top of green stem. Add one small green leaf near lower third.
Fasten off. Leave 15 cm tail.
Assembly
- Sew the head to the body, centering the narrower head underside over the upper body opening.
- Attach the muzzle low on the face, covering roughly rounds 8–13 of the head.
- Insert and secure the safety eyes if not already placed, keeping them level with the upper half of the muzzle.
- Add blush circles or embroidered pink shading one to two stitches outside each eye.
- Sew the ears to the head, slightly behind the eye line and near the crown curve.
- Attach the back legs low on the front-facing underside so the plush sits flat.
- Sew the front legs directly below the muzzle, angled inward so they can hold the flower.
- Stitch four daisy appliqués to the body front and sides with small green leaves tucked behind selected petals.
- Join the five crown flowers and leaves into a curved garland, then sew it from ear to ear across the top of the head.
- Fix the held daisy between the front paws and tack the stem to the belly at one point for stability.
The completed toy should stand upright on its lower body and front-facing feet.
7 Technical Tips
- Use a marker at every round start. Losing the start point by even two stitches will shift the muzzle center and throw off eye symmetry.
- Pack the body base harder than the head. A soft bottom causes the plush to roll backward once the muzzle and flower add weight to the front.
- Keep invisible decreases on visible shaping rounds. Standard decreases leave a ridge that shows on the tan body, especially at rounds 19–24.
- Place eyes before the muzzle is fully sewn. On this capybara, 12 mm eyes set between head rounds 9 and 10 give enough space above the muzzle without crowding the ears.
- Pin the front legs before sewing. Move them until both paws meet the stem naturally; a 3–5 mm mismatch is obvious from the front.
- Keep daisy crown spacing uneven on purpose. Real flower crowns sit better when one blossom is centered and the others stagger slightly toward each ear.
- Weave tails through the body, not just under petals. Flower appliqués loosen first at the petal base, so run the tail at least 2 cm through the body wall before trimming.
Conclusion
The main challenge in a capybara amigurumi crochet pattern is not the body. It is the face-to-body ratio, followed by stable seated assembly and controlled floral placement. This version handles all three with a broad muzzle, compact ears, short support legs, and detachable-looking daisies that are sewn down firmly. Next, swatch the tan yarn with your 2.75 mm hook and check whether your stitches hold stuffing without gaps. Then build the head before committing to flower placement. Share the finished piece on Pinterest and Instagram with #CapybaraDaisyPattern. One question remains: did you angle your muzzle low enough that the capybara still reads correctly under the flower crown?