Introduction
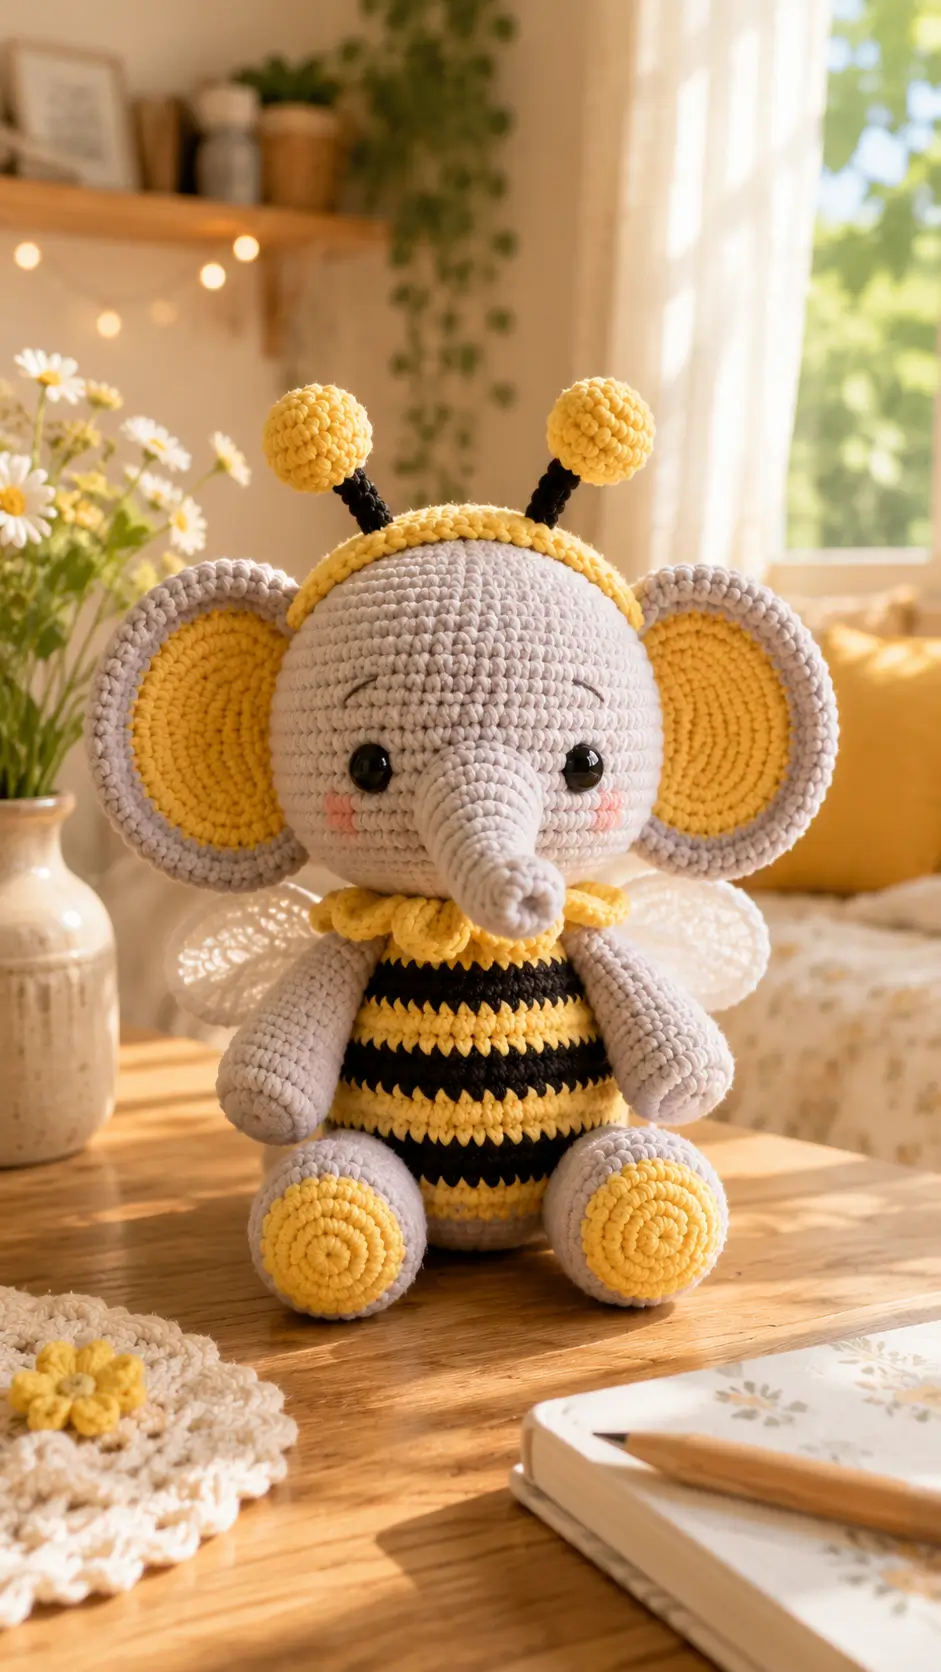
An elephant in a bee suit fails fast if the trunk drops into the collar line. This bee elephant amigurumi uses plush yarn, a compact seated body, medium-level shaping, and a striped torso with wings and antennae. The photographed version reads at roughly lap-to-shelf scale, while published bee-elephant patterns in the niche commonly sit around 18 cm in sport yarn with a 2.0 mm hook.
The Design: What Makes Bee Elephant Different
The trunk decides the whole silhouette. Too short, and the toy reads as a bee with ears. Too long, and it hides the stripe sequence across the torso. Large ears are the second structural choice; they frame the face and keep the elephant identity visible after wings and antennae are added. The third decision is body proportion. A seated lower half with a rounded belly gives the striped section enough vertical space to read cleanly as an elephant bee crochet pattern, not just a striped sweater. One frequent mistake is placing the wings too low. That pushes visual weight backward and makes the plush tip when sitting. In most crochet elephant bee plush builds, the back accessories need to sit high, just behind the shoulder line, so the head still leads the profile. Search results also show a gap here: few pages explain balance, trunk clearance, or stripe placement in technical terms.
Project Info at a Glance
| Skill Level | Time | Finished Size | Hook | Best For |
|---|---|---|---|---|
| Intermediate | 6–8 hours | 18 cm verified reference size | 2.0 mm verified reference hook | Shelf plush, nursery décor, themed gift |
Verified reference data above comes from a published Ravelry bee-elephant pattern; the custom plush version below is an original adaptation based on the photo and standard amigurumi math.
Materials and Tools
Yarn
- Light gray — plush/chenille style — about 120 g — Himalaya Dolphin Baby or similar
- Yellow — plush/chenille style — about 60 g — same base yarn
- Black — plush/chenille style — about 20 g — same base yarn
- White — lighter yarn or tulle/mesh substitute for wings — about 15 g — any soft accent yarn
- Soft pink — small amount for cheeks — scrap yarn or pastel blush thread
Tools
- Hook 4.5 mm for plush adaptation
- Safety eyes 12 mm for the photographed scale; published bee-elephant references range from 10 mm to 12 mm
- Polyester stuffing
- Yarn needle
- Stitch markers
- Pins or clips
- Optional floral wire for antenna support if your yarn is very soft
Abbreviations
MR / sc / inc / dec / sl st / ch / BLO / hdc
Invisible decrease keeps the face and trunk line cleaner than a standard decrease, especially in plush yarn where open decreases leave visible gaps.
Pattern — Step by Step
Continuous spiral unless noted. This is an original pattern adaptation for the photographed bee-costume elephant, built from standard amigurumi stitch math and the visible proportions in the image.
Head (Make 1)
Yarn: light gray — Source: standard amigurumi math + photo adaptation
R1: 6 sc in MR (6)
R2: inc x6 (12)
R3: (sc, inc) x6 (18)
R4: (2 sc, inc) x6 (24)
R5: (3 sc, inc) x6 (30)
R6: (4 sc, inc) x6 (36)
R7: (5 sc, inc) x6 (42)
R8-R15: sc around (42)
R16: (5 sc, dec) x6 (36)
R17: (4 sc, dec) x6 (30)
R18: (3 sc, dec) x6 (24)
Insert safety eyes between R11 and R12, about 8 sts apart. Begin stuffing firmly at R16.
R19: (2 sc, dec) x6 (18)
R20: (sc, dec) x6 (12)
R21: dec x6 (6)
Fasten off. Leave a 20 cm tail.
Trunk (Make 1)
Yarn: light gray — Source: standard amigurumi math + photo adaptation
R1: 6 sc in MR (6)
R2-R6: sc around (6)
R7: (2 sc, inc) x2 (8)
R8-R10: sc around (8)
R11: (3 sc, inc) x2 (10)
R12-R14: sc around (10)
R15: (4 sc, inc) x2 (12)
R16-R18: sc around (12)
Stuff lightly. Keep the last third softer so the tip can curve down slightly.
Fasten off. Leave a 25 cm tail.
Ears Outer (Make 2)
Yarn: light gray — Source: standard amigurumi math + photo adaptation
R1: 6 sc in MR (6)
R2: inc x6 (12)
R3: (sc, inc) x6 (18)
R4: (2 sc, inc) x6 (24)
R5: (3 sc, inc) x6 (30)
R6: (4 sc, inc) x6 (36)
Fasten off. Leave a tail.
Ears Inner (Make 2)
Yarn: yellow — Source: standard amigurumi math + photo adaptation
R1: 6 sc in MR (6)
R2: inc x6 (12)
R3: (sc, inc) x6 (18)
R4: (2 sc, inc) x6 (24)
R5: (3 sc, inc) x6 (30)
Fasten off. Leave a tail.
Lay the yellow circle on the gray circle and whipstitch the edge. Ease the gray edge slightly so the outer rim cups forward.
Body (Make 1)
Yarn: start light gray, then stripe with yellow and black — Source: standard amigurumi math + photo adaptation
R1: 6 sc in MR (6)
R2: inc x6 (12)
R3: (sc, inc) x6 (18)
R4: (2 sc, inc) x6 (24)
R5: (3 sc, inc) x6 (30)
R6: (4 sc, inc) x6 (36)
R7-R8: sc around in light gray (36)
R9-R10: sc around in yellow (36)
R11-R12: sc around in black (36)
R13-R14: sc around in yellow (36)
R15-R16: sc around in black (36)
R17-R18: sc around in yellow (36)
R19: (4 sc, dec) x6 (30)
R20: sc around (30)
R21: (3 sc, dec) x6 (24)
R22: (2 sc, dec) x6 (18)
Stuff the body firmly, with extra stuffing at the front belly so the plush sits upright.
R23: (sc, dec) x6 (12)
R24: dec x6 (6)
Fasten off. Leave a 25 cm tail.
Arms / Front Legs (Make 2)
Yarn: light gray — Source: standard amigurumi math + photo adaptation
R1: 6 sc in MR (6)
R2: inc x6 (12)
R3-R9: sc around (12)
R10: (4 sc, dec) x2 (10)
R11-R14: sc around (10)
Stuff only the lower half. Flatten the top opening before sewing.
Fasten off. Leave a 20 cm tail.
Back Legs (Make 2)
Yarn: yellow and light gray — Source: standard amigurumi math + photo adaptation
R1: 6 sc in MR in yellow (6)
R2: inc x6 (12)
R3: (sc, inc) x6 (18)
R4: BLO sc around in yellow (18)
R5: change to light gray, sc around (18)
R6-R8: sc around (18)
R9: (sc, dec) x6 (12)
Stuff firmly at the foot, lightly in the upper section. The yellow sole should face forward.
R10-R11: sc around (12)
Fasten off. Leave a 25 cm tail.
Wings (Make 2)
Yarn: white — Source: standard amigurumi math + photo adaptation
Ch 7.
Row 1: starting in 2nd ch from hook, 5 sc, ch 1, turn (6 including turning chain edge shape)
Row 2: inc, 3 sc, inc, ch 1, turn (8)
Row 3: 8 sc, ch 1, turn (8)
Row 4: dec, 4 sc, dec, ch 1, turn (6)
Row 5: 6 sc
Sl st evenly around the edge to smooth the oval.
Fasten off. Leave a 20 cm tail.
Do not overstuff. These should stay flat and slightly translucent if you use a lighter yarn.
Antennae Stems (Make 2)
Yarn: black — Source: standard amigurumi math + photo adaptation
R1: 6 sc in MR (6)
R2-R5: sc around (6)
Fasten off. Leave a 15 cm tail.
Antennae Pom-Poms (Make 2)
Yarn: yellow — Source: standard amigurumi math + photo adaptation
R1: 6 sc in MR (6)
R2: inc x6 (12)
R3: (sc, inc) x6 (18)
R4-R5: sc around (18)
R6: (sc, dec) x6 (12)
Stuff firmly.
R7: dec x6 (6)
Fasten off. Leave a tail to close and attach to the stem.
Petal Collar (Make 1)
Yarn: yellow — Source: standard amigurumi math + photo adaptation
Ch 24, join with sl st to form a ring.
Round base: 24 sc around (24)
Petals: (sl st in next st, ch 2, 3 hdc in next st, ch 2, sl st in next st) repeat 6 times around to create 6 petals.
Fasten off. Leave a 20 cm tail.
Cheek Patches (Make 2)
Yarn: soft pink — Source: standard amigurumi math
R1: 6 sc in MR (6)
R2: inc x6 (12)
Fasten off. Leave a short tail.
Head Band (Make 1)
Yarn: yellow — Source: photo adaptation
Ch 28.
Row 1: 27 sc.
Fasten off. Leave tails at both ends.
This sits like a shallow crown band behind the forehead, anchoring the antennae visually.
Assembly
- Sew the trunk centered between the eyes, with the top edge spanning roughly 8 stitches across the front face.
- Attach the ears to the sides of the head so the top edge sits slightly above eye level.
- Add the cheek patches just below and slightly outside each eye.
- Sew the head to the body with the striped section facing front.
- Attach the arms at the upper body sides, one round below the neck seam.
- Fix the back legs low on the body so the yellow soles face forward and support a seated pose.
- Sew the petal collar around the neck seam, keeping the petals clear of the trunk base.
- Attach the wings high on the back, close to the shoulder line rather than the waist.
- Sew the black stems to the head band, then attach the yellow pom-poms to the stem tops and secure the full unit to the crown of the head.
- Embroider simple curved brows, weave in all tails, and adjust stuffing by hand before the final knot is buried.
The completed plush should sit with the trunk clear of the collar and the wings visible from a three-quarter angle.
7 Technical Tips
- Mark the first stitch of every round. Losing the round start on a 36-stitch striped body shifts the black bands upward and makes the bee section look twisted.
- Stuff the head firmer than the body. A soft head collapses between the ears and pulls the trunk seam downward.
- Use invisible decreases on the face and trunk. Standard decreases leave wider holes, which show strongly in light gray plush yarn.
- Insert eyes before the final head decreases. Waiting past the 24-stitch stage makes 12 mm eyes harder to lock evenly through thick chenille fabric.
- Keep antenna stems short, about 4 rounds tall. Longer stems lean backward once the pom-poms are attached and read like horns instead of bee antennae.
- Pin the wings before sewing. The best placement is high and narrow; if the wings sit more than 2 rounds below the arm line, the plush can tip when viewed from the side.
- Weave tails back through dense stuffing, not empty stitches. Loose tails inside soft plush yarn work free faster, especially at the ear and leg joins.
Conclusion
The strongest version of a bee elephant amigurumi keeps three things under control: trunk length, wing height, and stripe spacing. Published references in this niche confirm the concept is established, but most leave the structural reasoning unstated. Start by making the head and trunk first, then dry-fit the collar before joining anything permanent. Share the finished toy on Pinterest and Instagram with one front view and one side view so the bee profile reads clearly. #BeeElephantAmigurumi How far forward did you angle the trunk so it clears the petal collar without hiding the first yellow stripe?









