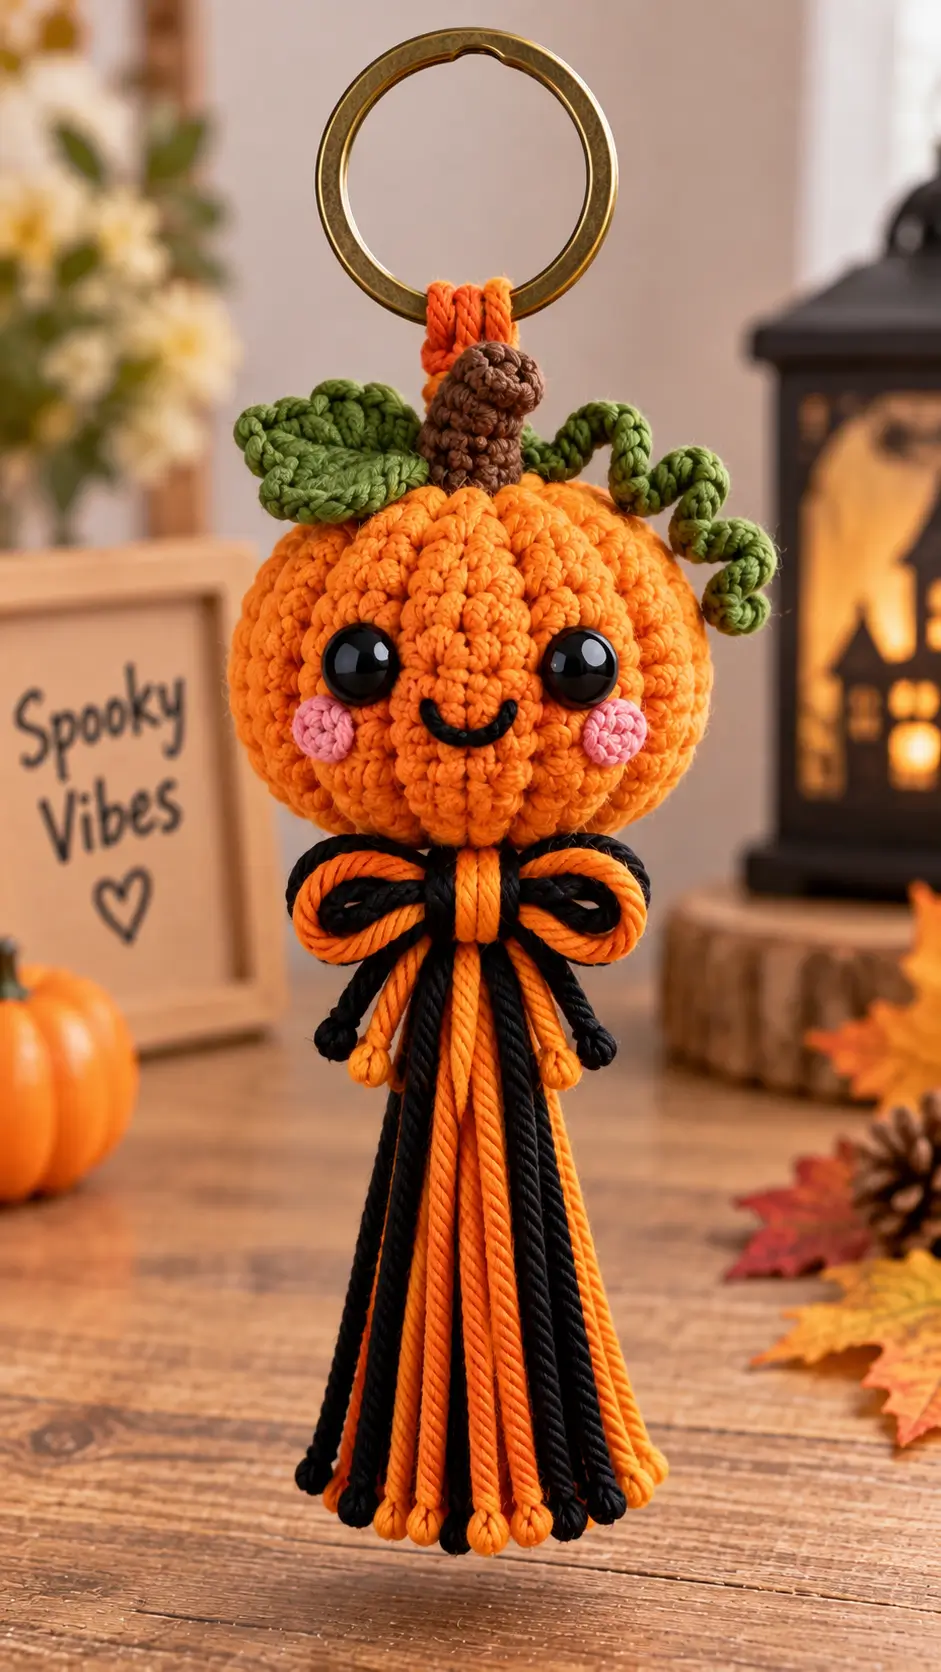
Pumpkins need vertical ribs; without them, this orange head becomes a ball with a stem. This pumpkin amigurumi crochet pattern builds those channels into a medium 36-stitch head, then adds leaves, vines, cheeks, a bow and tassel. Use worsted yarn, a 4 mm hook and safety eyes for an intermediate-level project measuring roughly 12–15 cm across the pumpkin section. The hanging format suits bags, hooks and Halloween displays.
The Design: What Makes This Pumpkin Different
The head is deliberately wider than the stem assembly because a pumpkin silhouette depends on a low, rounded mass rather than an elongated sphere. Six sculpting passes compress the stuffed head vertically and divide its surface into recognizable lobes. The Halloween crochet pumpkin also uses oversized facial components: widely spaced black eyes, small circular cheeks and a short embroidered mouth keep the expression readable after the ribs are tightened.
The second structural decision is the hanging body. Instead of crocheting a conventional torso, this pumpkin keychain crochet pattern uses long orange and black strands gathered beneath a bow. That reproduces the photographed design without adding limbs that are not present. The common failure is pulling the sculpting strands too hard. Excess compression produces narrow wedges and exposes stuffing between stitches rather than creating broad pumpkin sections.
Project Info at a Glance
| Skill Level | Time | Finished Size | Hook | Best For |
|---|---|---|---|---|
| Intermediate | 3–4 hours | Pumpkin approx. 12–15 cm; tassel length adjustable | 4 mm | Halloween bag charm, hanging decoration, keyring |
Published pumpkin patterns support both the 4 mm hook and a roughly 15 cm finished pumpkin scale.
Materials and Tools
Yarn
- Orange — worsted/medium weight — up to 50 g — Red Heart Super Saver or comparable smooth yarn
- Green — worsted/medium weight — scrap quantity — matching cotton/acrylic
- Brown — worsted/medium weight — scrap quantity — stem
- Pink — worsted/medium weight — scrap quantity — cheeks
- Black — worsted/medium weight — approximately 15–20 g for bow, tassel and mouth
A 50 g orange benchmark works well for this scale. Actual consumption changes with yarn thickness, crochet tension and tassel length.
Tools
- 4 mm crochet hook
- 12–18 mm safety eyes, one pair
- Polyester stuffing
- Tapestry needle
- Stitch markers
- Scissors
- Long sewing needle
- Metal keyring, approximately 30–40 mm
- Pins
Abbreviations
- MR — magic ring
- sc — single crochet
- inc — 2 sc in one stitch
- dec — invisible decrease
- sl st — slip stitch
- ch — chain
- BLO — back loop only
- st/sts — stitch/stitches
For an invisible decrease, insert the hook through the front loops of the next two stitches before completing one single crochet across both loops.
Pattern — Step by Step
Work the stuffed components in a continuous spiral unless a section states otherwise. The head uses standard six-point amigurumi expansion from 6 stitches to a 36-stitch plateau.
Pumpkin Head
Yarn: orange
R1: 6 sc in MR (6)
R2: inc ×6 (12)
R3: (sc, inc) ×6 (18)
R4: (2 sc, inc) ×6 (24)
R5: (3 sc, inc) ×6 (30)
R6: (4 sc, inc) ×6 (36)
R7: sc around (36)
R8: sc around (36)
R9: sc around (36)
R10: sc around (36)
R11: sc around (36)
R12: sc around (36)
R13: sc around (36)
R14: sc around (36)
R15: sc around (36)
R16: (4 sc, dec) ×6 (30)
R17: (3 sc, dec) ×6 (24)
Install the eyes between R10 and R11, approximately 7–8 stitches apart. Add stuffing before the opening becomes narrow.
R18: (2 sc, dec) ×6 (18)
R19: (sc, dec) ×6 (12)
Finish stuffing firmly enough that the head retains its circumference when the sculpting strands are tightened.
R20: dec ×6 (6)
Fasten off. Leave a 70 cm tail.
Thread the long tail through the center of the pumpkin and wrap it externally from top to bottom. Make six evenly spaced sculpting channels. Each pass should indent the surface without collapsing the 36-stitch center.
Brown Stem
Yarn: brown
R1: 6 sc in MR (6)
R2: sc around (6)
R3: sc around (6)
R4: sc around (6)
R5: sc around (6)
Add only a small pinch of stuffing if the stem collapses.
Fasten off. Leave a 20 cm tail.
Leaf — Make 2
Yarn: green
R1: 6 sc in MR (6)
R2: inc ×6 (12)
R3: (sc, inc) ×6 (18)
Fold the circle slightly and pinch one side to form a pointed leaf. Sl st through both layers across three stitches near the pinched end.
Fasten off. Leave a 20 cm tail for attachment.
The design uses broad leaves rather than narrow botanical leaves, so a shallow round component gives the correct visual mass above the pumpkin head.
Curly Vine — Make 2
Yarn: green
Ch 26.
Starting in the second ch from the hook, work 2 sc in each chain across (50).
The repeated increases force the strip into a spiral. For a tighter curl, work 3 sc into every fourth chain rather than stretching the finished vine manually.
Fasten off. Leave a 15 cm tail.
Cheek Patches — Make 2
Yarn: pink
R1: 6 sc in MR (6)
R2: inc ×6 (12)
Sl st to the first stitch. Fasten off and leave a 15 cm tail.
Keep each patch flat. Do not stuff.
Embroidered Mouth
Yarn: black
Cut approximately 35 cm of black yarn. Bring the needle out roughly one round below the eyes and create a shallow curved smile spanning about four stitches.
Anchor the center of the curve with one small vertical couching stitch. Return both yarn ends through the same region at the back or underside of the head and secure them internally.
Bow Center
Yarn: orange
Ch 7.
Row 1: Starting in second ch, 6 sc (6)
Row 2: ch 1, turn, 6 sc (6)
Row 3: ch 1, turn, 6 sc (6)
Fasten off. Leave a 20 cm tail.
Black and Orange Bow Loops
Yarn: black and orange
Cut two 25 cm black strands and two 25 cm orange strands. Pair one strand of each color and form a loop approximately 5 cm wide. Repeat for the second side.
Wrap the crocheted orange bow center firmly around the middle. Sew through all four strands several times so the loops cannot pull free when the keychain hangs vertically.
Tassel Body
Yarn: orange and black
Cut 12 orange strands and 12 black strands, each approximately 45 cm long. Fold all strands in half over a temporary cord or directly beneath the bow attachment point.
Bind the bundle 2–3 cm below the fold using black yarn. Arrange the colors in alternating sections before tightening the wrap.
Trim the finished tassel to approximately 20 cm below the bow. The strand count can be increased for a fuller tassel, but all strands should remain the same finished length.
Keyring Hanging Loop
Yarn: orange
Ch 16.
Row 1: Starting in second ch, 15 sc (15)
Fasten off with a 25 cm tail.
Pass the strip through the metal keyring, fold the ends together and stitch both ends securely to the stem/head junction. Sew through the pumpkin fabric several times rather than attaching the weight-bearing loop only to the brown stem.
Assembly
- Position the brown stem directly over the top center of the completed pumpkin head and sew around its six-stitch base.
- Run the pumpkin’s long orange sculpting tail from top to bottom six times, spacing the channels evenly around the circumference.
- Position the safety eyes before the final head closure if they were not already fitted, then sew the pink cheek circles one round below and slightly outside the eyes.
- Embroider the black smile centrally between the cheek patches, keeping the curve approximately four stitches wide.
- Sew one green leaf to the left of the stem and the second slightly behind it so their edges overlap without covering the hanging point.
- Attach both curly vines near the stem base. Place one curl toward the front-right and the other farther back to avoid a symmetrical antenna effect.
- Assemble the orange-and-black bow and stitch its center directly beneath the pumpkin head.
- Fold the orange and black tassel strands at their midpoint, bind the top tightly and stitch the bundle to the rear of the bow center.
- Pass the orange hanging strip through the metal keyring and sew both ends through the head’s upper center with multiple passes.
- Trim the tassel ends level, bury all sewing tails inside the head and check that the keyring load is carried by the head fabric rather than the stem alone.
The finished piece should hang vertically with the pumpkin centered above the bow and tassel.
7 Technical Tips for a Better Pumpkin Amigurumi
- Stitch-marker drift: Move the marker after every round. Losing even one stitch in the 36-stitch plateau shifts the decrease columns and makes one pumpkin rib visibly wider.
- Stuffing firmness: Stop adding filling when the head rebounds after light finger pressure but before individual stitches spread apart. Overpacking creates gaps that become larger when the six sculpting strands are tightened.
- Invisible-decrease ridges: Work decreases through the front loops only. Conventional sc2tog stitches create visible horizontal bumps across the lower half of the pumpkin.
- Eye-placement timing: Install safety eyes between R10 and R11 before decreasing past 24 stitches. Once the opening reaches 18 stitches, positioning and fastening large eye washers becomes difficult.
- Yarn tension: Keep the 36-stitch plateau at the same tension as R1–R6. A looser middle section produces a barrel-shaped head and weakens the channels between the pumpkin ribs.
- Pinning accuracy: Pin the two cheeks and both leaves before sewing. A cheek displacement of only two stitches is conspicuous because the face uses a strongly centered eye-and-mouth layout.
- Tail weaving: Carry structural sewing tails through at least 3 cm of stuffed fabric before cutting them. The hanging loop and tassel experience repeated pulling, so short surface knots can migrate through the crochet fabric.
Finishing the Pumpkin Tassel Keychain
The final construction depends on three measurements: a 36-stitch head plateau, six evenly tensioned sculpting channels and a tassel trimmed to one consistent length. Check those points before burying the final yarn tails. The leaves and tendrils can then be rotated around the stem to fit the intended hanging position without changing the core pattern.
For the next version, test black, cream or muted green pumpkin yarn while retaining the same stitch counts. Save this pumpkin amigurumi crochet pattern to Pinterest and share the finished keychain on Instagram with #PumpkinTasselKeychain. Which feature would you change first: the pumpkin’s rib depth, the oversized eyes or the orange-and-black tassel?









