A round calico cat only works if the patches break the body shape without hiding it. This calico cat amigurumi crochet pattern gives you a plush adaptation of the current calico-cat pattern baseline, using a compact loaf body, tiny ears, small feet, and an upright tail. You get the full build order, core materials, and placement logic for the patches. The reason to make it is practical. The one-piece body is fast to reproduce.
The Design: What Makes This Cat Different
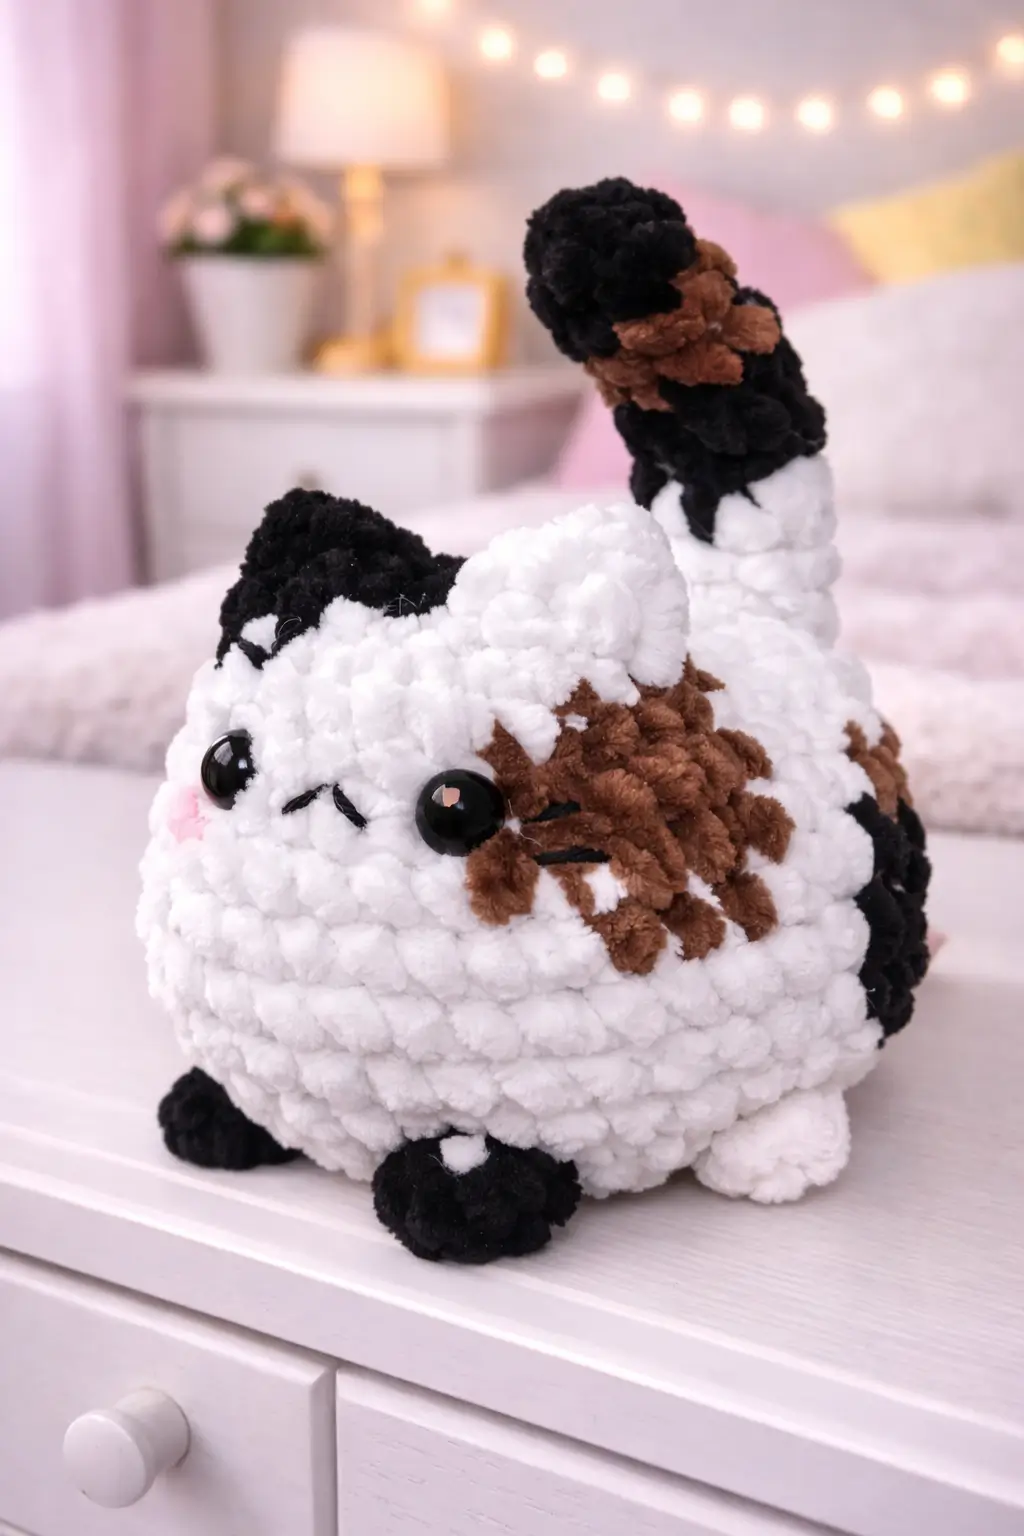
Most calico cat patterns still follow a standard cat formula: head, body, four visible legs, tail, ears, and a face with a little more detail. This plush does not. The photographed version behaves more like a loaf cat or desk cat. The body is the character. That changes the whole construction logic. The round mass has to read first, while the tail and ears only confirm “cat” after the silhouette is already working. Published calico cat patterns support separate ears, tail, and leg pieces, but this photo compresses all of that into a much simpler front view.
Patch placement matters just as much as shaping. A calico cat with badly spaced spots looks random instead of intentional. The face in the photo uses a concentrated patch on one side and smaller body patches elsewhere. Good move. It keeps the front recognizable. A common mistake is making both sides of the face equally busy. Then the eyes disappear into the color changes. This version avoids that by leaving more white open space near the snout and lower face.
Project Information at a Glance
| Skill Level | Time | Finished Size | Hook | Best For |
|---|---|---|---|---|
| Advanced beginner | 1.5–2 hours | 17 cm / 6.7 in | 3.5 mm baseline | Desk decor, gifts, cat-lover markets |
Materials and Tools
Yarn
- White plush chenille yarn — plush adaptation of worsted calico-cat baseline — about 90g
- Brown plush chenille yarn — for major patches — about 20g
- Black plush chenille yarn — for ears, tail tip, and smaller patches — about 15g
- Pink yarn — scrap amount — optional for nose or inner detail
- Black embroidery floss — scrap amount — for whisker marks or optional smile
Tools
- 3.5 mm hook for published worsted baseline; scale up as needed for chenille adaptation.
- 12–14 mm safety eyes for this plush version, scaled up from smaller published calico-cat builds.
- Fiberfill stuffing
- Yarn needle
- Stitch markers
- Pins
- Small scissors
Crochet Abbreviations
MR / sc / inc / dec / sl st / ch / BLO / FLO
Use invisible decrease only on the closing rounds. Plush yarn opens too easily under a standard decrease, and that is most obvious on a round white body.
Step-by-Step Calico Cat Plush Pattern
Work in continuous spiral rounds unless noted.
Head and Body (Make 1)
Yarn: white
Source: Standard amigurumi math
R1: 6 sc in MR (6)
R2: inc x6 (12)
R3: (sc, inc) x6 (18)
R4: (2 sc, inc) x6 (24)
R5: (3 sc, inc) x6 (30)
R6: (4 sc, inc) x6 (36)
R7: sc around (36)
R8: sc around (36)
R9: sc around (36)
R10: sc around (36)
Insert 12–14 mm safety eyes between R8 and R9, about 7 stitches apart.
R11: (4 sc, dec) x6 (30)
R12: (3 sc, dec) x6 (24)
R13: (2 sc, dec) x6 (18)
Stuff firmly, but keep the lower half broader than the face.
R14: sc around (18)
R15: sc around (18)
R16: (2 sc, inc) x6 (24)
R17: sc around (24)
R18: sc around (24)
R19: (2 sc, dec) x6 (18)
R20: (sc, dec) x6 (12)
R21: dec x6 (6)
Fasten off. Leave a 20 cm tail.
Ears (Make 2)
Yarn: black and white or solid black, depending on placement
Source: Standard amigurumi math
R1: 4 sc in MR (4)
R2: inc x4 (8)
R3: sc around (8)
R4: (2 sc, dec) x2 (6)
Flatten lightly.
Fasten off. Leave a 15 cm tail.
Front Feet (Make 2)
Yarn: white or black depending on patch placement
Source: Standard amigurumi math
R1: 6 sc in MR (6)
R2: inc x6 (12)
R3: sc around (12)
R4: (4 sc, dec) x2 (10)
Stuff lightly at the base only.
Fasten off. Leave a 15 cm tail.
Back Feet (Make 2)
Yarn: white or black depending on patch placement
Source: Standard amigurumi math
R1: 6 sc in MR (6)
R2: inc x6 (12)
R3: sc around (12)
R4: sc around (12)
R5: (4 sc, dec) x2 (10)
Stuff lightly.
Fasten off. Leave a 15 cm tail.
Tail (Make 1)
Yarn: black and brown or black and white, based on the photo
Source: Standard amigurumi math
R1: 6 sc in MR (6)
R2: (sc, inc) x3 (9)
R3: sc around (9)
R4: sc around (9)
R5: sc around (9)
R6: sc around (9)
R7: sc around (9)
R8: sc around (9)
R9: sc around (9)
R10: sc around (9)
Stuff firmly so the tail stays upright.
Fasten off. Leave a 20 cm tail.
Brown Face Patch (Make 1)
Yarn: brown
Source: Standard amigurumi math
R1: 6 sc in MR (6)
R2: inc x6 (12)
R3: (sc, inc) x6 (18)
Fasten off. Leave a 20 cm tail.
Shape slightly with your fingers before sewing so it sits as an uneven calico patch rather than a perfect disc.
Body Patch Pieces (Make 2–3)
Yarn: brown or black
Source: Standard amigurumi math
R1: 5 sc in MR (5)
R2: inc x5 (10)
Fasten off. Leave a 12 cm tail.
Make them slightly irregular by tightening one side more than the other.
Whisker Marks (Optional)
Yarn: black embroidery floss
Source: Standard amigurumi math
Embroider 2 to 3 short angled stitches on each side of the face.
Keep them short. Long whiskers fight the loaf silhouette.
Assembly Instructions
- Shape the body with your hands so the bottom sits flatter than the top.
- Sew the ears close together on the crown rather than far apart at the sides.
- Attach the front feet low on the front half of the body.
- Sew the back feet wider apart on the lower rear section so the plush sits evenly.
- Add the tail high enough at the back that it rises instead of dragging.
- Place the brown face patch on one side of the face, keeping one eye partly framed but not crowded.
- Sew 2 to 3 smaller body patches on the side and rear sections.
- Add any black patching around one ear or the tail base to match the calico look.
- Embroider the whisker marks only after all patches are attached.
- Check the cat from front, side, and rear view, then weave every tail at least 4 cm into the stuffing path.
The calico cat plush is complete.
7 Technical Tips for Cleaner Amigurumi
- Mark the 36-stitch plateau immediately. Missing one increase before R6 leaves the body visibly uneven once the eyes and tail are attached.
- Stuff the lower body firmer than the face. A soft base makes the cat roll backward when the upright tail is sewn on.
- Do not overfill the tail. Too much stuffing makes the tail thick and stiff instead of slim and lifted.
- Keep the face patch asymmetrical. A perfectly round patch looks like a badge, not a natural calico marking.
- Pin the feet before sewing all four down. A difference of even 5 mm in leg placement can make the cat sit crooked.
- Install the eyes before the final tightening rounds. Forcing large eyes through dense chenille later can split the white stitches.
- Sew patches after full body shaping. Patch spacing judged on an unshaped sphere changes once the cat is sitting flat.
Conclusion
This calico cat amigurumi crochet pattern works because the body stays simple while the patching carries the personality. Use the published 17 cm scale, 3.5 mm worsted baseline, and current calico-cat construction logic as your reference, then scale the yarn up to chenille for the plush look in the photo. Post the finished cat on Pinterest and Instagram with #CalicoCatPlush so the patch placement and loaf shape are visible in one frame. One final design choice: does the next cat keep the upright tail, or are you turning the second version into a loaf with the tail tucked out of view?